
Last updated on
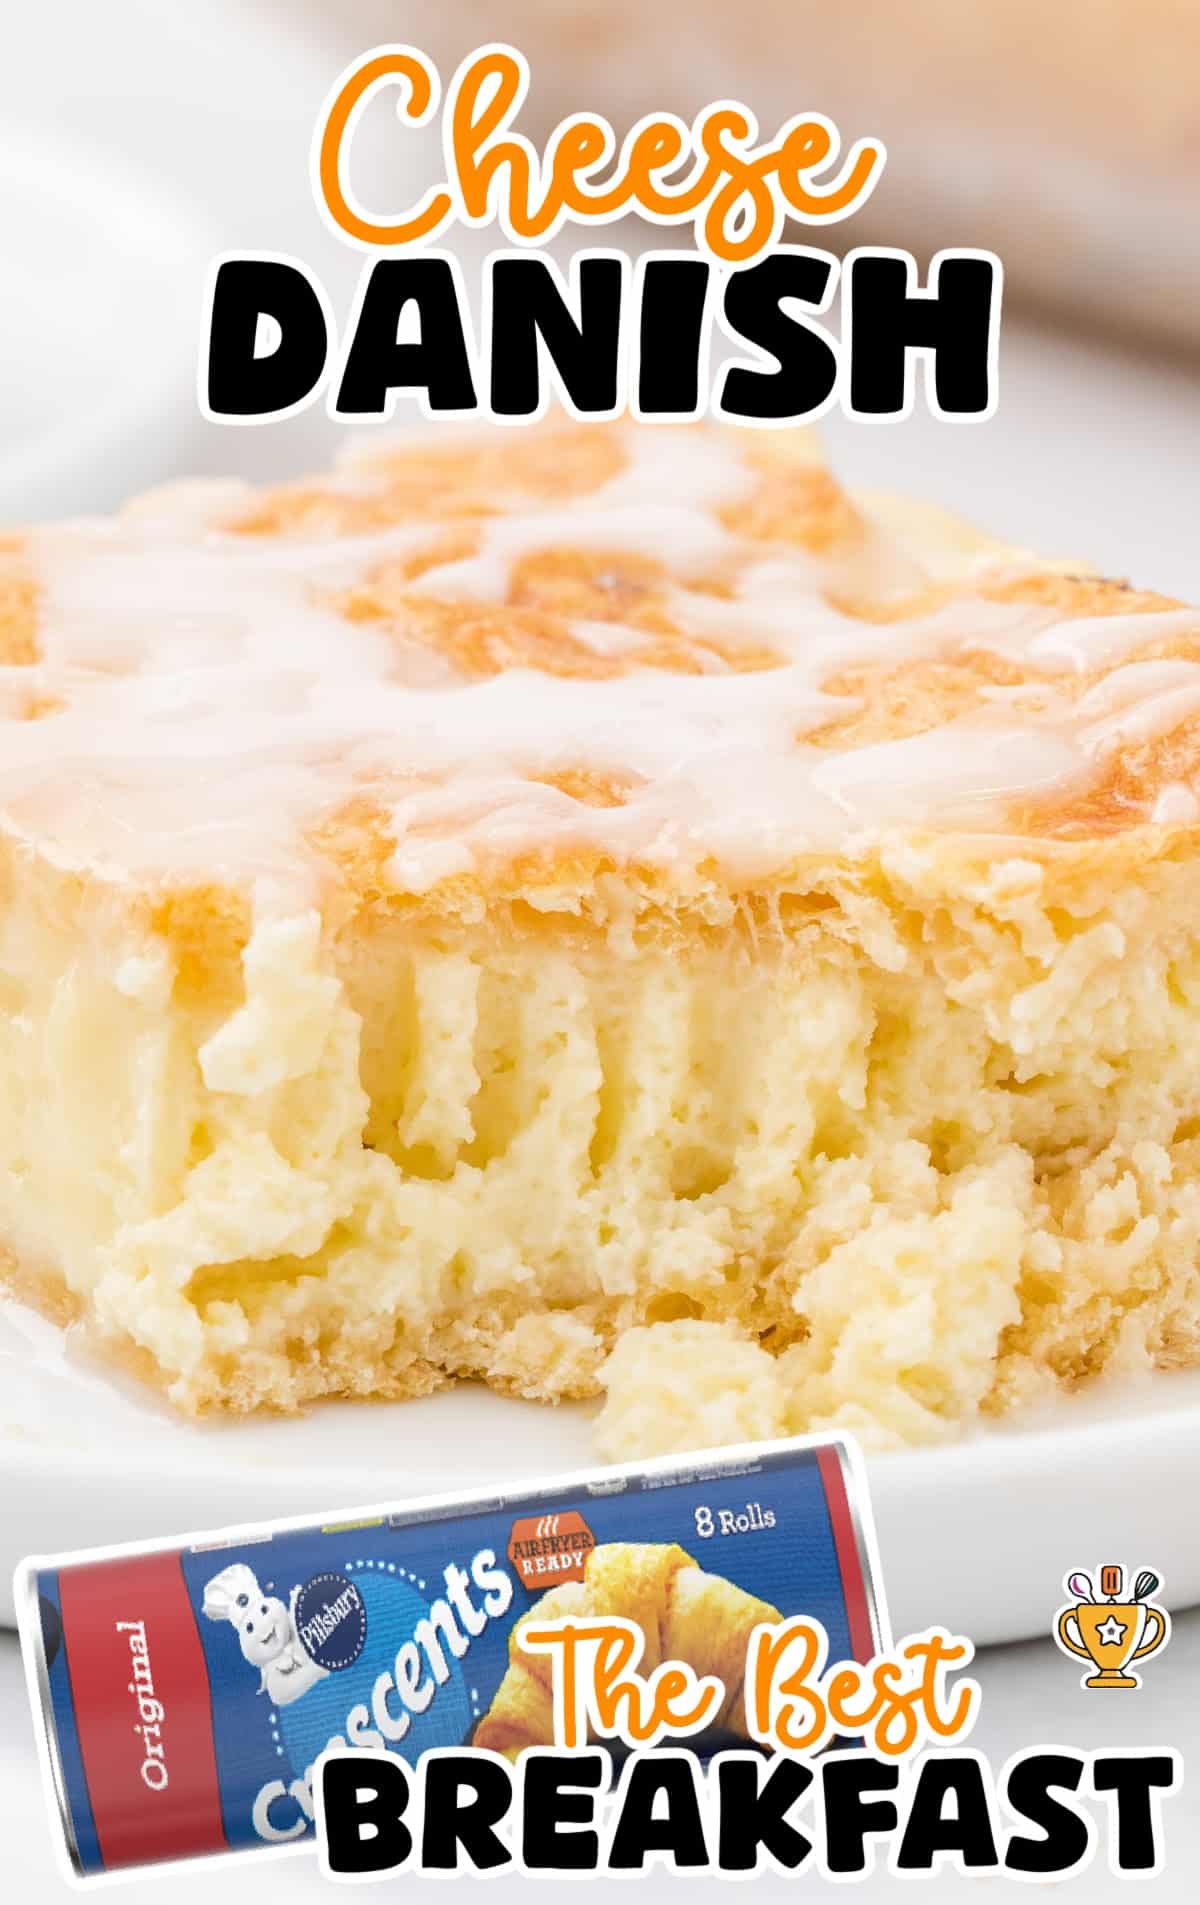
Cheese Danish

This easy cheese Danish recipe makes a sweet, creamy pastry with a golden, flaky crust in just minutes. Use simple ingredients and follow step-by-step directions for bakery-style results every time.
Jump to RecipeTable of Contents


Warm, gooey cheese Danish with flaky crescent dough makes the best treat for breakfast or a sweet afternoon snack. This easy cheese Danish recipe uses simple ingredients but bakes up golden, creamy, and rich. You’ll love how fast it comes together and how perfect it tastes with coffee. Make this sweet pastry at home instead of buying it at the store!
Follow the easy guide below to make this recipe from scratch. We’ve added step-by-step photos and directions so nothing gets missed. Be sure to check out our pro tips, tricks, and most frequently asked recipe questions with answers.
More Recipes ⭐ Cherry Danish | Blueberry Danish | Apple Dumplings with Crescent Rolls
This easy cheese Danish recipe uses crescent rolls and a creamy filling that turns out buttery, rich, and sweet every time. Serve it for breakfast, brunch, or a quick dessert that feels extra special.
Each bite tastes soft in the center, with flaky layers all around. Friends and family will ask for seconds, so make extra!
Ingredients
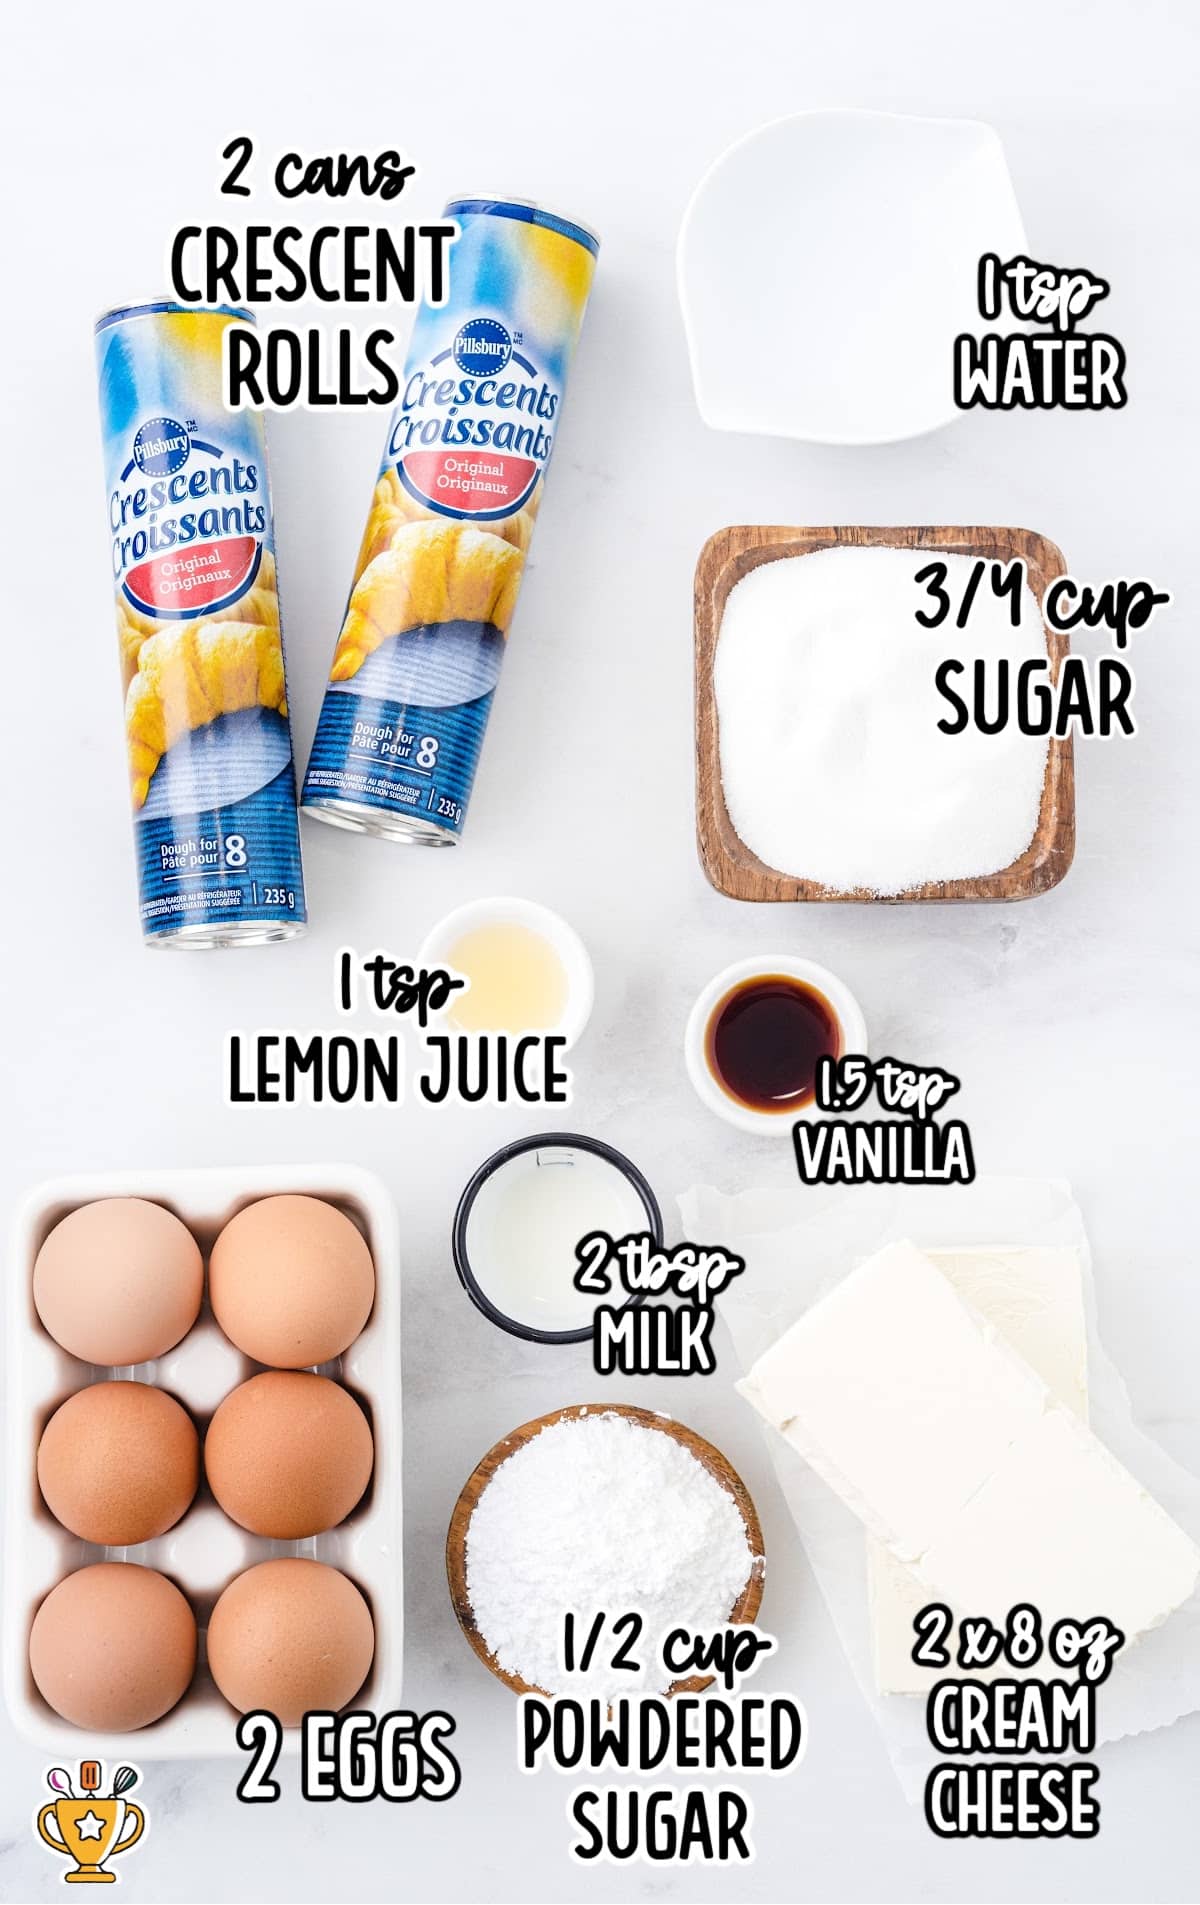
What you'll need to make this Cheese Danish recipe:
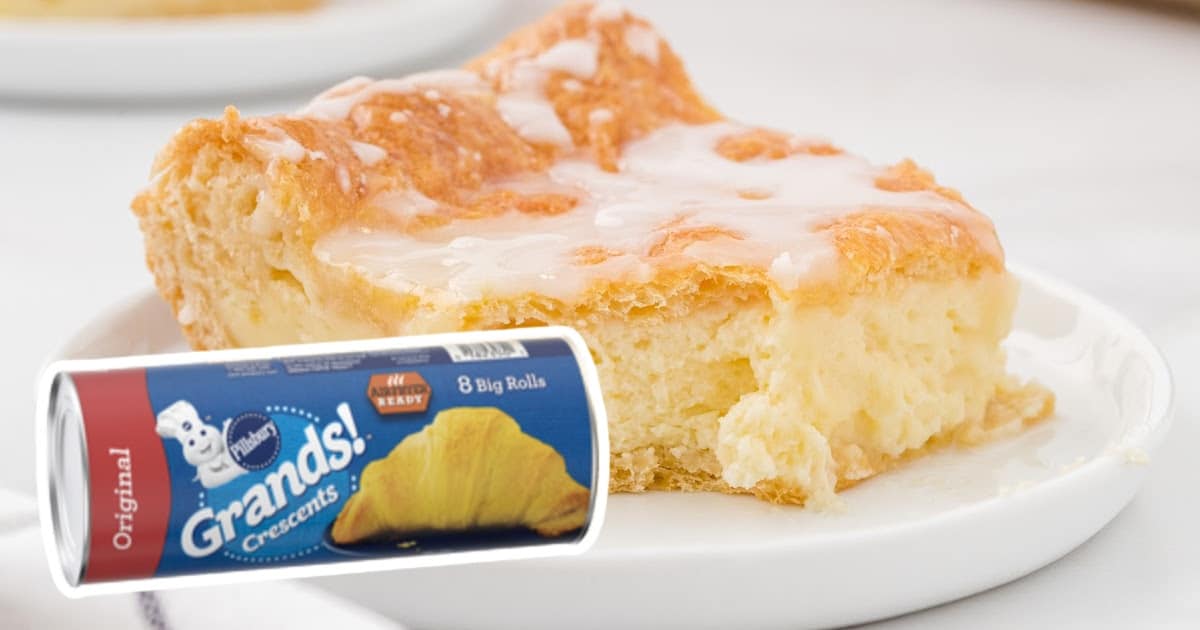
- 2 (8-ounce) cans of crescent rolls
- 2 (8-ounce) packages cream cheese, softened
- 1½ teaspoons vanilla extract, divided
- 1 teaspoon lemon juice
- ¾ cup granulated sugar
- 2 eggs
- 1 tablespoon of water
- ½ cup powdered sugar
- 2 tablespoons milk
Substitutions and Additions
- Substitute Crescent Rolls: Use puff pastry sheets for an extra flaky texture in your cheese Danish.
- Add Fruit Filling: Spoon in cherry, raspberry, or blueberry pie filling for a fruity layer under the cream cheese.
- Substitute Vanilla Extract: Try almond extract for a sweet, nutty flavor that pairs well with the creamy filling.
- Add Icing Drizzle: Mix powdered sugar with milk and drizzle on top for a bakery-style finish.
- Add Cinnamon Sugar: Sprinkle cinnamon sugar over the top before baking for extra sweetness and spice.
How to Make Cheese Danish
Follow along with our step-by-step pictures to make the best cheese Danish using simple ingredients. Check out the tips and tricks listed below to help you get it just right. Let’s get started!
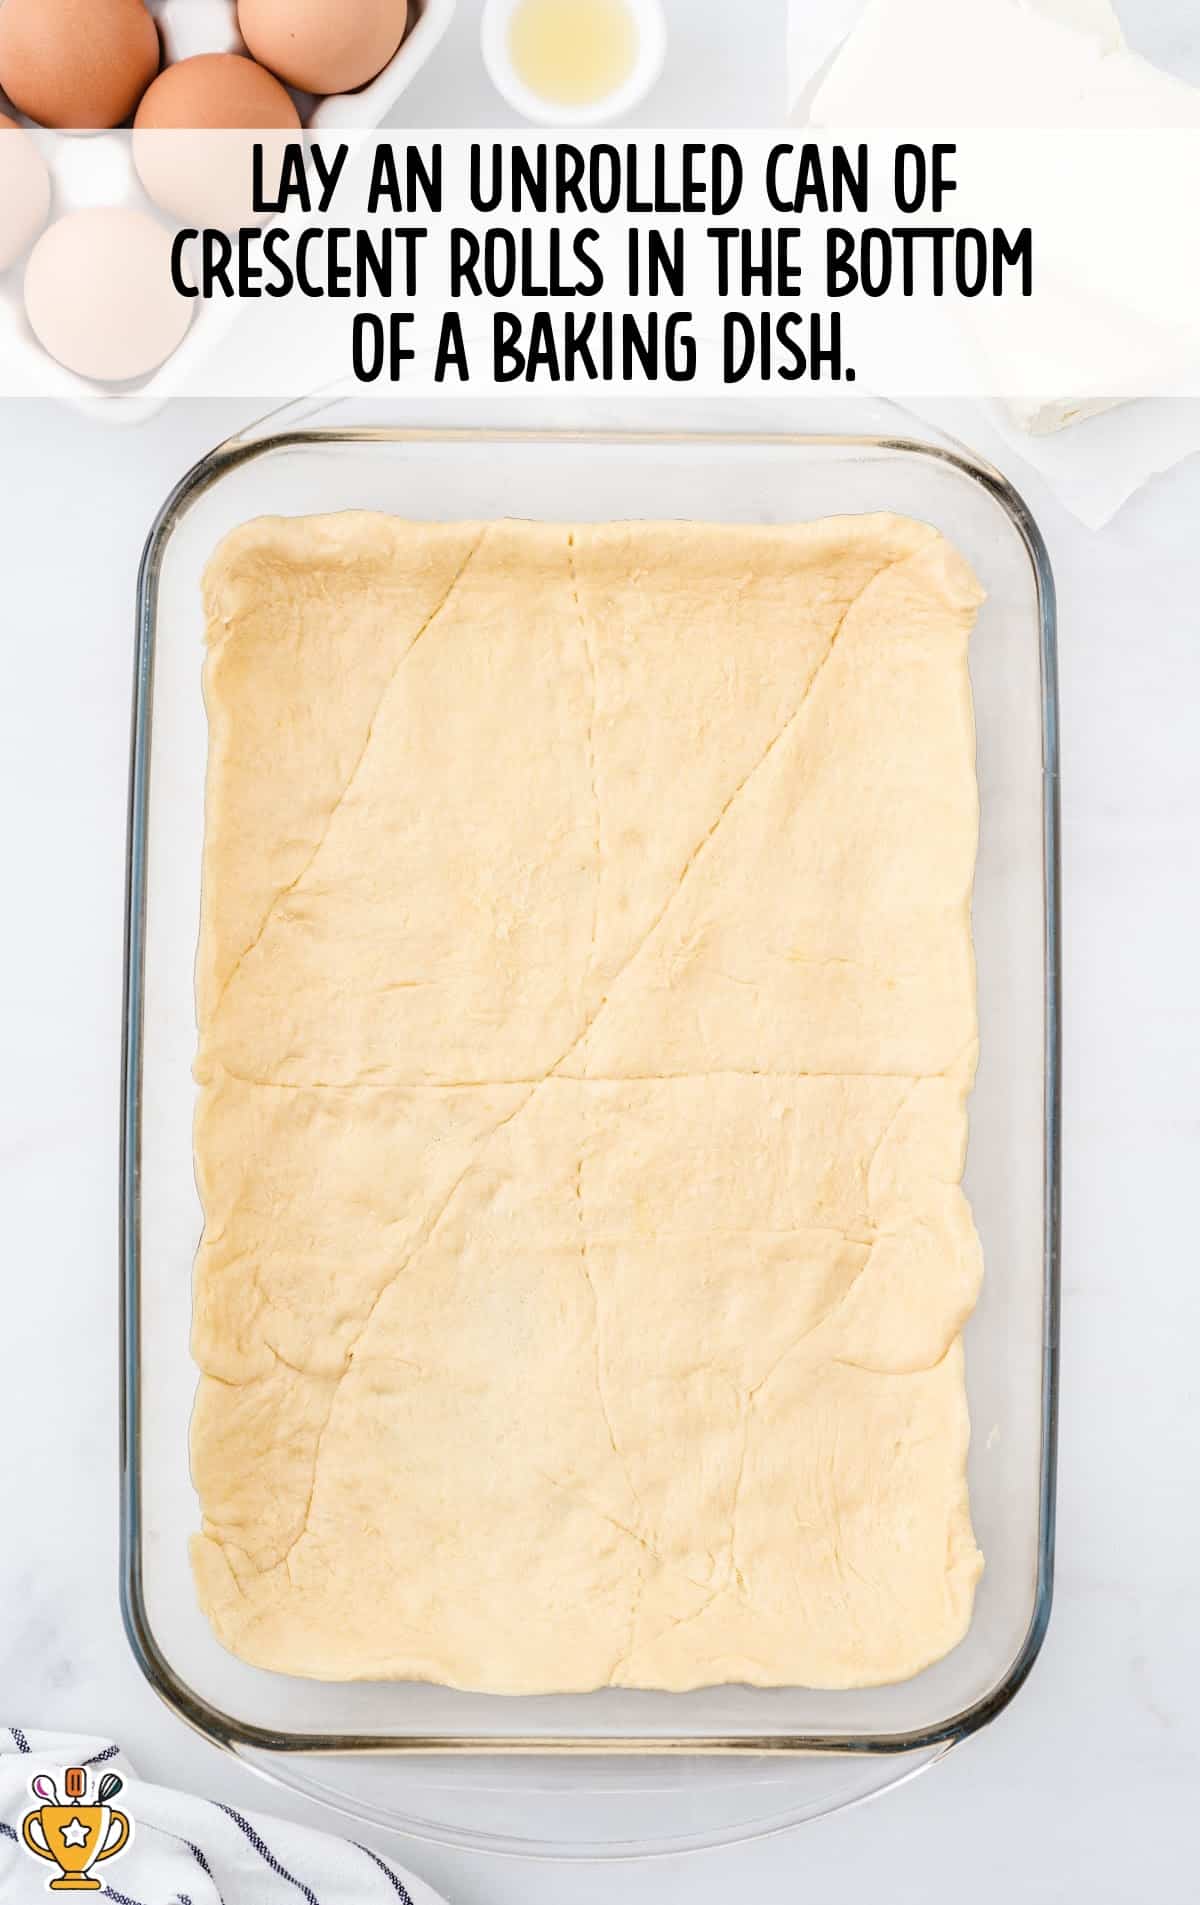
FIRST STEP: Preheat the oven to 350°F. Unroll one package of crescent rolls and press into the bottom and up the sides of a glass 9×13-inch baking dish sprayed with nonstick cooking spray. Press the seams together to seal.
Pro Tip
If you use regular crescent roll dough, you don’t have to seal the edges perfectly, because they will puff up and come together while baking.
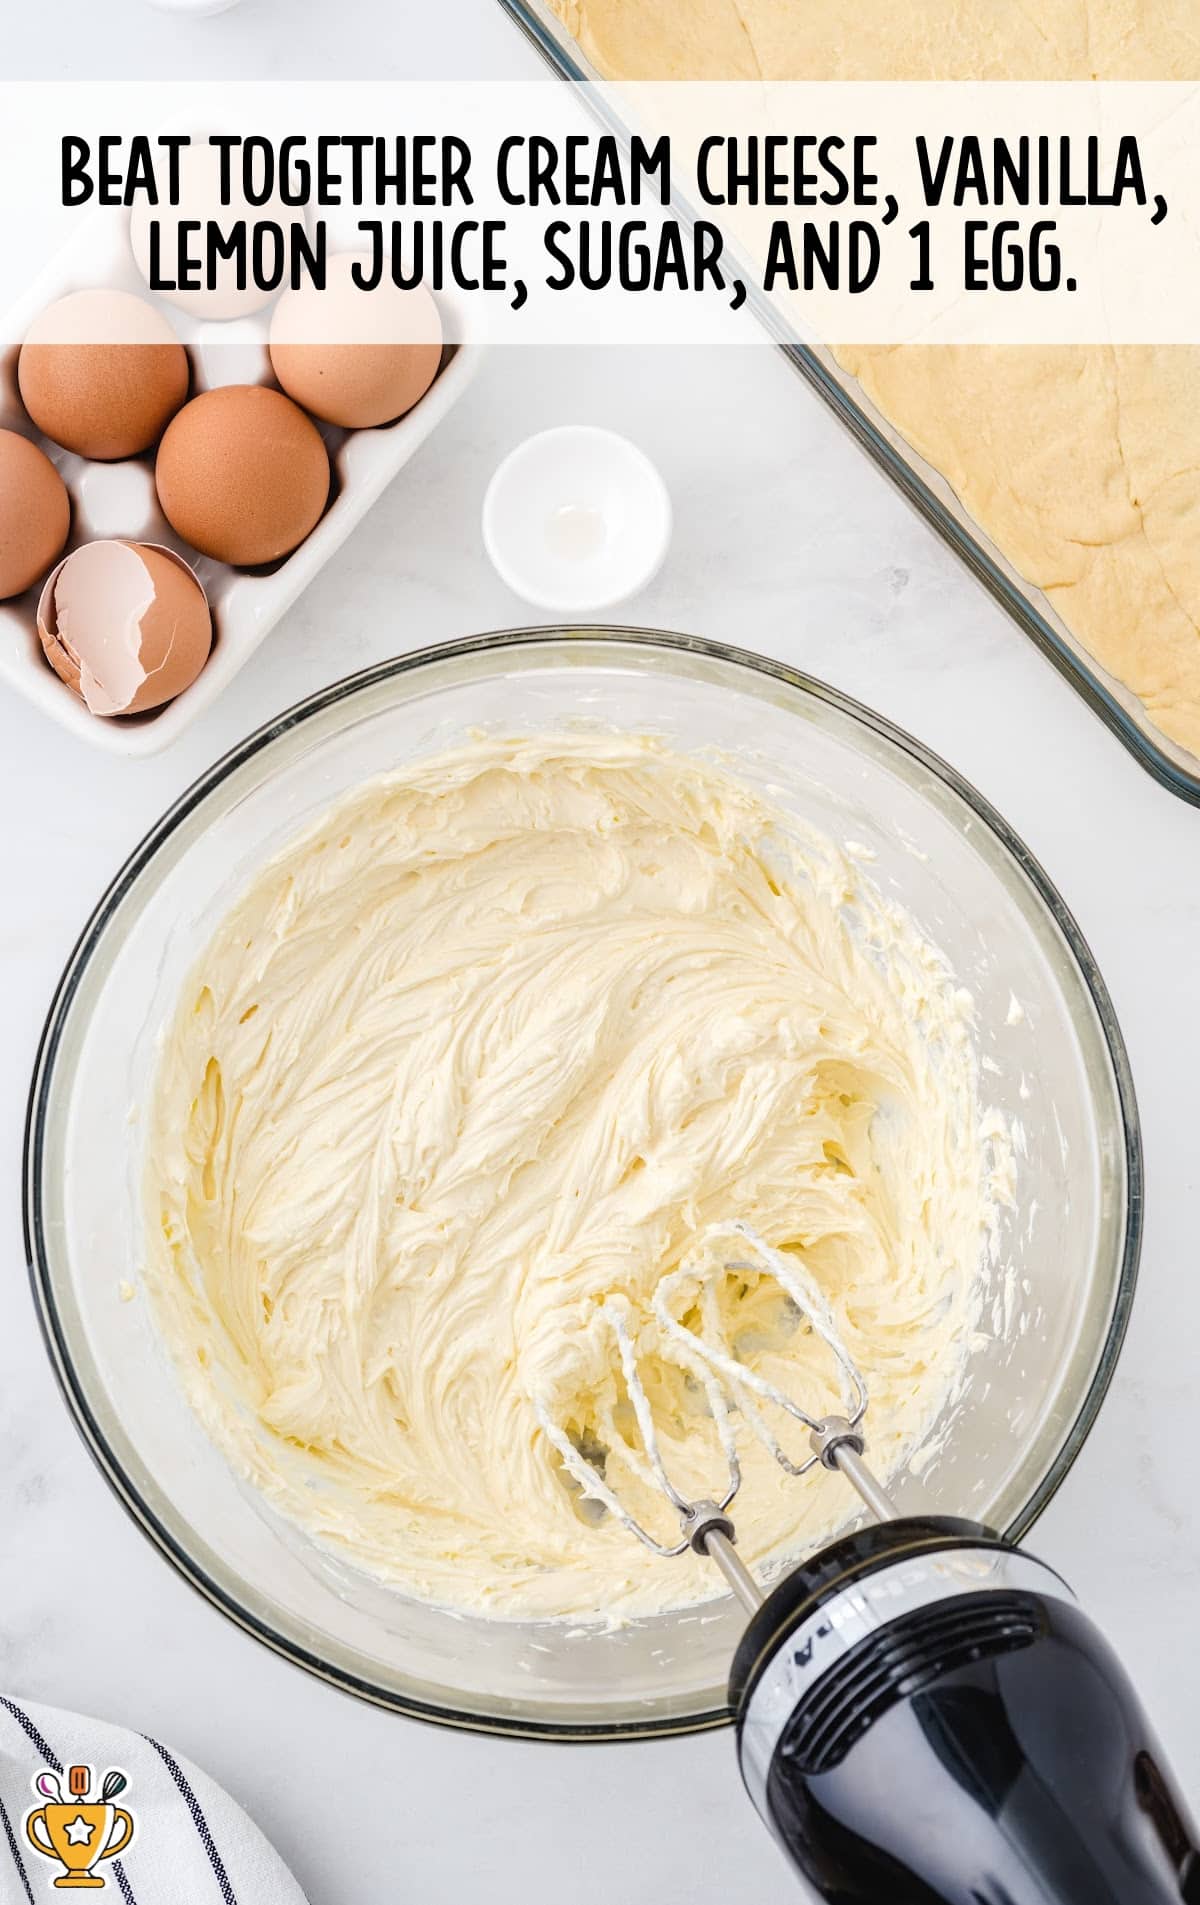
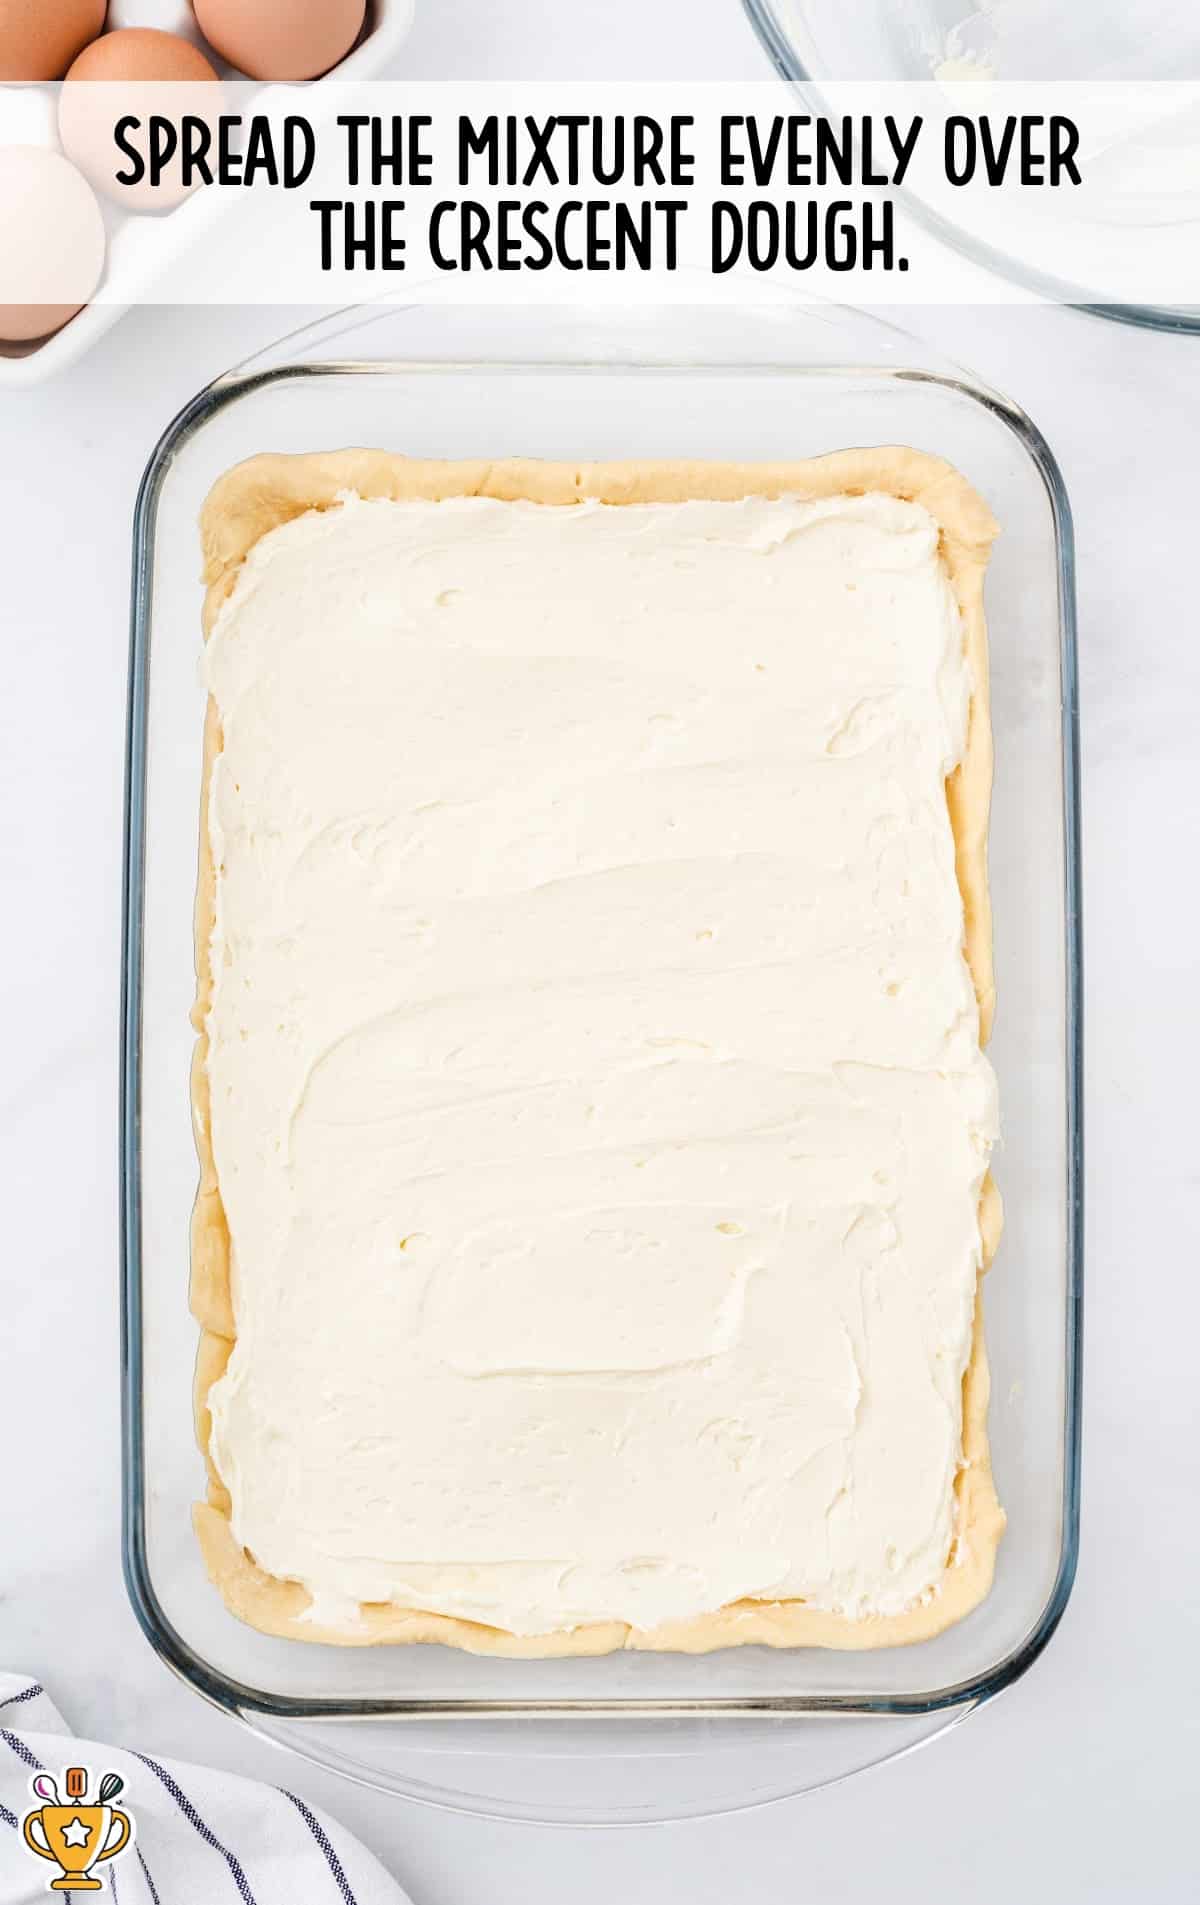
SECOND STEP: With a hand mixer and a medium bowl, beat together the cream cheese, 1 teaspoon of vanilla extract, lemon juice, granulated sugar, and one egg.
THIRD STEP: Spread the cream cheese mixture evenly over the crescent dough.
Pro Tip
Lemon juice adds a hint of flavor to the cream cheese filling, but can be omitted if you prefer. For a sweeter danish filling, increase the sugar to a full cup.
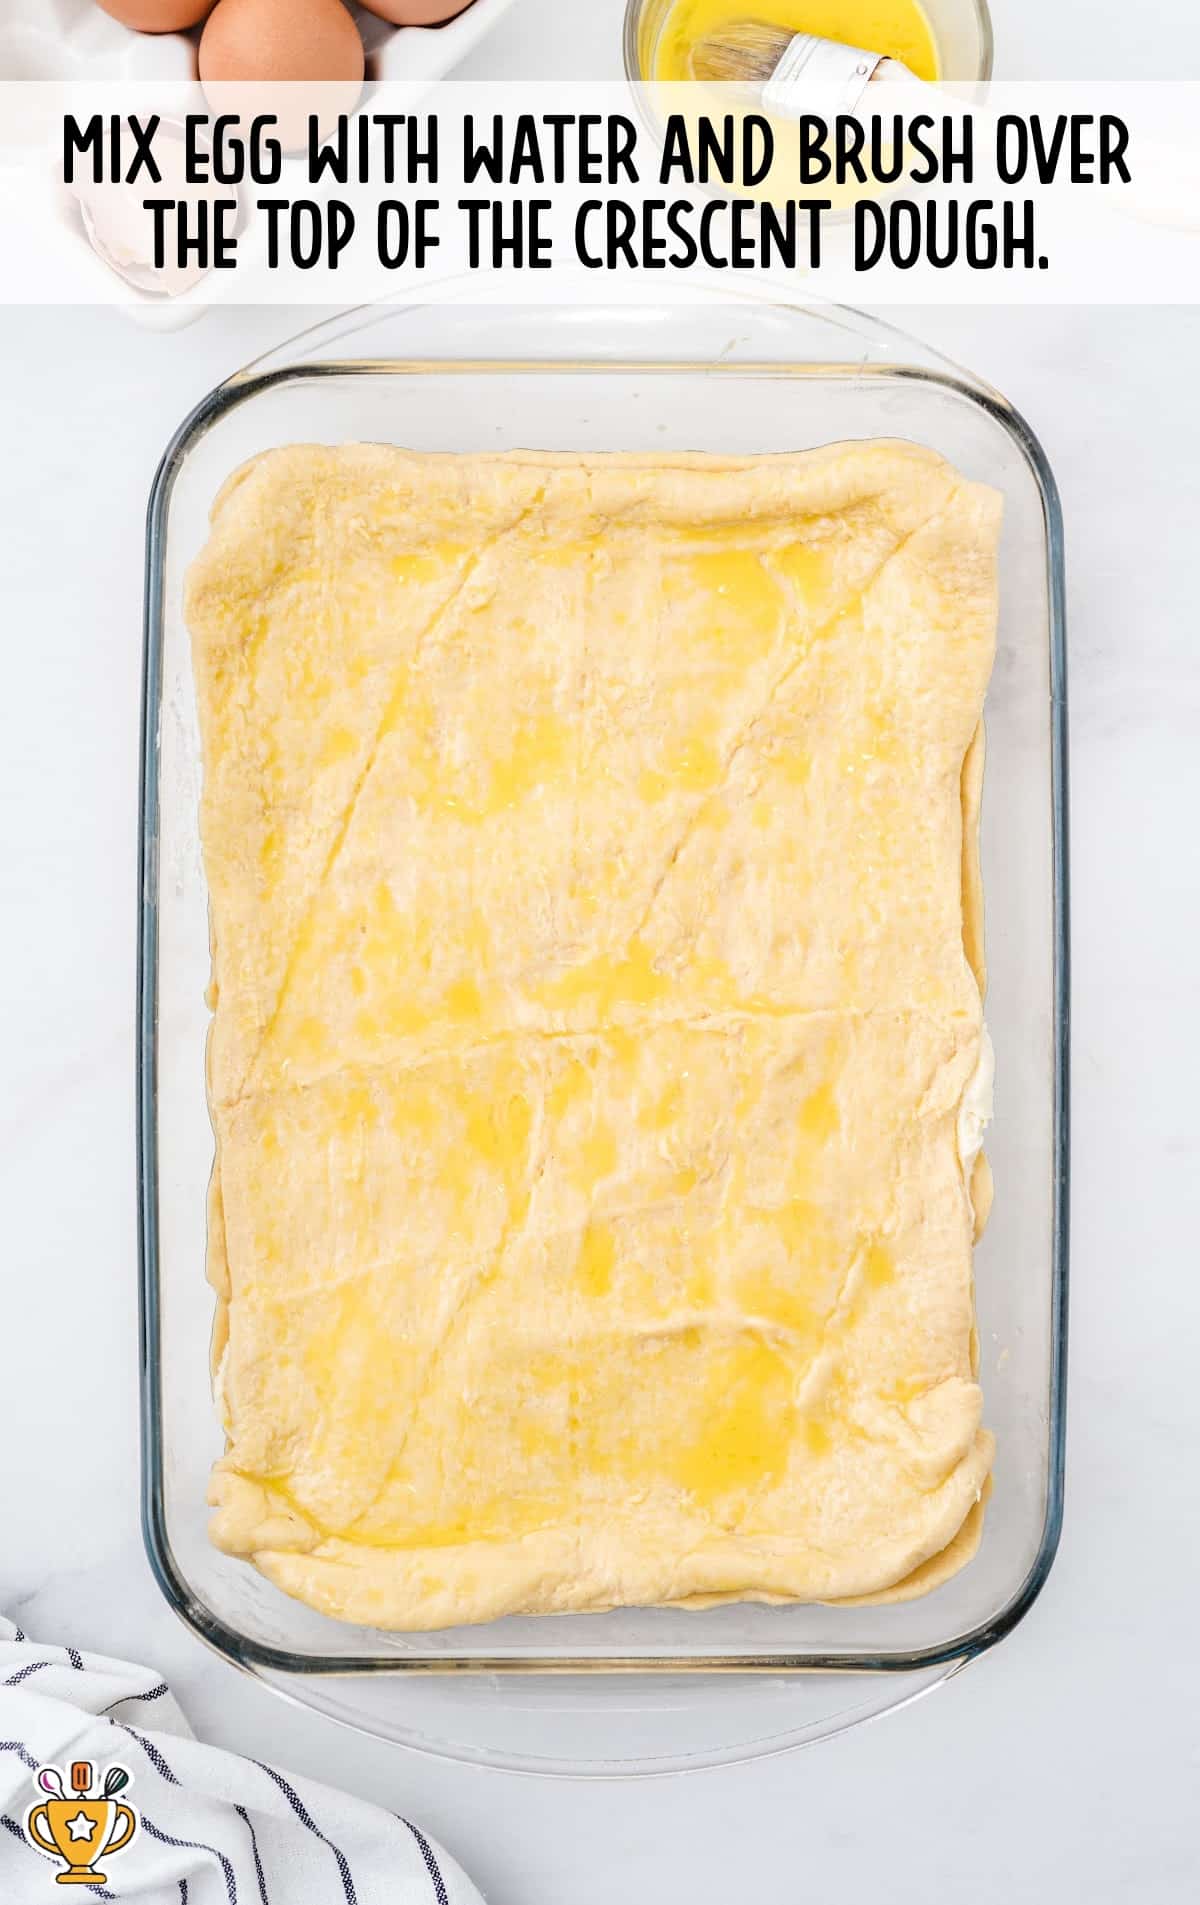
FOURTH STEP: Unroll the second package of dough, pinch the seams together, and lay over the top of the cheese mixture.
FIFTH STEP: Mix the second egg with a tablespoon of water to create an egg wash, and brush the egg mixture lightly over the dough.
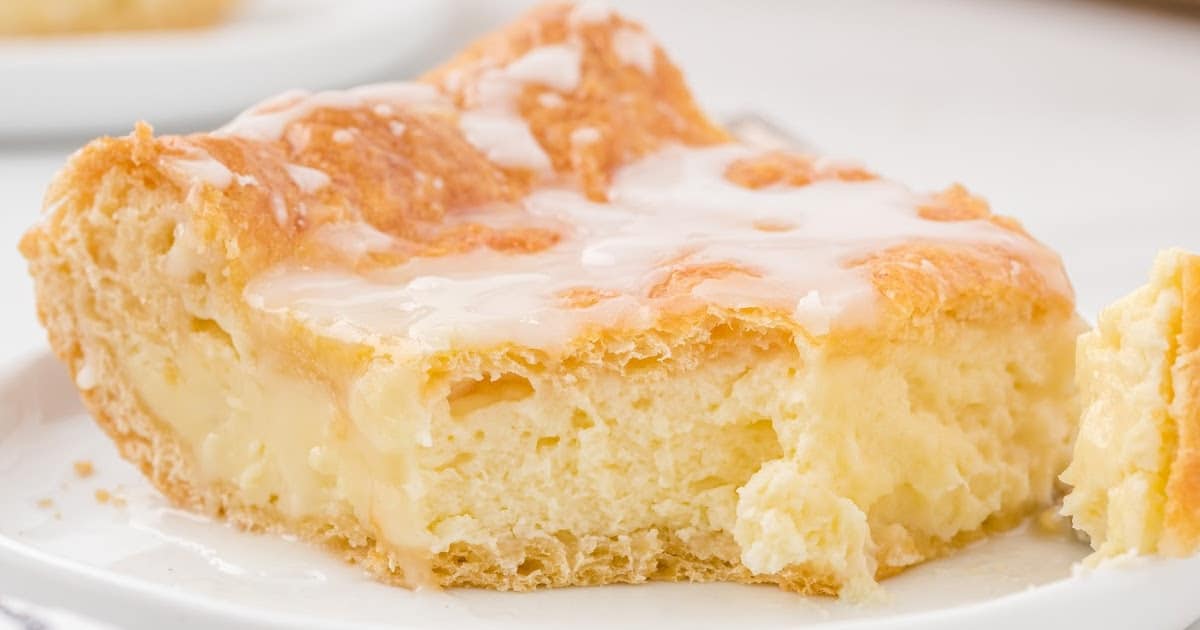
SIXTH STEP: Bake in the preheated oven for 30 to 40 minutes, until the top and bottom pastry is golden brown.
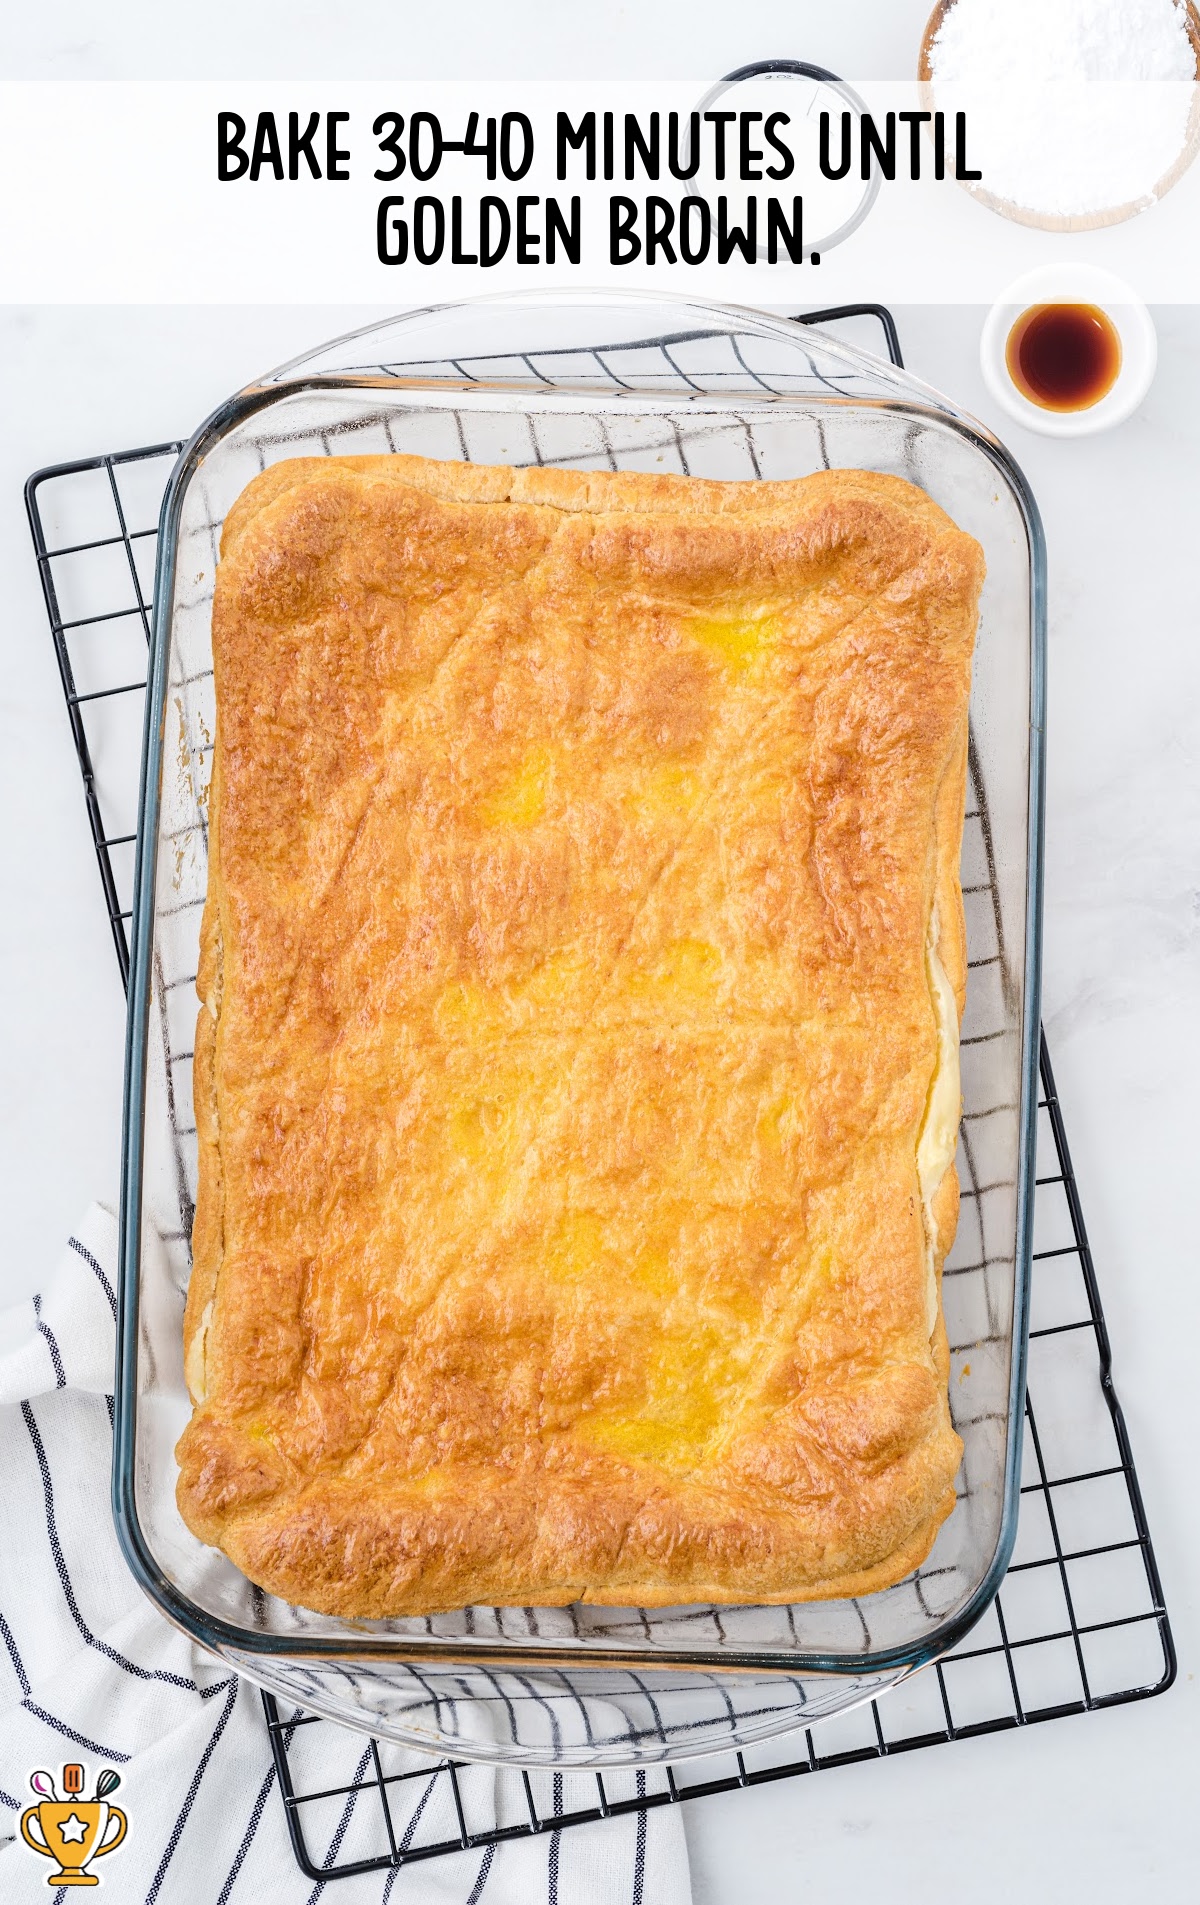
SEVENTH STEP: Let the Danish cool for 20 to 30 minutes before topping with the glaze.
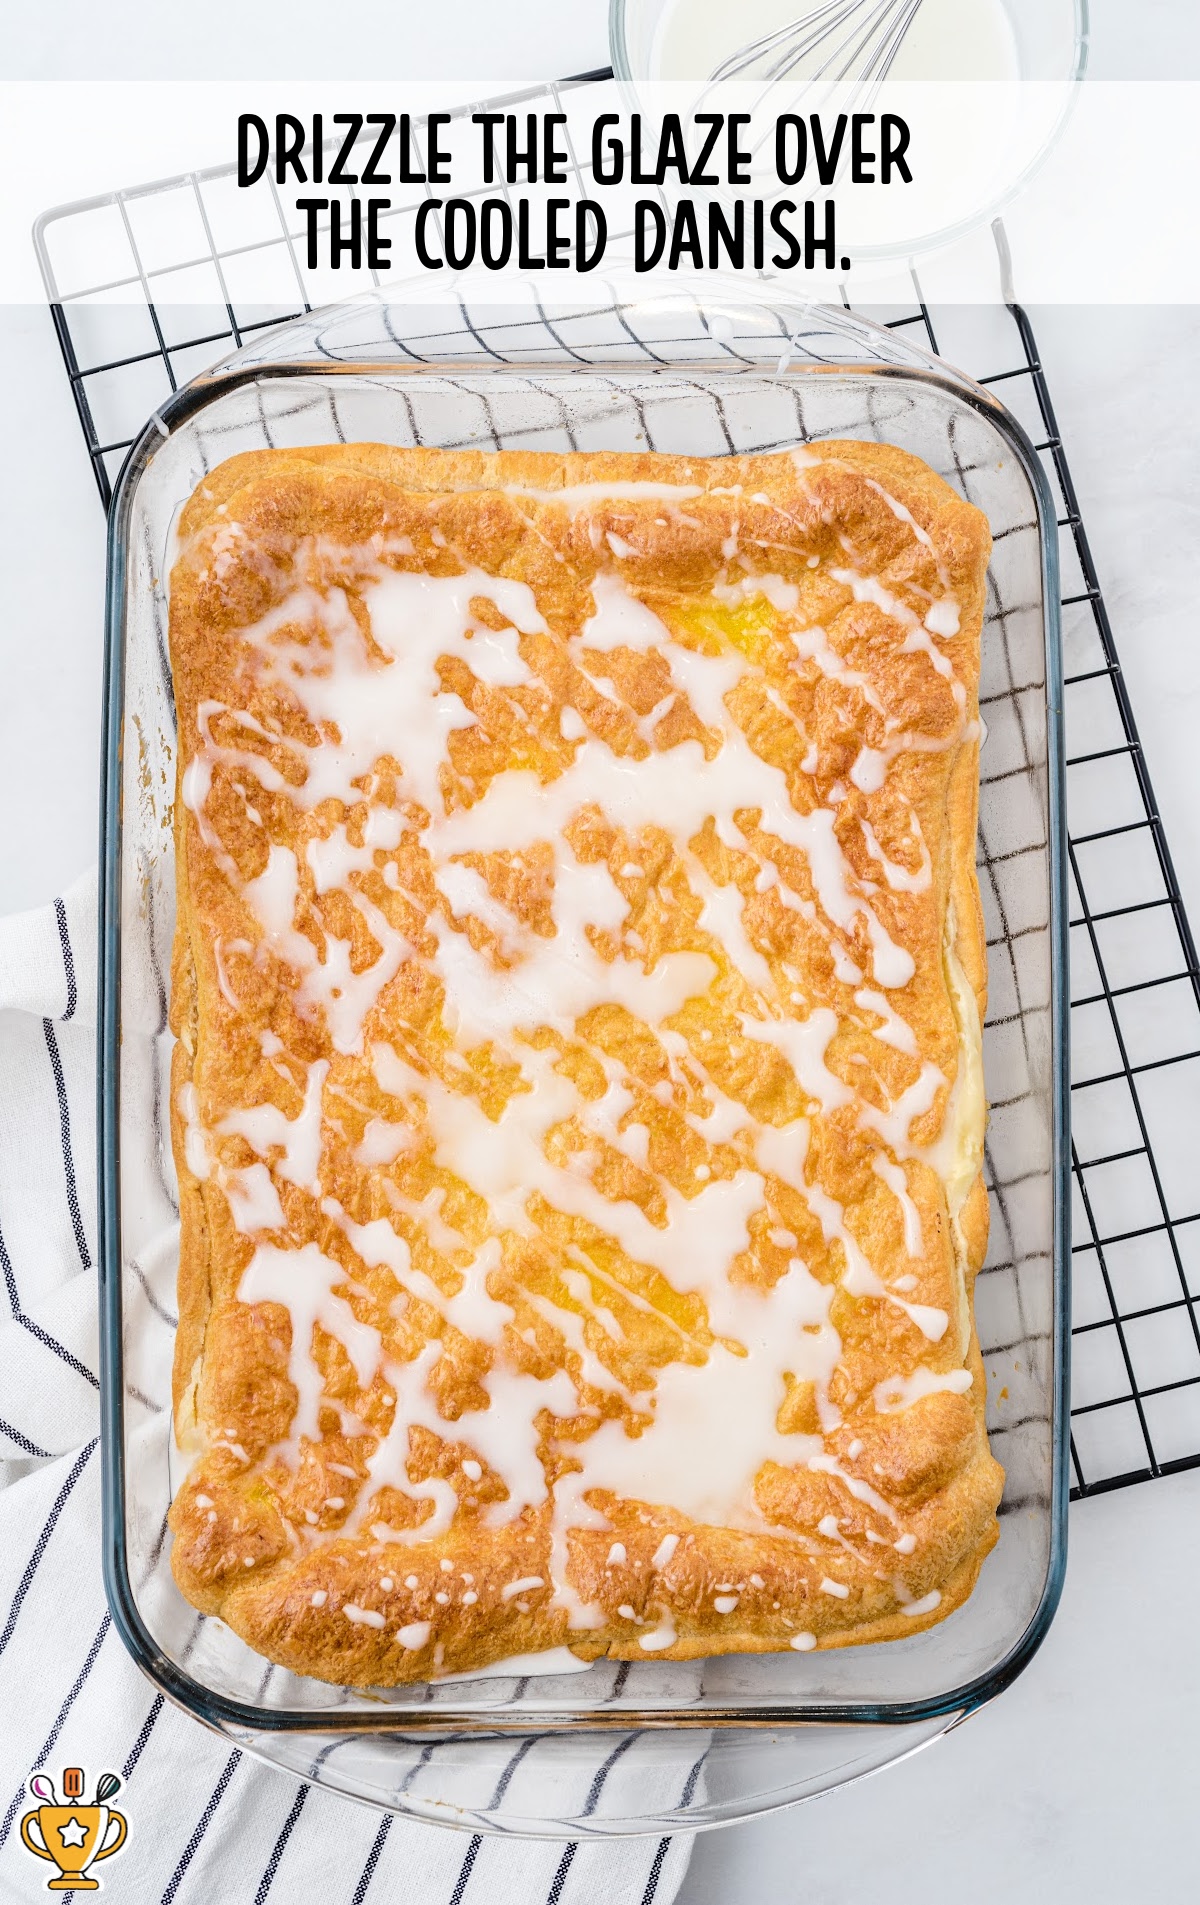
EIGHTH STEP: To make the glaze, in a small bowl whisk the powdered sugar, remaining vanilla extract, and milk until smooth.
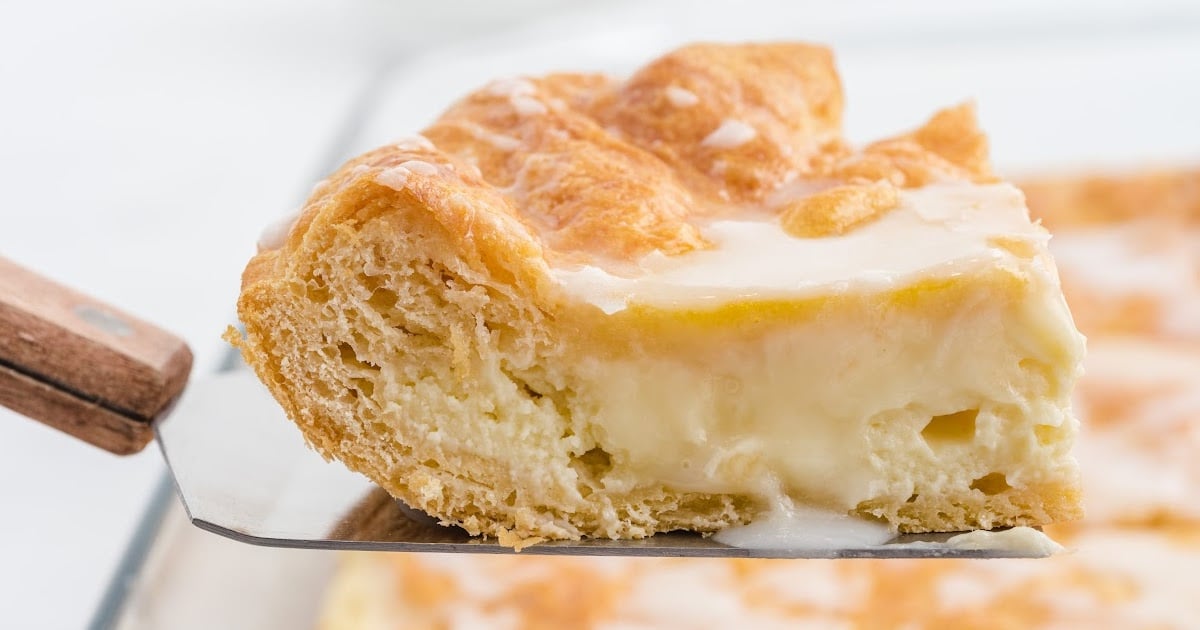
NINTH STEP: Drizzle the glaze over the cooled Danish.
TENTH: Using a sharp knife, cut into twelve bars and serve with coffee or hot tea.
Pro Tip
For an extra special touch, sprinkle the glazed danish with coarse sugar or add lemon to the glaze.
How To Serve Homemade Cheese Danish
This easy cheese Danish recipe works perfectly for all kinds of fun moments and sweet celebrations. Kids and adults love the creamy filling, flaky crust, and bakery-style flavor all year long.
- Serve It for Holiday Brunch: This sweet and flaky Danish shines on Christmas morning or Easter brunch. Add french toast roll-ups or sausage breakfast casserole for a cozy holiday spread.
- Enjoy It as an Afternoon Snack: Warm up a cheese Danish for a quick, satisfying treat during fall or winter. Pair it with pumpkin roll cookies or pumpkin spice hot latte for a fun afternoon break.
- Make It for a Baby or Bridal Shower: This pretty pastry makes any celebration feel extra special. Serve it with strawberry crunch cupcakes or chicken salad for a tasty party platter.

Why You'll Love This Recipe for Cheese Danish
This cheese Danish recipe has become a go-to favorite with our readers, and it’s easy to see why. It checks all the boxes—quick prep, rich flavor, and bakery-style results without the fuss. You can serve it for breakfast, brunch, dessert, or any time that calls for something warm and sweet.
- Perfect for Beginners: You don’t need baking skills to pull this off, and it still looks like it came from a bakery.
- Crowd-Pleaser: Everyone loves it, from picky eaters to sweet tooth fanatics—it always disappears fast.
- Versatile Year-Round: This recipe works in every season, from cozy fall mornings to bright spring brunches.
- Looks Impressive: It bakes up golden and pretty every time, even if you’re not an expert in the kitchen.
- Perfect Any Time: You can serve it for breakfast, snack time, or dessert, and it always fits right in.
This cheese Danish recipe keeps readers coming back because it’s simple, fun, and always hits the sweet spot!
Recipe FAQ
Do I need to let the cream cheese soften before using it?
Yes, softened cream cheese mixes smoother and spreads easier for this easy cheese Danish recipe, with no lumps or chunks.
Can I double the recipe to make more cheese Danishes?
Yes, you can double this recipe. Just use two baking sheets or bake in batches for best results.
How do I keep the filling from leaking out while baking?
To keep the Cheese filling from leaking, press the seams of the dough tightly and don’t overfill the center.
Do I need an egg wash for this cheese Danish recipe?
Yes, brushing the dough with egg wash makes the Danish golden, shiny, and beautifully crisp around the edges.
Can I add fruit filling to this Cheese Danish?
Yes, you can add fruit filling on top of the cream cheese. Cherry, blueberry, or raspberry all work great with this recipe.
How long should I bake the Cheese Danish?
Bake for eighteen to twenty minutes, or until the dough turns golden brown and the center looks set.
Why is my Danish too soft in the middle after baking?
If your Cheese Danish turns out soft, bake it a few more minutes until the dough looks golden and fully set.
Serving FAQ
What’s the best way to serve Cheese Danish for breakfast or brunch?
Cut into equal squares and serve warm with coffee, milk, or juice for a sweet morning treat.
Should I serve Cheese Danish warm or cold?
You can serve warm for a soft, creamy center or chilled for a firmer, rich bite.
Can I cut the Cheese Danish into smaller pieces for a crowd?
Yes, slice the Danish into mini squares or strips so guests can grab a quick bite at parties or showers.
Is Cheese Danish a good option for holidays or special brunches?
Yes, Danish makes holidays feel extra special. It looks fancy but takes just minutes to prep and serve.
Can I add powdered sugar before serving the Cheese Danish?
Yes, dusting powdered sugar on top adds a sweet finish and makes it look bakery-style.
Do I need to serve Cheese Danish with a topping or glaze?
No, the Cheese Danish tastes great on its own, but you can drizzle icing for extra sweetness and shine if you like.
Storage FAQ
Follow the simple tips and tricks below to store your Cheese Danish and keep it tasting fresh. With the right storage method, this sweet treat stays flaky and creamy longer. Use these easy directions to chill or freeze your danish the right way.
Whats the best way to store cheese Danish?
After the dish is cool and the glaze is set, cover it with plastic wrap or place in an airtight container and store in the refrigerator for up to five days.
Can I freeze cheese Danish?
Unbaked danish can be frozen, tightly wrapped, for three to four months. Defrost at room temperature for a few hours before baking. Baked danish can be frozen for a two weeks.

Cheese Danish
This easy cheese Danish recipe makes a sweet, creamy pastry with a golden, flaky crust in just minutes. Use simple ingredients and follow step-by-step directions for bakery-style results every time.
Did you try this recipe?Let our readers know how it turned out by Leaving a Review!
Ingredients
- 2 8-ounce cans crescent dough rolls
- 2 8-ounce packages full fat cream cheese, softened
- 1½ teaspoons vanilla extract (divided)
- 1 teaspoon lemon juice
- ¾ cup granulated sugar
- 2 eggs
- 1 tablespoon water
- ½ cup powdered sugar
- 2 tablespoons milk
DIRECTIONS
- Preheat oven to 350°F. Spray a 9×13-inch glass baking dish with nonstick cooking spray.
- Unroll a full sheet of crescent dough and press into the bottom and up the sides of the prepared baking dish, pressing the seam lines together.
- In a medium mixing bowl, beat together softened cream cheese, 1 teaspoon vanilla extract, lemon juice, granulated sugar, and 1 egg. Spread mixture evenly over the crescent dough.
- Roll out the second sheet of crescent dough, pressing seams together with your fingers. Lay dough over the top of the cream cheese layer.
- Mix remaining egg with a tablespoon of water and brush over the top of the crescent dough top.
- Bake for 30 to 40 minutes or until crescent dough is golden brown on the top and on the bottom of the baking dish.
- Allow the cheese danish to cool for 20 to 30 minutes before topping with glaze.
- To make the glaze, whisk together ½ cup powdered sugar, remaining ½ teaspoon vanilla extract, and milk until smooth.
- Drizzle glaze over cooled danish.
- Cut into 12 bars and serve.
WATCH THIS RECIPE VIDEO
Notes
- If you use regular crescent roll dough, you don’t have to seal the edges perfectly, because they will puff up and come together while baking.
- Lemon juice adds a hint of flavor to the cream cheese filling, but can be omitted if you prefer. For a sweeter danish filling, increase the sugar to a full cup.
- For an extra special touch, sprinkle the glazed danish with coarse sugar or add lemon to the glaze.
Nutrition
Calories: 98kcal | Carbohydrates: 20g | Protein: 1g | Fat: 2g | Saturated Fat: 1g | Polyunsaturated Fat: 0.5g | Monounsaturated Fat: 0.5g | Trans Fat: 0.003g | Cholesterol: 28mg | Sodium: 49mg | Potassium: 16mg | Fiber: 0.001g | Sugar: 18g | Vitamin A: 46IU | Vitamin C: 0.2mg | Calcium: 8mg | Iron: 0.2mg
HAVE YOU TRIED THIS RECIPE?Follow me on Pinterest @bestblogrecipes


Comments
Anne says
Just made this exactly as written and it turned out incredible. Baked for the max time listed, and it did puff up more than I expected!