
Last updated on
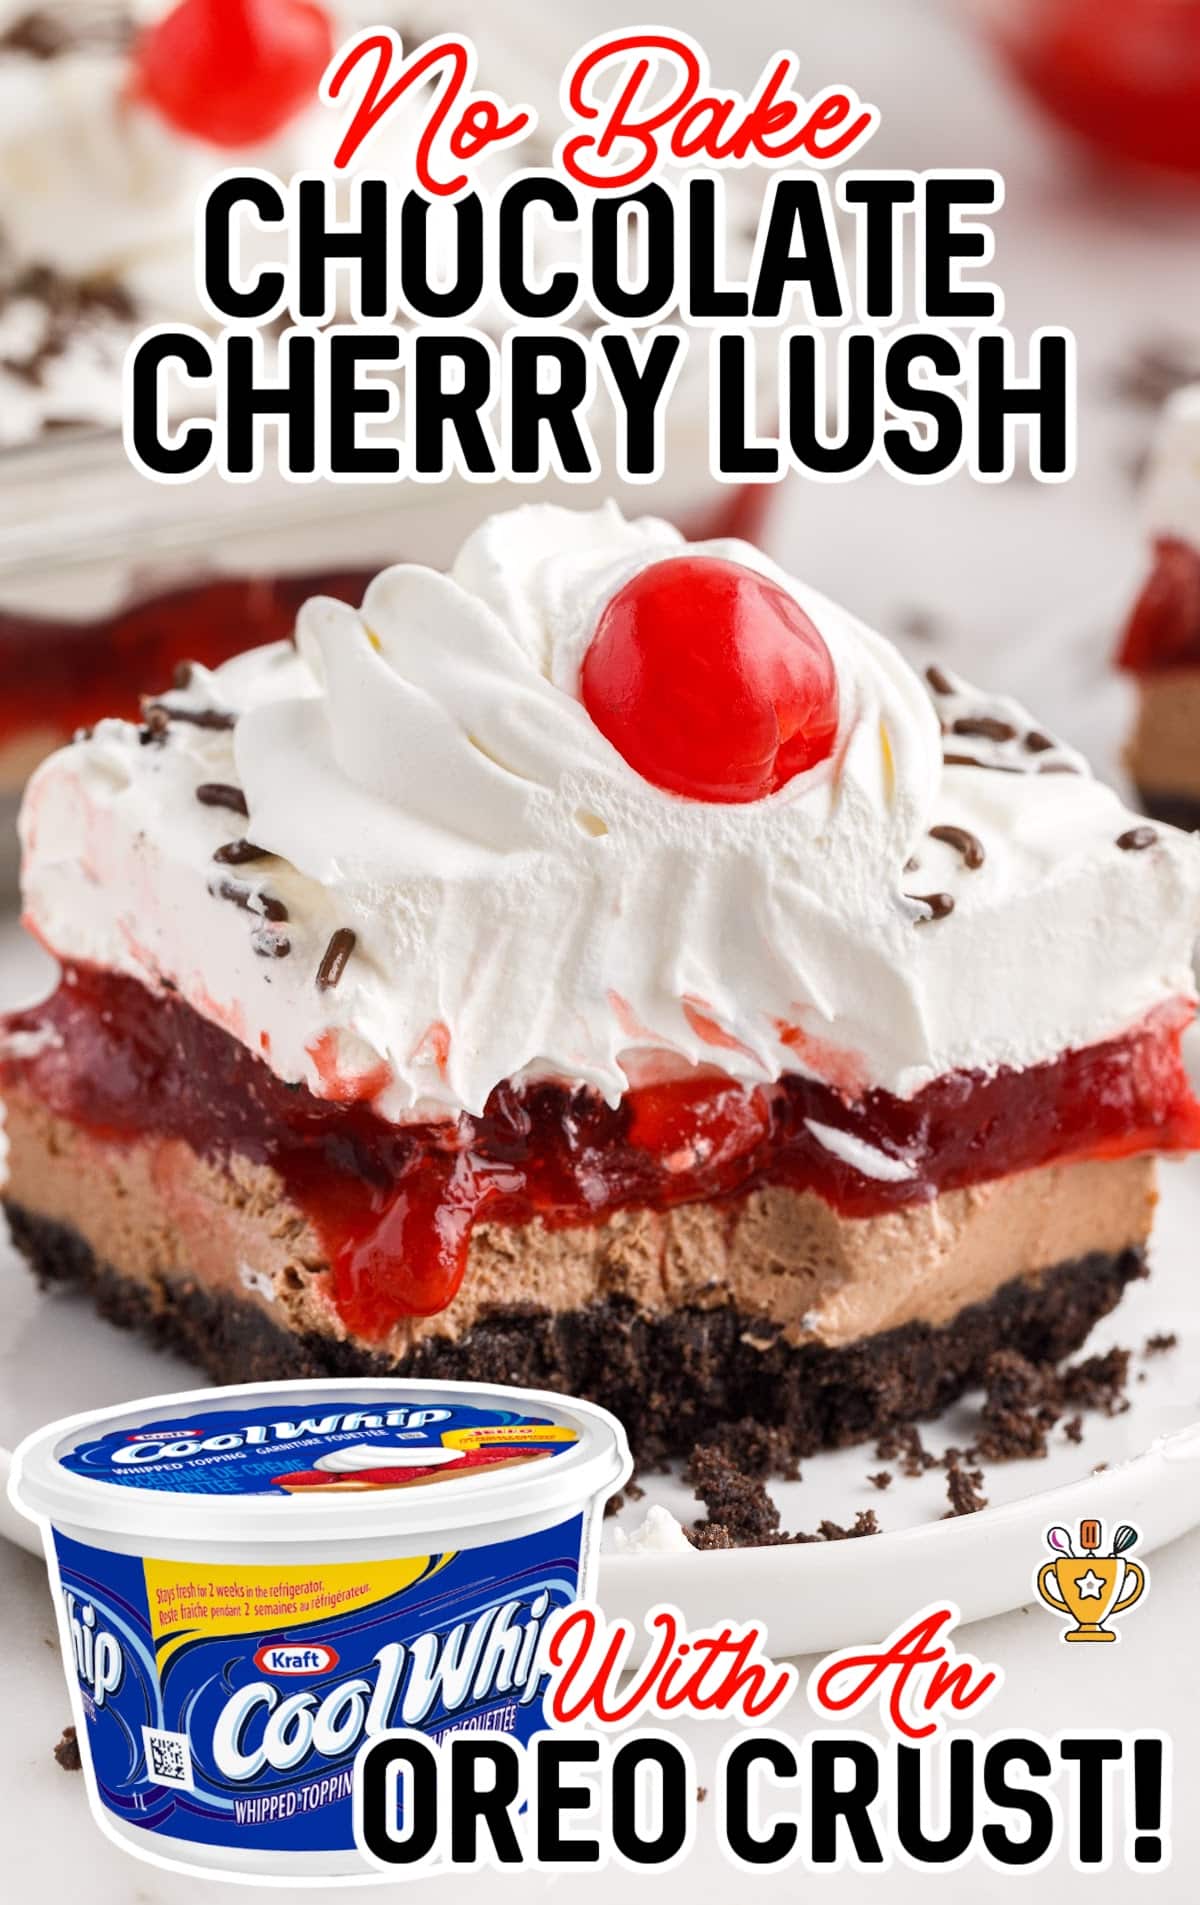
No-Bake Chocolate Cherry Lush

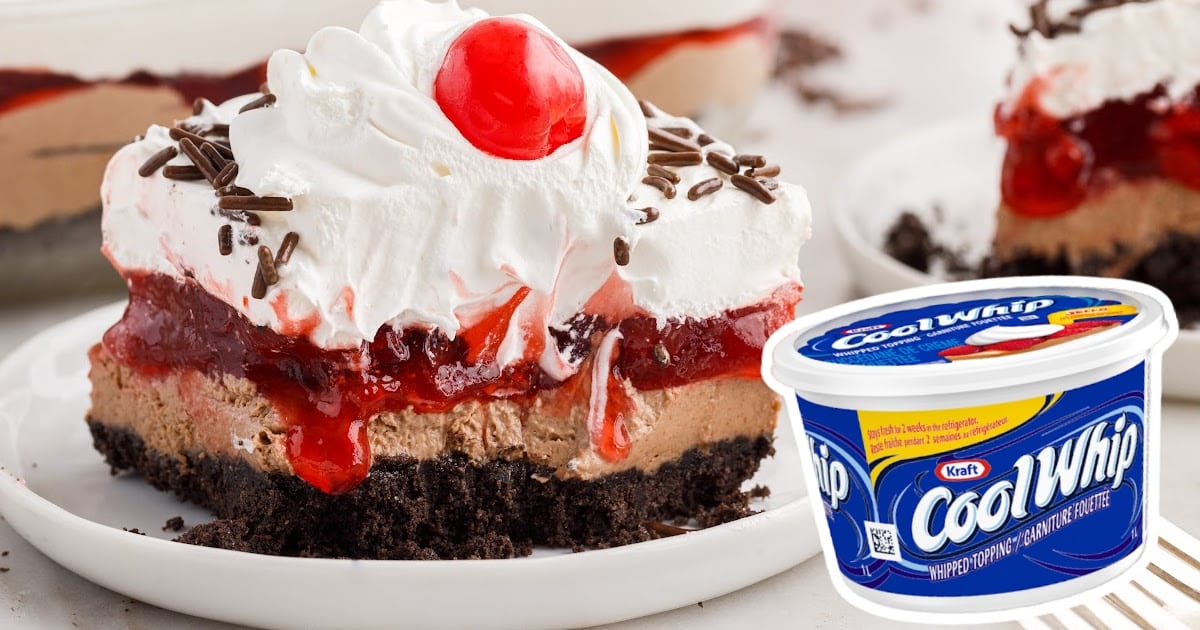
No-bake chocolate cherry lush is a rich, layered dessert with creamy cheesecake, sweet cherries, and a crunchy cookie crust. This easy, no-bake treat is perfect for any occasion and will delight everyone with its irresistible flavors!
Jump to RecipeTable of Contents

Rich and indulgent, this no-bake chocolate cherry lush blends chocolate and cherry into a perfect flavor combination. With creamy cheesecake layers, a crunchy Oreo cookie crust, and sweet cherry pie filling, it's sure to be a crowd-pleaser!
Whip this up in minutes, chill it, and get ready to impress your family and friends! We’ve included pro tips, tricks, and answers to the most frequently asked questions to make your dessert perfect every time!
More Recipes ⭐ Cherry Pie Bombs | Cherry Cobbler Muffins | Cherry Cheesecake Lush
Inspired by the classic Black Forest cake, no-bake chocolate cherry lush is a dreamy, crowd-pleasing dessert. Layers of chocolate cookie crust, cherry pie filling, whipped cream, and rich chocolate cheesecake create a decadent treat topped with chocolate sprinkles. Packed with timeless flavors, this dessert is irresistibly creamy and satisfying. Easy to make, it’s the perfect no-bake treat for any season!
Ingredients for No-Bake Chocolate Cherry Lush
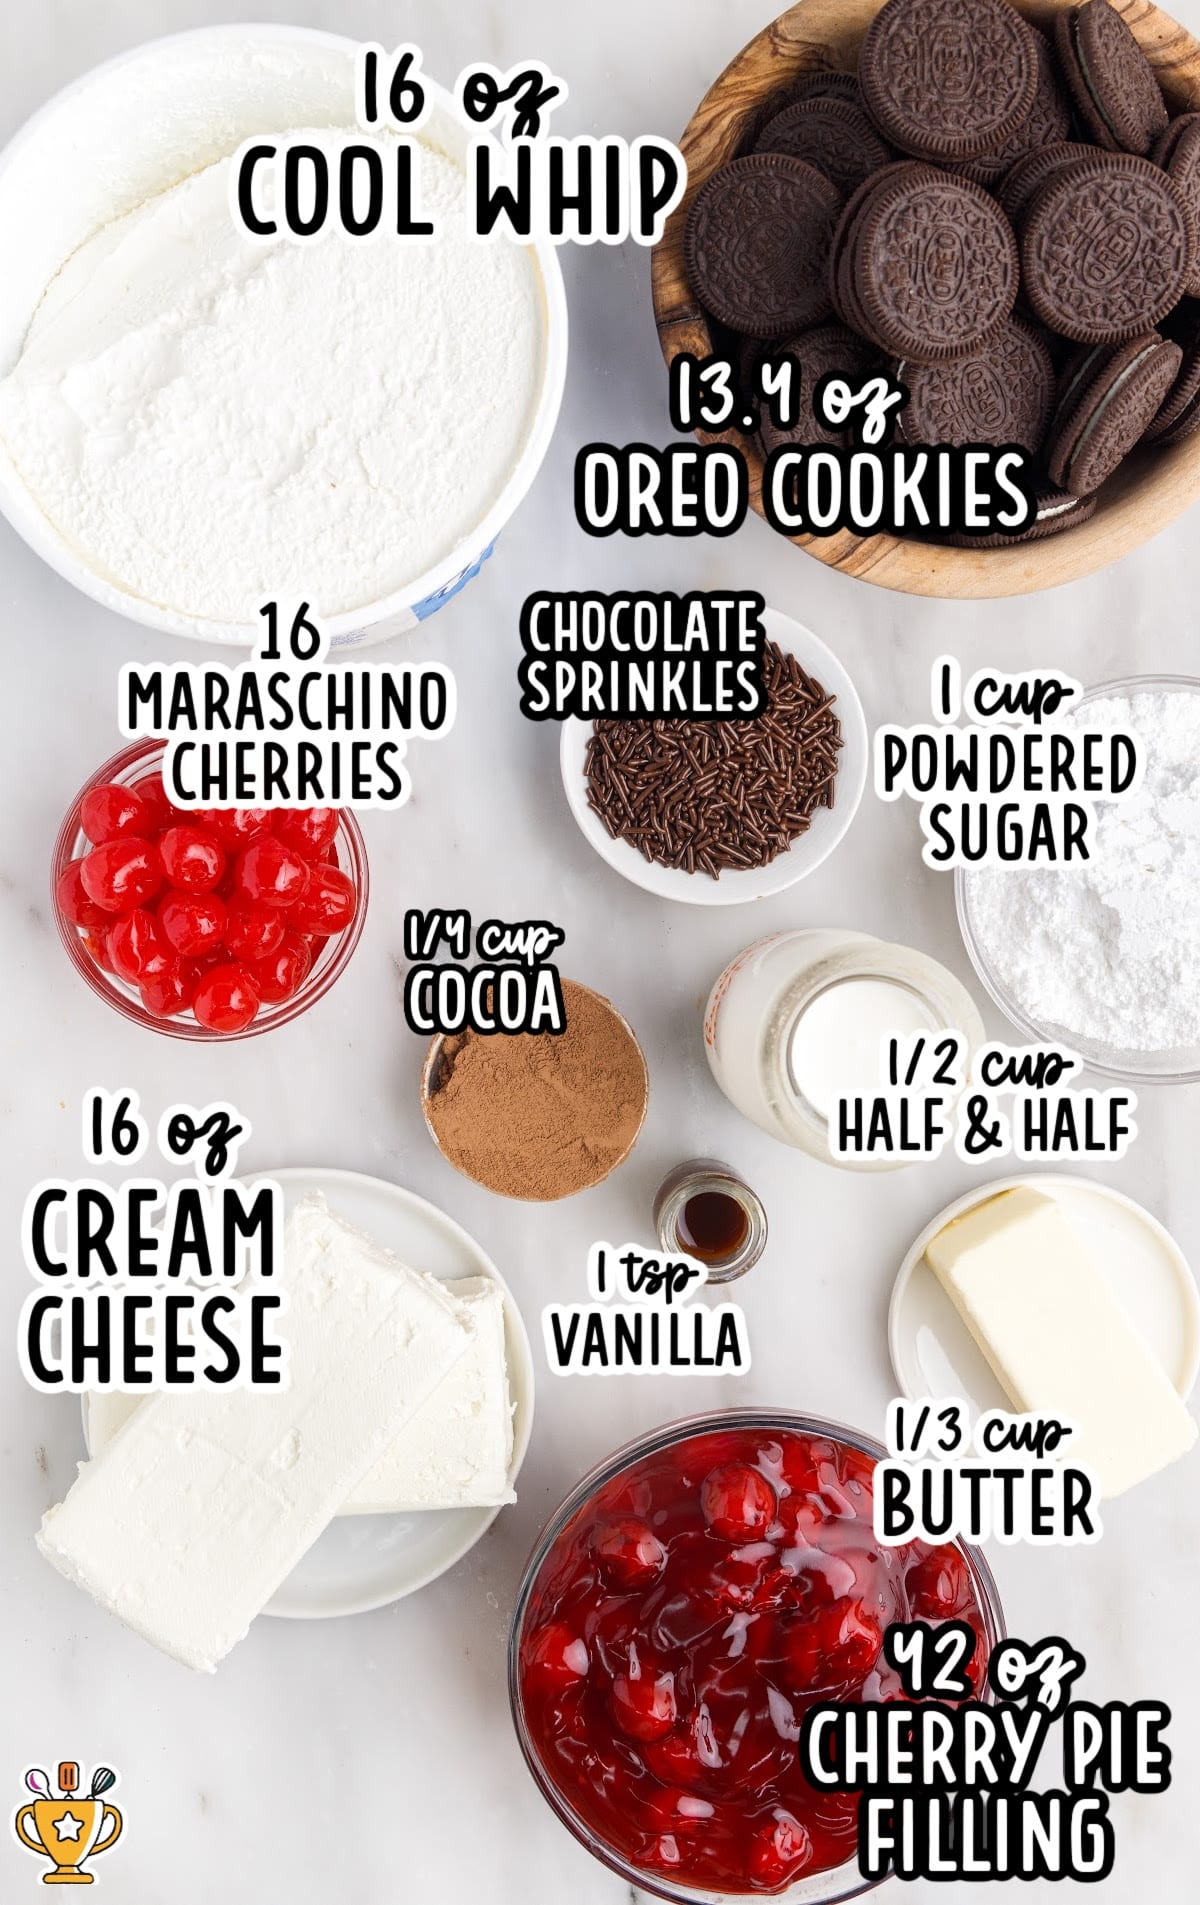
What you'll need to make this No-Bake Chocolate Cherry Lush recipe:
For the Oreo Crust
- 1 (14.3-ounce) package of chocolate sandwich cookies (approximately 36 cookies)
- ⅓ cup salted butter, melted (plus more for greasing the pan)
For the Chocolate Cheesecake Layer
- 16 ounces of cream cheese, softened
- 1 cup of powdered sugar
- ¼ cup of unsweetened cocoa powder
- 1 teaspoon of vanilla extract
- ½ cup half & half (⅓ cup whole milk can be substituted)
For the Other Layers
- 2 (21-ounce) cans of cherry pie filling
- 16-ounce tub of frozen whipped topping (Cool Whip), thawed
- Chocolate sprinkles (optional)
- 16 maraschino cherries (optional)
Substitutions and Additions
Simple changes make your lush uniquely yours. Here are some top substitutions and additions:
Top with Crushed Candy: Sprinkle crushed peppermint, toffee bits, or mini chocolate chips for added texture and flavor.
Substitute the Cookie Crust: Use graham crackers, vanilla wafers, or shortbread cookies for a different base flavor.
Swap the Cherry Filling: Try blueberry, strawberry, or raspberry pie filling to create a new fruity twist.
Add a Chocolate Layer: Include a layer of chocolate pudding for an extra creamy and indulgent dessert.
How to Make No- Bake Chocolate Cherry Lush
Get ready to make this delicious no-bake chocolate cherry lush by following our step-by-step instructions and photos. Check out the tips and tricks below to ensure your dessert turns out perfectly. Let’s get started and create something amazing!
FIRST STEP: Grease a 9x13-inch glass baking dish with butter and set aside.
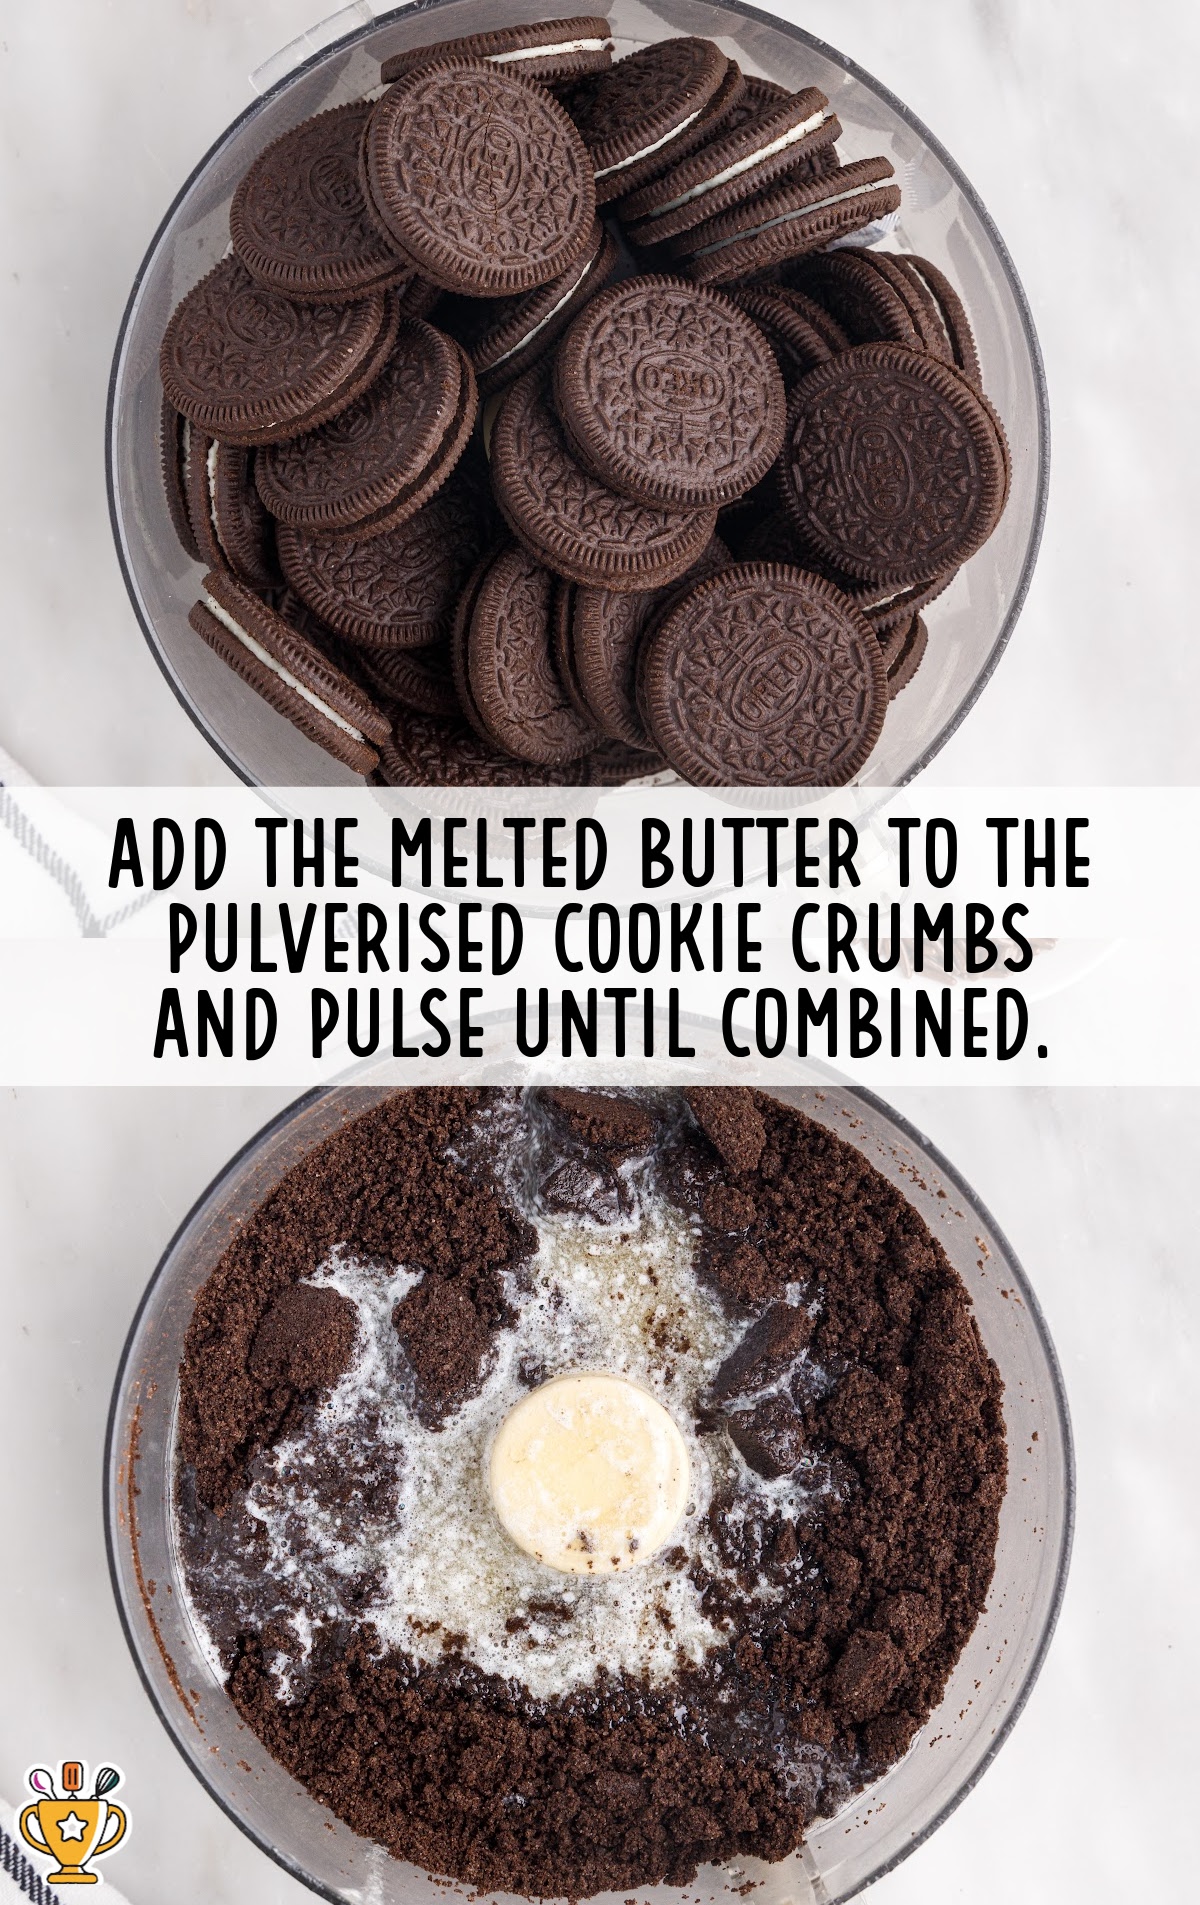
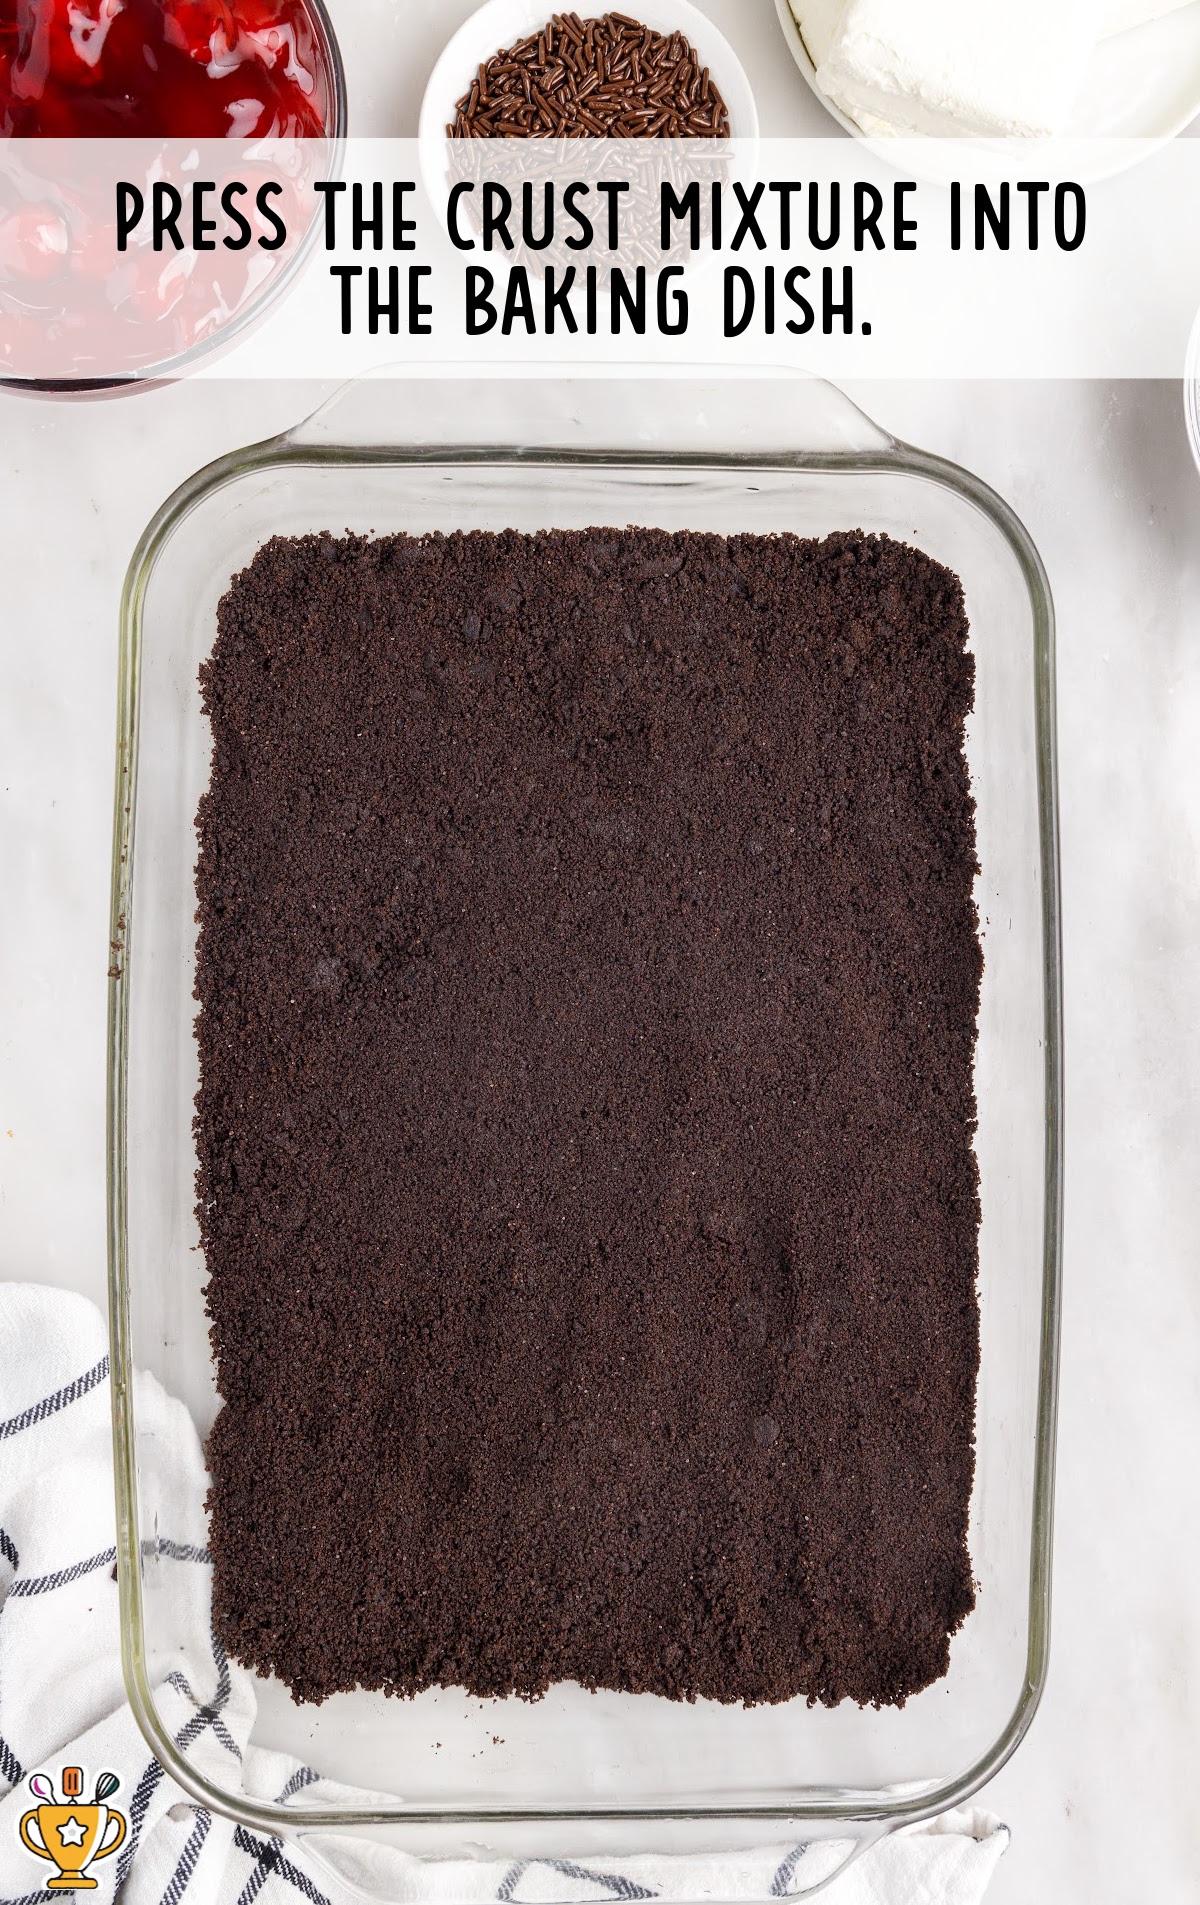
SECOND STEP: In the bowl of a food processor, pulverize the Oreo cookies until small, even crumbs form. Add the melted butter to the cookie crumbs and pulse until combined.
THIRD STEP: Press the crust mixture into the prepared baking dish and place it in the freezer to chill while preparing the next layer.
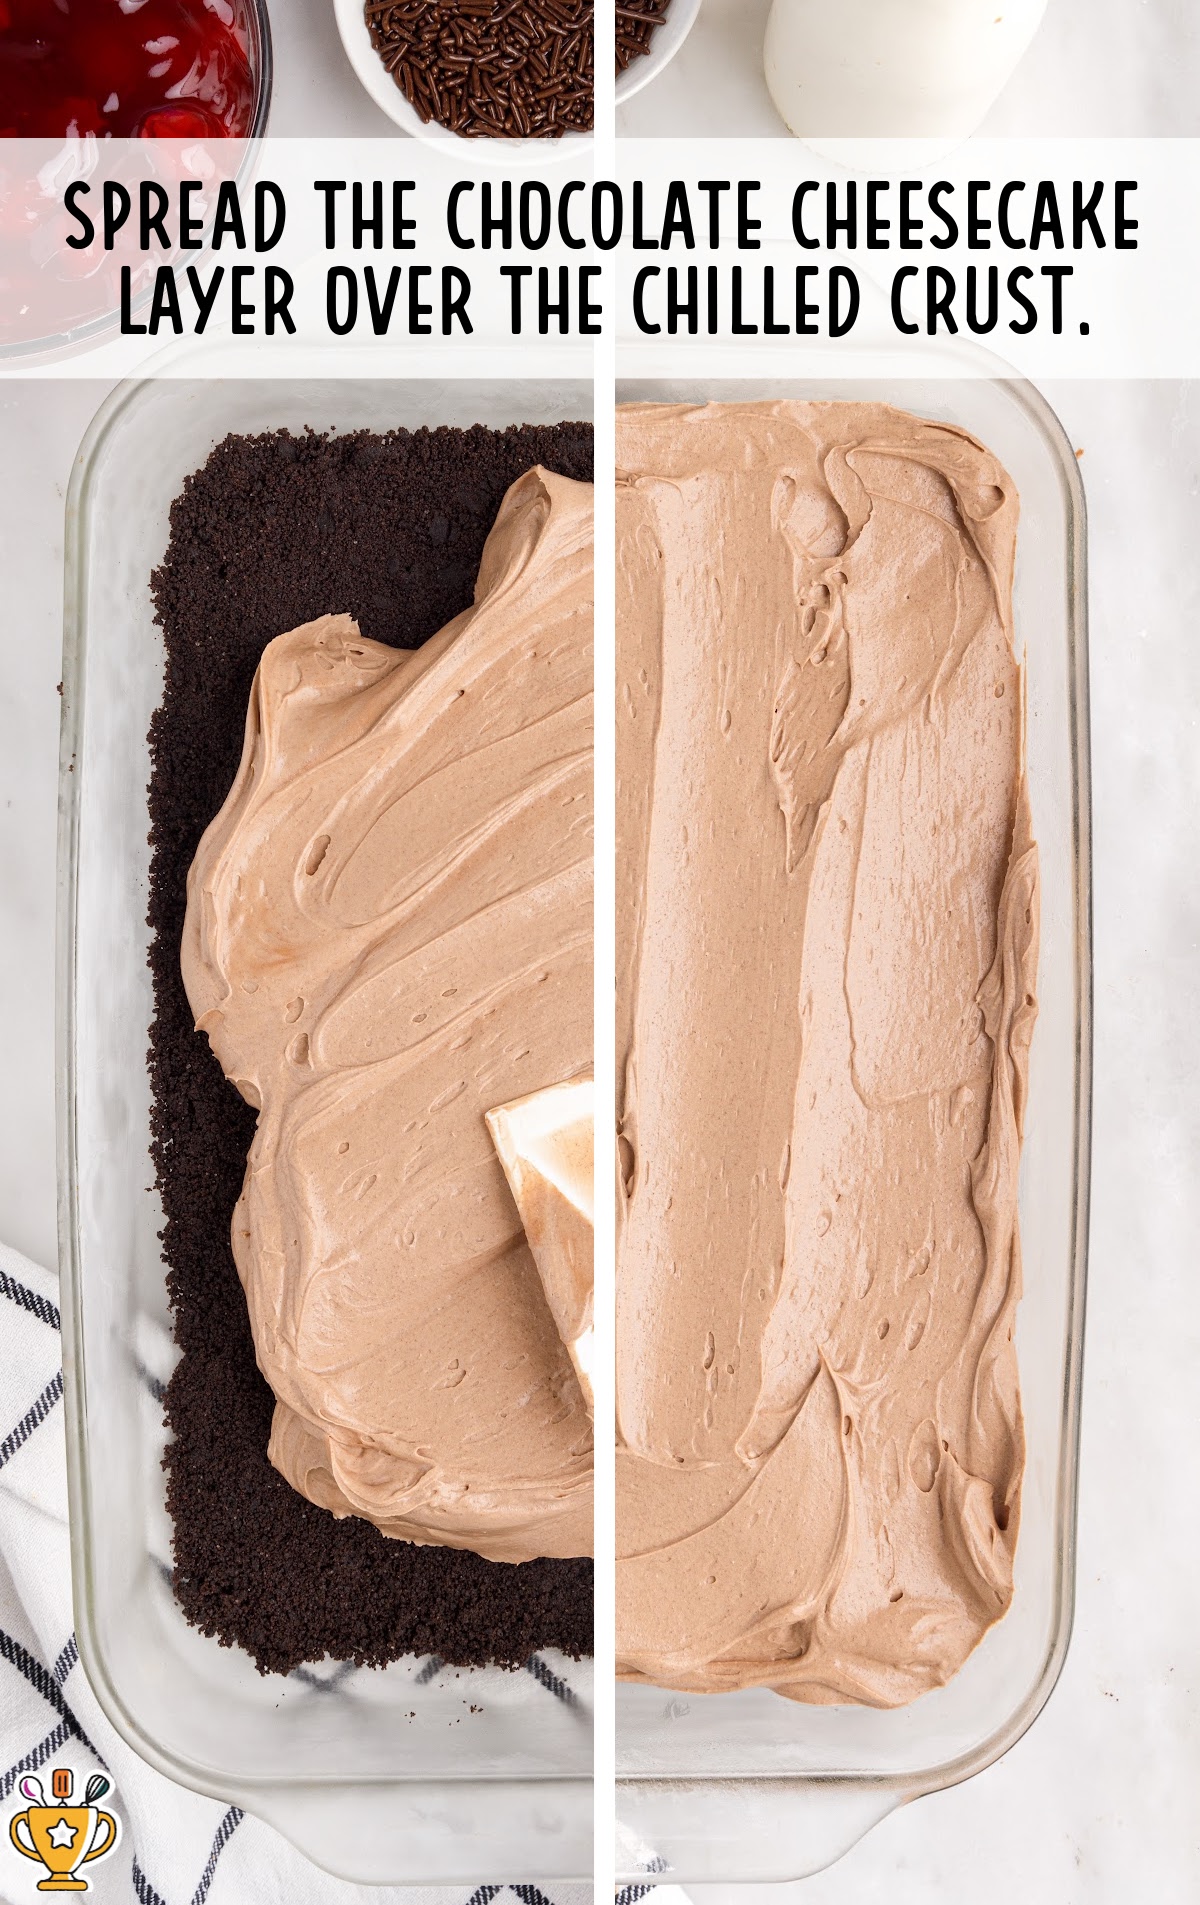
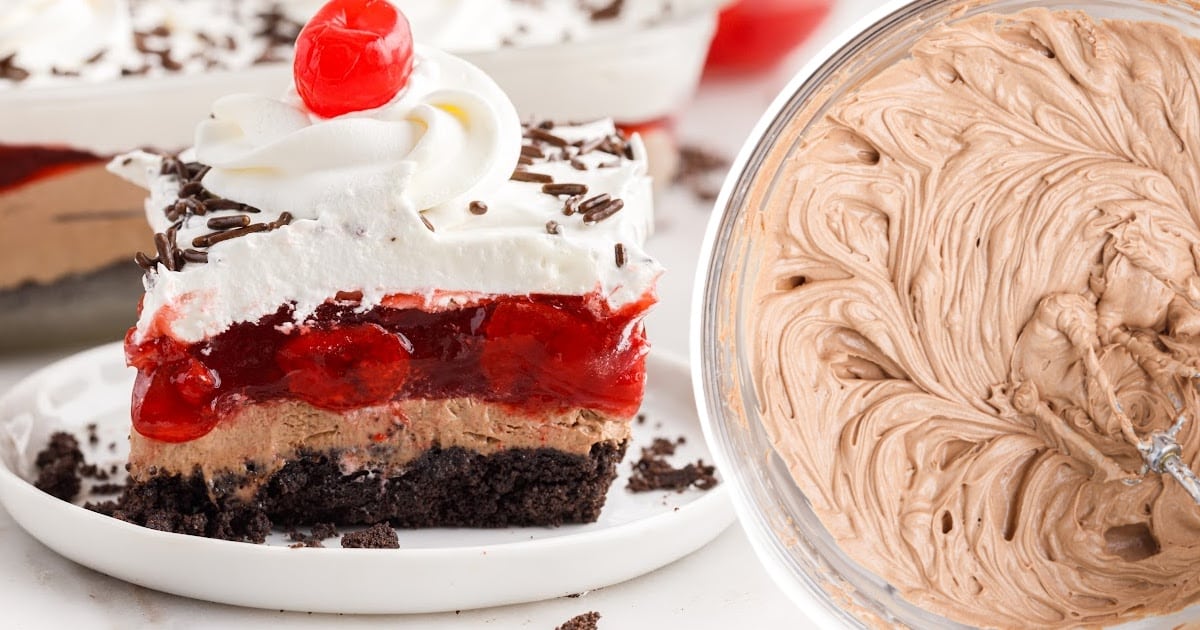
FOURTH STEP: In a medium bowl with an electric mixer, beat together cream cheese, powdered sugar, cocoa powder, vanilla extract, and the cream. Continue beating until the mixture is smooth and fluffy.
Pro Tip
Make sure your cream cheese is at room temperature; otherwise, you will end up with lumps in your cream cheese mixture.

FIFTH STEP: Spread the chocolate cheesecake layer over the chilled cookie crumb layer.
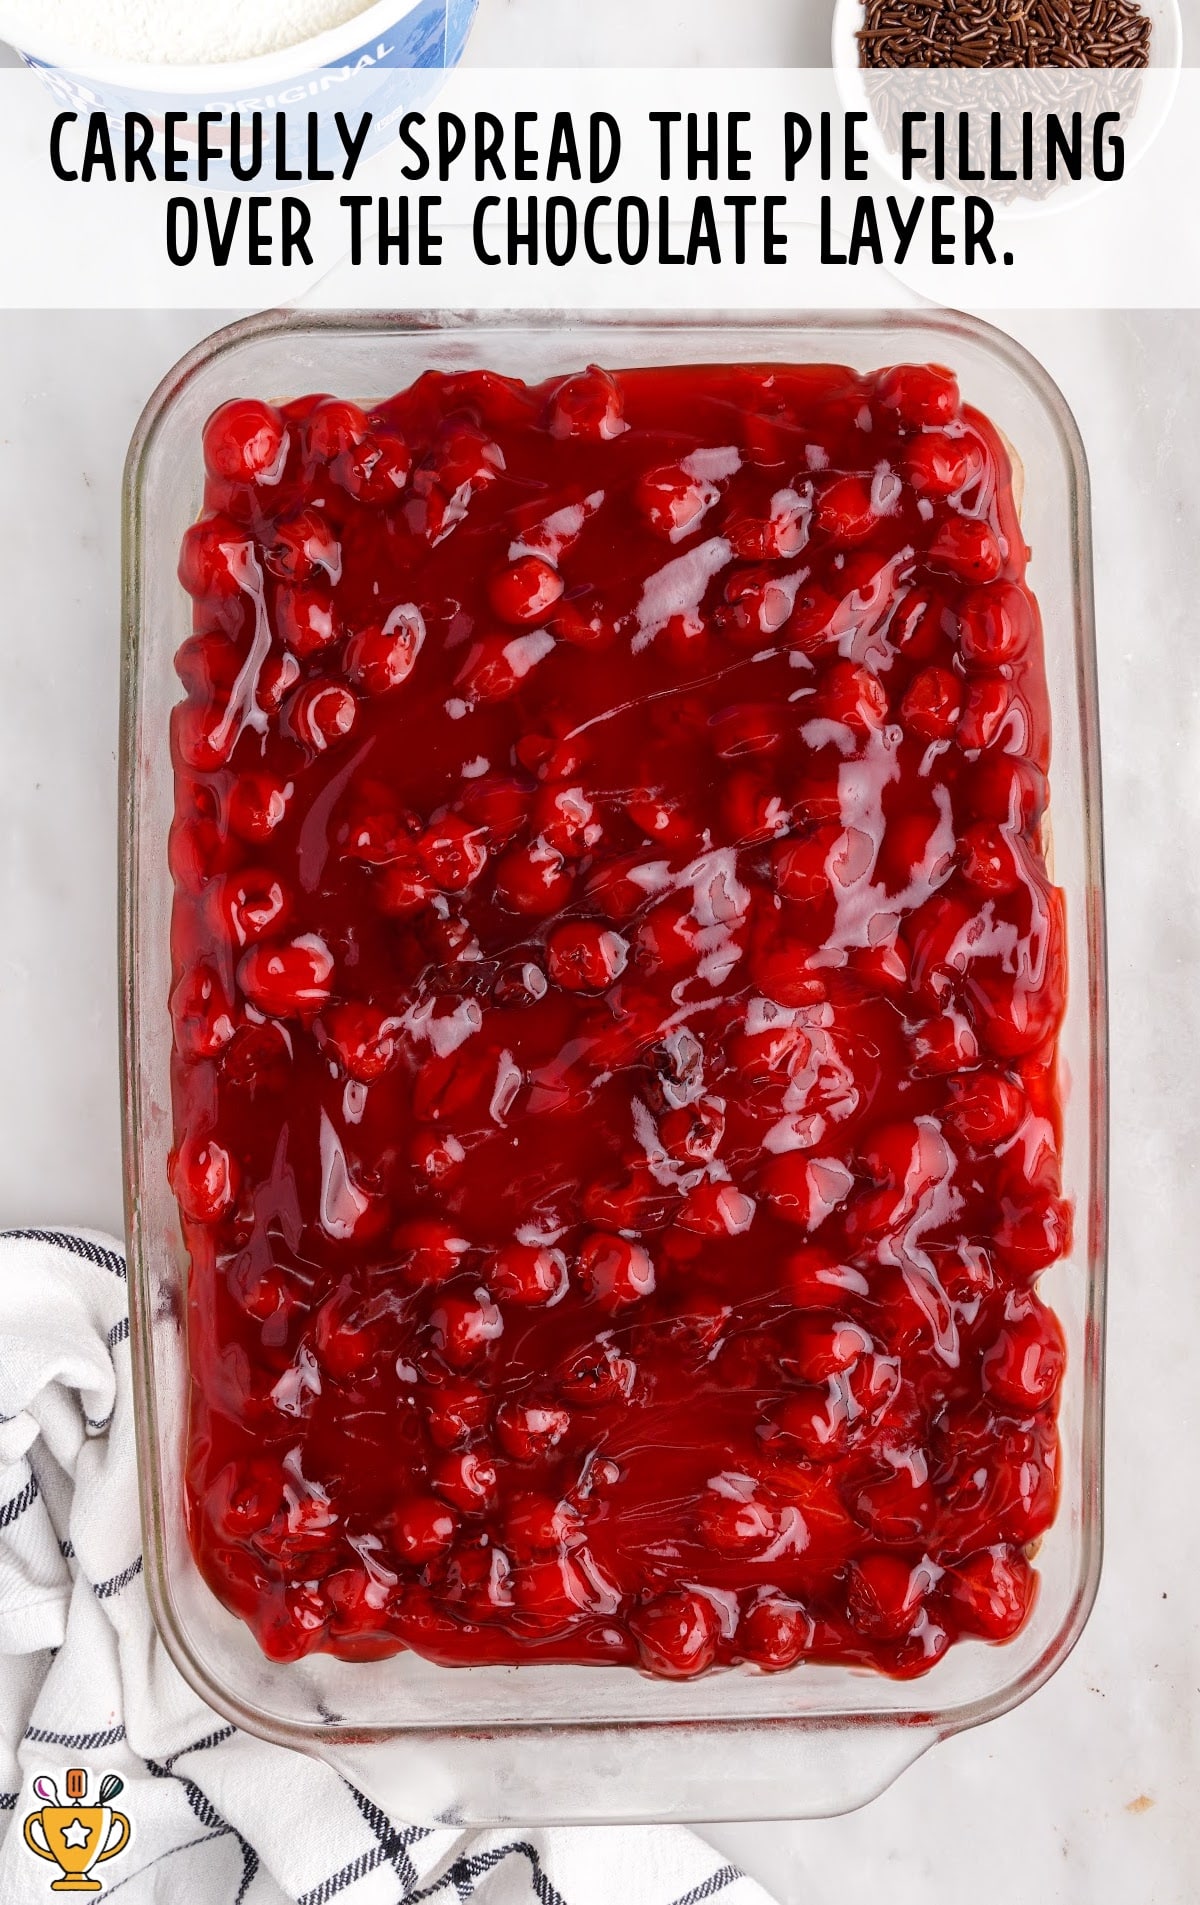
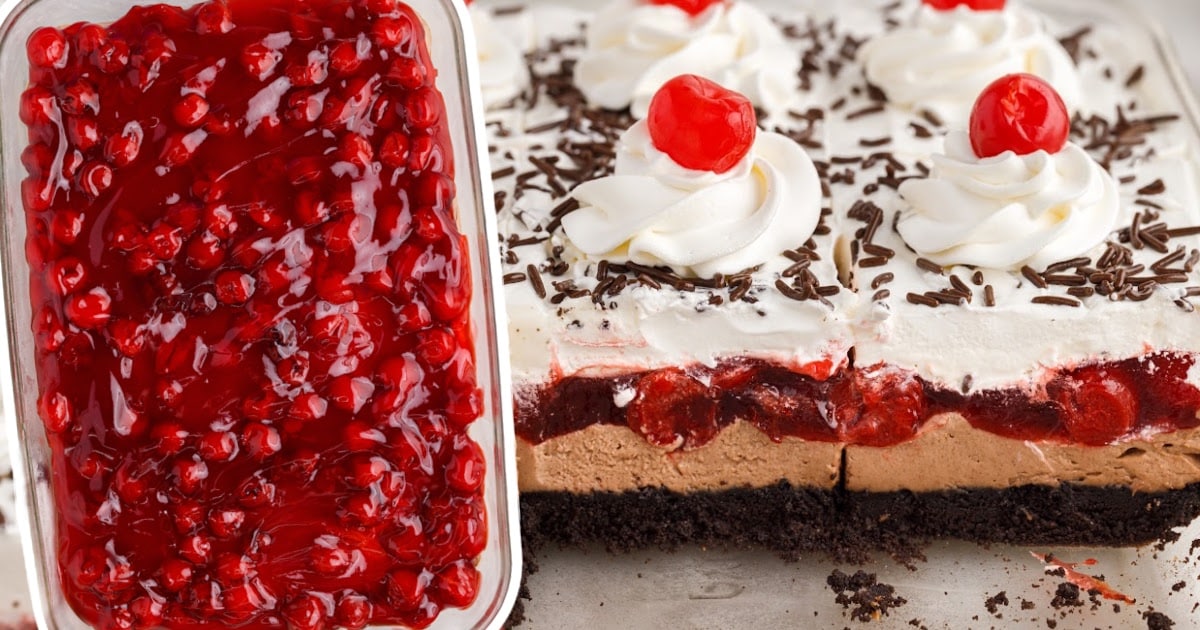
SIXTH STEP: Use a spatula to carefully spread each can of cherry pie filling evenly over top of the cheesecake layer
Pro Tip
If the cheesecake layer appears too soft, you can chill the dish in the freezer for 15 minutes or so between each layer to help firm up the surface.
SEVENTH STEP: Top with the Cool Whip, reserving about a cup to pipe swirls on top of the lush if you wish.
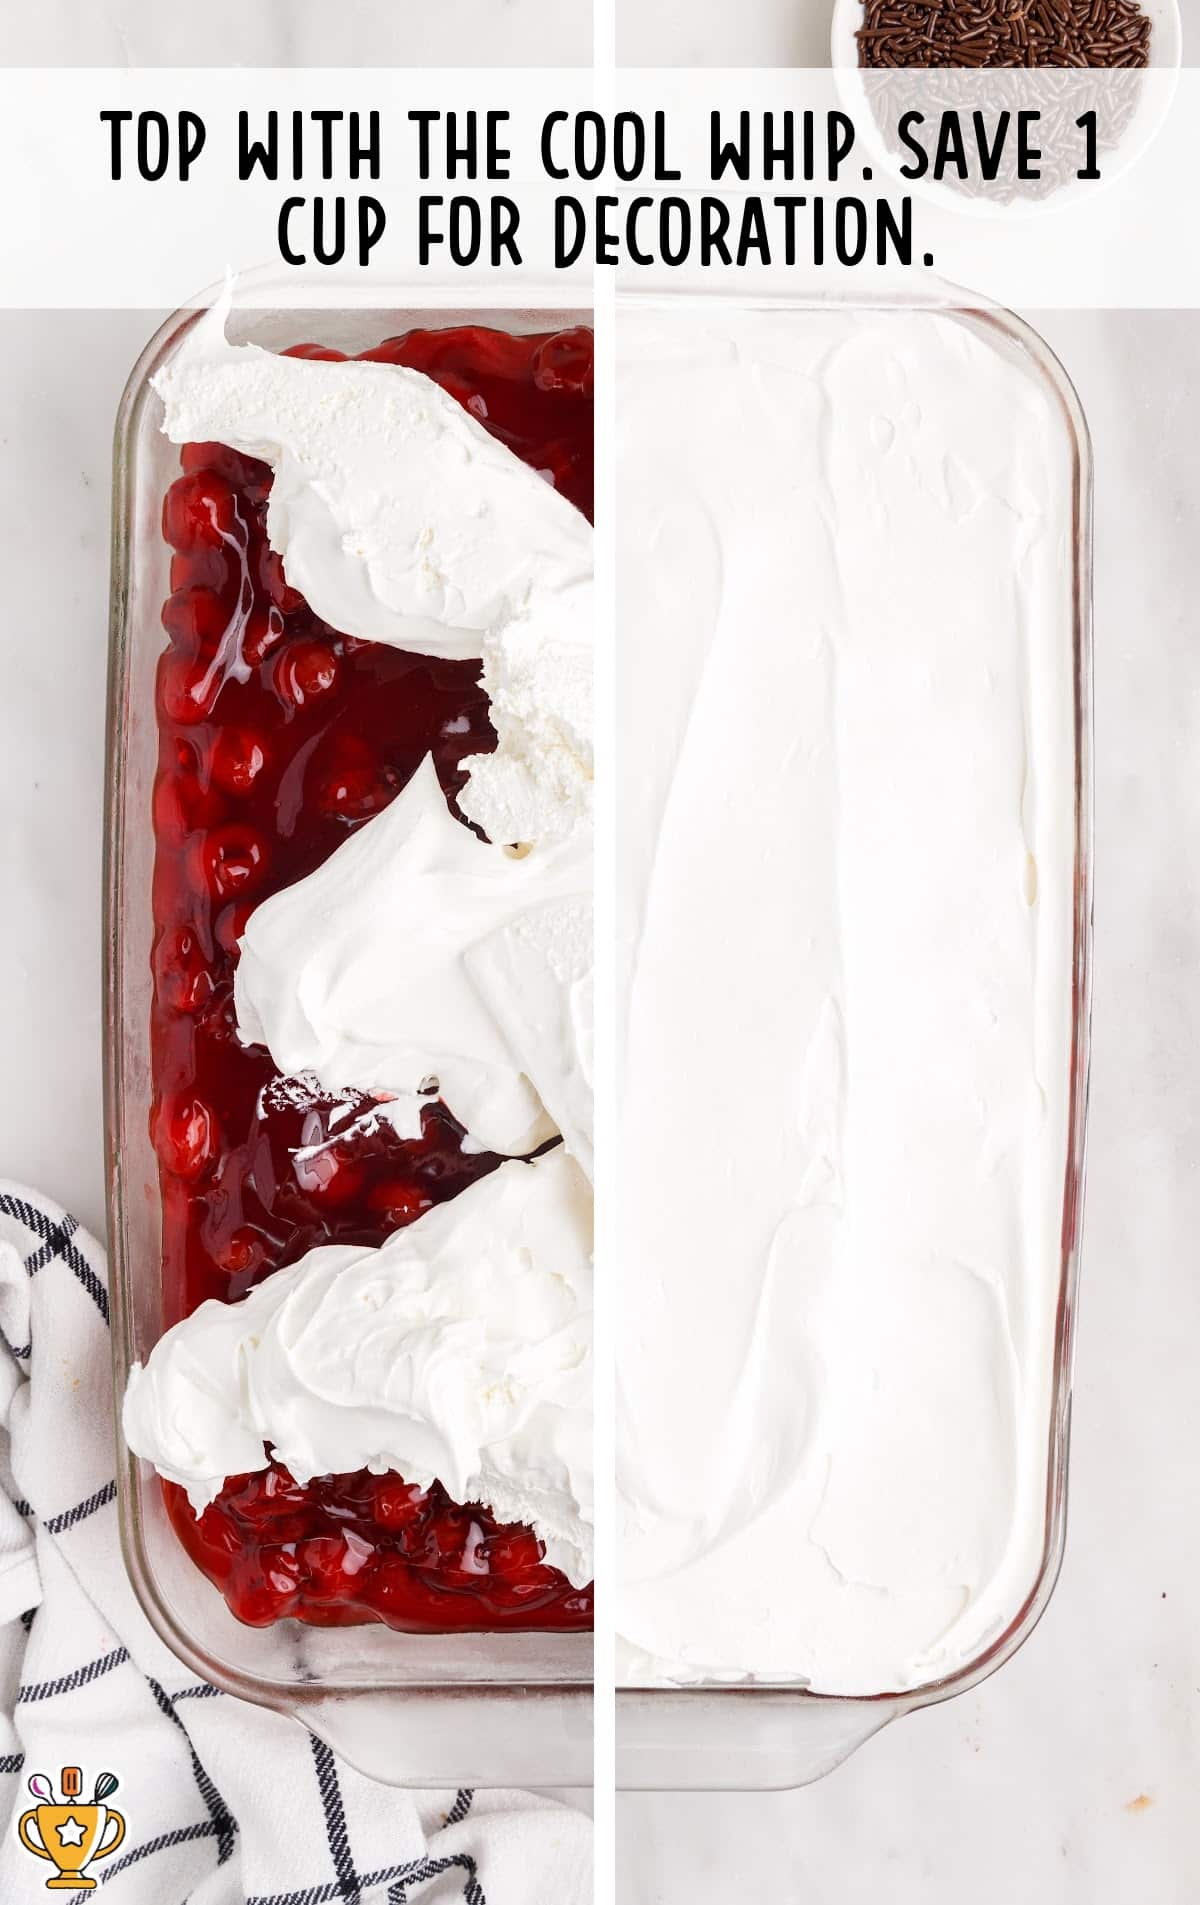
EIGHTH STEP: Spread the Cool Whip smoothly. Sprinkle with chocolate sprinkles.
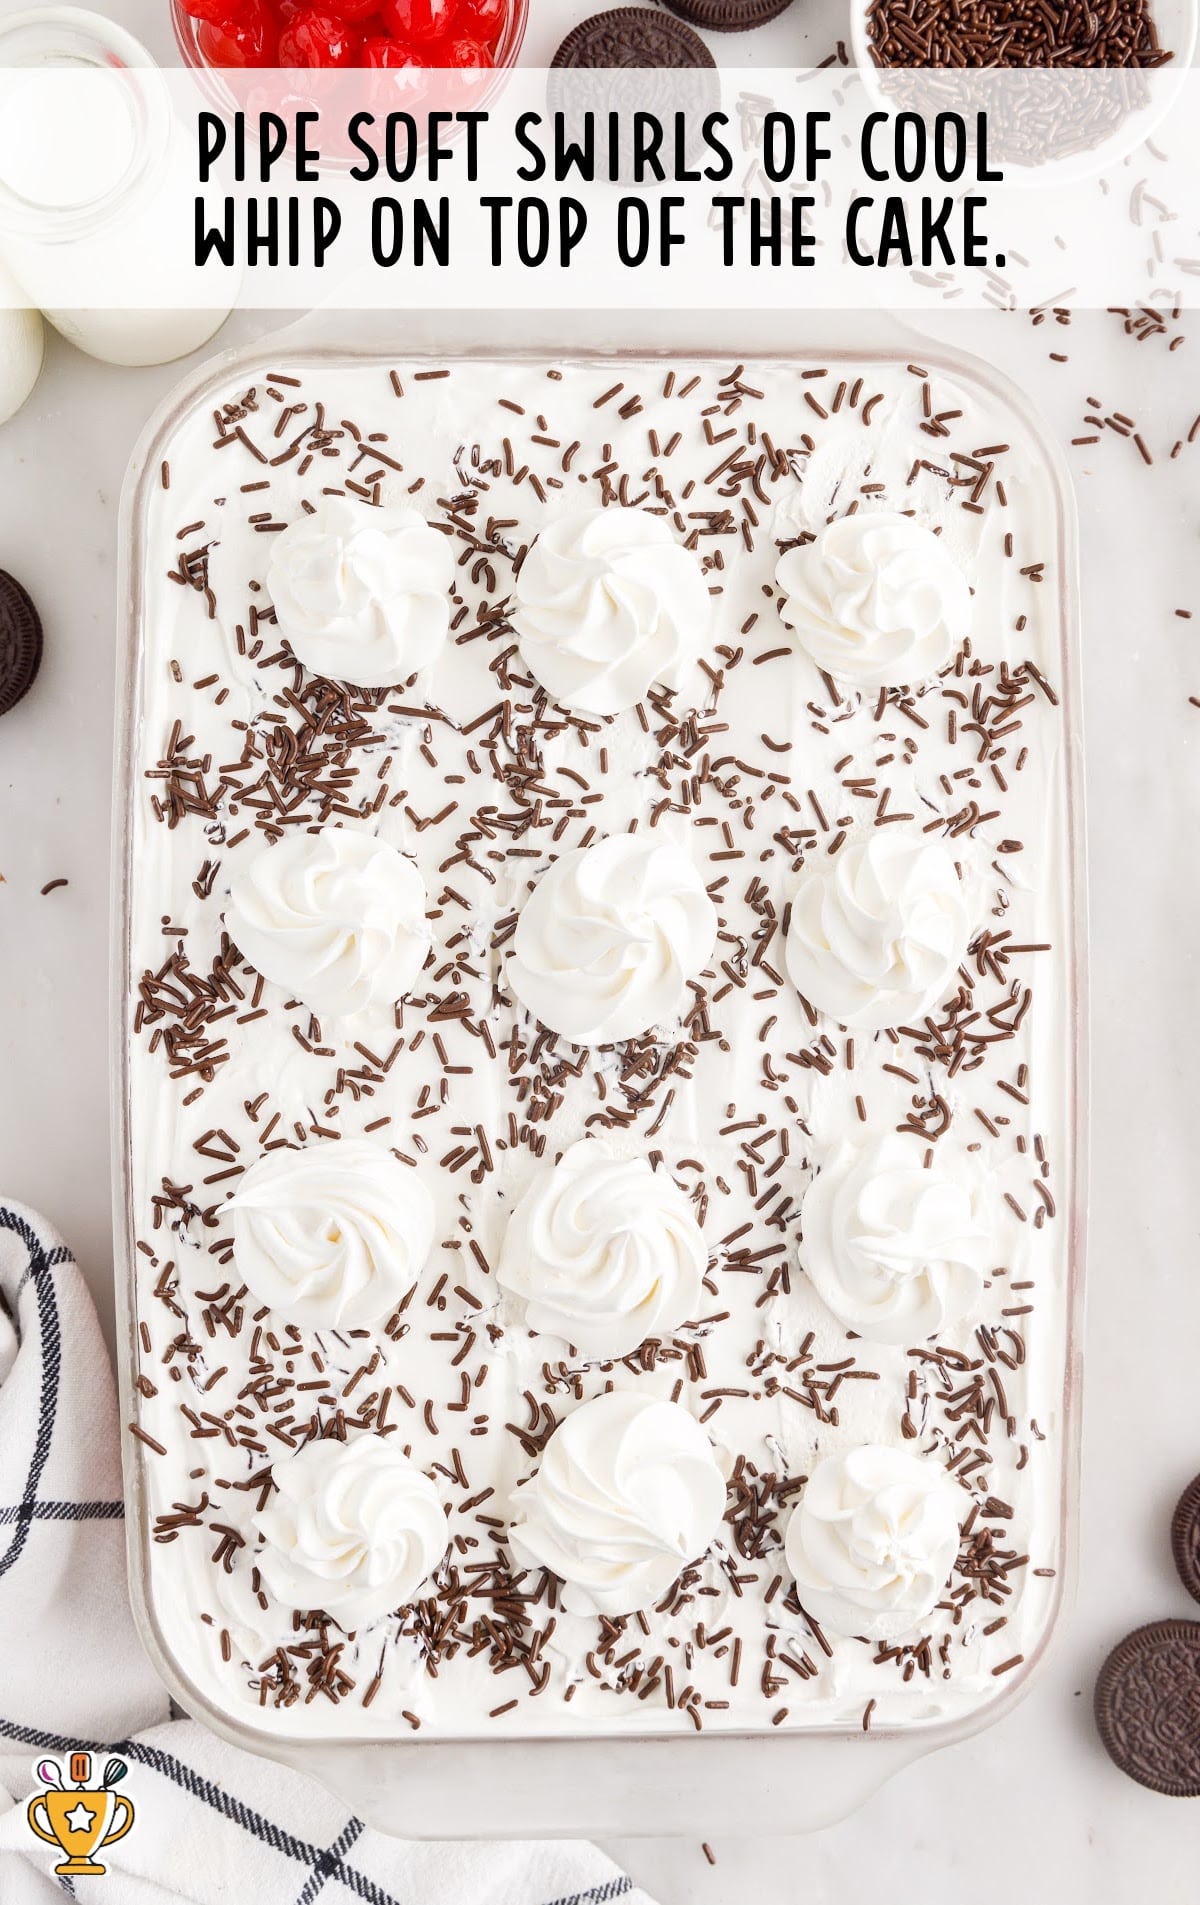
NINTH STEP: Use a piping bag and tip #1M to pipe soft swirls of Cool Whip on top of the lush.
TENTH STEP: Place the lush in the freezer to firm up for at least 2 hours.
Pro Tip
Chilling even longer or even overnight would allow all the flavors to mingle and blend together even more!
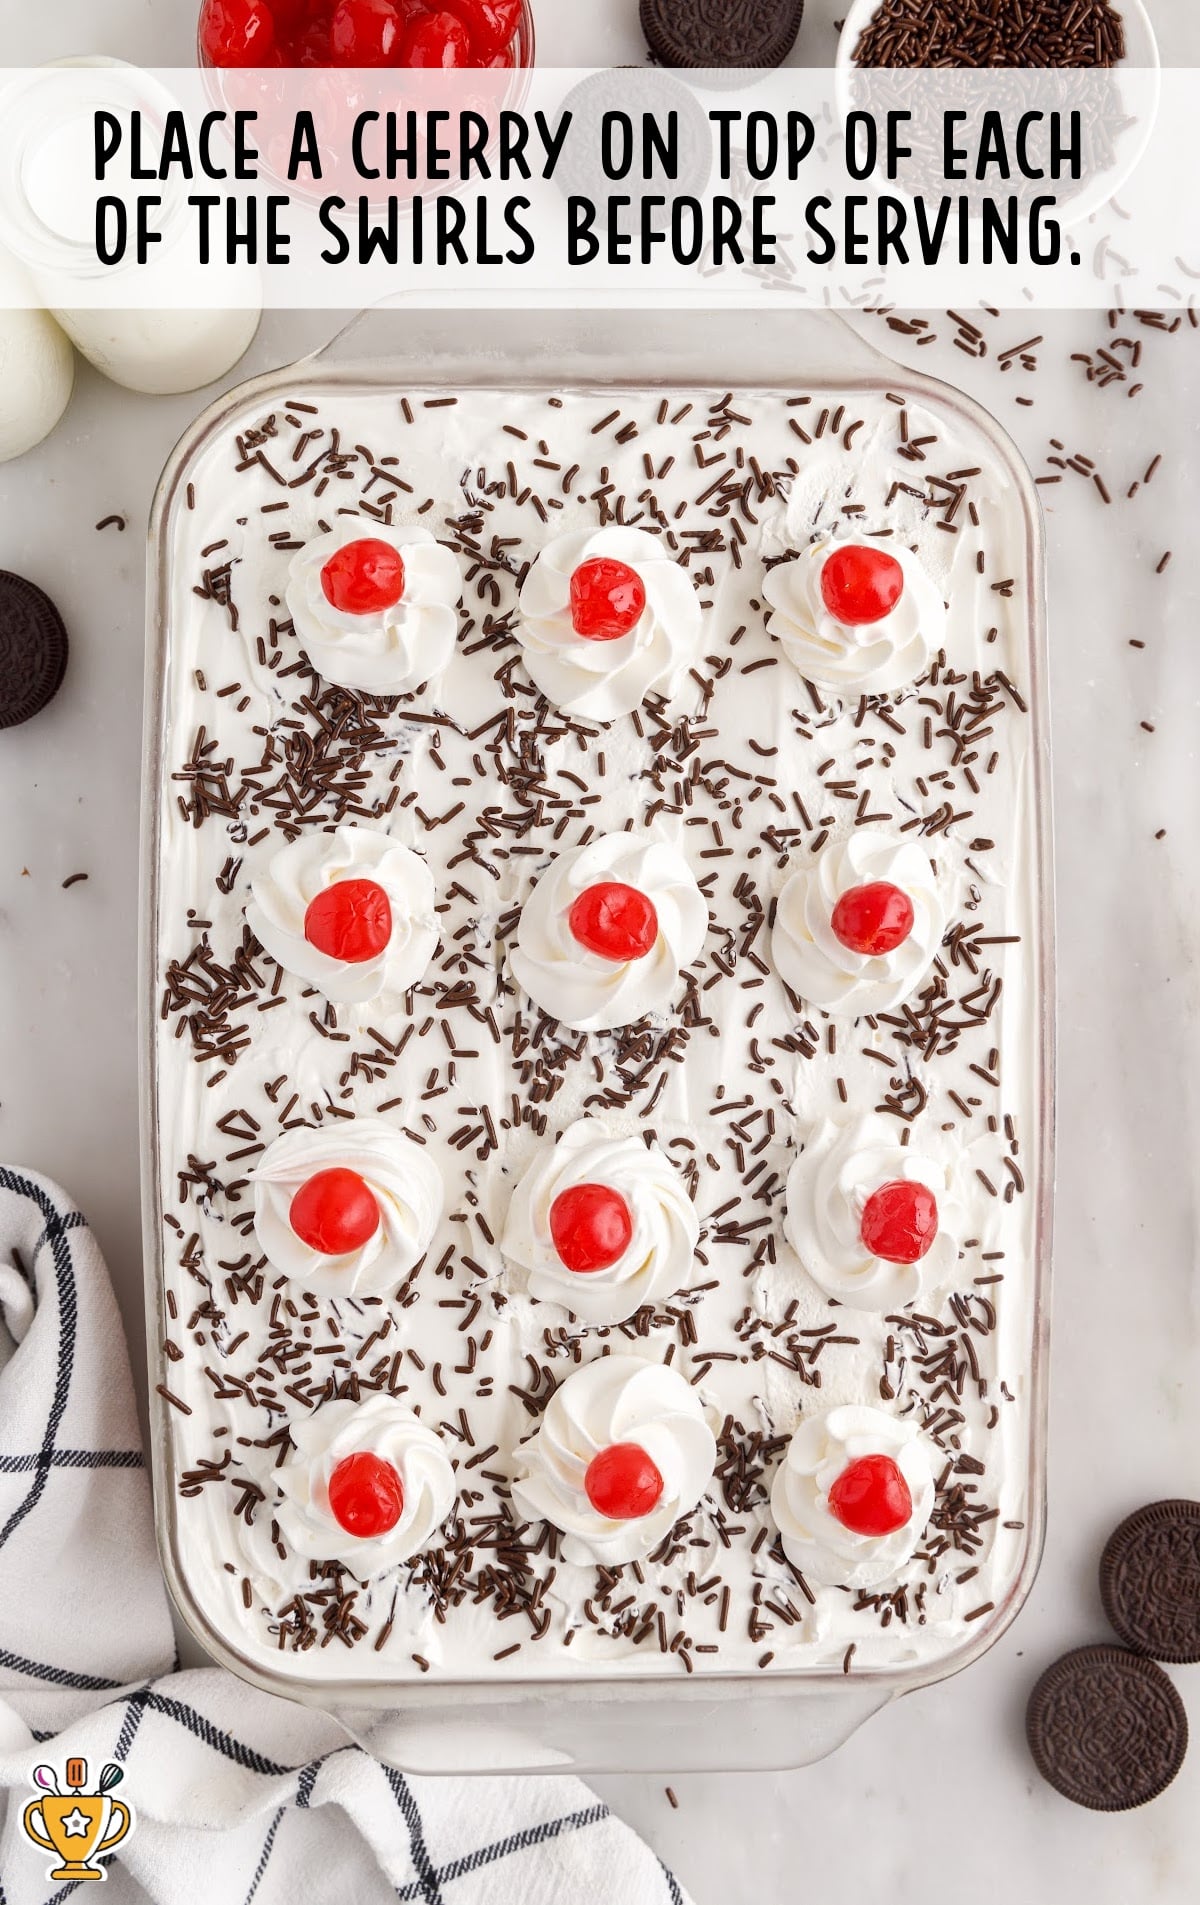
ELEVENTH STEP: Gently place a cherry on top of each piped swirl.
TWELFTH STEP: Cut into pieces and serve.
How To Serve No-Bake Chocolate Cherry Lush
This dessert is perfect for any occasion, any season, and all ages! Its creamy layers make it a crowd favorite. Here are some fun ways to serve it and complementary treats to pair with it.
- Special Occasions: Celebrate birthdays, anniversaries, or holidays with this decadent dessert that feels extra fancy but is super easy to make. Pair it with strawberry mousse or cheesecake stuffed strawberries for an unforgettable treat.
- Seasonal Delights: Serve this recipe in summer when no one wants to heat the oven, or during winter for holiday gatherings. Add hot chocolate or homemade fudge for a cozy pairing.
- Kid-Friendly Fun: Kids will love the chocolate and cherry combination, making it great for birthday parties or family movie nights. Serve it alongside an Oreo milkshake or Fudgesicle for extra smiles!

Why You'll Love this No-Bake Chocolate Cherry Lush
- A Perfect Blend of Flavors: This recipe combines the rich taste of chocolate with the bright, sweet flavor of cherries in every creamy bite. Each layer—from the Oreo crust to the whipped topping—adds a delicious texture that keeps you coming back for more. It’s a dessert that feels indulgent yet simple enough to make anytime.
- Effortless to Prepare: With no baking required, you can whip this dessert together quickly, making it ideal for busy days or last-minute plans. The easy layering process means even beginner bakers can create this stunning treat. It’s the ultimate dessert hack for any occasion.
- Loved by All Ages: The creamy cheesecake layer and cherry pie filling make this a hit with both kids and adults alike. It’s fun to serve at family dinners, where everyone from grandparents to toddlers will enjoy every spoonful.
No-bake chocolate cherry lush is a deliciously simple way to add joy to any gathering!
Recipe FAQ
What’s the difference between chocolate cherry lush, chocolate cherry lasagna, and chocolate cherry delight?
These names all describe the same delicious layered dessert. Each version features soft, creamy layers everyone loves to enjoy!
Can I use a different type of crushed cookie base instead of chocolate sandwich cookies?
Absolutely! Try golden Oreos with banana pudding or chocolate Oreos with pistachio pudding. Match your toppings to complement each flavor.
How many layers does no-bake chocolate cherry lush have?
This dessert has four luscious layers: a crunchy cookie crust, creamy cheesecake, sweet cherry filling, and whipped topping.
Can I make no-bake chocolate cherry lush ahead of time?
Yes, prepare it a day in advance to let the flavors blend perfectly. Chill it until you're ready to serve.
Serving FAQ
What’s the best way to serve no-bake chocolate cherry lush?
Cut the lush into neat squares for easy serving. Arrange them on a platter to showcase the beautiful layers.
Should I garnish no-bake chocolate cherry lush before serving?
Yes, add extra whipped topping or chocolate sprinkles just before serving to make it even more tempting and festive.
Can I serve no-bake chocolate cherry lush in individual portions?
Absolutely! Use small dessert cups or jars to layer the ingredients for a fun, personalized presentation everyone will love.
How long should I let no-bake chocolate cherry lush sit before slicing?
Let it chill for at least four hours, so the layers firm up and the dessert slices cleanly.
Storage FAQ
Follow our tips and tricks for storing and serving no-bake chocolate cherry lush to keep it fresh and delicious. We’ve covered everything you need to enjoy this dessert perfectly every time.
Can I prepare no-bake chocolate cherry lush ahead of time?
Yes, assemble the dessert a day in advance to allow the flavors to meld. Chill it in the refrigerator until serving.
What’s the best way to store leftover no-bake chocolate cherry lush?
Cover the dessert tightly with plastic wrap or store it in an airtight container. Keep it refrigerated for up to seven days.
Can I freeze no-bake chocolate cherry lush for later?
Yes, freeze the dessert in an airtight container for up to three months. Let it thaw in the refrigerator before serving.
How do I serve no-bake chocolate cherry lush after freezing?
Slicing and lifting is easiest when the dessert is still slightly frozen. Once thawed, the dessert is ready to enjoy. Add fresh whipped topping or sprinkles just before serving for a final touch.
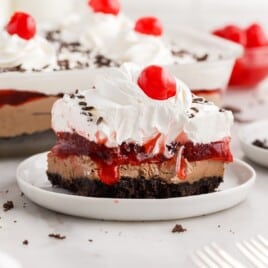
No Bake Chocolate Cherry Lush
No-bake chocolate cherry lush is a rich, layered dessert with creamy cheesecake, sweet cherries, and a crunchy cookie crust. This easy, no-bake treat is perfect for any occasion and will delight everyone with its irresistible flavors!
Did you try this recipe?Let our readers know how it turned out by Leaving a Review!
Ingredients
Oreo Crust
- 14.3 ounces chocolate sandwich cookies. (approximately 36 cookies)
- ⅓ cup salted butter melted (plus more for greasing the pan)
Chocolate Cheesecake Layer
- 16 ounces cream cheese (softened)
- 1 cup powdered sugar
- ¼ cup unsweetened cocoa powder
- 1 teaspoon vanilla extract
- ½ cup half & half ⅓ cup whole milk can be substituted
Other Layers
- 42 ounces cherry pie filling
- 16 ounces frozen whipped topping cool whip (thawed)
- Chocolate sprinkles (optional)
- 16 maraschino cherries (optional)
DIRECTIONS
- Grease a 9×13-inch glass baking dish with butter and set aside.
- In the bowl of a food processor, pulverize the Oreo cookies until small even crumbs form. Add the melted butter to the cookie crumbs and pulse until combined.
- Press the crust mixture into the prepared baking dish and place it in the freezer to chill while preparing the next layer.
- With a hand mixer, beat together cream cheese, powdered sugar, cocoa powder, vanilla extract, and the cream. Continue beating until the mixture is smooth and fluffy.
- Spread the chocolate cheesecake layer over the chilled crust.
- Use a spatula to carefully spread the cherry pie filling evenly over the cheesecake layer (if the cheesecake layer appears too soft, you can chill the dish in the freezer for 15 minutes or so between each layer to help firm up the surface.
- Top with the Cool Whip, reserving about a cup to pipe swirls on top of the lush if you wish.
- Spread the Cool Whip smooth. Sprinkle with chocolate sprinkles.
- Use a piping bag and tip #1M to pipe soft swirls of Cool Whip on top of the lush.
- Place the lush in the freezer to firm up for at least 2 hours.
- Gently place a cherry on top of each piped swirl.
- Cut into pieces and serve.
Notes
- Make sure your cream cheese is at room temperature; otherwise, you will end up with lumps in your cream cheese mixture.
- If the cheesecake layer appears too soft, you can chill the dish in the freezer for 15 minutes or so between each layer to help firm up the surface.
- Chilling even longer or even overnight would allow all the flavors to mingle and blend together even more!
Nutrition
Calories: 393kcal | Carbohydrates: 58g | Protein: 5g | Fat: 17g | Saturated Fat: 8g | Polyunsaturated Fat: 1g | Monounsaturated Fat: 5g | Trans Fat: 0.01g | Cholesterol: 35mg | Sodium: 230mg | Potassium: 246mg | Fiber: 2g | Sugar: 26g | Vitamin A: 606IU | Vitamin C: 3mg | Calcium: 91mg | Iron: 3mg
HAVE YOU TRIED THIS RECIPE?Follow me on Pinterest @bestblogrecipes

Comments
Joy says
If it is chilled overnight do you still have to put it in the freezer first?
Amy T says
Hi Joy, great question! No, if you refrigerate this overnight, the freezing step isn't necessary. Hope you enjoy this as much as I do!