
Last updated on
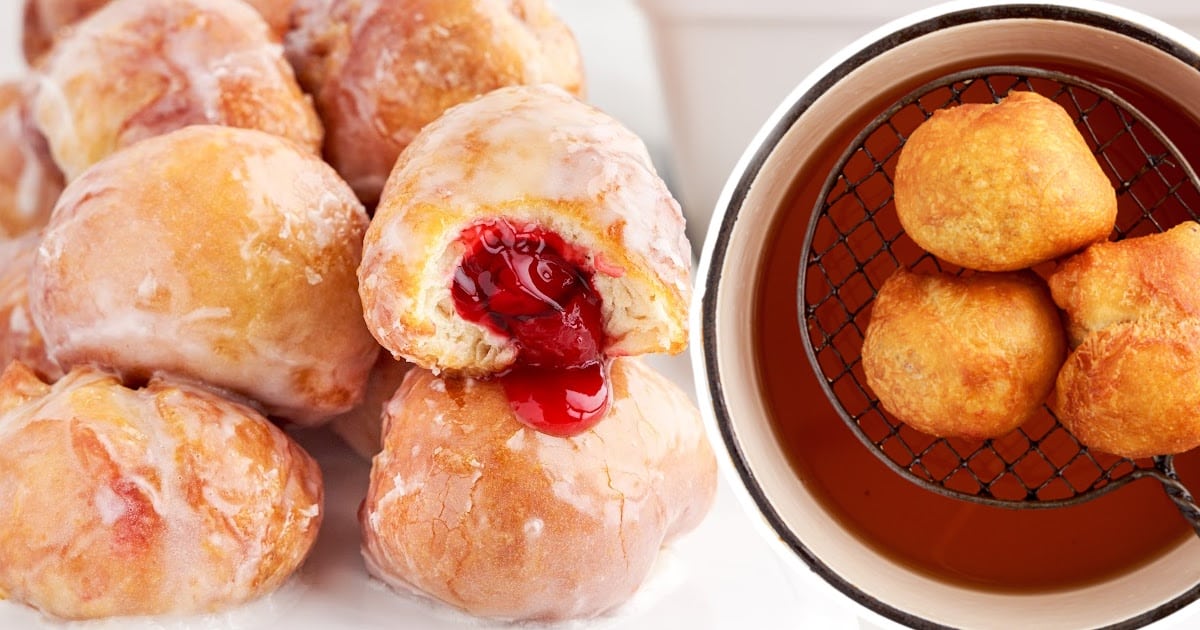
Cherry Pie Bombs

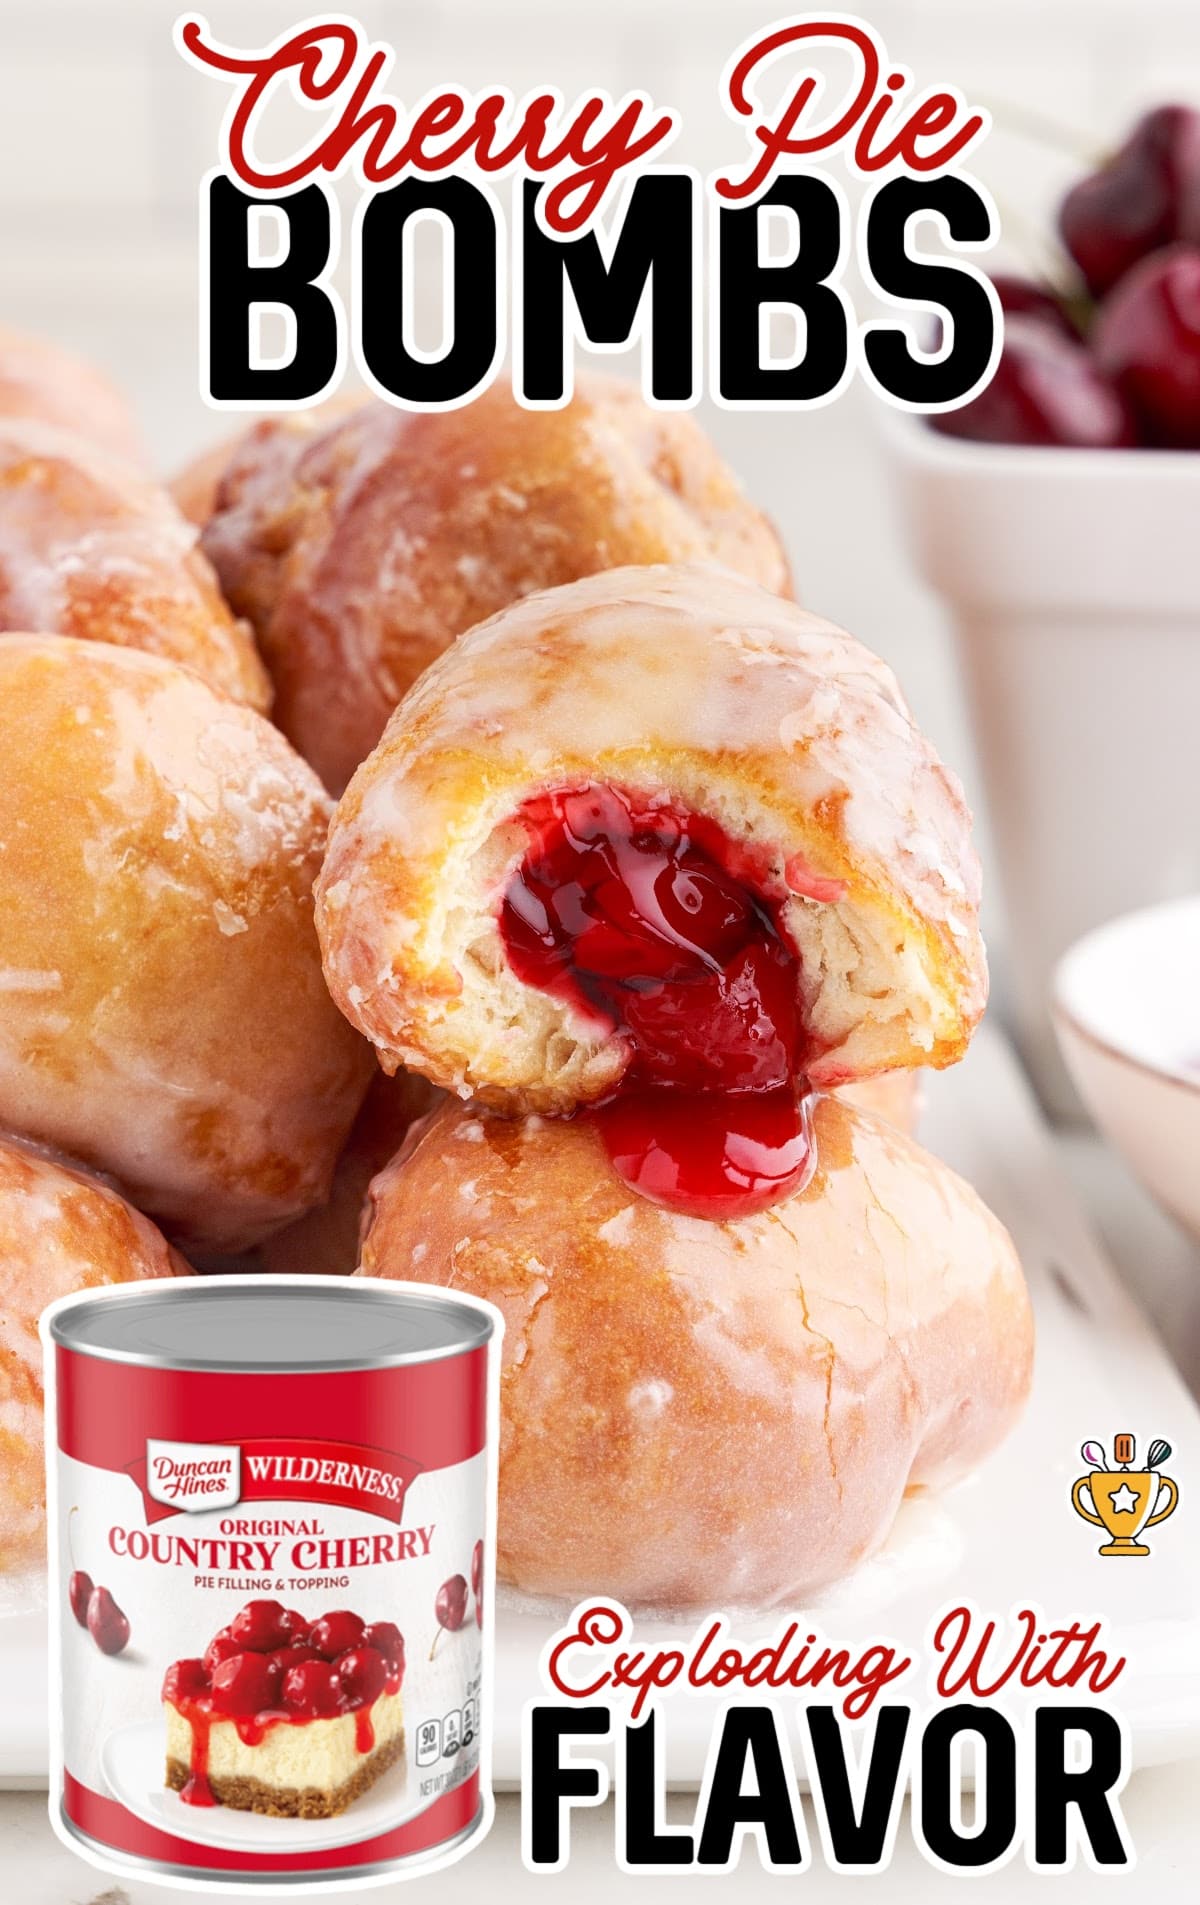
Cherry pie bombs combine buttery biscuits and sweet cherry filling for an easy, irresistible dessert everyone will love. Perfect for parties, holidays, or any time you crave a fruity, golden-brown treat!
Jump to RecipeTable of Contents
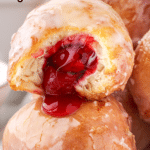


Cherry pie bombs are a delicious, bite-sized treat that combines buttery biscuits with sweet cherry pie filling. These golden-brown goodies have a crispy outside and a warm, gooey center that melts in your mouth. Perfect for parties, holidays, or a fun family dessert, they’ll disappear in minutes. Try them today and delight everyone with their irresistible flavor!
This recipe is super easy to make, and you can follow the detailed guide below for perfect results. We’ve included step-by-step photos and clear directions to help you every step of the way. You’ll also find pro tips, handy tricks, and answers to the most frequently asked recipe questions.
More Recipes ⭐ Cherry Cheesecake Dip | Cherry Cheesecake Tacos | Cherry Cupcakes
Grands biscuits create a flaky, buttery base for these fried cherry pies. The canned cherry pie filling steals the show, adding a burst of fruity sweetness.
The glaze combines powdered sugar and corn syrup, with a splash of milk for a silky-smooth finish.
Ingredients for Cherry Pie Bombs

What you'll need to make this recipe for Cherry Bombs recipe:
- Vegetable oil for frying
- 1 (16.3-ounce) can of Grands “Big” biscuits, flaky
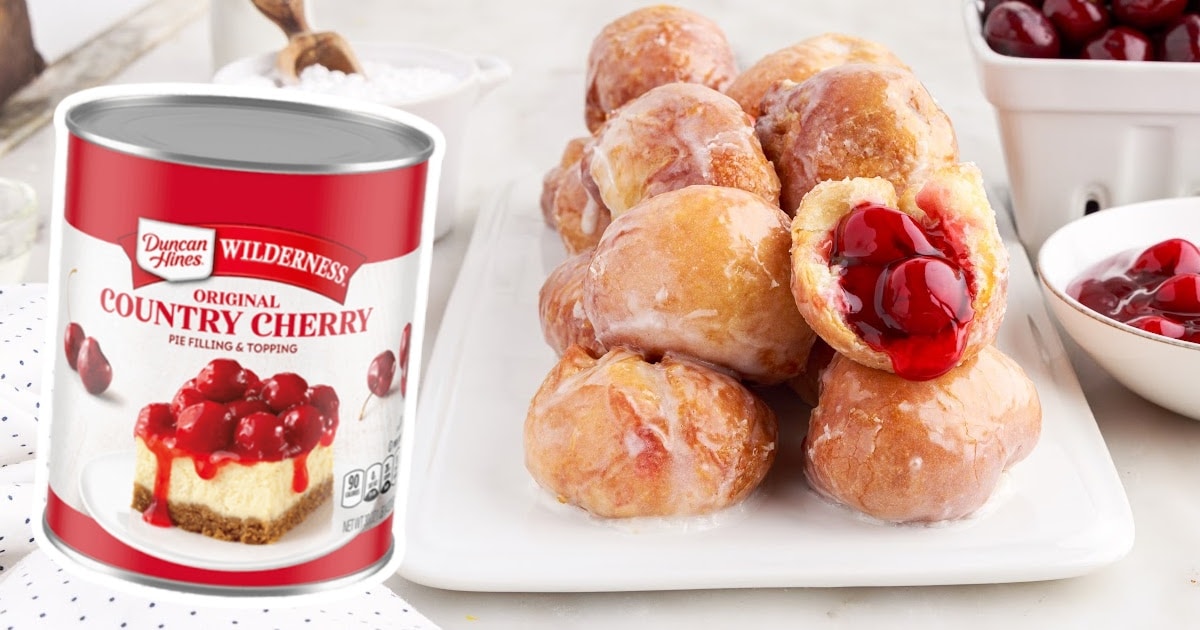
- 1 (21-ounce) can of cherry pie filling
- 2 cups of powdered sugar
- ¼ cup of milk
- 1 tablespoon of light corn syrup
Substitutions and Additions
These swaps and additions make it easy to create your perfect version of cherry pie bombs!
- Substitute Cherry Filling: Try apple, blueberry, or peach pie filling for a different fruity flavor in your cherry pie bombs.
- Substitute Grands Biscuits: While we recommend Grands “Big” biscuits for their size, you can use regular-sized biscuits and make smaller cherry pie bombs. Adjust the amount of filling accordingly.
- Add Spices: Mix a dash of cinnamon or nutmeg into the filling for a warm, spiced flavor perfect for fall.
- Substitute Glaze: Try adding a splash of vanilla extract to the glaze for an extra layer of flavor. You can also experiment with different flavored glazes like lemon or almond to suit your taste.
How to Make Cherry Bombs
Cherry pie bombs are a dessert dream come true, and we will show you how to bake up a batch in no time. Our guide makes it easy and fun to create this delicious recipe at home. Let’s get started!
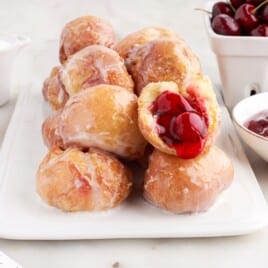
FIRST STEP: Fill a 2 to 3-quart heavy-bottomed saucepan a little over halfway with vegetable oil. You will want this deep enough to cover the dough balls completely. Set it aside.
SECOND STEP: Open the can of biscuits and divide each biscuit in half by pulling apart the “flaky” layers at the center.
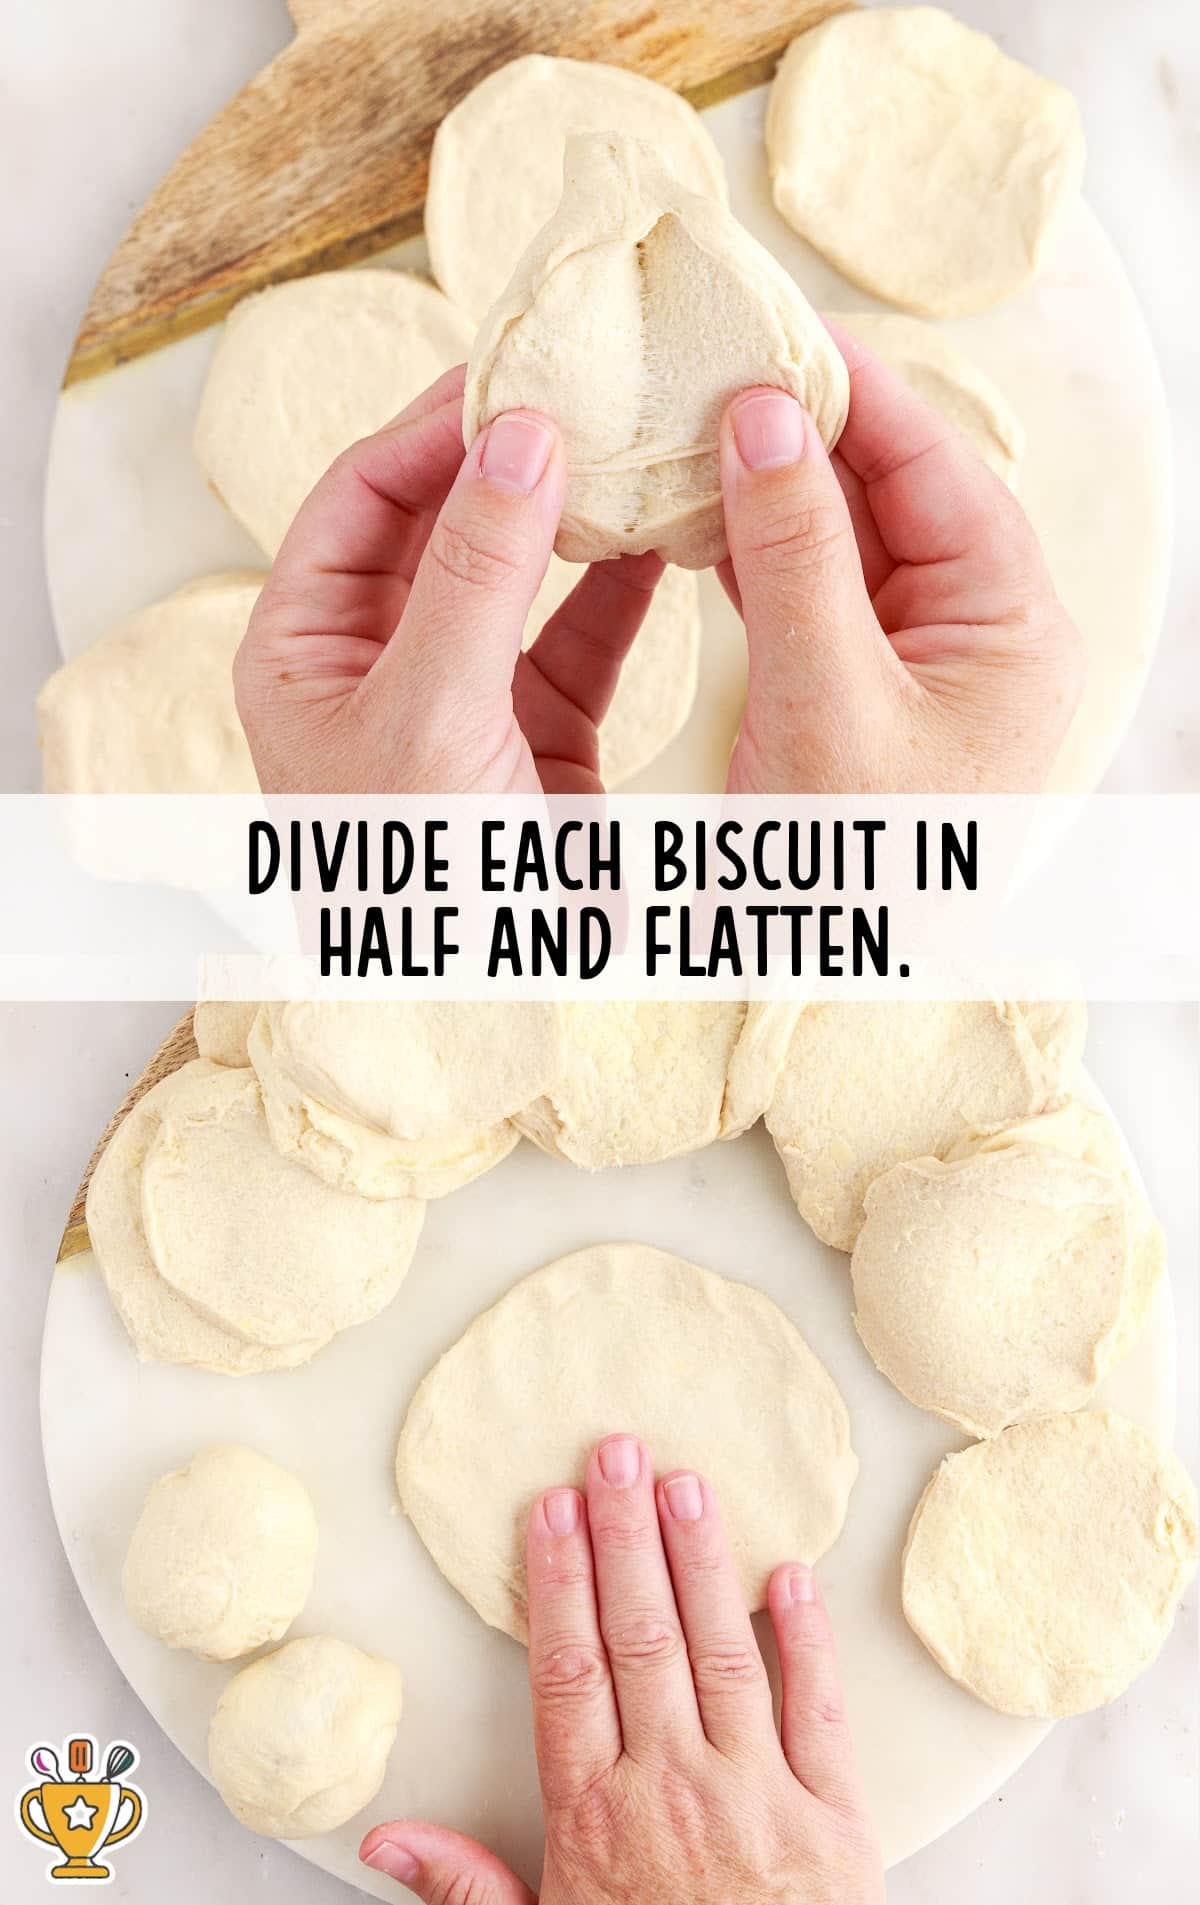
Use your fingers or a rolling pin to flatten the biscuit dough. Don’t roll the dough out thin – just flatten it.
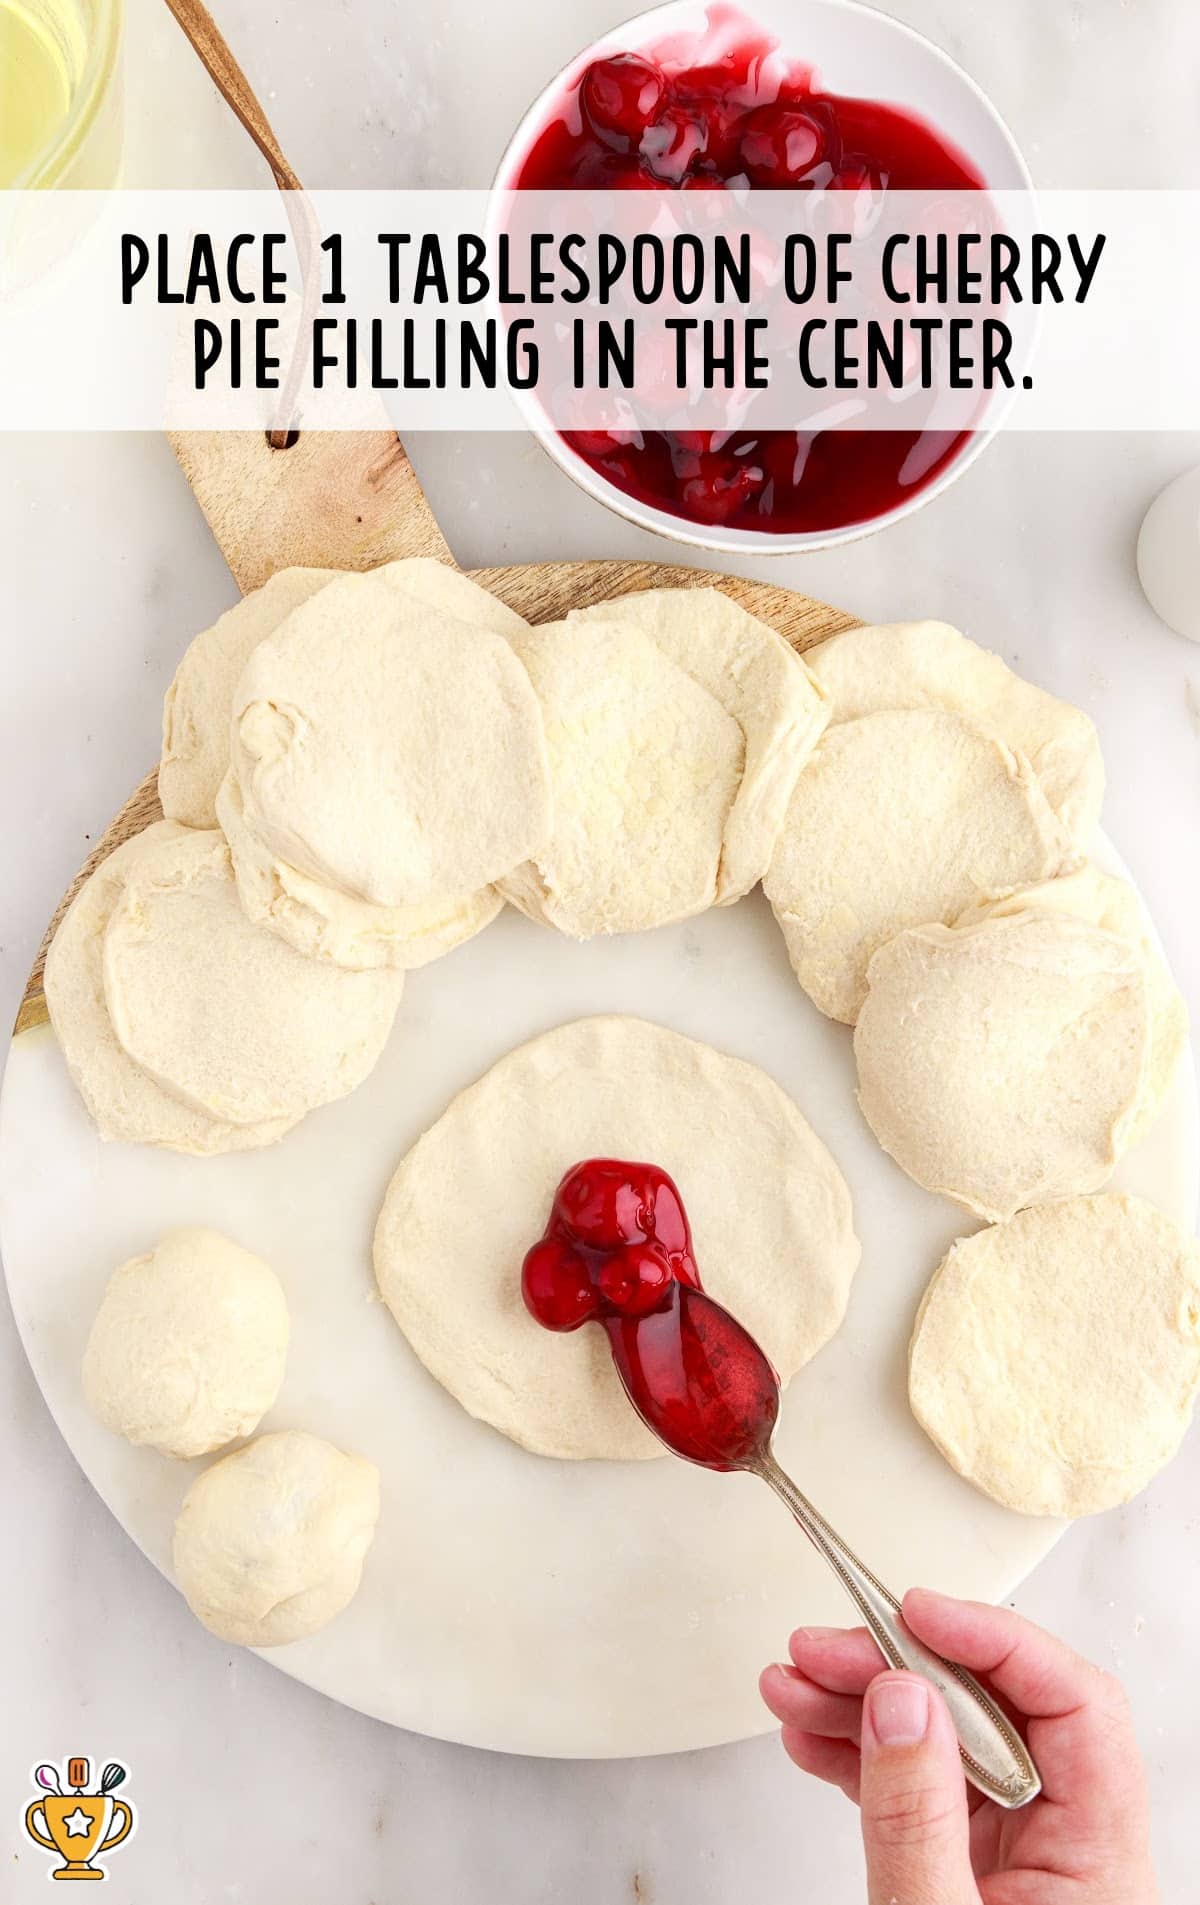
THIRD STEP: Place one tablespoon of cherry pie filling in the center of the dough circle.
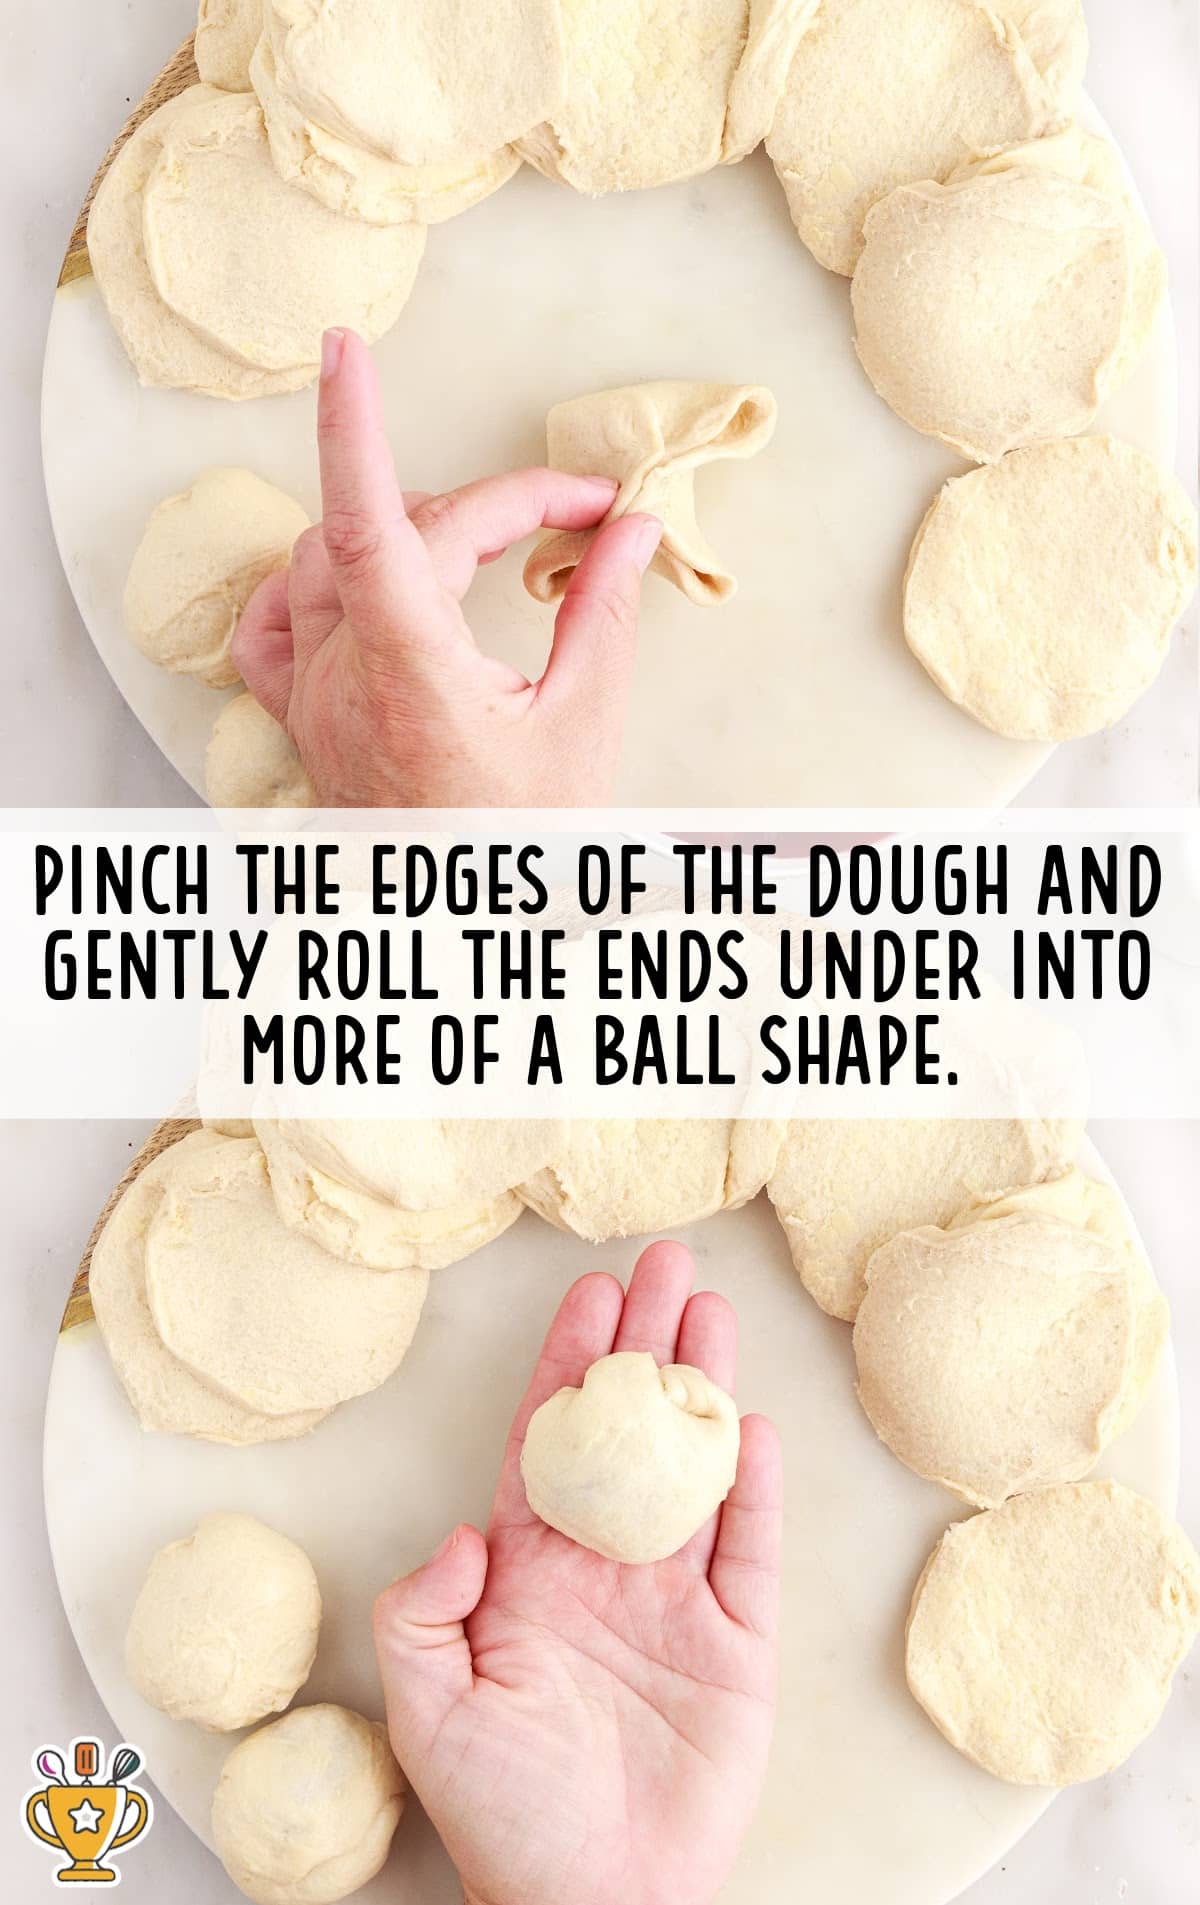
FOURTH STEP: Pinch the edges of the dough together to ensure it does not come apart while frying. Once you have pinched the edges, gently roll the ends under into more of a ball shape.
FIFTH STEP: Heat the oil to precisely 325°F and maintain this temperature throughout frying.
Pro Tip
You can fry several pie bombs at a time; don’t overcrowd. You need the pie bombs to have enough room so that you can turn them to cook evenly and remove them when done.
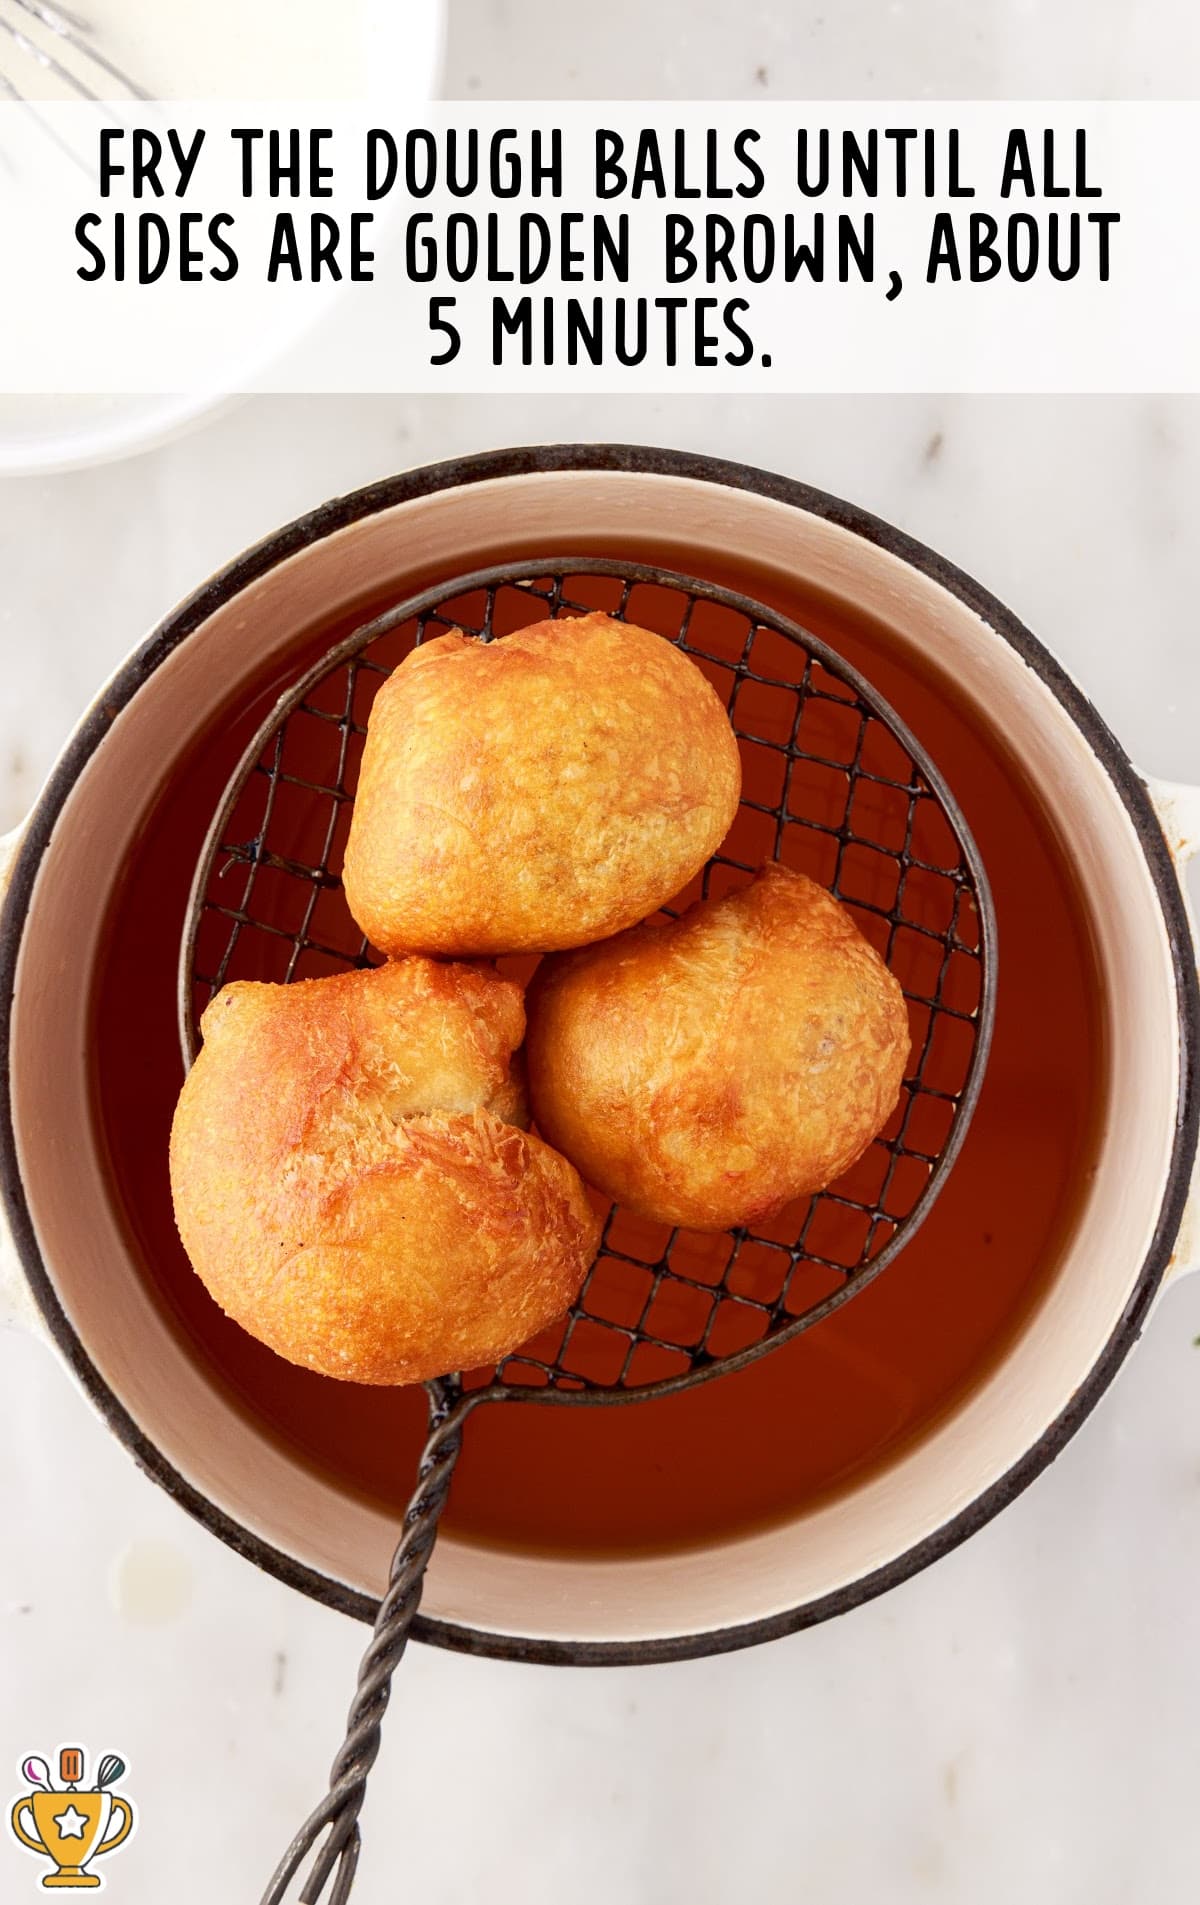
SIXTH STEP: Carefully lower the dough balls into the oil using a slotted metal spoon, cooking two to three at a time.
Use the slotted spoon to roll the balls around in the oil to ensure they do not stick or burn. Fry the dough balls until all sides are a nice golden brown color, about five minutes.
Pro Tip
The pie bombs will have more dough on the side where they were sealed up, which makes that side of the pie bomb heavier.
Use the slotted spoon to turn the pie bombs and hold them as needed in the frying oil to ensure all sides are cooked evenly.
SEVENTH STEP: Be sure to constantly monitor the oil temperature and adjust accordingly. Too hot and you will burn the dough; too low and it will not cook evenly.
Pro Tip
We cook these at 325°F (a little lower than typical) to give the thick dough time to cook all the way through without over-browning.
EIGHTH STEP: Carefully lift the pie bombs out of the oil and transfer them to a plate with several sheets of paper towels to absorb excess oil. Continue frying the rest of the pie bombs.
NINTH STEP: In a small bowl, whisk together the powdered sugar, milk, and corn syrup until smooth to make a sugar glaze.
Pro Tip
The corn syrup in the glaze is optional, but it gives a nice sheen and also helps the glaze set dry to the touch.
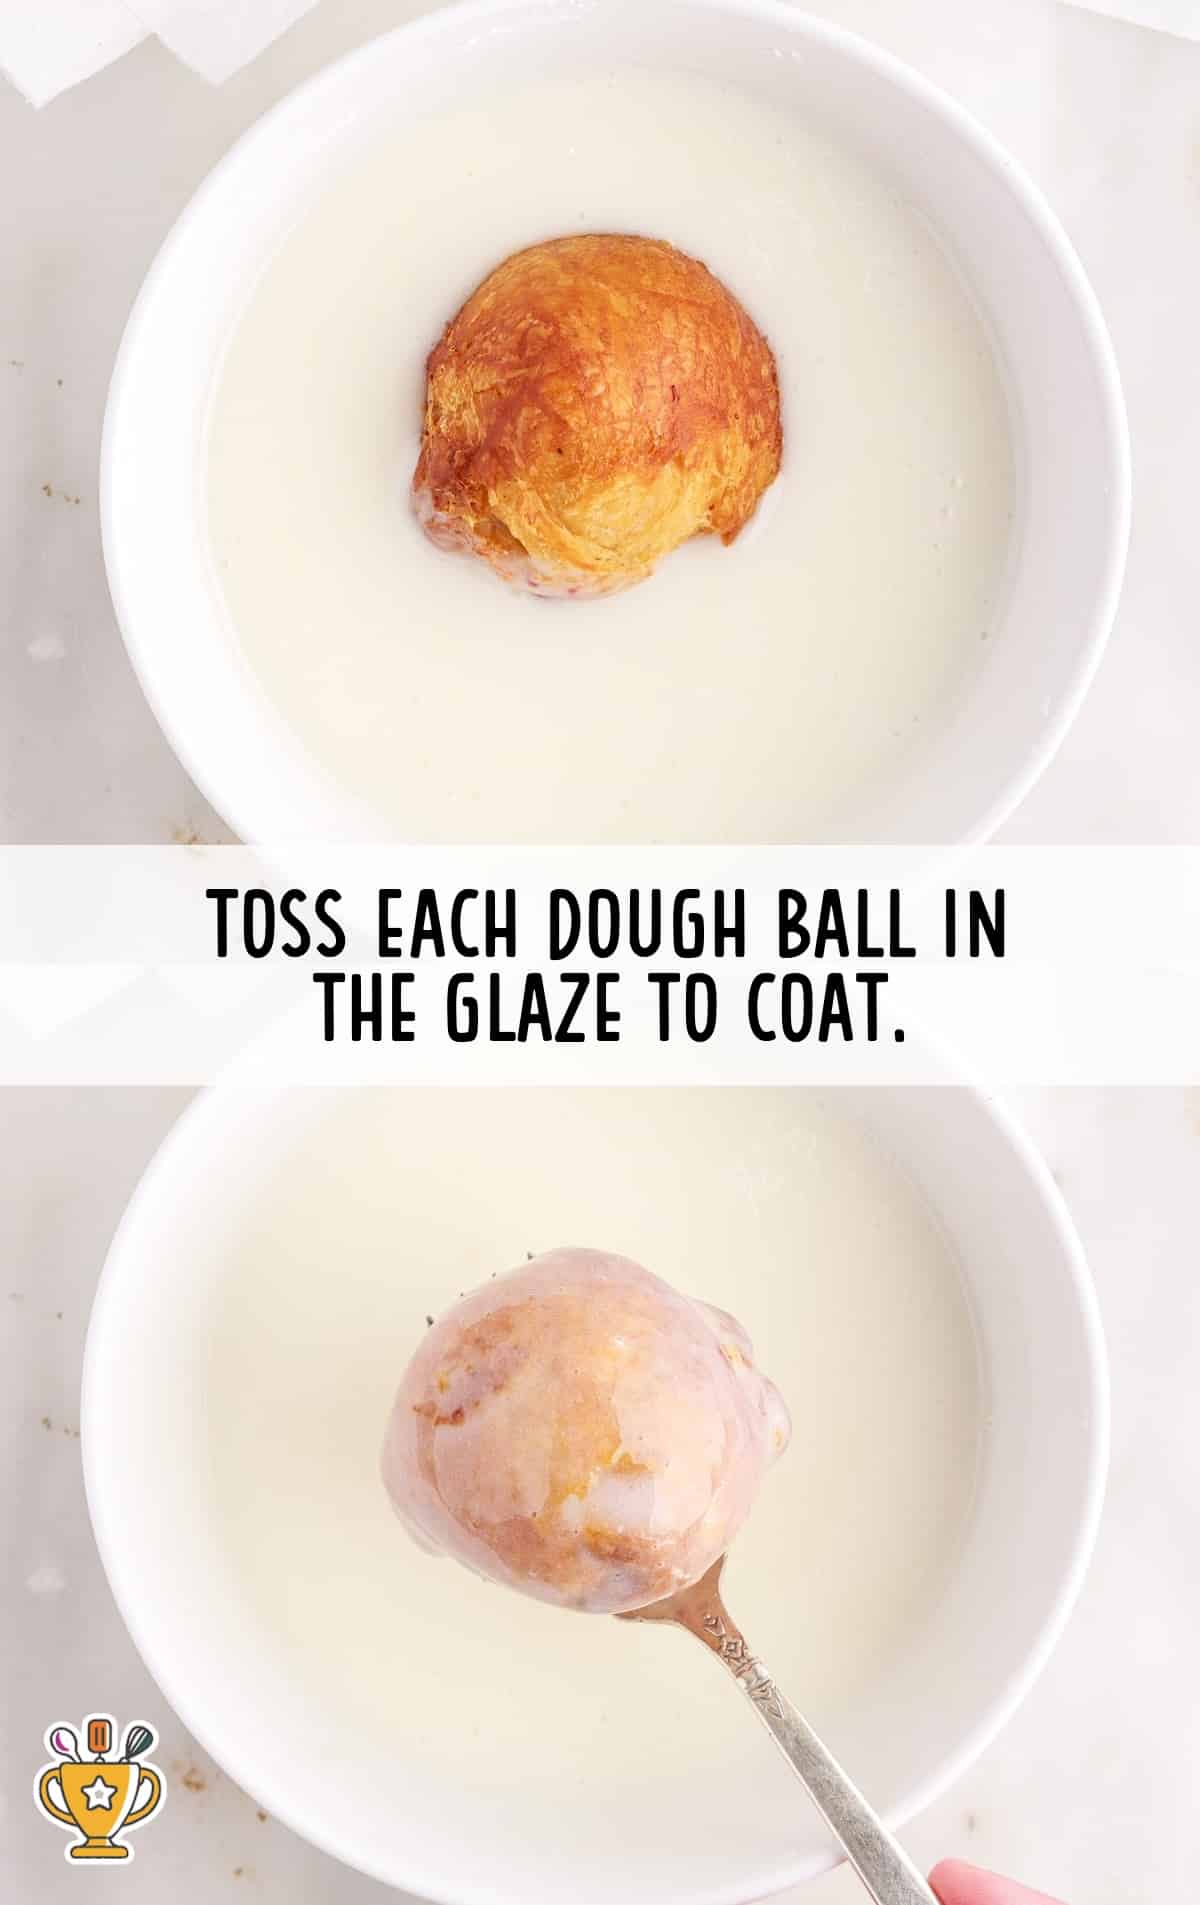
TENTH STEP: Toss each dough ball in the glaze to coat, lift from the mixture, and allow the excess to drip off, then set aside on parchment paper or a cooling rack to set.
ELEVENTH STEP: Serve immediately or allow the glaze to dry (about ten minutes), and then serve.

How To Serve these Cherry Pie Bombs
A cherry pie bomb will be a hit for any occasion, for any season. Kids and adults alike will love their fruity sweetness and flaky crust. Here are three fun ways to serve this recipe:
- Perfect for Parties and Holidays: Surprise your guests at a potluck with these bite-sized treats, as well as our lemon brownies or cheesecake bites. They’re easy to transport and always a hit. They add a sweet and festive touch to any dessert table.
- A Sweet Summer Treat: These pie bombs are ideal for summer barbecues or picnics with their fruity filling and golden, crispy shell. Pair them with iced tea or a no-bake cheesecake to create a refreshing and satisfying dessert spread.
- Kid-Friendly Desserts: Kids love the gooey cherry filling and flaky biscuit crust, making this recipe a hit at birthdays or family dinners. Serve them alongside peanut butter fudge or oatmeal chocolate chip cookies for a dessert selection that keeps everyone smiling.

Why You'll Love This Recipe
We love cherry pie bombs for many reasons. We know you will too!
- A Burst of Flavor in Every Bite: The buttery biscuit crust perfectly complements the rich, fruity cherry pie filling, creating a heavenly combination of flavors. Every bite delivers the ideal balance of sweetness and crispiness, making these irresistible treats perfect for any occasion.
- Quick and Easy to Make: Even if you're new to baking, you'll find making cherry pie bombs straightforward and satisfying. This recipe comes together quickly, using simple ingredients that you may already have in your kitchen. The straightforward instructions ensure you’ll enjoy warm, golden cherry pie bombs in no time. It’s a foolproof dessert that everyone can master.
- A Fun Dessert for All Ages: Cherry pie bombs bring joy to kids and adults alike, with their handheld size and gooey, flavorful filling. They’re a versatile dessert that adds a touch of fun to any gathering or casual family night.
Recipe FAQ
What’s the best way to shape the biscuits for cherry pie bombs?
Flatten each biscuit slightly and create a small well in the center to hold the cherry pie filling securely.
How do I seal the cherry pie bombs so the filling doesn’t leak?
Pinch the edges of the biscuit dough tightly around the filling, ensuring there are no gaps or openings.
How many cherries should I use in each pie bomb?
Add two or three cherries with a bit of filling to each biscuit to keep them easy to close and bake evenly.
What is the best type of oil for frying? Choose vegetable, canola, or peanut oil because they can handle high heat well.
Serving FAQ
What’s the best way to serve cherry pie bombs at a party?
Arrange the pie bombs on a platter for easy grabbing. Their bite-sized shape makes them perfect for party snacks.
Should cherry pie bombs be served warm or cooled?
Serve them warm for a gooey, comforting dessert or at room temperature for a quick and easy treat.
Can I dust cherry pie bombs with powdered sugar before serving?
Yes, a light dusting of powdered sugar adds a pretty touch and enhances their sweetness for a picture-perfect presentation.
Are cherry pie bombs suitable for individual servings?
Their compact size makes them ideal for individual portions, so everyone gets their own delicious bite.

Storage FAQ
To make the most of your cherry pie bombs, from making ahead to storage, here are some helpful tips:
MAKE AHEAD: Prepare your pie bombs in advance and freeze them. Cook them fresh later for the best flavor and texture.
IN THE FRIDGE: Store leftover pie bombs in an airtight container in the refrigerator, and enjoy them within one day.
IN THE FREEZER: Place uncooked pie bombs in a freezer-safe bag or container to store for up to three months. Cook them straight from frozen, adding a little extra time.
REHEATING: Reheat using an oven, air fryer, or microwave to warm them quickly while keeping the outside perfectly crispy.
More Cherry Dessert Recipes

Cherry Pie Bombs
Cherry pie bombs combine buttery biscuits and sweet cherry filling for an easy, irresistible dessert everyone will love. Perfect for parties, holidays, or any time you crave a fruity, golden-brown treat!
Did you try this recipe?Let our readers know how it turned out by Leaving a Review!
Ingredients
- Vegetable oil (for frying)
- 16.3 ounces Grands “Big” biscuits (flaky)
- 21 ounces cherry pie filling
- 2 cups powdered sugar
- ¼ cup milk
- 1 tablespoon light corn syrup
DIRECTIONS
- Fill a 2 to 3-quart heavy-bottomed saucepan a little over ½ way with vegetable oil. You will want this deep enough to cover the dough balls completely. Set it aside.
- Open the can of biscuits and divide each biscuit in half by pulling apart the “flaky” layers at the center. Use your fingers or a rolling pin to flatten the biscuit dough. Don’t roll the dough out thin – just flatten it.
- Place 1 tablespoon of cherry pie filling in the center of the dough circle.
- Pinch the edges of the dough together to ensure it does not come apart while frying. Once you have pinched the edges, gently roll the ends under into more of a ball shape.
- Heat the oil to precisely 325°F and maintain this temperature throughout frying.
- Carefully lower the dough balls into the oil using a slotted metal spoon, cooking 2-3 at a time. Use the slotted spoon to roll the balls around in the oil to ensure they do not stick or burn. Fry the dough balls until all sides are golden brown, about 5 minutes.
- Be sure to constantly monitor the oil temperature and adjust accordingly. Too hot and you will burn the dough; too low and it will not cook evenly.
- Carefully lift the pie bombs out of the oil and transfer them to a plate with several sheets of paper towels to absorb excess oil. Continue frying the rest of the pie bombs.
- In a small bowl, whisk together the powdered sugar, milk, and corn syrup until smooth to make a sugar glaze.
- Toss each dough ball in the glaze to coat, lift from the mixture, and allow the excess to drip off, then set aside on parchment paper or a cooling rack to set.
- Serve immediately or allow the glaze to dry (about 10 minutes), and then serve.
Notes
- You can fry several pie bombs at a time; don’t overcrowd. You need the pie bombs to have enough room so that you can turn them to cook evenly and remove them when done.
- The pie bombs will have more dough on the side where they were sealed up, which makes that side of the pie bomb heavier. Use the slotted spoon to turn the pie bombs and hold them as needed in the frying oil to ensure all sides are cooked evenly.
- We cook these at 325°F (a little lower than typical) to give the thick dough time to cook all the way through without over-browning.
- The corn syrup in the glaze is optional, but it gives a nice sheen and also helps the glaze set dry to the touch.
Nutrition
Calories: 213kcal | Carbohydrates: 41g | Protein: 2g | Fat: 5g | Saturated Fat: 1g | Polyunsaturated Fat: 2g | Monounsaturated Fat: 2g | Cholesterol: 1mg | Sodium: 281mg | Potassium: 110mg | Fiber: 1g | Sugar: 17g | Vitamin A: 83IU | Vitamin C: 1mg | Calcium: 23mg | Iron: 1mg
HAVE YOU TRIED THIS RECIPE?Follow me on Pinterest @bestblogrecipes

Leave a Comment