
Published on
Strawberries and Cream Cheesecake
This strawberries and cream cheesecake layers a vanilla cheesecake and a strawberry cheesecake in one impressive, bakery-style dessert. With a buttery graham cracker crust, a silky filling in two distinct colors, and a finishing touch of whipped cream and fresh strawberries, it's a showstopper that's easier to make than it looks.
Jump to RecipeTable of Contents
- Ingredients For Strawberries and Cream Cheesecake
- Ingredient Substitutions
- Tips for the Best Strawberries and Cream Cheesecake
- How to Make Strawberries and Cream Cheesecake
- To Use A Water Bath Or Not?
- The Jiggle Test: How to Know When It's Done
- How to Remove From the Pan and Decorate
- JUMP TO RECIPE
- Frequently Asked Questions


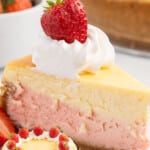
Some desserts look like they belong in a bakery case, and this strawberries and cream cheesecake is one of them. Underneath that impressive pink-and-white layered look is a recipe that's genuinely simple to make, even if you've never made a cheesecake from scratch before.
This cheesecake pairs a buttery graham cracker crust with a filling that's half classic vanilla and half blushing strawberry, all finished with billowy whipped cream and a fresh strawberry on every slice. It's rich without being heavy, and it's the kind of dessert that makes people ask for the recipe before they've even finished their plate.
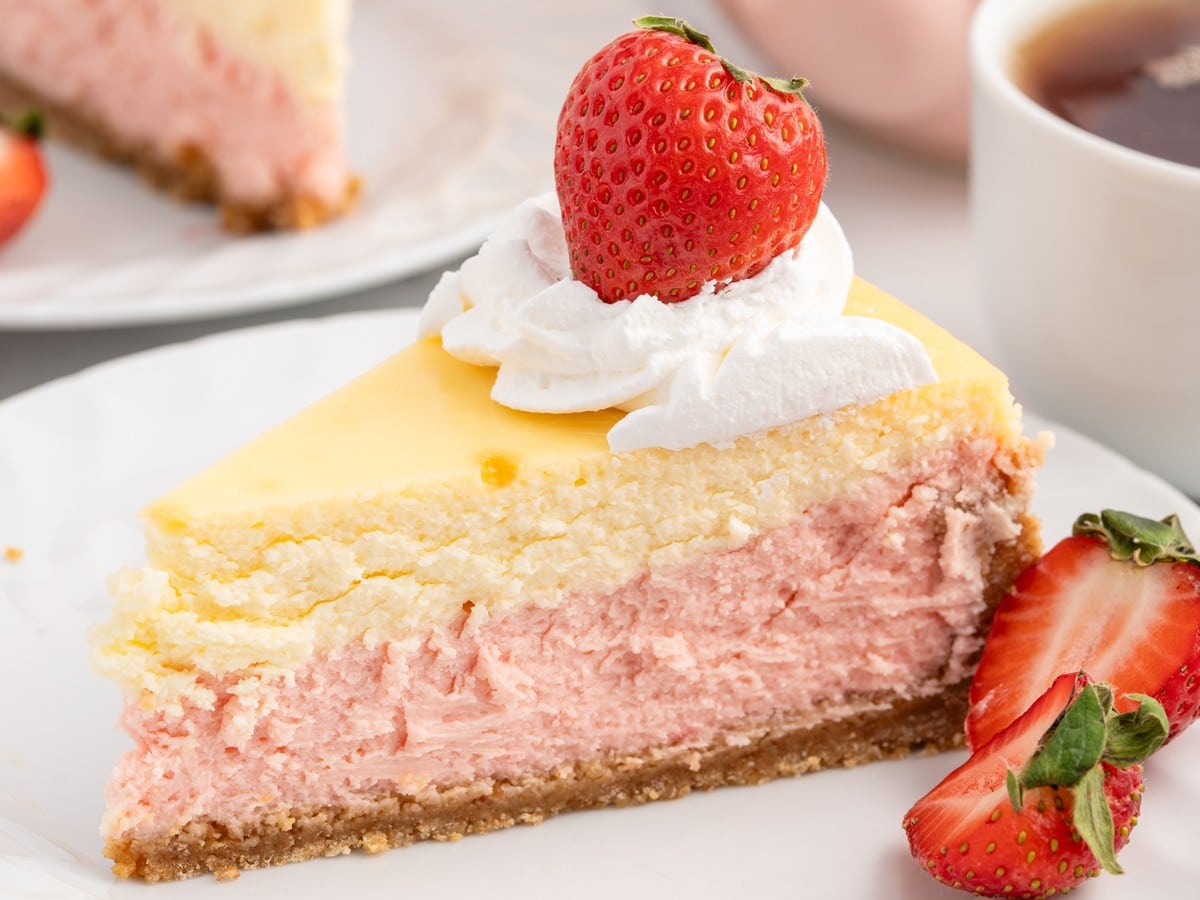
The first time I made this cheesecake, I was nervous about getting those two layers to stay separate instead of swirling together. Turns out the trick is simple: spoon the batter on instead of pouring it, and the layers set up clean and distinct every time. No special skill required, just a little patience.
Also, I've included two ways to bake it (with or without a water bath), tips for getting perfectly clean layers, and answers to just about every substitution question you might have.
Ingredients For Strawberries and Cream Cheesecake
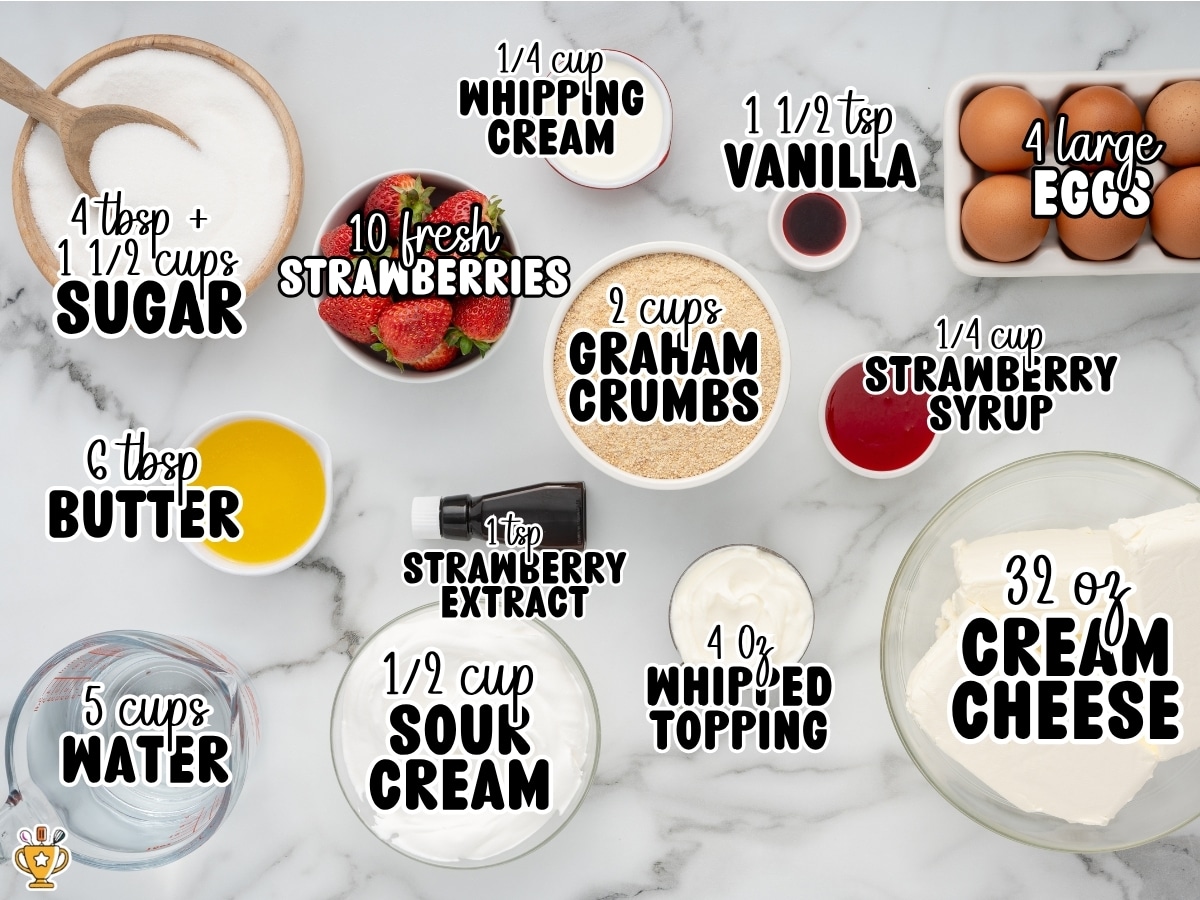
What you'll need to make strawberries and cream cheesecake:
Graham Cracker Crust
- 2 cups graham cracker crumbs - Store-bought crumbs work great, or pulse whole graham crackers in a food processor.
- 4 tablespoons granulated sugar
- 6 tablespoons unsalted butter, melted
- 4 to 5 cups boiling water (for the water bath)
Cheesecake Filling
- 32 ounces full-fat cream cheese, (four 8-ounce blocks) - Use full-fat, brick-style cream cheese, softened to room temperature. Whipped or tub-style cream cheese has too much air and water content and won't set up properly.
- 1½ cups granulated sugar
- 1½ teaspoons vanilla extract
- 4 large eggs - Room temperature eggs incorporate more smoothly and help prevent overmixing.
- ½ cup full-fat sour cream - Adds tang and helps keep the filling silky. Full-fat is important here for the right texture.
- ¼ cup heavy whipping cream - Used in the filling for richness, and again for the whipped cream garnish.
- ¼ cup strawberry syrup - This is what gives the strawberry layer its color and flavor without watering down the batter.
- ½ to 1 teaspoon strawberry extract, optional, for a more intense strawberry flavor
Garnish
- 4 ounces frozen whipped topping, thawed
- 10 small fresh whole strawberries
Ingredient Substitutions
Ingredient Substitutions
Graham cracker crumbs – Chocolate graham crumbs or Oreo cookie crumbs work well in place of graham crackers if that's what you have on hand.
Sour cream – Full-fat Greek yogurt can be used in place of sour cream in equal amounts. Non-fat or low-fat yogurt won't work here; the batter will end up too thin.
Heavy whipping cream – This needs to stay full-fat for both the filling and the whipped cream garnish. Lower-fat creams won't whip properly or add the right richness to the filling.
Strawberry syrup – If you can't find strawberry syrup, you can leave it out and rely on the strawberry extract alone for flavor. Add a small amount of pink food coloring if you want to replicate the pink hue.
Strawberry extract – This is optional in the original recipe, so it can simply be left out if you want. The strawberry flavor will be less intense.
Frozen whipped topping – Homemade whipped cream can be used instead.
Tips for the Best Strawberries and Cream Cheesecake
This is a forgiving cheesecake recipe, but there are a few things that can help ensure success and make it easier to come together.
- Use room temperature ingredients. This is true of any cheesecake you make. Cold cream cheese and eggs won't blend smoothly, and you'll end up with a lumpy, flat batter. Pull your cream cheese out of the fridge at least an hour or two before you start.
- Don't overmix. Beat just until each ingredient is incorporated. Overmixing adds too much air to the batter, and those air bubbles are one of the main causes of cracks as the cheesecake bakes and cools.
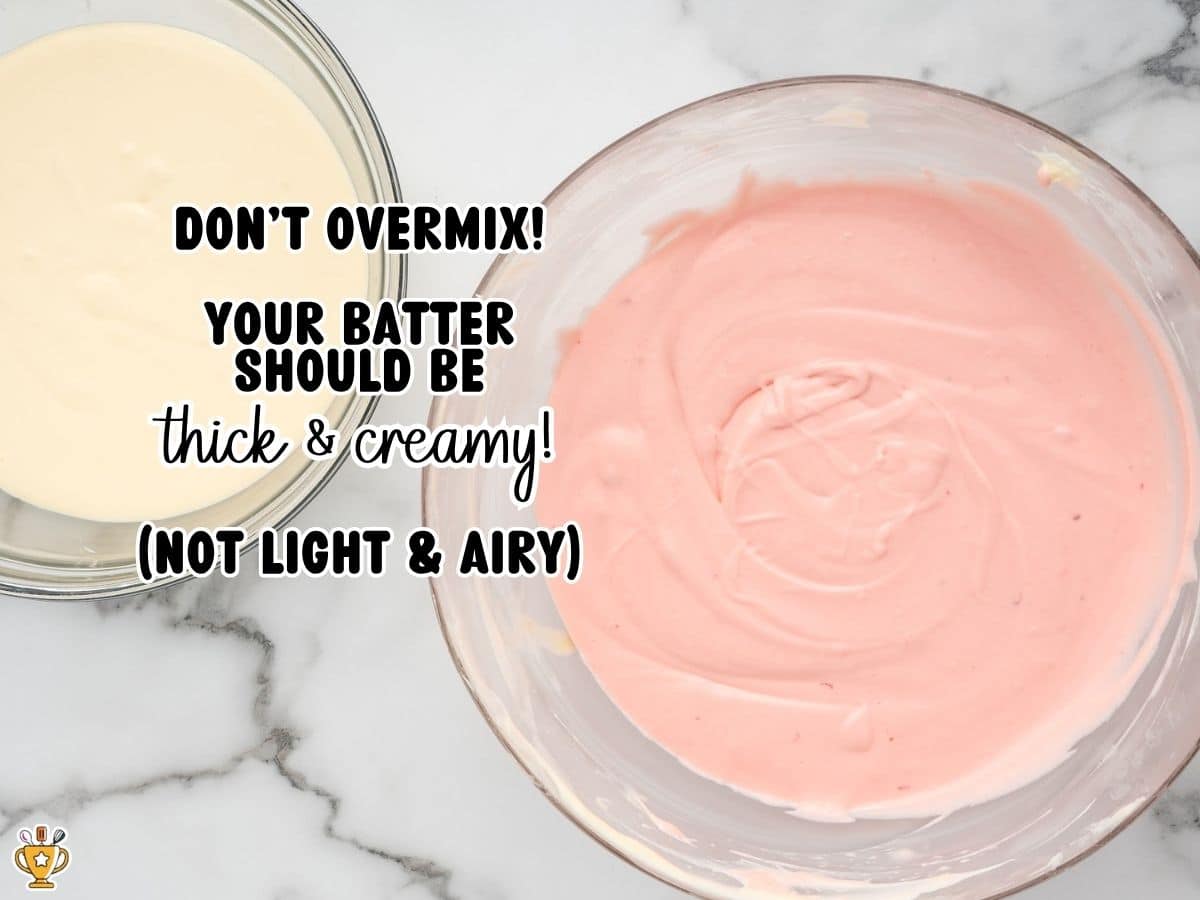
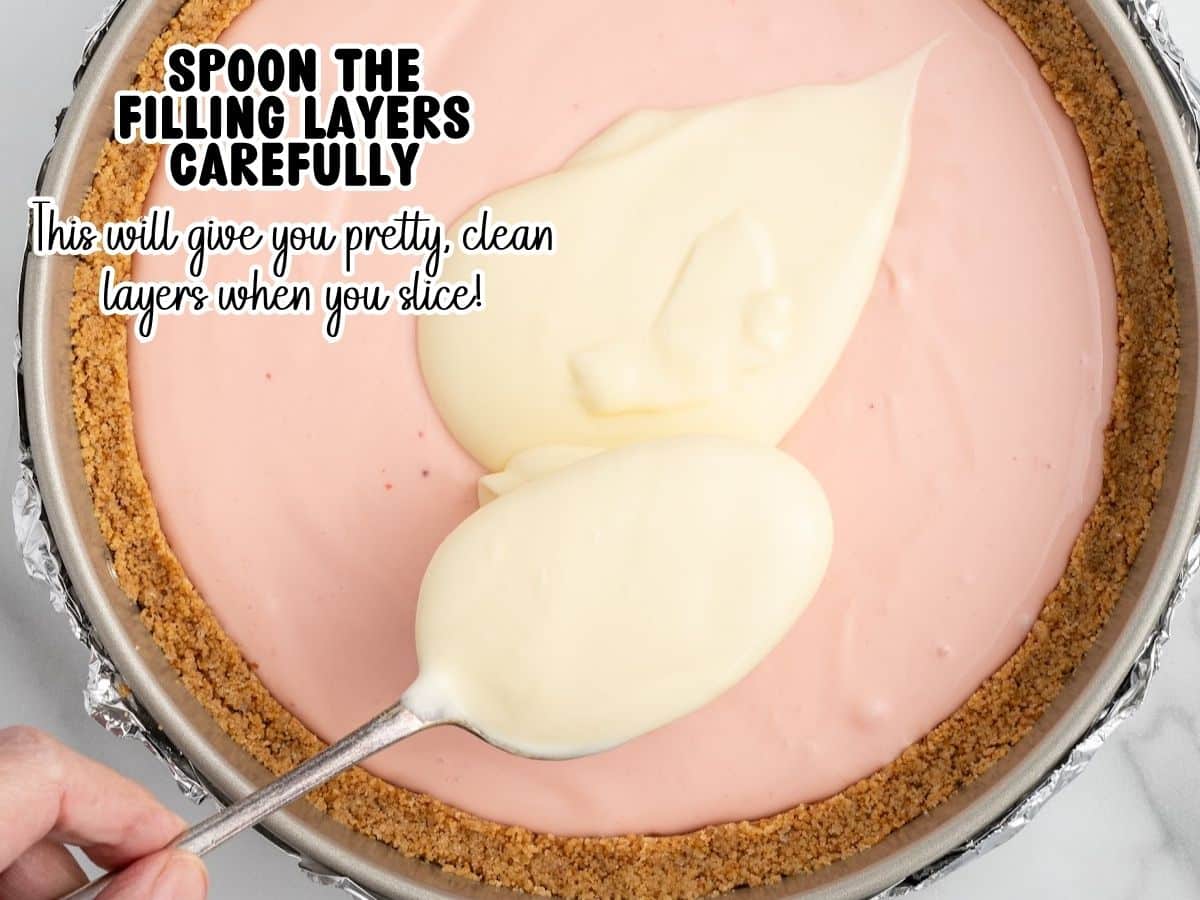
- Spoon, don't pour, when layering. Pouring the second layer of batter on top of the first tends to blend the two colors together into a swirl instead of clean layers. Spooning it on gently in dollops, then smoothing it out with an offset spatula, keeps the strawberry and vanilla layers distinct.
- Watch it in the last 15 minutes. If the top starts browning too quickly before the bake time is up, loosely tent it with foil (fold it into a tent shape rather than pressing it directly onto the cheesecake) so it doesn't trap moisture.
- Chill it fully before slicing. Even if the cheesecake looks set, it needs the full chilling time to firm up completely. Cutting into it too soon is the most common reason a slice looks softer or messier than expected.
- Use a hot, clean knife for neat slices. Dip your knife in hot water and wipe it dry between each cut. This keeps the layers looking crisp instead of dragging crumbs or filling through the cut.
How to Make Strawberries and Cream Cheesecake
See the recipe card (at the bottom of the post) for the full instructions.
FIRST STEP: Make the crust. Combine graham cracker crumbs, sugar, and melted butter, then press the mixture into the bottom and up the sides of a foil-wrapped springform pan. Bake for 10 minutes, then set aside.
SECOND STEP: Make the filling. Beat the cream cheese and sugar until smooth, then mix in the vanilla and eggs one at a time. Add the sour cream and heavy whipping cream.
THIRD STEP: Split and tint the batter. Divide the filling in half. Stir the strawberry syrup (and extract, if using) into one half until it's a uniform pink with no white streaks.
FOURTH STEP: Layer carefully. Pour the strawberry batter into the crust first. Then spoon the plain batter on top in dollops rather than pouring it, gently spreading it into an even layer. Spooning instead of pouring is what keeps the two layers distinct instead of swirling together.
FIFTH STEP: Bake in a water bath. Place the pan in a larger roasting pan, add boiling water, and bake low and slow until just set with a slight jiggle in the center.
SIXTH STEP: Cool gradually, then chill. Let the cheesecake cool in the oven with the door cracked, then refrigerate for at least 8 hours, or overnight.
SEVENTH STEP: Decorate and serve. Top with whipped cream dollops and a fresh strawberry on each slice.
To Use A Water Bath Or Not?
How to Bake With a Water Bath
Pros: Produces the most even bake and the smoothest, crack-free texture. It's the more foolproof method if a flawless top matters to you.
Cons: Requires wrapping the pan in foil and managing hot water, which adds a few extra steps and some risk of leaks if the foil isn't sealed well.
- Wrap the outside of your springform pan tightly in two layers of heavy-duty foil so no water can seep in.
- Place the wrapped pan inside a larger roasting pan, then pour boiling water into the roasting pan until it comes about one inch up the side of the springform pan.
- Bake low and slow, then let the cheesecake cool gradually in the turned-off oven with the door cracked before chilling.
How to Bake Without a Water Bath
Pros: Simpler and faster to set up, with no foil wrapping or hot water to deal with.
Cons: Higher risk of cracking, since the cheesecake bakes in a drier environment. Since this cheesecake is topped with whipped cream and strawberries, minor surface cracks won't be visible once it's decorated.
- Let the cheesecake cool gradually at room temperature before transferring it to the fridge to chill.
- Skip the foil wrapping and roasting pan. Place the springform pan directly on the middle oven rack.
- Bake at the same temperature, checking a few minutes early since it may finish slightly faster without the extra moisture.
The Jiggle Test: How to Know When It's Done
Your cheesecake is ready when the edges look set and slightly puffed, but the center still has a gentle wobble when you nudge the pan, similar to Jell-O. It should move as one cohesive layer, not slosh like liquid.
If the center looks completely wet or ripples like water, it needs more time. If it looks puffed, cracked, or the wobble is gone entirely, it's likely overbaked.
Don't worry if it still seems slightly underdone at the end of the bake time. The residual heat and the gradual cooling process will finish setting the center, so pulling it a little early is safer than overbaking.
How to Remove From the Pan and Decorate
Once your cheesecake has chilled for at least 8 hours, unclip and remove the sides of the springform pan. If it feels like it's sticking or resisting at all, run a thin knife gently around the edge first to loosen it before releasing the sides. Don't try to remove it before it's fully chilled.
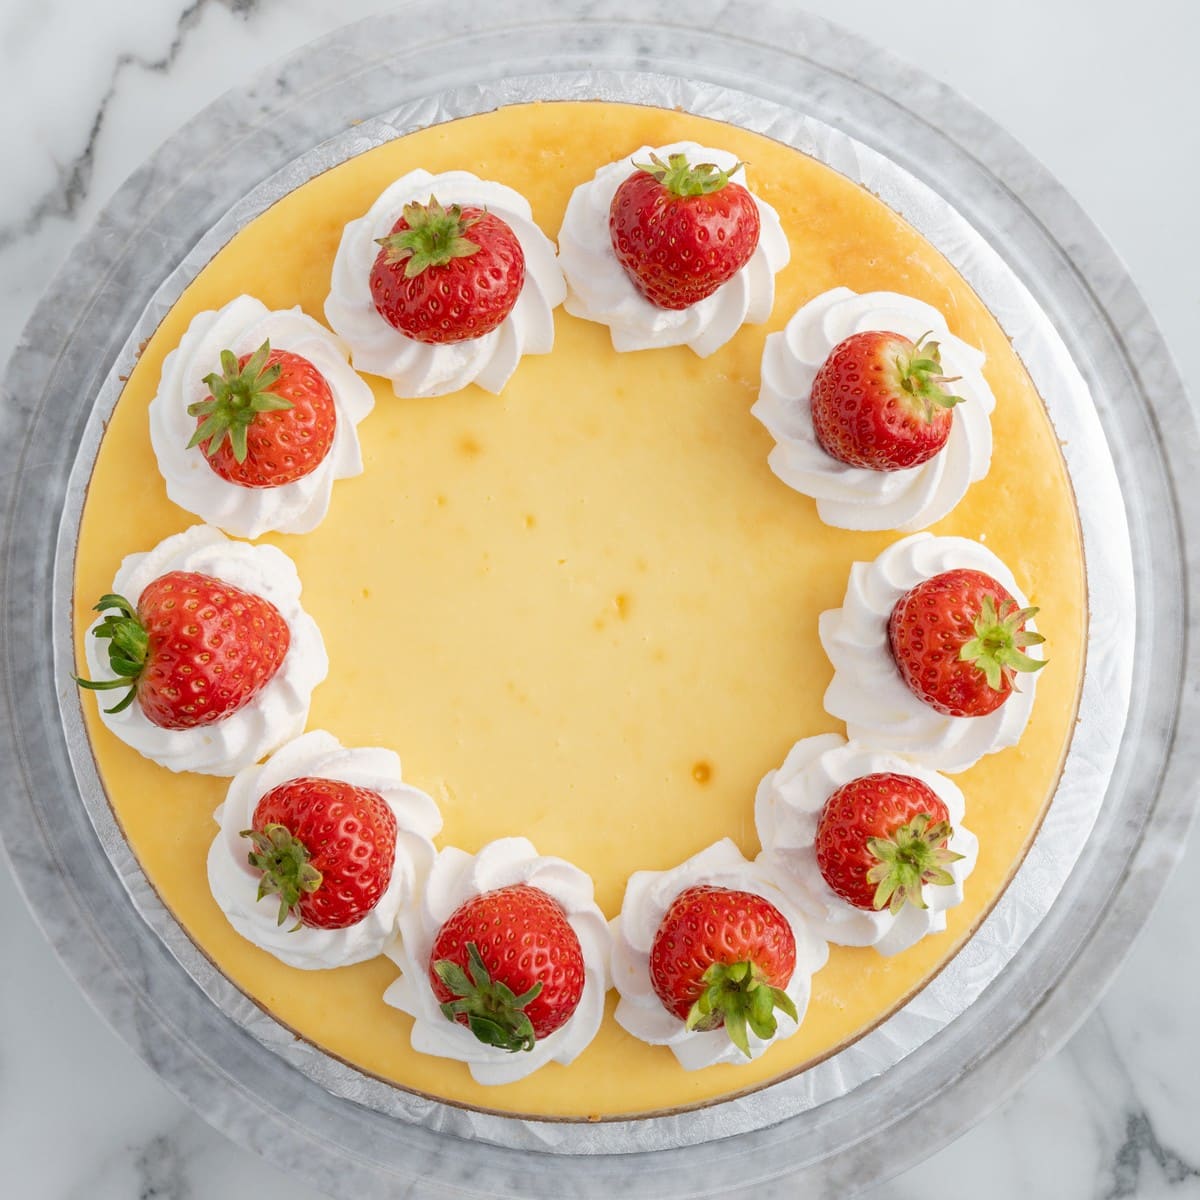
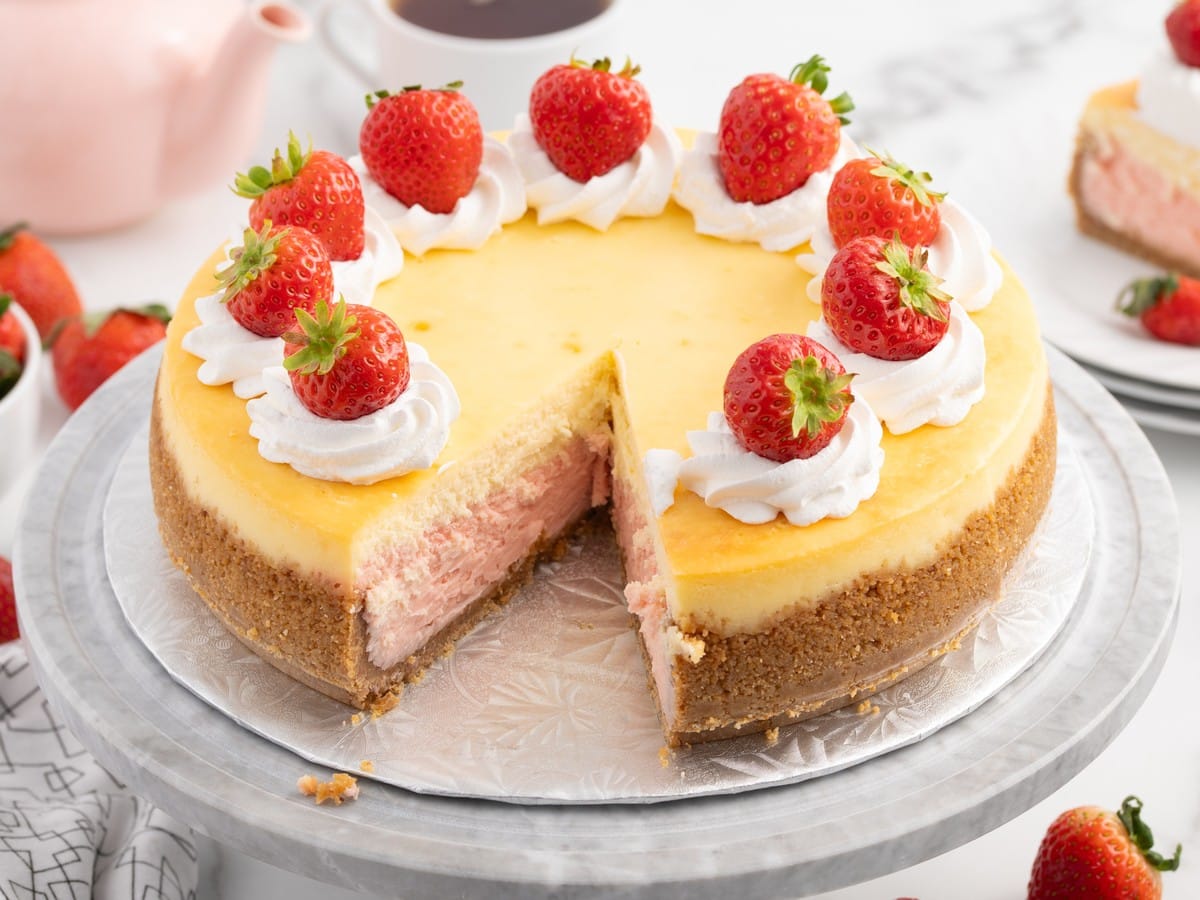
To decorate, spoon your whipped cream (or thawed whipped topping) into a piping bag fitted with a large tip, and pipe ten decorative dollops evenly around the edge of the cheesecake. Place a fresh whole strawberry into the center of each dollop. For the cleanest slices, dip a sharp knife into hot water and wipe it dry between cuts. This keeps the pink and white layers looking crisp instead of dragging through the filling.
How To Serve Strawberries and Cream Cheesecake
This cheesecake is a showstopper on its own, but a few finishing touches make it feel extra special. Add a light dusting of powdered sugar, some white chocolate curls, or a drizzle of extra strawberry syrup over the top just before serving.
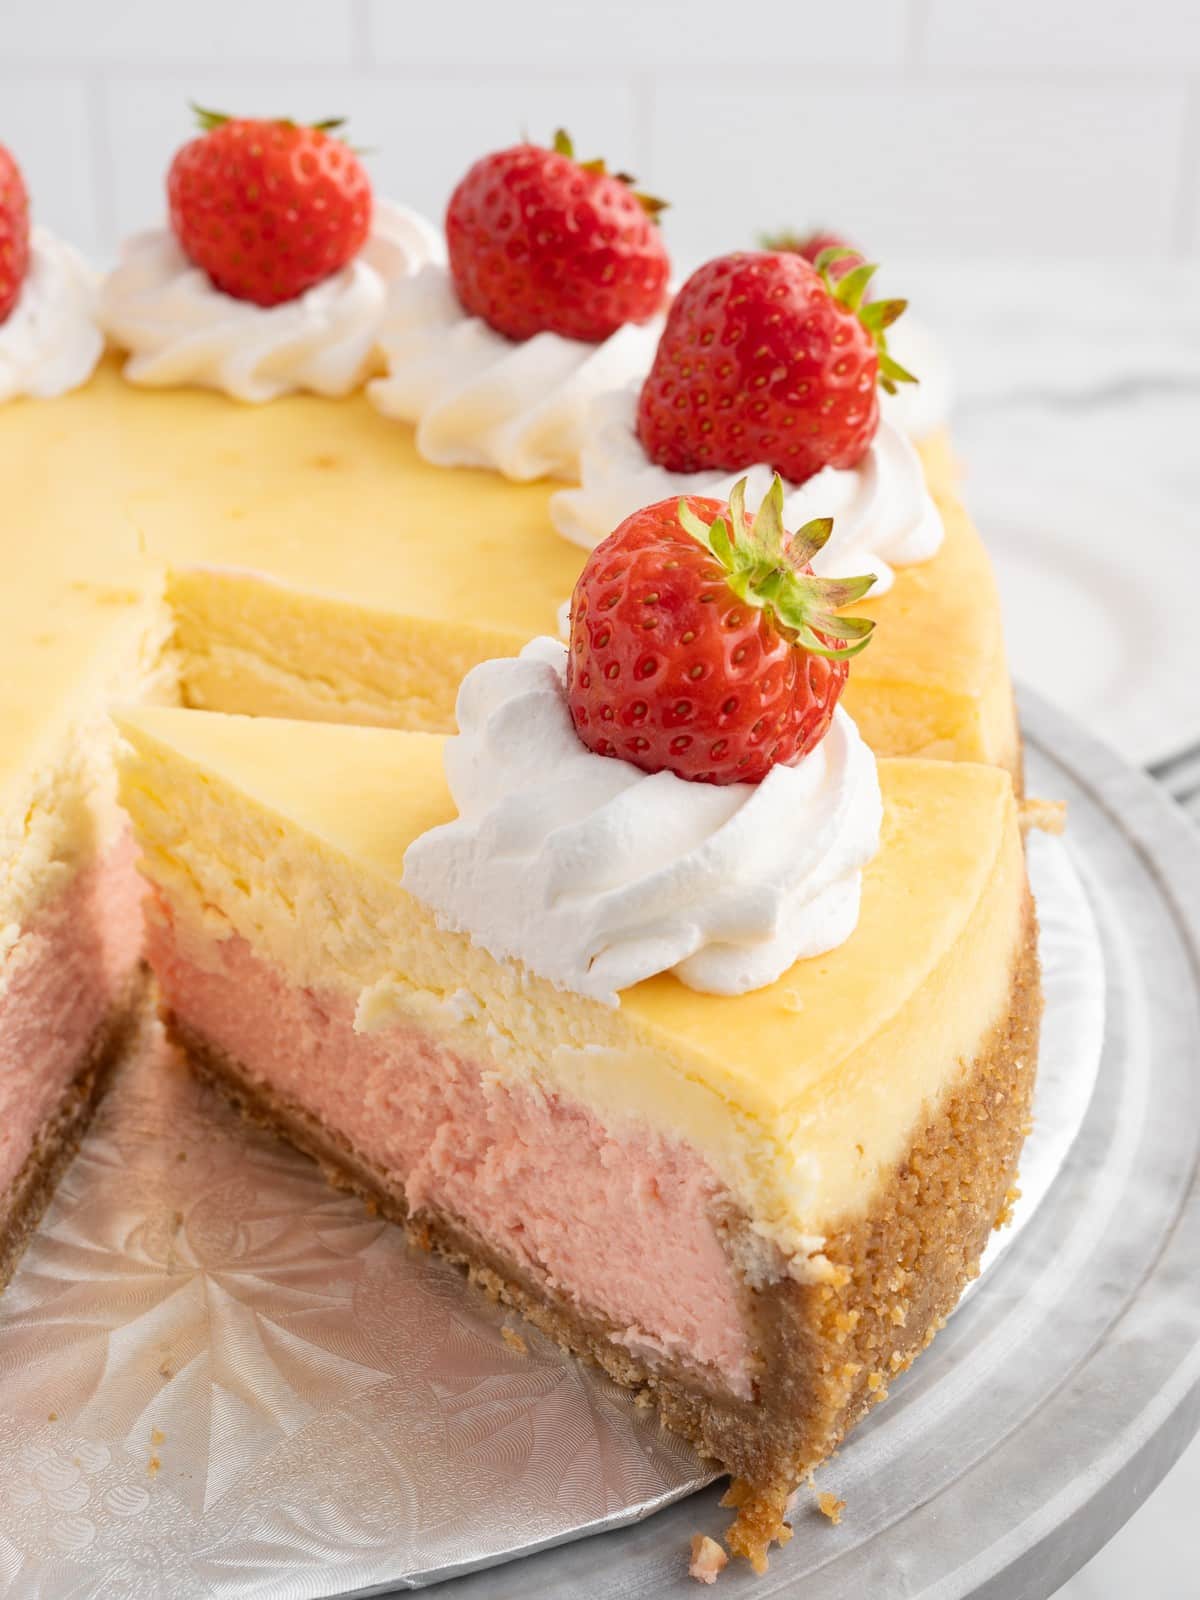
When you slice the cheesecake, cut so that each piece gets one whipped cream dollop and one strawberry.
For the cleanest slices, dip a sharp knife into hot water and wipe it dry between cuts. This keeps the pink and white layers looking crisp instead of dragging through the filling.
Pair it with a cup of coffee or a glass of chilled rosé for a light, elegant end to a meal.
More Cheesecake Recipes ⭐ Lemon Blueberry Cheesecake Recipe | Peach Cobbler Cheesecake | Lemon Cheesecake

Strawberries and Cream Cheesecake
This strawberries and cream cheesecake layers a vanilla cheesecake and a strawberry cheesecake in one impressive, bakery-style dessert. With a buttery graham cracker crust, a silky filling in two distinct colors, and a finishing touch of whipped cream and fresh strawberries, it's a showstopper that's easier to make than it looks.
Did you try this recipe?Let our readers know how it turned out by Leaving a Review!
Ingredients
Graham Cracker Crust
- 2 cups graham cracker crumbs
- 4 tablespoons granulated sugar
- 6 tablespoons unsalted butter (melted)
- 4 to 5 cups boiling water (for the water bath)
Cheesecake Filling
- 32 ounces full-fat cream cheese (softened to room temperature (four 8-ounce blocks))
- 1½ cups granulated sugar
- 1½ teaspoons vanilla extract
- 4 large eggs (room temperature)
- ½ cup full-fat sour cream
- ¼ cup heavy whipping cream
- ¼ cup strawberry syrup
- ½ to 1 teaspoon strawberry extract (optional, for a more intense strawberry flavor)
Garnish
- 4 ounces frozen whipped topping (thawed)
- 10 small fresh whole strawberries
DIRECTIONS
To Make the Crust
- Preheat oven to 375°F.
- Tear off two large pieces of heavy-duty aluminum foil. Set the springform pan on the first piece and bring the foil up around the sides. Repeat with the second piece, wrapping tightly so no water can seep in during baking.
- Line the bottom of the pan with a parchment paper round, then spray the bottom and sides with baker's spray. Set aside.
- In a medium bowl, combine the graham cracker crumbs, sugar, and melted butter until the mixture resembles wet sand.
- Firmly press the mixture into the bottom and halfway up the sides of the prepared pan.
- Bake on the middle rack for 10 minutes. Remove and set the pan into a large roasting pan to cool while you make the filling.
- Reduce the oven temperature to 325°F. Start a large pot of water to boil for the water bath.
To Make the Cheesecake Filling
- Beat the cream cheese and sugar in a large bowl with a hand mixer on medium speed for 2 to 3 minutes, until smooth. Scrape the sides and bottom of the bowl to fully combine.
- With the mixer on low, add the vanilla extract and eggs, one at a time, beating just until each egg is incorporated. Avoid overmixing.
- Add the sour cream and heavy whipping cream, mixing on low just until combined.
- Remove half of the batter to a separate bowl and set aside.
- Stir the strawberry syrup and optional strawberry extract into the batter remaining in the original bowl until it's a uniform light pink with no white streaks.
- Pour the strawberry batter into the crust and spread into an even layer.
- Working slowly, spoon the plain batter over the strawberry layer in small dollops rather than pouring, so the two layers stay distinct. Use an offset spatula to gently spread it into an even layer without disturbing the strawberry layer underneath.
- Place the roasting pan with the cheesecake on the middle oven rack. Slowly pour the boiling water into the roasting pan until it reaches about one inch up the side of the springform pan, being careful not to splash any into the batter.
- Bake for 1 hour and 30 minutes, or until set. The cheesecake should not look liquid, but should wobble gently in the center when nudged.
- Turn off the oven, crack the door open 1 to 2 inches, and leave the cheesecake inside to sit for 1 hour as the oven cools.
- Remove the roasting pan from the oven, then remove the springform pan from the foil. Run a thin, sharp knife around the edge of the cheesecake to loosen it from the pan.
- Refrigerate for a minimum of 8 hours, preferably overnight, until fully chilled and set.
- When ready to serve, pipe the thawed whipped topping into a piping bag fitted with a large tip and pipe ten decorative dollops around the edge of the cheesecake. Place a fresh strawberry in the center of each dollop. Slice so each piece includes one dollop and one strawberry.
Notes
- If the cheesecake sticks to the edges of the pan, it can crack as it cools.
- Run the knife slowly and gently to avoid damaging the outside.
- Avoid overmixing the batter. Too much air incorporated into the batter increases the risk of cracks.
- Strawberry extract that's red in color will add extra tint to the batter.
- Check the cheesecake at the 1 hour 15 minute mark. If the top is browning too quickly, loosely tent it with foil, folded like a tent rather than pressed directly onto the surface, so moisture doesn't get trapped.
Nutrition
Calories: 704kcal | Carbohydrates: 63g | Protein: 10g | Fat: 47g | Saturated Fat: 27g | Polyunsaturated Fat: 2g | Monounsaturated Fat: 12g | Trans Fat: 0.3g | Cholesterol: 189mg | Sodium: 442mg | Potassium: 232mg | Fiber: 1g | Sugar: 48g | Vitamin A: 1694IU | Vitamin C: 8mg | Calcium: 142mg | Iron: 1mg
HAVE YOU TRIED THIS RECIPE?Follow me on Pinterest @bestblogrecipes
Frequently Asked Questions
Do I need a water bath to make this cheesecake?
No, though it does give you the most even bake and the best odds of a smooth, crack-free top. If you'd rather skip it, see the no-water-bath method above. Since this cheesecake is topped with whipped cream and strawberries, any minor surface cracks won't be visible once it's decorated
Why did my two layers turn into a swirl instead of staying separate?
This usually happens when the second layer of batter is poured on too quickly or too heavily in one spot. Spoon it on gently in small dollops instead of pouring, and use an offset spatula to spread it out without disturbing the layer underneath.
How do I know when my cheesecake is done baking?
Look for a center that has a gentle, cohesive wobble, similar to Jell-O, rather than looking like liquid or rippling like water. It will continue to set as it cools, so it's better to pull it slightly early than to overbake it.
Can I make this cheesecake ahead of time?
Yes. It actually needs to chill for at least 8 hours, so making it a day ahead works perfectly. You can also decorate it up to a few hours before serving and keep it refrigerated until you're ready.
How do I store leftover cheesecake?
Cover and refrigerate for up to 5 days. You can store it right in the springform pan base inside an airtight container to save a dish.
Can I freeze this cheesecake?
Yes. I recommend removing the strawberries and whipped cream before freezing. Slice it, wrap each piece tightly in plastic wrap, and store in a zip-top bag or airtight container for up to 1 month. Thaw overnight in the fridge before serving.
Why does my cheesecake feel fragile when I try to remove it from the pan?
This is almost always a sign it needs more chilling time, not a sign it's underbaked. Give it the full 8 hours (or overnight) before attempting to remove the sides of the pan.
Can I use frozen strawberries for the garnish?
Fresh strawberries are best for garnish since they hold their shape and look their best on top.
Leave a Comment