
Last updated on
Chocolate Kiss Cookies

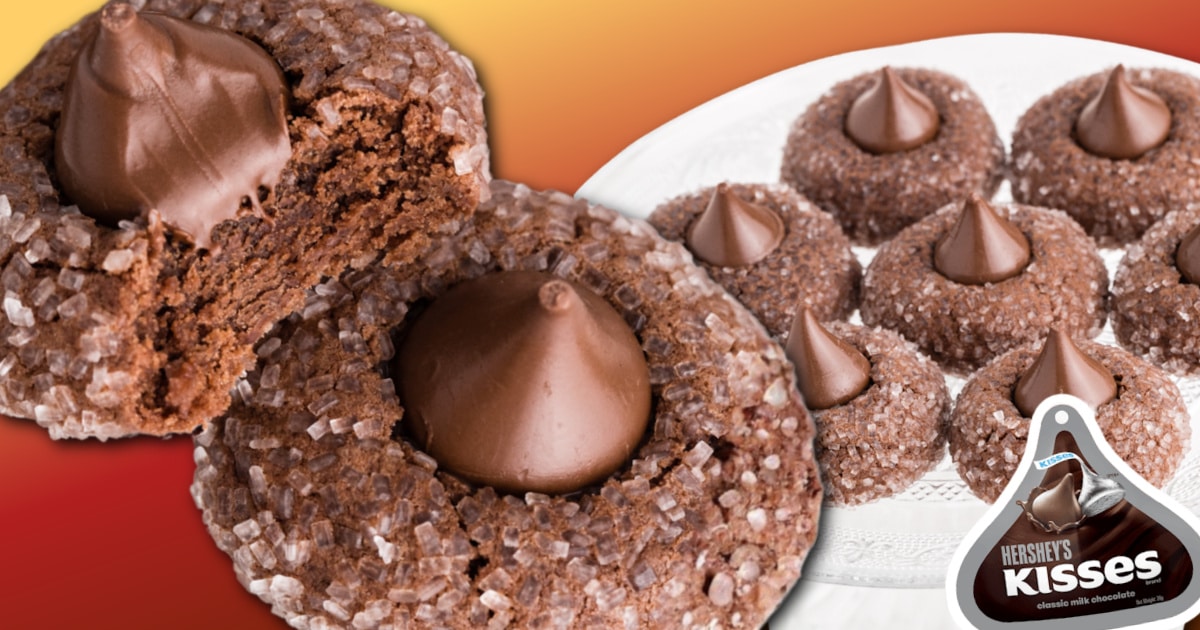
Soft chocolate kiss cookies with a sugar-coated exterior and a classic Hershey’s Kiss on top. This easy recipe bakes up thick and puffy every time.
Jump to RecipeTable of Contents
- Why This Chocolate Kiss Cookie Recipe Works
- Ingredients For Chocolate Kiss Cookies
- Ingredient Notes
- How to Make Chocolate Kiss Cookies
- Tips for Perfect, Thick Chocolate Kiss Cookies
- Texture and Appearance Guide (What to Expect)
- Storage, Freezing, and Make-Ahead Tips
- Chocolate Kiss Cookie FAQs
- JUMP TO RECIPE
- More Easy Cookie Recipes to Try


These chocolate kiss cookies are soft, puffy, and coated in coarse sanding sugar, with a classic Hershey’s Kiss pressed on top. They hold their shape as they bake, so you get thick chocolate sugar kiss cookies instead of flat, over-spread ones.

The dough is sturdy enough to stay puffed in the oven, but still bakes up tender and chocolatey. A light flatten before baking controls the spread, and adding the kiss while the cookies are warm helps it stick without melting.
If you want chocolate kiss cookies that look the way they should and turn out consistently every time, this recipe delivers.
Why This Chocolate Kiss Cookie Recipe Works
This recipe is built to give you soft chocolate kiss cookies that bake up thick and puffy, not flat or fragile.
Each step has a purpose, which is why these cookies hold their shape so reliably.
🍪 A sugar cookie dough base provides structure. It creates a sturdy dough that supports the chocolate and prevents the cookies from spreading too much in the oven.
🍫 Cocoa powder adds chocolate flavor without thinning the dough. These chocolate kiss cookies with cocoa powder get their rich chocolate flavor from cocoa, without changing the structure of the dough. You get rich chocolate taste while keeping the dough firm enough to stay puffed as it bakes.
✋ A very light flattening controls the spread. Gently pressing the dough before baking helps the cookies spread just enough, without turning into no-spread chocolate cookies that bake unevenly or lose their shape.
😘 The Hershey’s Kisses are added after baking. Pressing the chocolate into warm cookies keeps the kiss intact and prevents melting or sinking.
Together, these details are what make the cookies consistent, soft, and easy to get right every time.
Ingredients For Chocolate Kiss Cookies
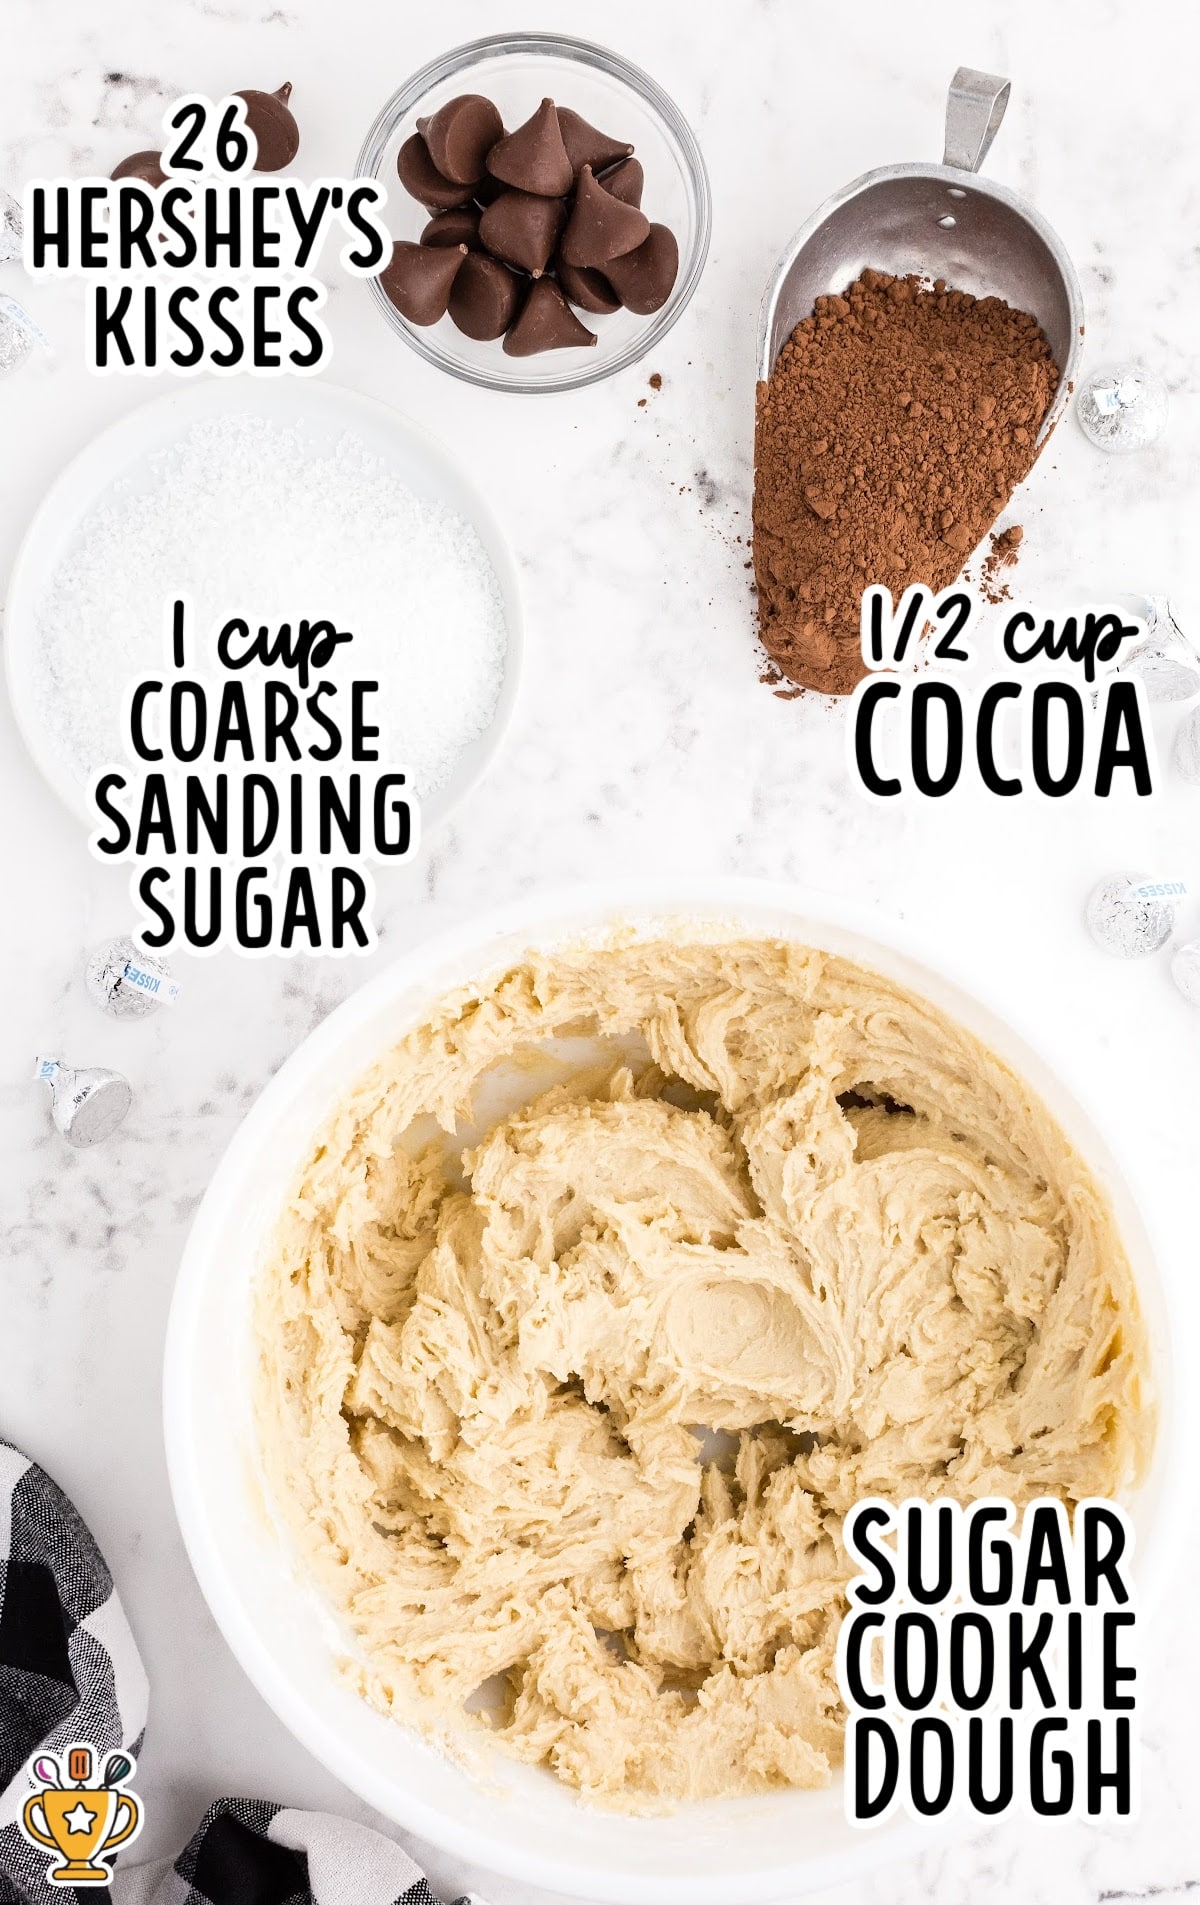
What you'll need to make chocolate kiss cookies with sugar cookie dough:
- 1 batch no spread sugar cookies (try our no spread sugar cookie recipe or 1 roll of refrigerated sugar cookie dough)
- ½ cup unsweetened cocoa powder
- 1 cup coarse sanding sugar
- 26 Hershey’s milk chocolate kisses
Ingredient Notes
Sugar Cookie Dough
If you’re using refrigerated sugar cookie dough to make your Hershey kiss cookies, let it sit on the counter for about 45 minutes before mixing. Dough that’s too cold is very hard on a mixer and won’t blend smoothly with the cocoa powder. Slightly softened dough mixes more evenly and should feel thick and soft, not stiff or crumbly.
About the Sugar Coating
Coarse sanding sugar works best for coating these cookies. The larger crystals cling better to the dough and keep their sparkle after baking. If you only have regular granulated sugar, it will work in a pinch, but the coating will be finer and less textured.
More Easy Dessert Recipes ⭐ Brownie Muffins | Snickers Cups | Coffee Cookies
How to Make Chocolate Kiss Cookies
These chocolate thumbprint kiss cookies come together quickly, but paying attention to a few 👀 visual cues makes all the difference.
Chilling the dough is a key step. Taking the time to chill helps the cookies hold their shape and bake up thick instead of flat.
How To Make Chocolate Kiss Cookies
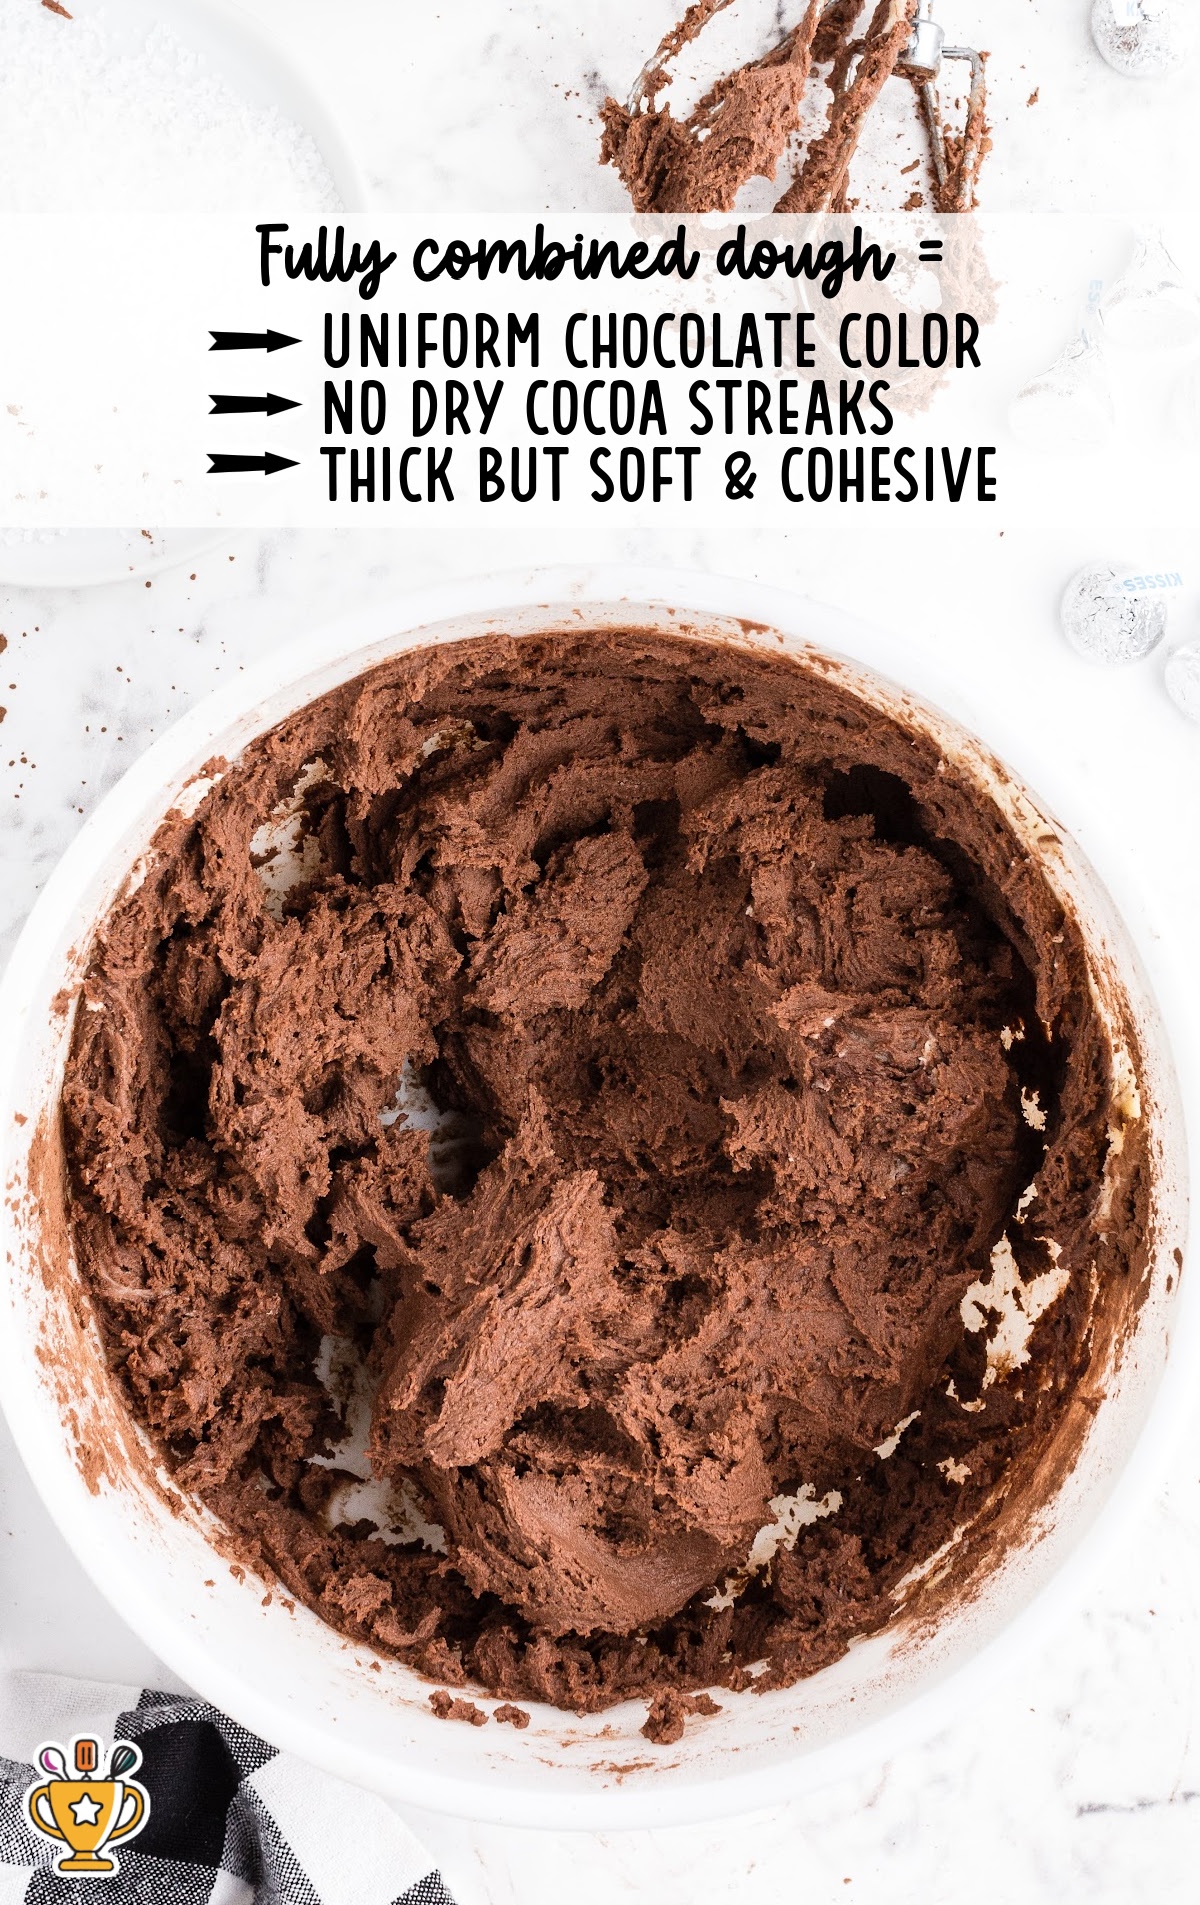
FIRST STEP: Mix the Dough Until Fully Combined. Add the cocoa powder to the sugar cookie dough and mix until the dough is uniform in color. 👀 You’re looking for a rich, even chocolate tone with no dry cocoa streaks.
The dough should feel thick, soft, and cohesive. It will also probably be sticky, and that's expected. If it still looks marbled or crumbly, keep mixing just until everything comes together.
SECOND STEP: Chill the Dough (Do Not Skip). Cover the dough and refrigerate it for about 1 hour.
Chilling the dough is what keeps these cookies from spreading too much in the oven. Cold dough firms up the fats, which helps the cookies stay puffy and hold their shape as they bake.
If you skip this step, the cookies are much more likely to spread and bake flat.
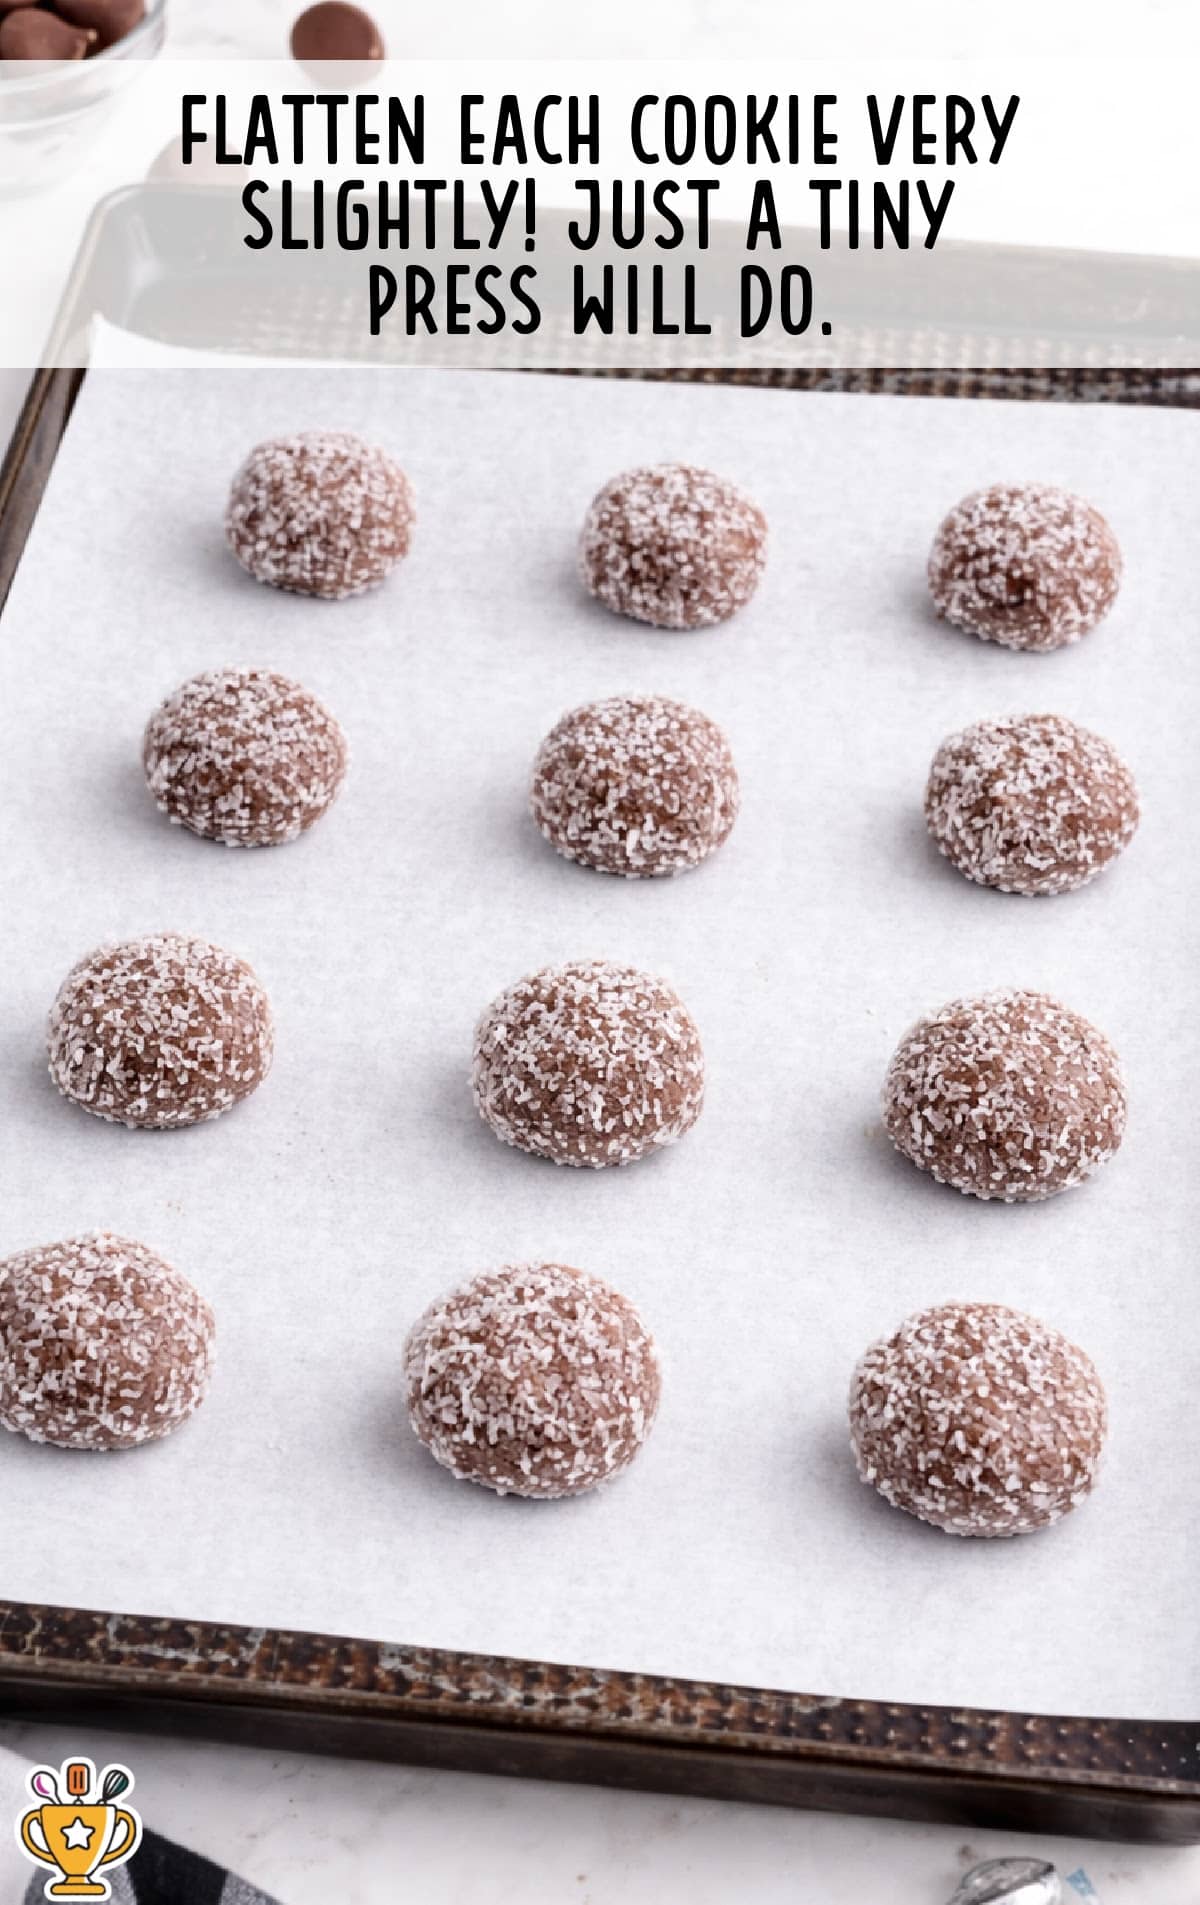
THIRD STEP: Roll, Coat, and Lightly Flatten. Scoop the dough into evenly sized balls, then roll each one in coarse sanding sugar until fully coated. Place the dough balls on a parchment-lined baking sheet, spacing them about 1½ inches apart.
Using your fingers or the bottom of a glass, gently press each cookie just slightly. This small press helps control the spread while keeping the cookies thick and puffy.
How To Bake
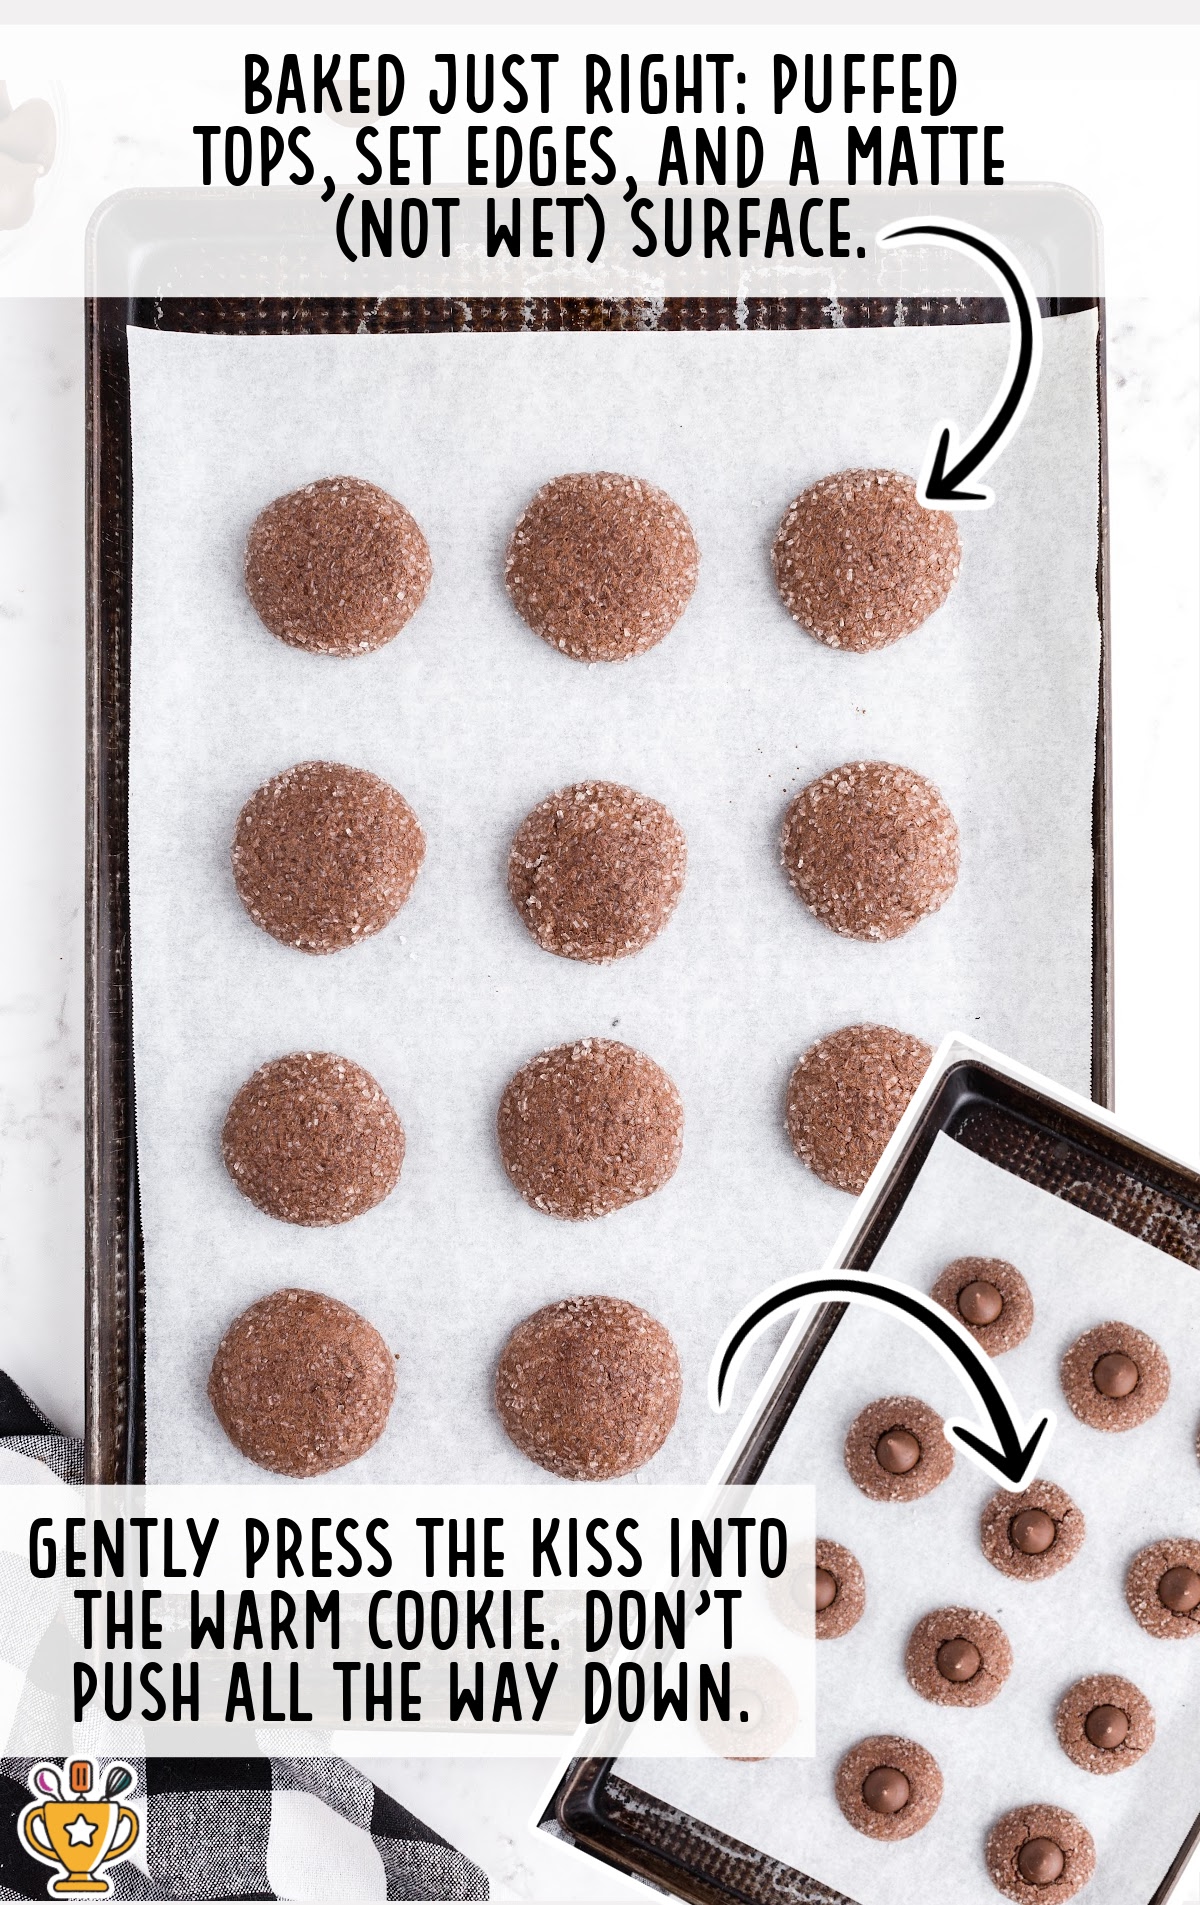
FOURTH STEP: Bake Until Puffy and Set. Bake the cookies in a 350°F oven for 8 to 9 minutes. 👀 When they’re ready, the cookies should look puffed with set edges and a matte surface.
If the tops still look shiny or wet, they need another minute, However, keep in mind, the cookies will continue to set as they cool.
FIFTH STEP: Press in the Hershey’s Kisses. As soon as the cookies come out of the oven, gently press a Hershey’s Kiss into the center of each one. Press just until the base touches the cookie. There’s no need to push it all the way down.
The warmth of the cookie helps the chocolate stick in place, and the kiss will firm up again as the cookies cool 🍫
Tips for Perfect, Thick Chocolate Kiss Cookies
These simple tips help make easy chocolate kiss cookies that turn out right every time.
- Space the cookies properly - Place the dough balls about 1½ inches apart on the baking sheet to give them room to puff and set without touching as they bake.
- Let the cookies cool briefly before moving them. Leave the cookies on the baking sheet for a few minutes after baking to firm up, so they don’t break when you transfer them.
- Add the kisses while the cookies are warm. Press the Hershey’s Kisses into the cookies right after they come out of the oven. If the cookies cool too much, the chocolate won’t stick as well.
- Avoid overbaking. Pull the cookies when the tops look matte and the edges are set. Overbaking dries them out and takes away from the soft center.
These small details make a big difference in how the cookies look and taste.
Texture and Appearance Guide (What to Expect)
These puffy chocolate kiss cookies should look and feel just as good as they taste. Use this quick guide to check your results.
- Chocolate sugar cookies rolled in sanding sugar will have a crisp exterior and a soft, tender center.
- A soft, thick chocolate center that stays tender
- Hershey’s Kiss hold their shape and sit neatly on top
- Cookies that stay thick and rounded instead of spreading flat
If your cookies match these cues, you’re right where you want to be.

Storage, Freezing, and Make-Ahead Tips
These 4 ingredient chocolate kiss cookies store well, which makes them ideal for planning ahead.
Room temperature storage - Store baked cookies in an airtight container at room temperature for up to 5 days. Keep them in a single layer or separate layers with parchment to protect the kisses.
Freezing baked cookies - You can freeze fully baked chocolate kiss cookies for up to 3 months. After baking, let them cool completely (make sure the kisses are fully set), then place them in a freezer-safe container. Thaw at room temperature before serving.
Freezing the dough - Thinking about these chocolate kiss cookies for Christmas or another holiday? They're a favorite because they hold their shape, travel well, and look festive without extra decorating.
For make ahead chocolate kiss cookies, scoop and roll the dough into balls, then freeze on a baking sheet until firm. Transfer the frozen dough balls to a freezer-safe bag and freeze for up to 3 months.
When ready to bake, thaw the dough in the refrigerator, then roll in sugar and bake as directed.
Chocolate Kiss Cookie FAQs
Why did my chocolate kiss cookies spread so much?
The most common reason is skipping the chill time. Cold dough helps the cookies hold their shape in the oven. Warm dough spreads too quickly and bakes flat. Make sure you chill the dough for about an hour and avoid placing it on a warm baking sheet.
Why do my Hershey’s Kisses melt?
When to add Hershey’s Kisses to cookies matters. Kisses melt when the cookies are too hot or when they kisses accidentally go in the oven and become baked.
Always add the kisses after baking, while the cookies are warm but not piping hot. This is the secret for how to keep kisses from melting on cookies. Press gently so the chocolate sticks without softening too much.
Can I use different flavors of Hershey’s Kisses?
Yes, you can swap in other Kiss flavors like dark chocolate or caramel. Keep in mind that some varieties soften faster than milk chocolate, so press them in gently and let the cookies cool completely before moving them.
Are chocolate kiss cookies the same as blossom cookies?
No, these are kiss cookies without peanut butter. Blossom cookies usually use peanut butter cookie dough and are rolled in granulated sugar before baking. These chocolate kiss cookies use a sugar cookie dough base with cocoa powder, which gives them a different texture and flavor.
Can I make these ahead for the holidays?
Yes. You can make the dough ahead and refrigerate it, or freeze the dough balls for later baking. You can also freeze chocolate kiss cookies after their baked; just make sure they are fully cooled before freezing.


Chocolate Kiss Cookies
Soft chocolate kiss cookies with a sugar-coated exterior and a classic Hershey’s Kiss on top. This easy recipe bakes up thick and puffy every time.
Did you try this recipe?Let our readers know how it turned out by Leaving a Review!
Ingredients
- 1 batch sugar cookies (or 1 roll of refrigerated sugar cookie dough)
- ½ cup cocoa powder (unsweetened )
- 1 cup coarse sanding sugar
- 26 Hershey’s milk chocolate Kisses
DIRECTIONS
- In a large mixing bowl, use a hand mixer or stand mixer to thoroughly mix the sugar cookie dough and the cocoa powder.
- Cover dough with plastic wrap and chill in the refrigerator for about one hour.
- Preheat oven to 350°F.
- Use a cookie scoop to form even balls of dough. Roll the balls in the palm of your hands to form a smooth cookie.
- Roll each cookie dough ball in a shallow bowl filled with the coarse sugar until completely coated.
- Place the balls 1½ inches apart on a cookie sheet lined with parchment paper. Flatten the top of the cookies just a bit with the palm of your hand to help them spread evenly.
- Bake for 8 to 9 minutes or until the cookies are puffy and the dough no longer looks wet.
- Remove cookie sheet from the oven. Press a chocolate kiss gently into the top of each warm cookie and allow cookies to cool for a couple minutes before carefully transferring to a cooling rack to cool the rest of the way.
Notes
-
Space the cookies properly - Place the dough balls about 1½ inches apart on the baking sheet to give them room to puff and set without touching as they bake.
-
Let the cookies cool briefly before moving them. Leave the cookies on the baking sheet for a few minutes after baking to firm up, so they don’t break when you transfer them.
-
Add the kisses while the cookies are warm. Press the Hershey’s Kisses into the cookies right after they come out of the oven. If the cookies cool too much, the chocolate won’t stick as well.
-
Avoid overbaking. Pull the cookies when the tops look matte and the edges are set. Overbaking dries them out and takes away from the soft center.
Nutrition
Calories: 56kcal | Carbohydrates: 11g | Protein: 1g | Fat: 2g | Saturated Fat: 1g | Polyunsaturated Fat: 0.01g | Monounsaturated Fat: 0.1g | Cholesterol: 1mg | Sodium: 4mg | Potassium: 25mg | Fiber: 1g | Sugar: 10g | Vitamin A: 0.01IU | Calcium: 11mg | Iron: 0.3mg
HAVE YOU TRIED THIS RECIPE?Follow me on Pinterest @bestblogrecipes
More Easy Cookie Recipes to Try
If you enjoyed these chocolate kiss cookies, here are more easy chocolate cookie recipes we’ve tested and make on repeat.
No Bake Chocolate Oatmeal Cookie Bars
Chocolate Chip Cheesecake Cookies
Tollhouse Chocolate Chip Cookies
Chocolate Peanut Butter Cookies


Comments
Mary Heath says
Awesome