
Published on
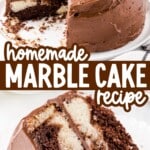
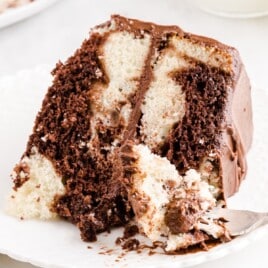
Marble Cake
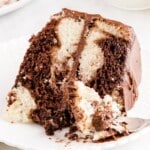
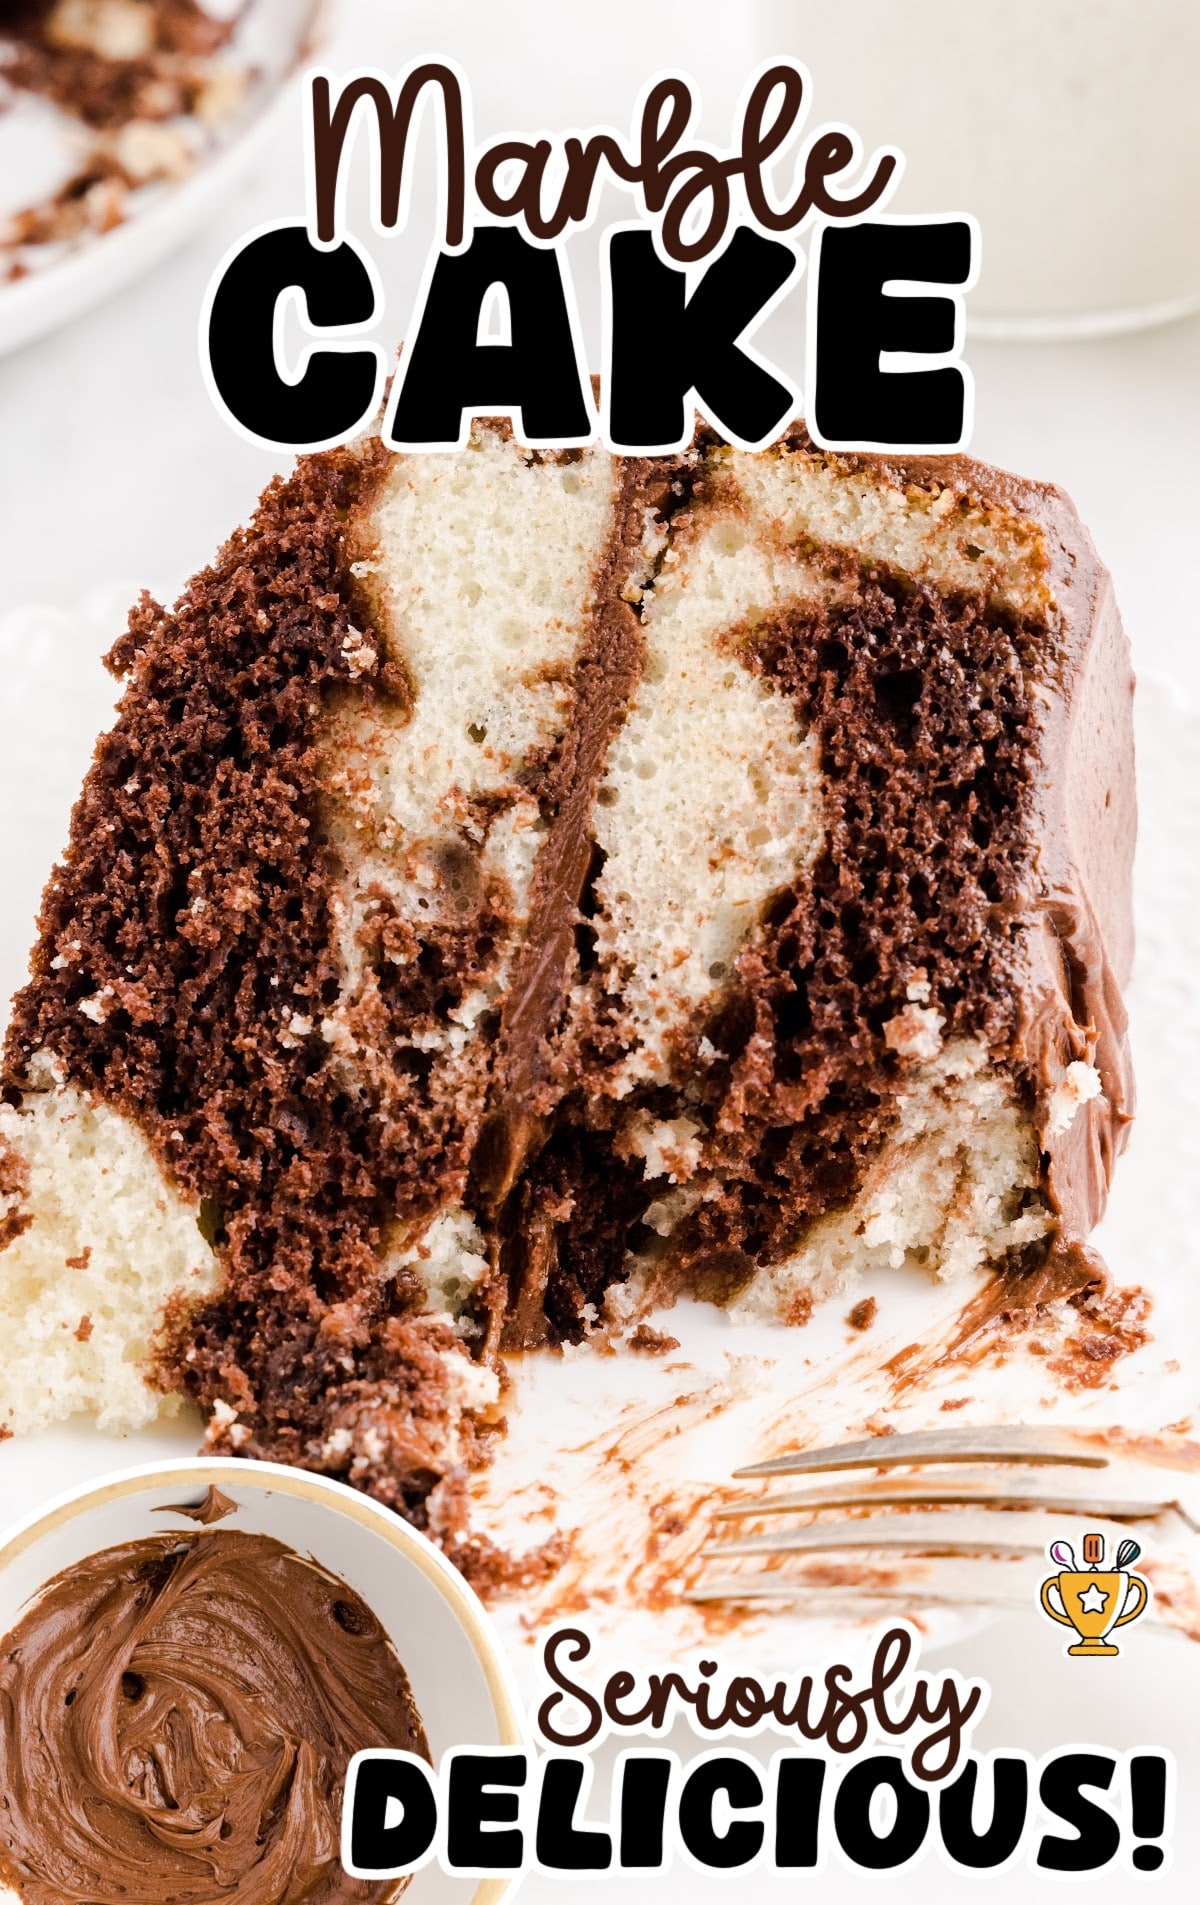
Marble cake combines rich chocolate and sweet vanilla in every bite with a soft, moist texture. This easy homemade cake looks impressive but takes little effort to make.
Jump to RecipeTable of Contents
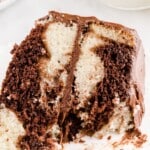
Marble cake is the perfect mix of rich chocolate and sweet vanilla in every bite. This easy homemade recipe creates a soft, moist cake with a beautiful swirl. No fancy equipment needed—just a simple batter and a fork to swirl the flavors together. Bake it for birthdays, potlucks, or a weekend treat everyone will love.
This recipe is simple to make, and the step-by-step photos and directions make it even easier. We’ve included pro tips and tricks to help you get the best swirl and texture. Plus, you’ll find answers to the most frequently asked questions right below!
More Recipes ⭐ Cherry Chip Cake | Gingerbread Cake | Turtle Poke Cake
Marble bundt cake bakes up soft, moist, and packed with chocolate and vanilla in every bite. It takes just over an hour, making it a great homemade dessert for any occasion. The beautiful swirl looks impressive, but the recipe is simple enough for beginners.
Serve it for birthdays, potlucks, or a weekend treat that feels special but doesn’t take all day. A basic fork creates the perfect marbled effect, so no fancy tools are needed.
Ingredients for Marble Cake
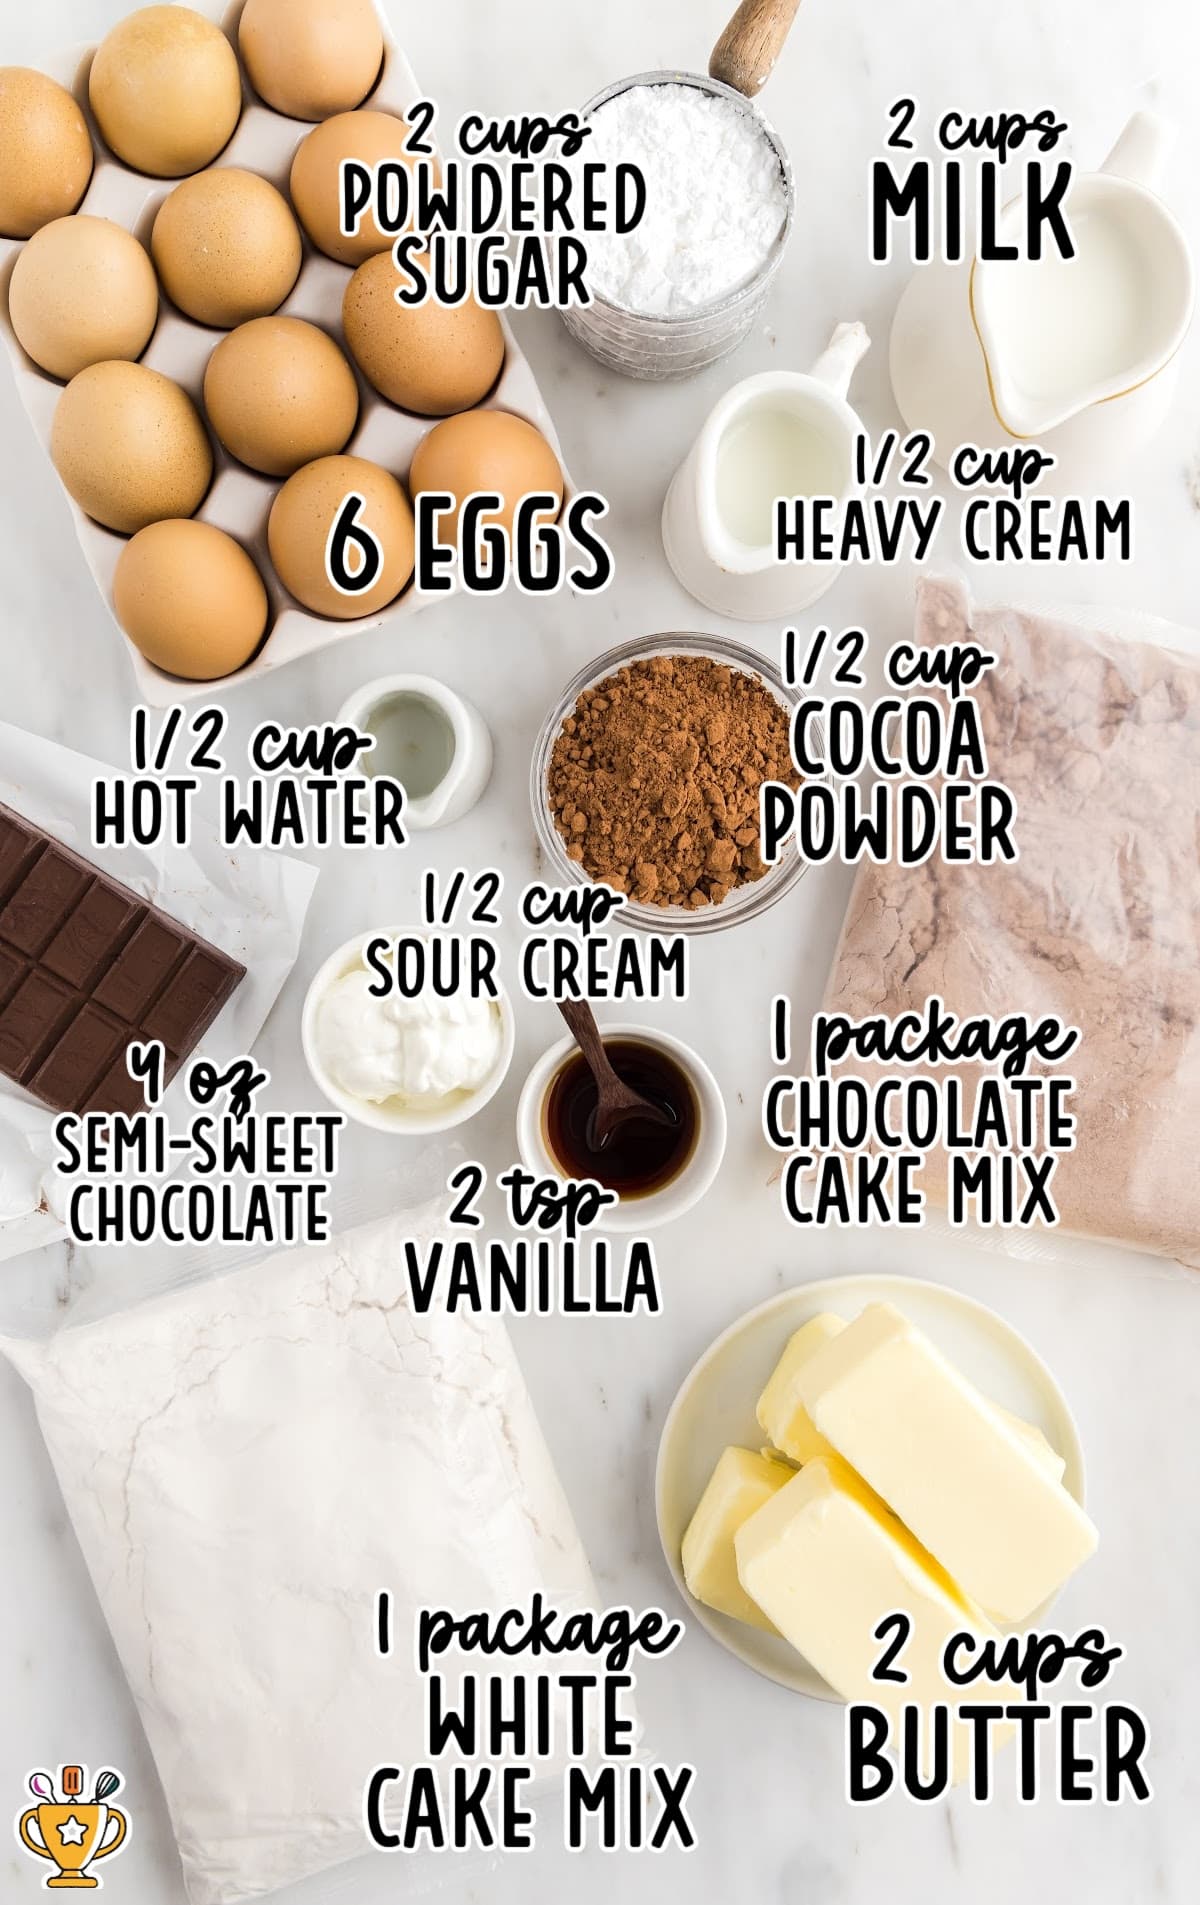
What you'll need to make this recipe for Marble Cake:
For The White Cake:
- 1 (15.25-ounce) box of white or yellow cake mix
- ½ cup of salted butter, softened
- 3 large eggs
- ¼ cup of sour cream
- 1 cup of milk or buttermilk
- 1 teaspoon of vanilla extract
To Make The Chocolate Cake:
- 1 (15.25-ounce) box of chocolate cake mix
- ½ cup of salted butter, softened
- 3 large eggs
- ¼ cup of sour cream
- 1 cup of milk or buttermilk
- 1 teaspoon of vanilla extract
For The Frosting:
- 4-ounce German chocolate or semi-sweet baking bar, melted and cooled
- ½ cup of hot water or heated heavy cream
- ½ cup of unsweetened cocoa powder
- 1 cup of salted butter, softened
- 2 cups of powdered sugar
Substitutions and Additions
Make your marble cake your own with fun ingredient swaps and tasty mix-ins! These easy tweaks add extra flavor and personality to your cake. Check out these top substitutions and additions:
- Substitute Cocoa Powder: Use Dutch-process cocoa instead of regular cocoa powder for a deeper, richer chocolate flavor.
- Add Espresso Powder: Mix in a teaspoon of espresso powder to enhance the chocolate taste without making the cake taste like coffee.
- Substitute Milk: Swap whole milk for half-and-half or heavy cream for a richer, more decadent cake texture.
- Add Chocolate Chips: Stir mini chocolate chips into the batter for extra bursts of chocolate in every bite.
- Substitute Vanilla Extract: Use almond extract instead of vanilla for a nutty, slightly sweet flavor twist.
- Add Nuts: Fold in chopped pecans or walnuts for a bit of crunch and extra flavor.
How to Make Marble Cake
Follow along with our step-by-step pictures, instructions, and expert tips to make the perfect swirl cake. We’ve got tricks to help you get the best swirl and texture every time. Let’s get started!
FIRST STEP: Preheat the oven to 325°F. Spray two 9-inch round cake pans with non-stick cooking spray, or use the wrappers from the butter to grease them thoroughly.
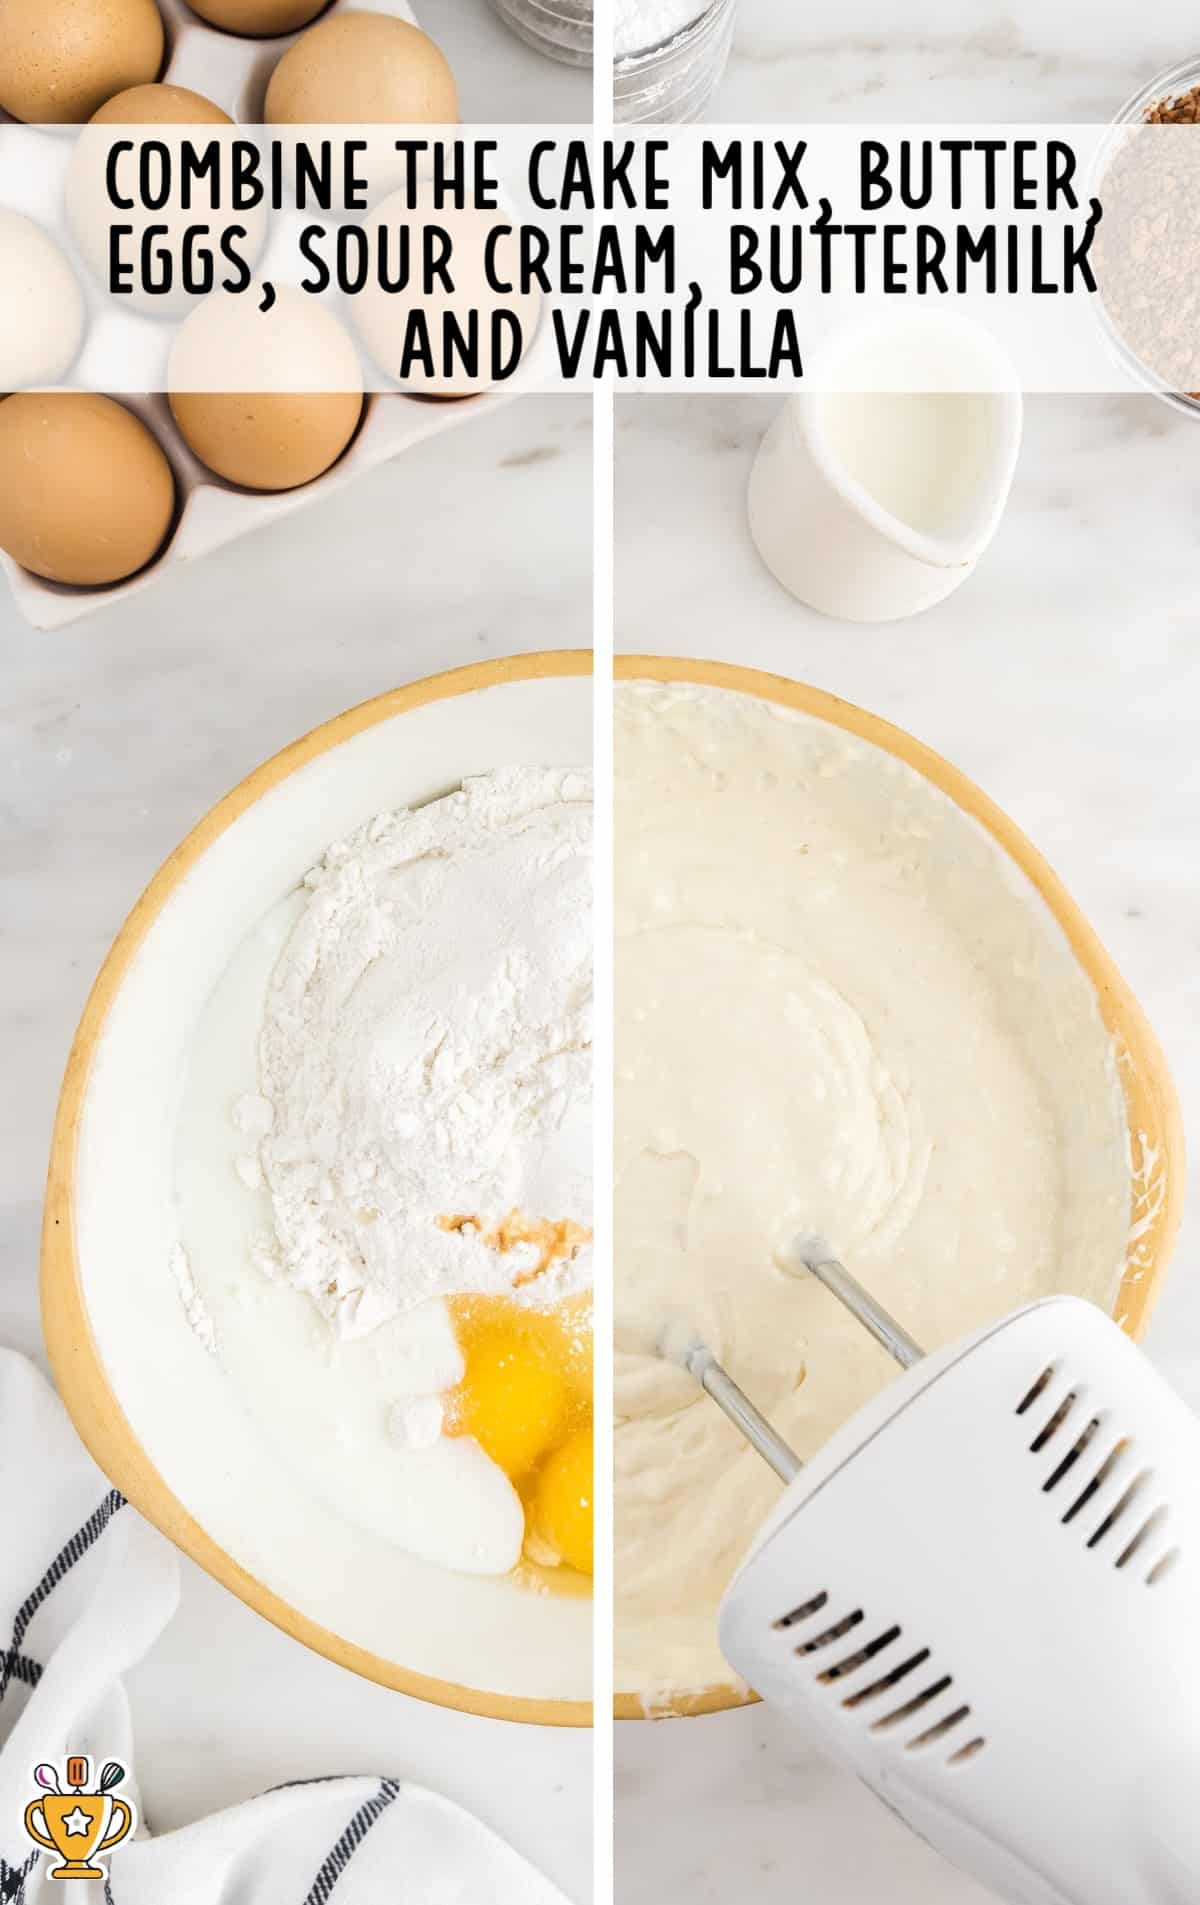
SECOND STEP: In one large bowl, combine the white or yellow cake batter ingredients: cake mix, butter, eggs, sour cream, buttermilk, and vanilla extract.
Beat on low speed for 1 minute and then on medium-high speed for two additional minutes. Set aside.
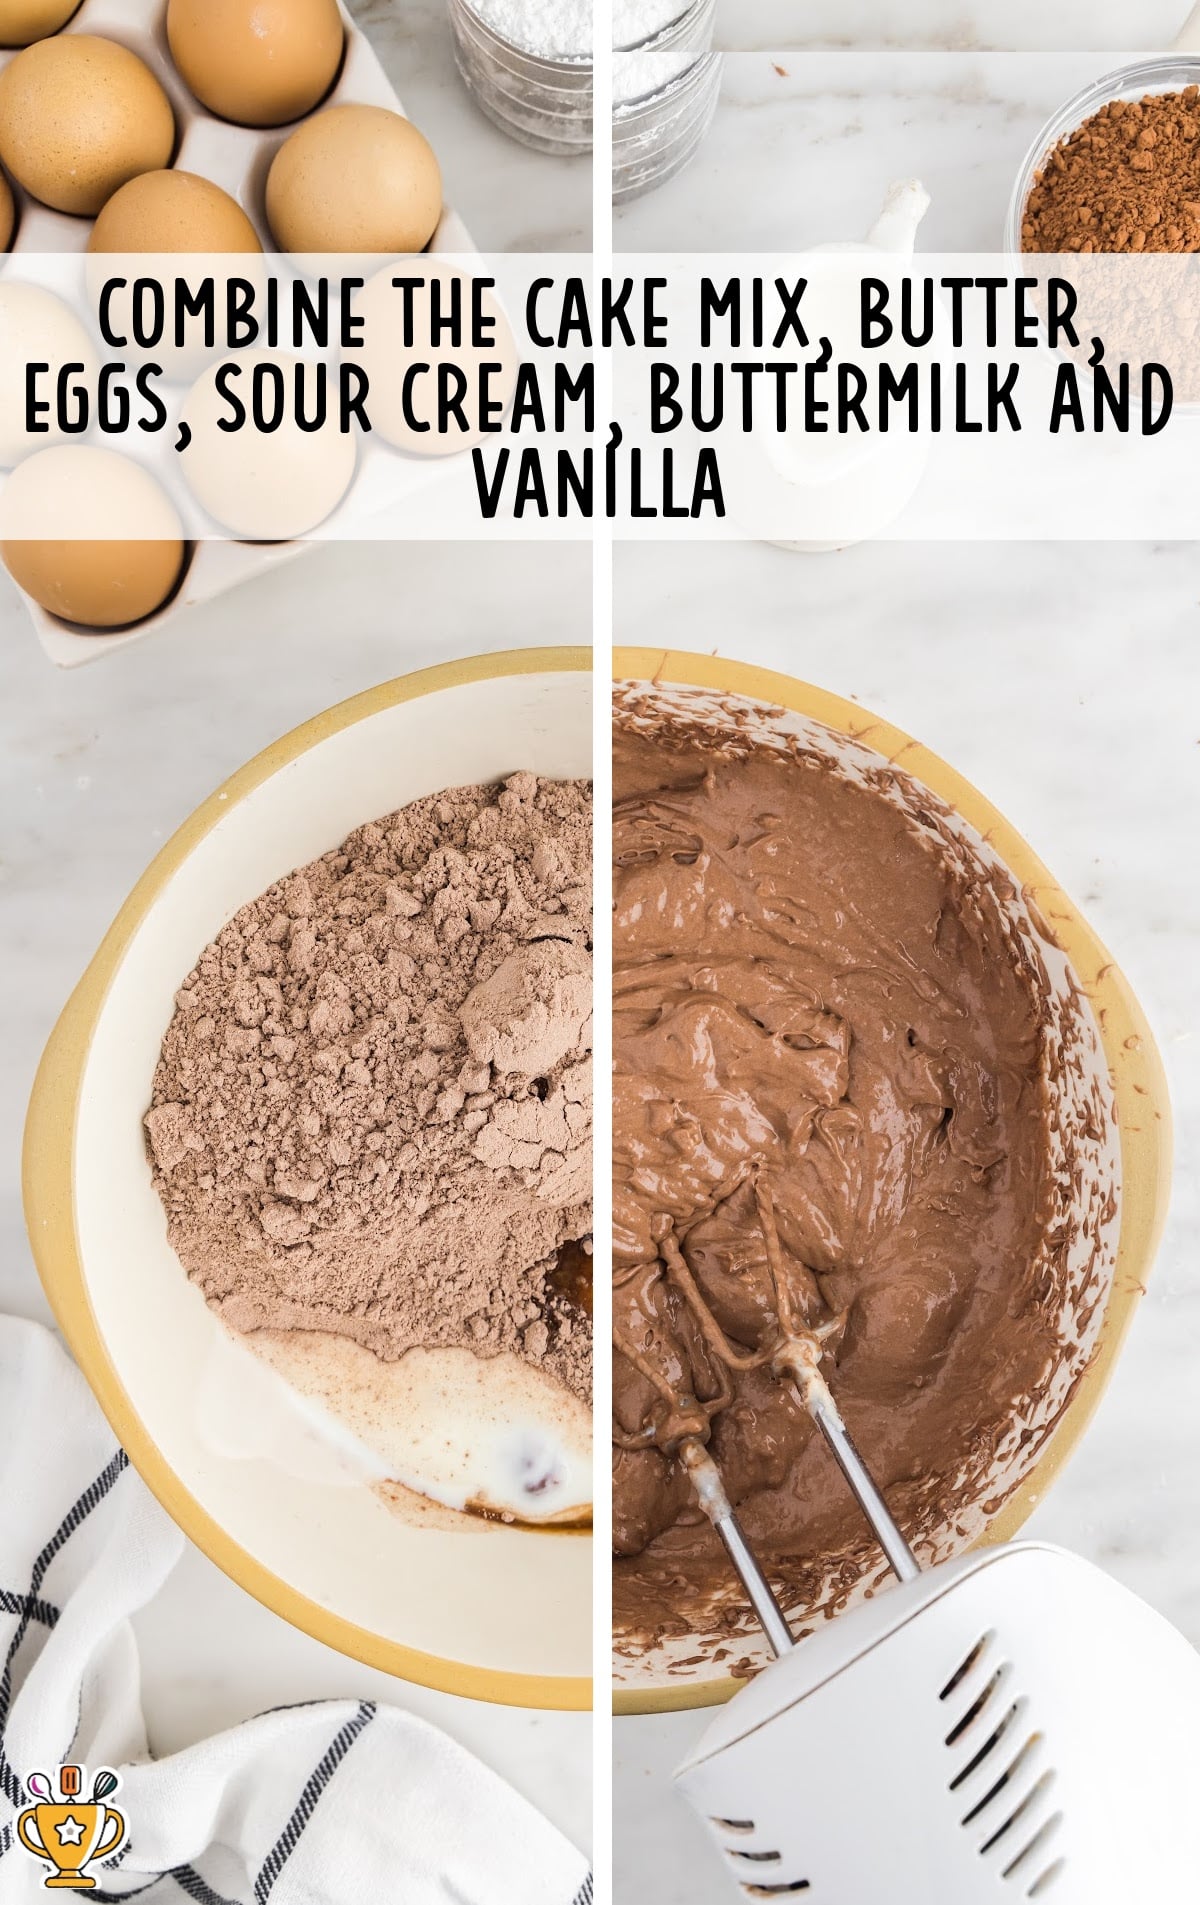
THIRD STEP: In a separate bowl, combine the chocolate cake batter ingredients: chocolate cake mix, butter, eggs, sour cream, buttermilk, and vanilla extract.
Beat on low speed for 1 minute and then on medium-high speed for two additional minutes.
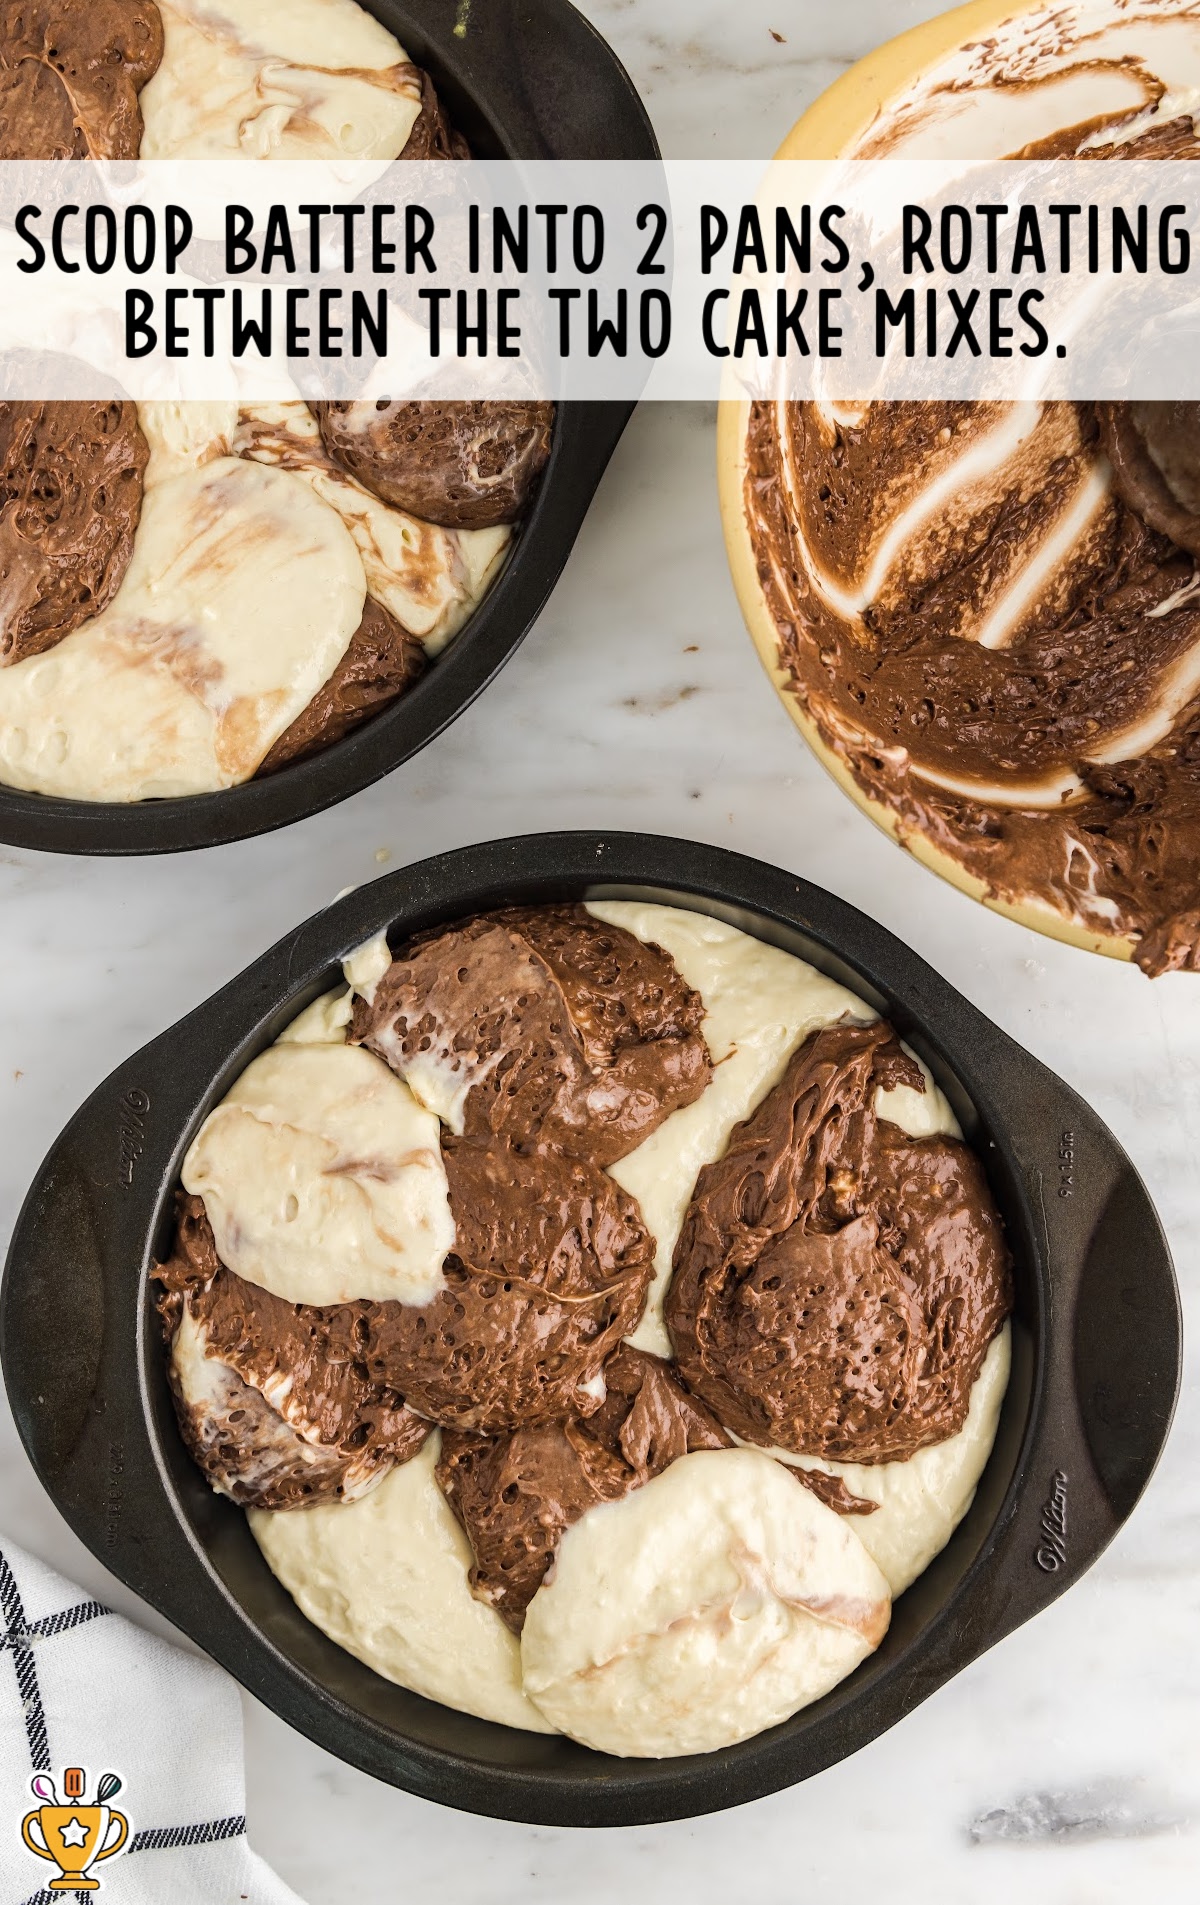
FOURTH STEP: Using an ice cream scoop or large spoon, pile dollops of cake batter into the pans, rotating between the white and chocolate batter.
Fill the pans about ⅔ of the way full to prevent overflowing. You may not use all of the batter, depending on your pan.
Pro Tip
I filled my pans quite full (¾ of the way full) to use up all the batter. I baked the cakes with a sheet pan on the shelf underneath in the oven to catch any spills. The cakes puffed over the rim.
If you have deeper 9-inch cake pans, you can use those. I like the extra height on the cakes by filling the pans really full. You can just trim any overage with a bread knife before frosting.
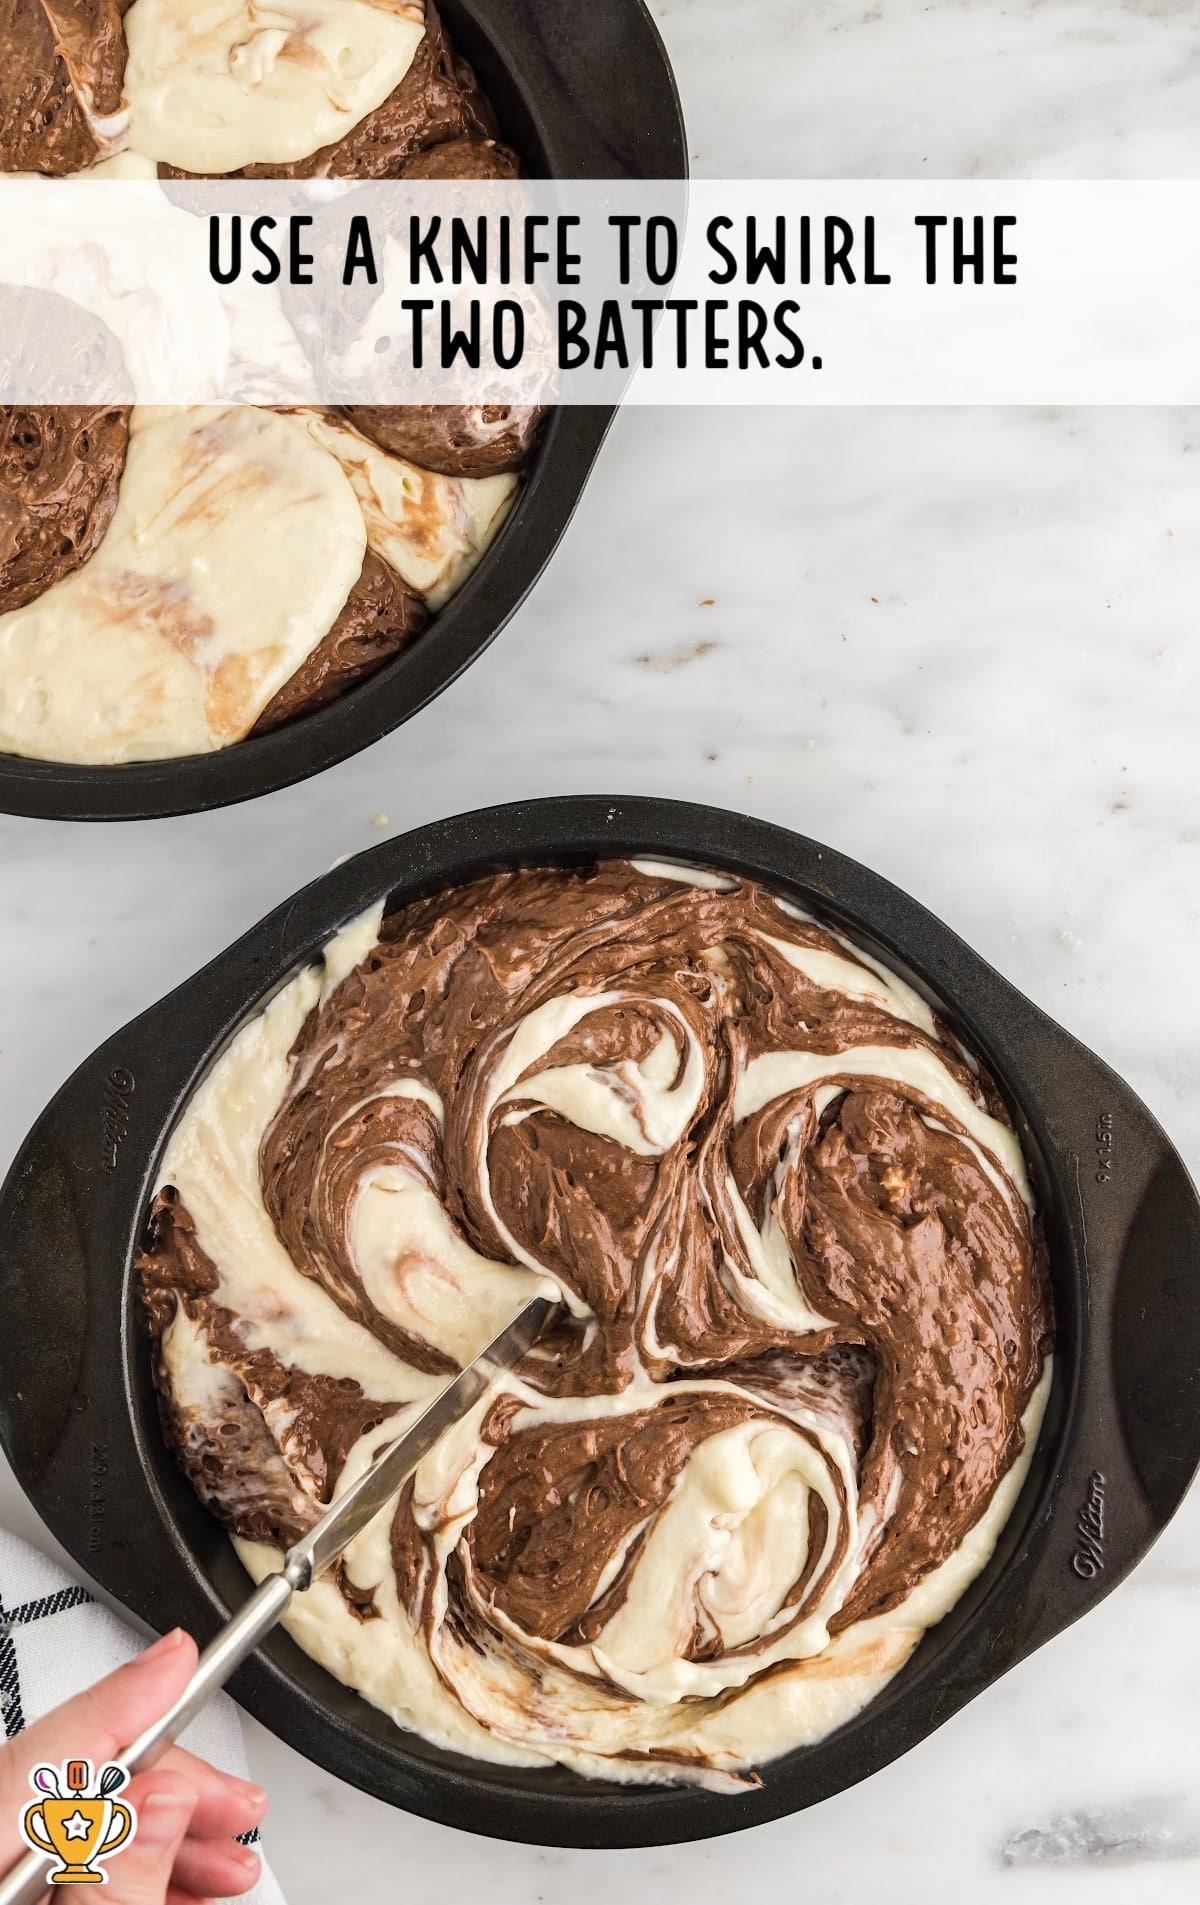
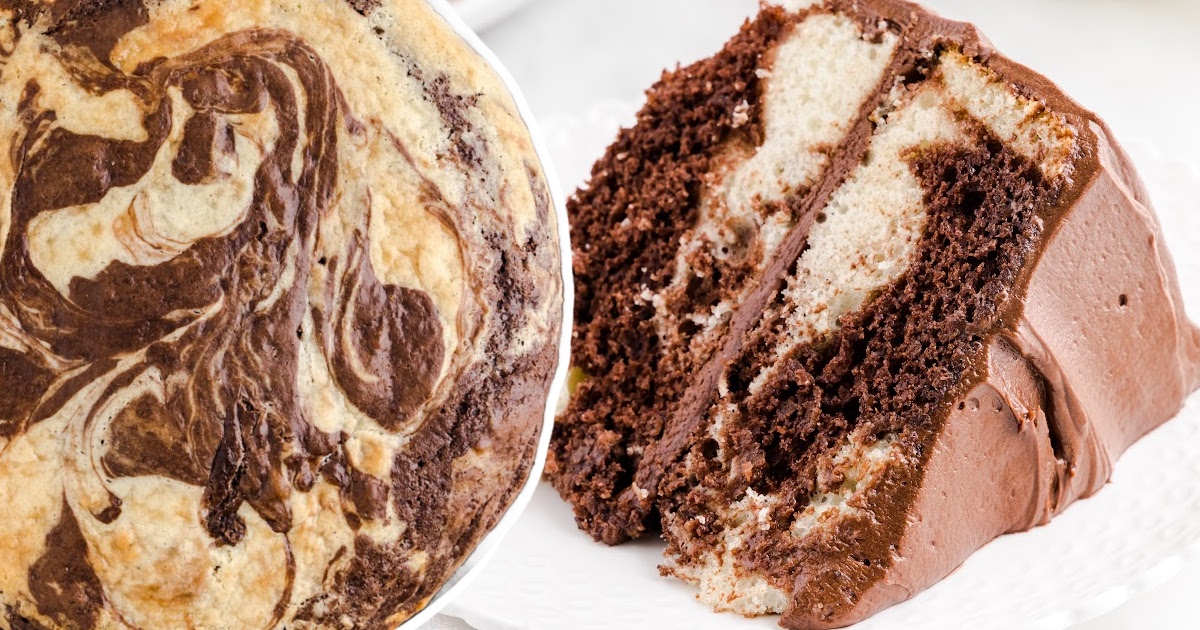
FIFTH STEP: Use a butter knife to cut through the batter and swirl the two colors. Do not over-swirl, which can result in the colors blending.
Pro Tip
The marble effect comes from swirling the two cake colors into each other.
There isn’t a specific pattern or movement; just let your knife flow all the way down to the bottom of the pan and swirl a few times in curved strokes throughout the batter.
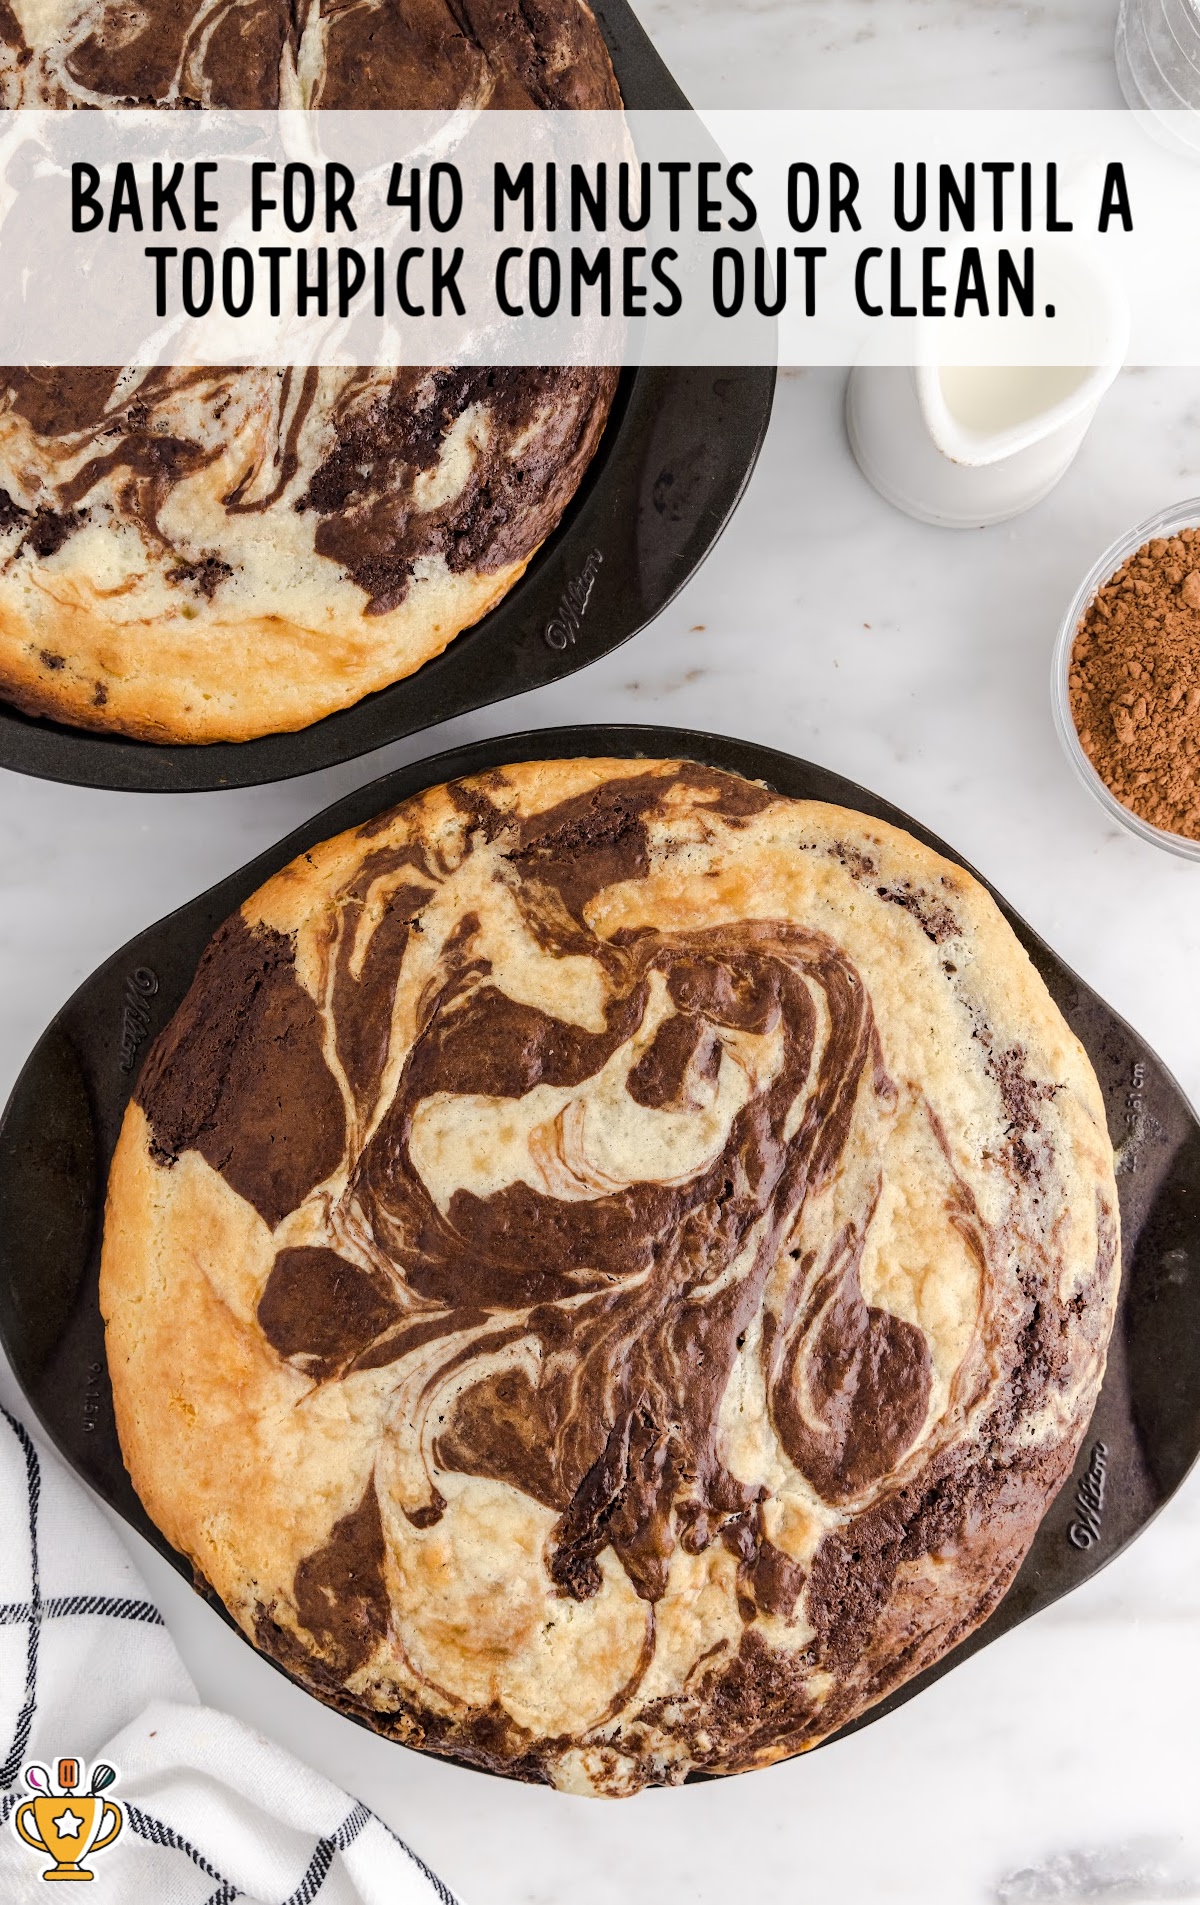
SIXTH STEP: Bake for about 40 minutes or until a toothpick inserted into the cakes comes out with just a few crumbs (the pans are going to be fuller than with a single cake mix, so the bake time will likely be 5 to 10 minutes longer than indicated on the box of cake mix.
SEVENTH STEP: Cool the cakes for 10 to 15 minutes and then remove the cakes from the pans and let them cool completely on a wire rack.
Pro Tip
Freeze cake layers before frosting to make them firmer and easier to assemble and frost.
Wrap with plastic wrap once cooled completely and then place in the freezer for 1 hour or up to 1 week.
No need to defrost before assembling and frosting the cake.
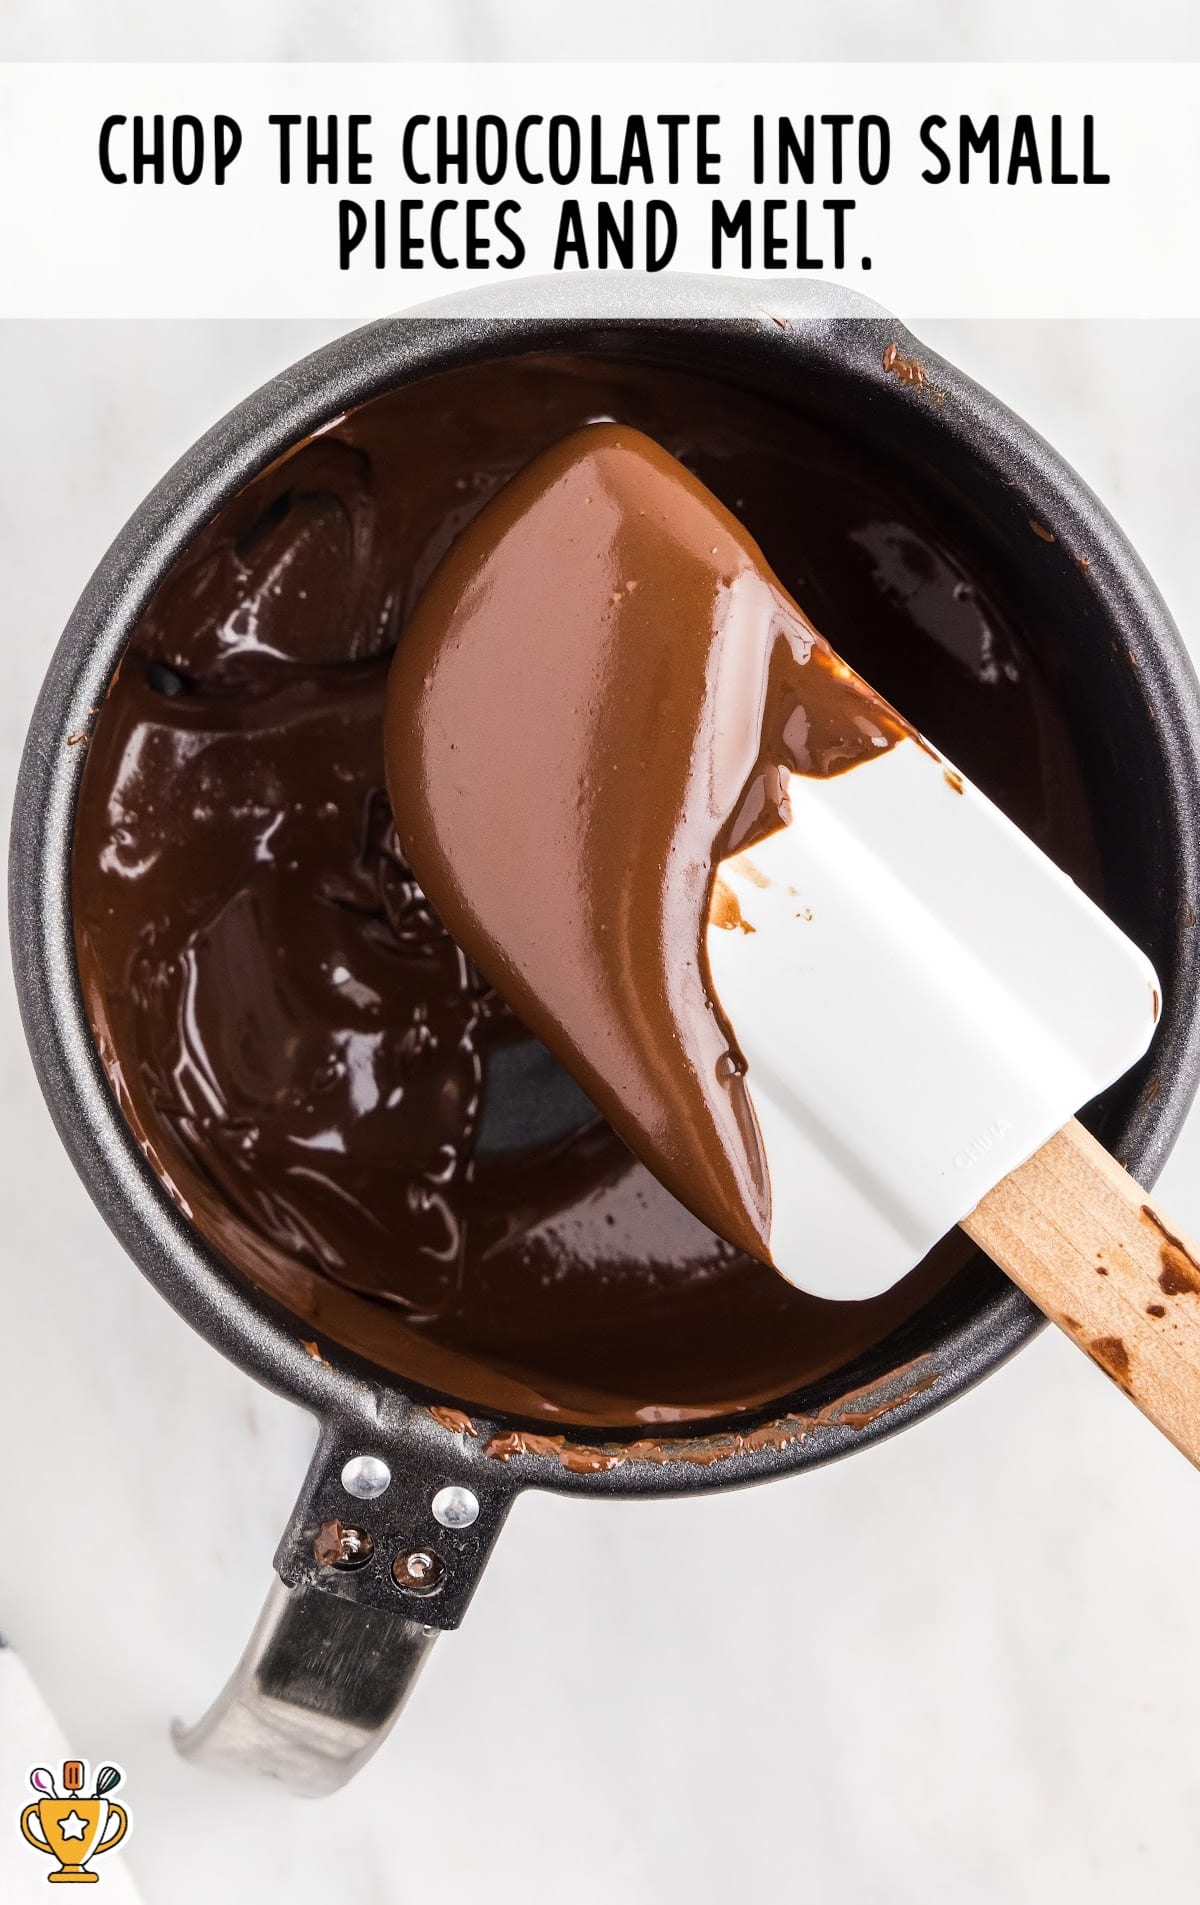
EIGHTH STEP: Meanwhile, prepare the frosting. Chop the German chocolate baking bar into small pieces.
Use a double boiler or 30-second increments in the microwave to melt the chopped chocolate. Stir until fully melted and set aside to cool.
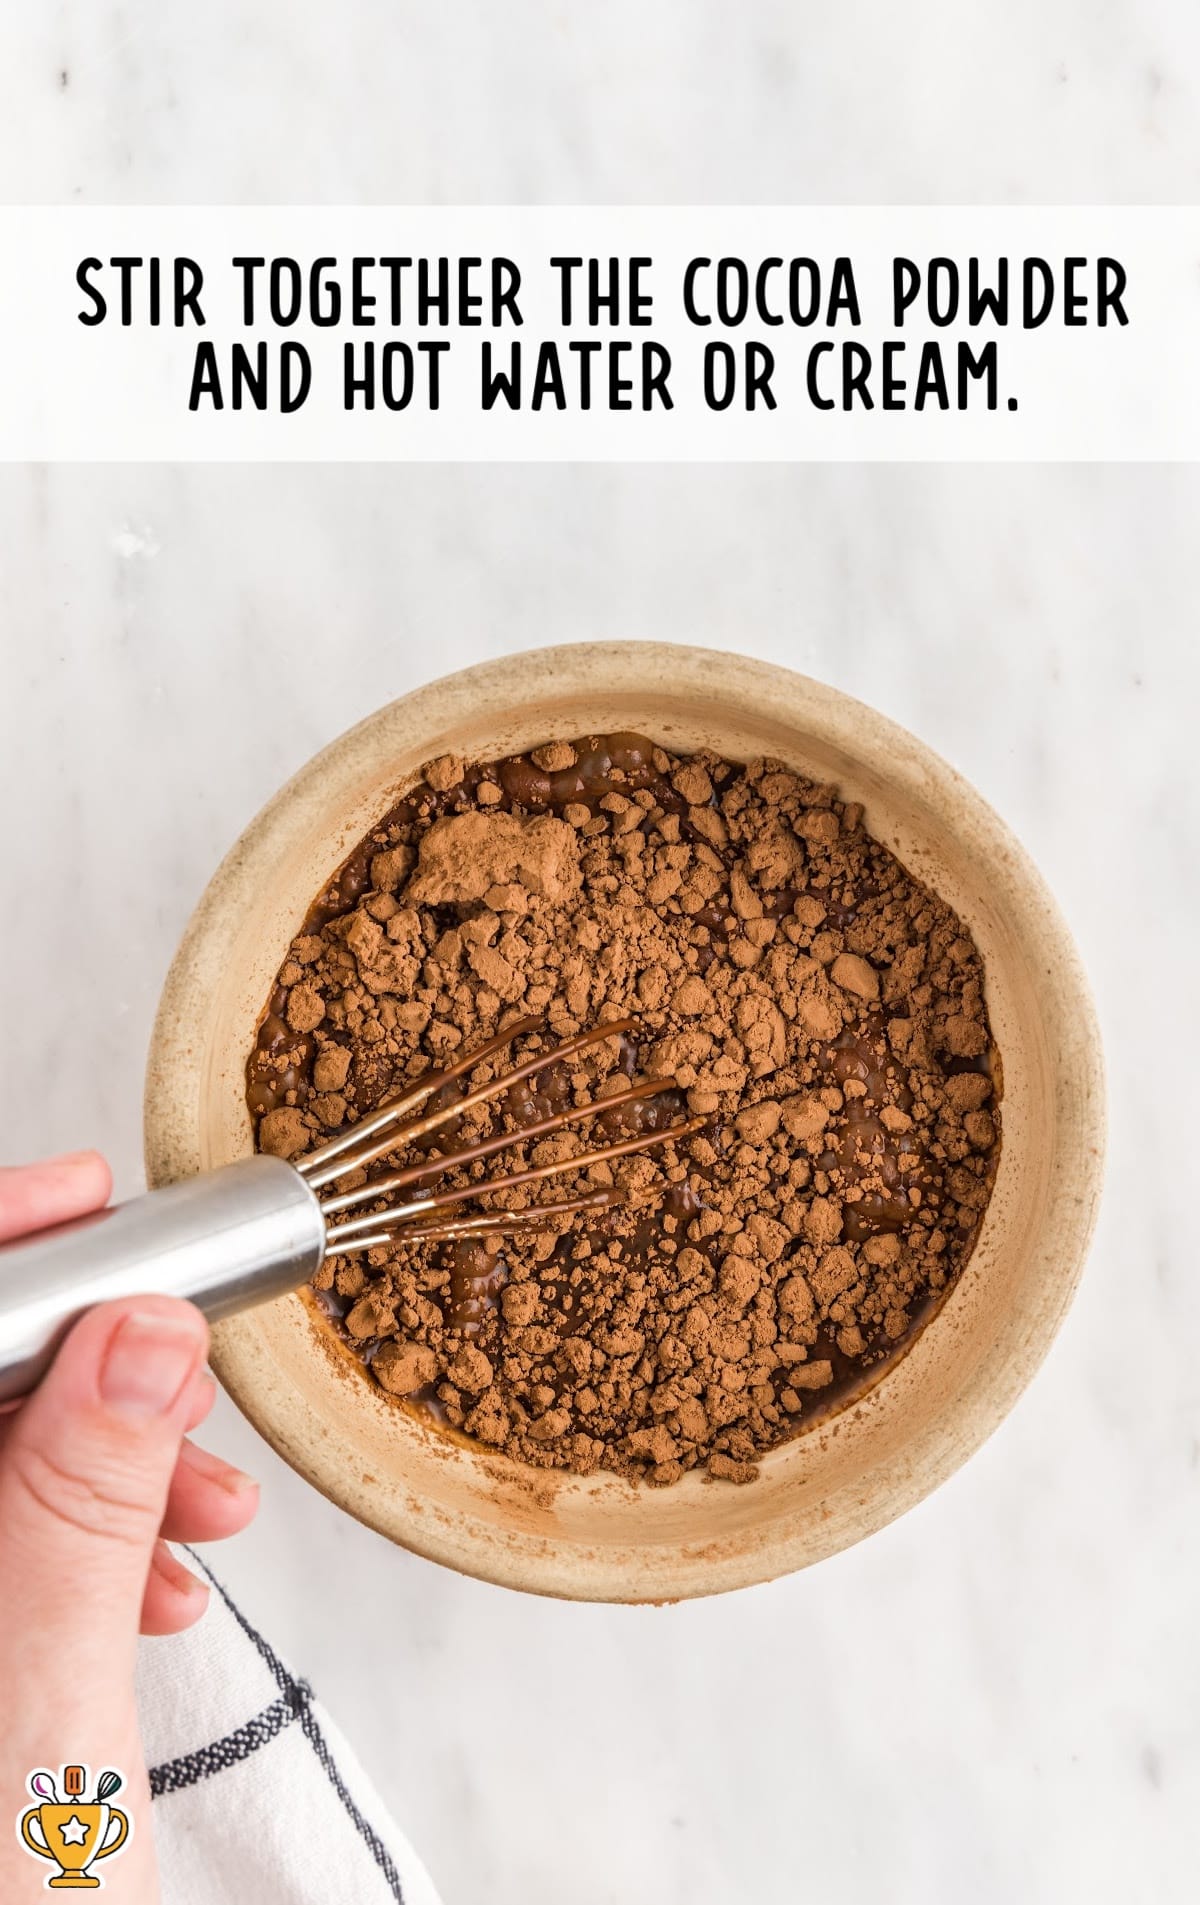
NINTH STEP: Use a whisk to stir together the cocoa powder and hot water (or hot cream) until smooth and shiny.
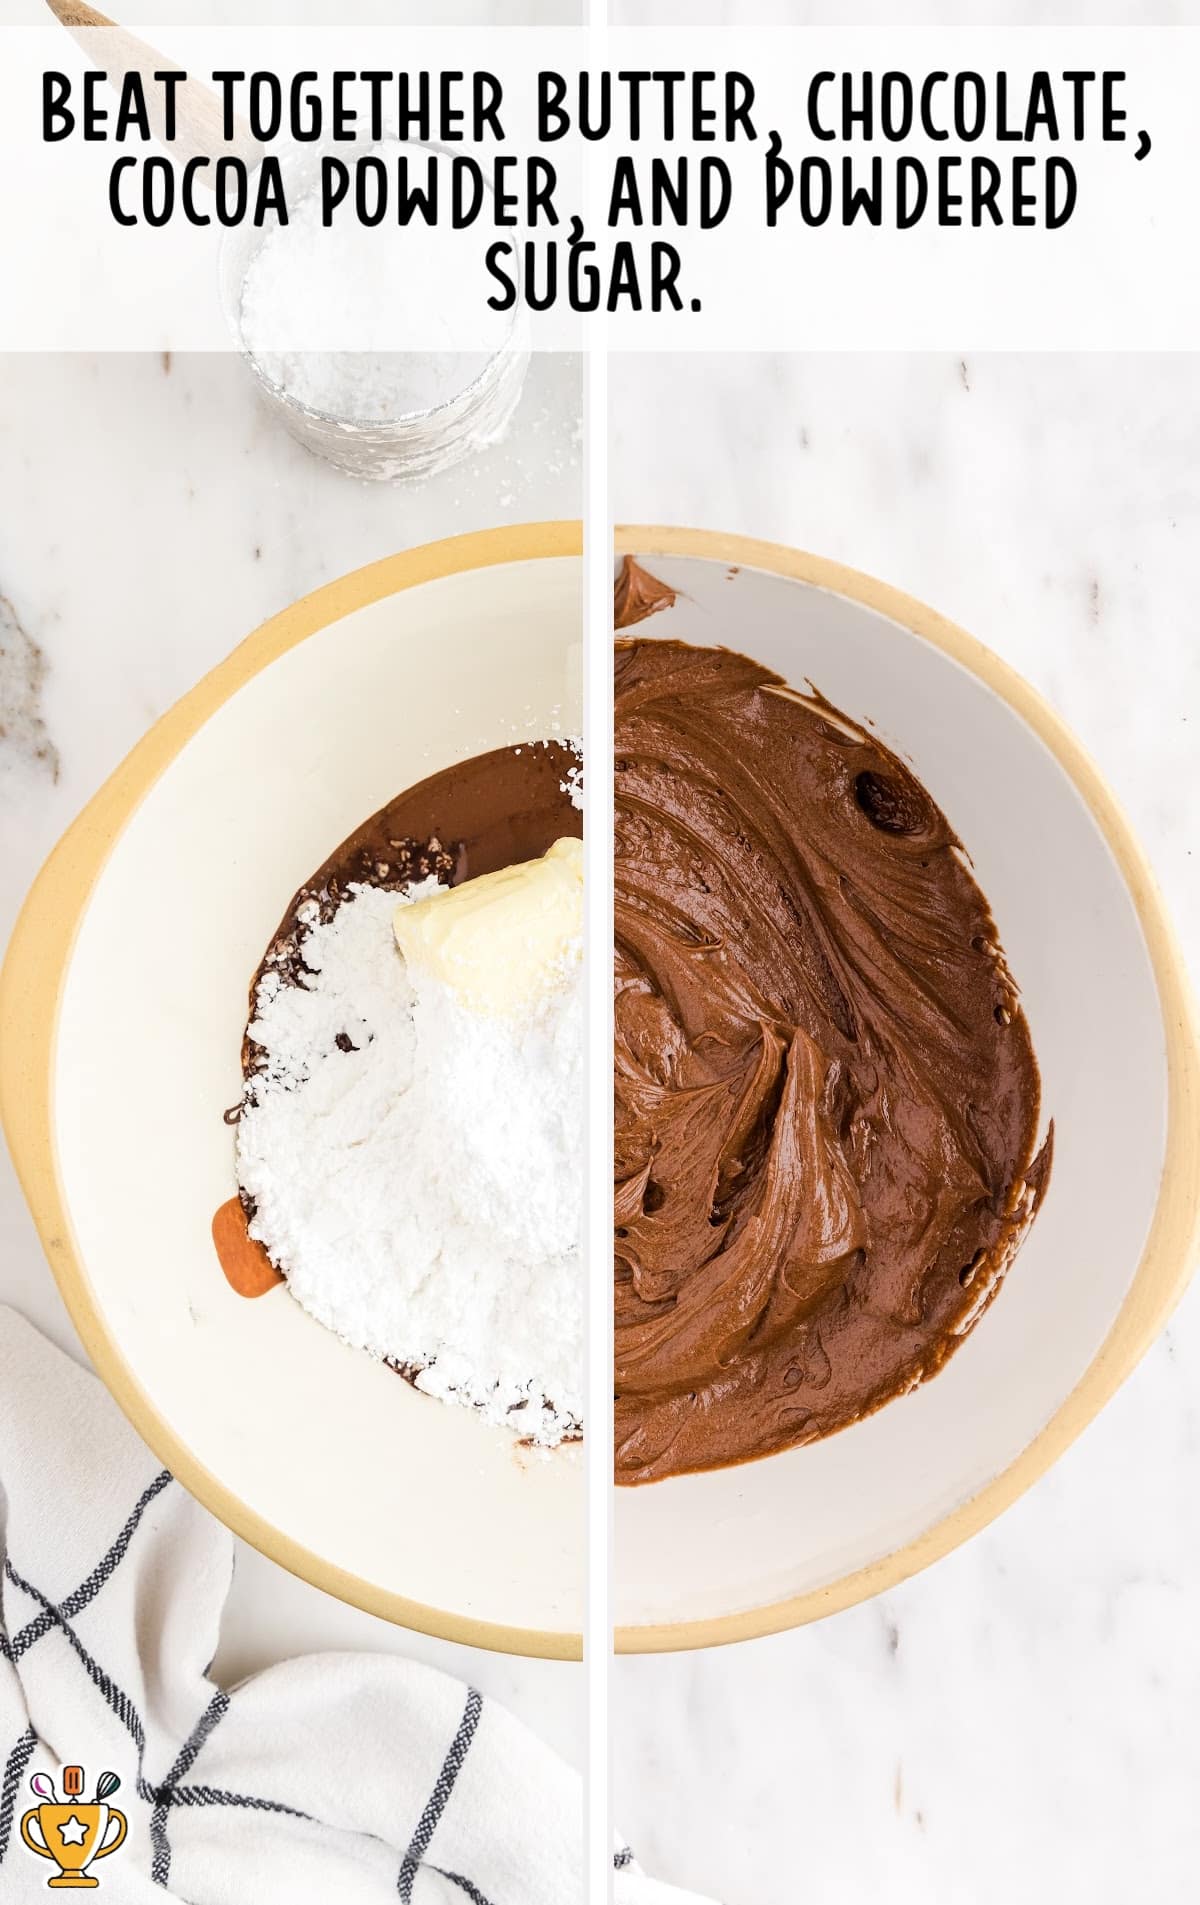
TENTH STEP: In a large mixing bowl using a hand mixer or in the bowl of a stand mixer, beat together the softened butter, cooled melted chocolate, cocoa powder mixture, and powdered sugar.
Beat until the butter mixture is fully combined and fluffy.
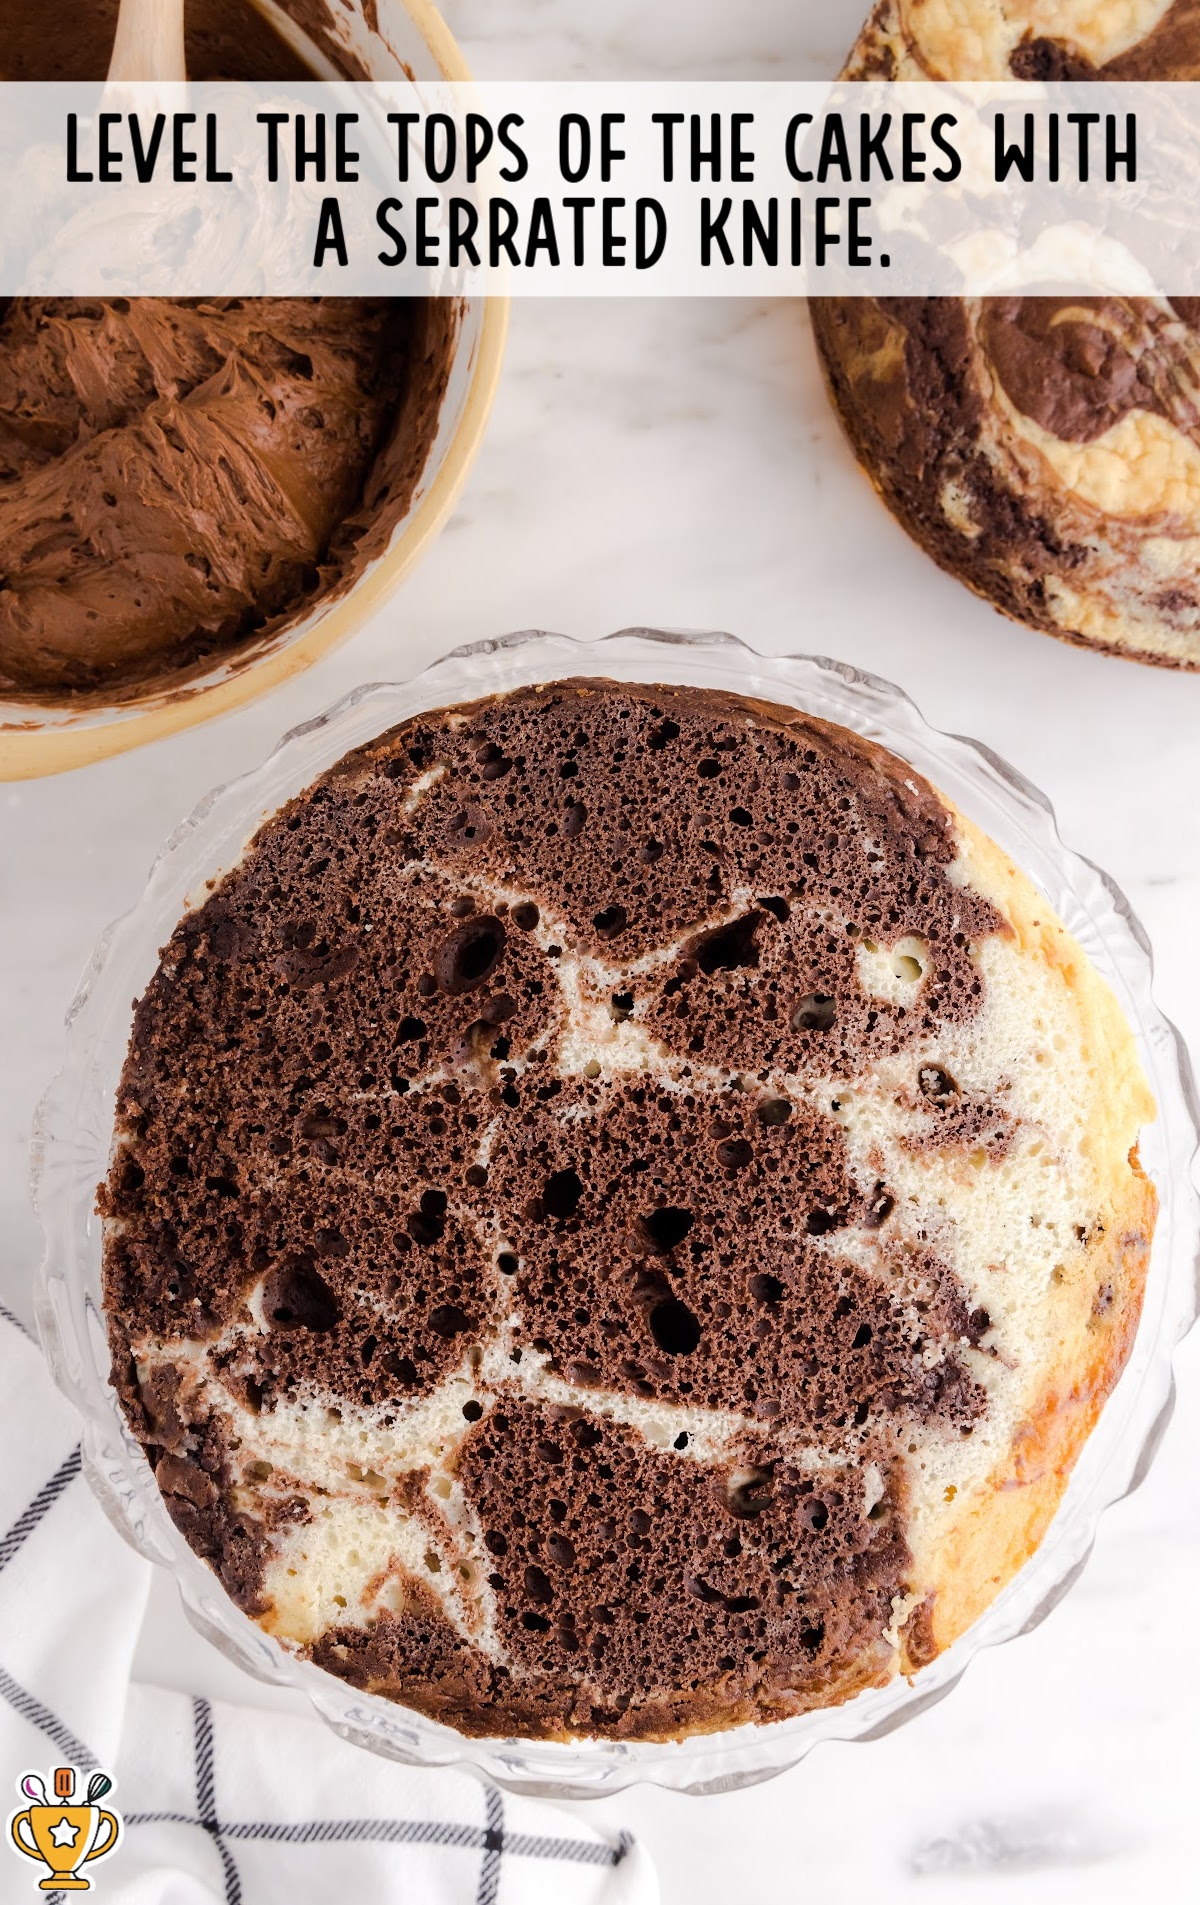
ELEVENTH STEP: Level the tops of the cakes (and any lip from overfilled cake pans) with a serrated knife.
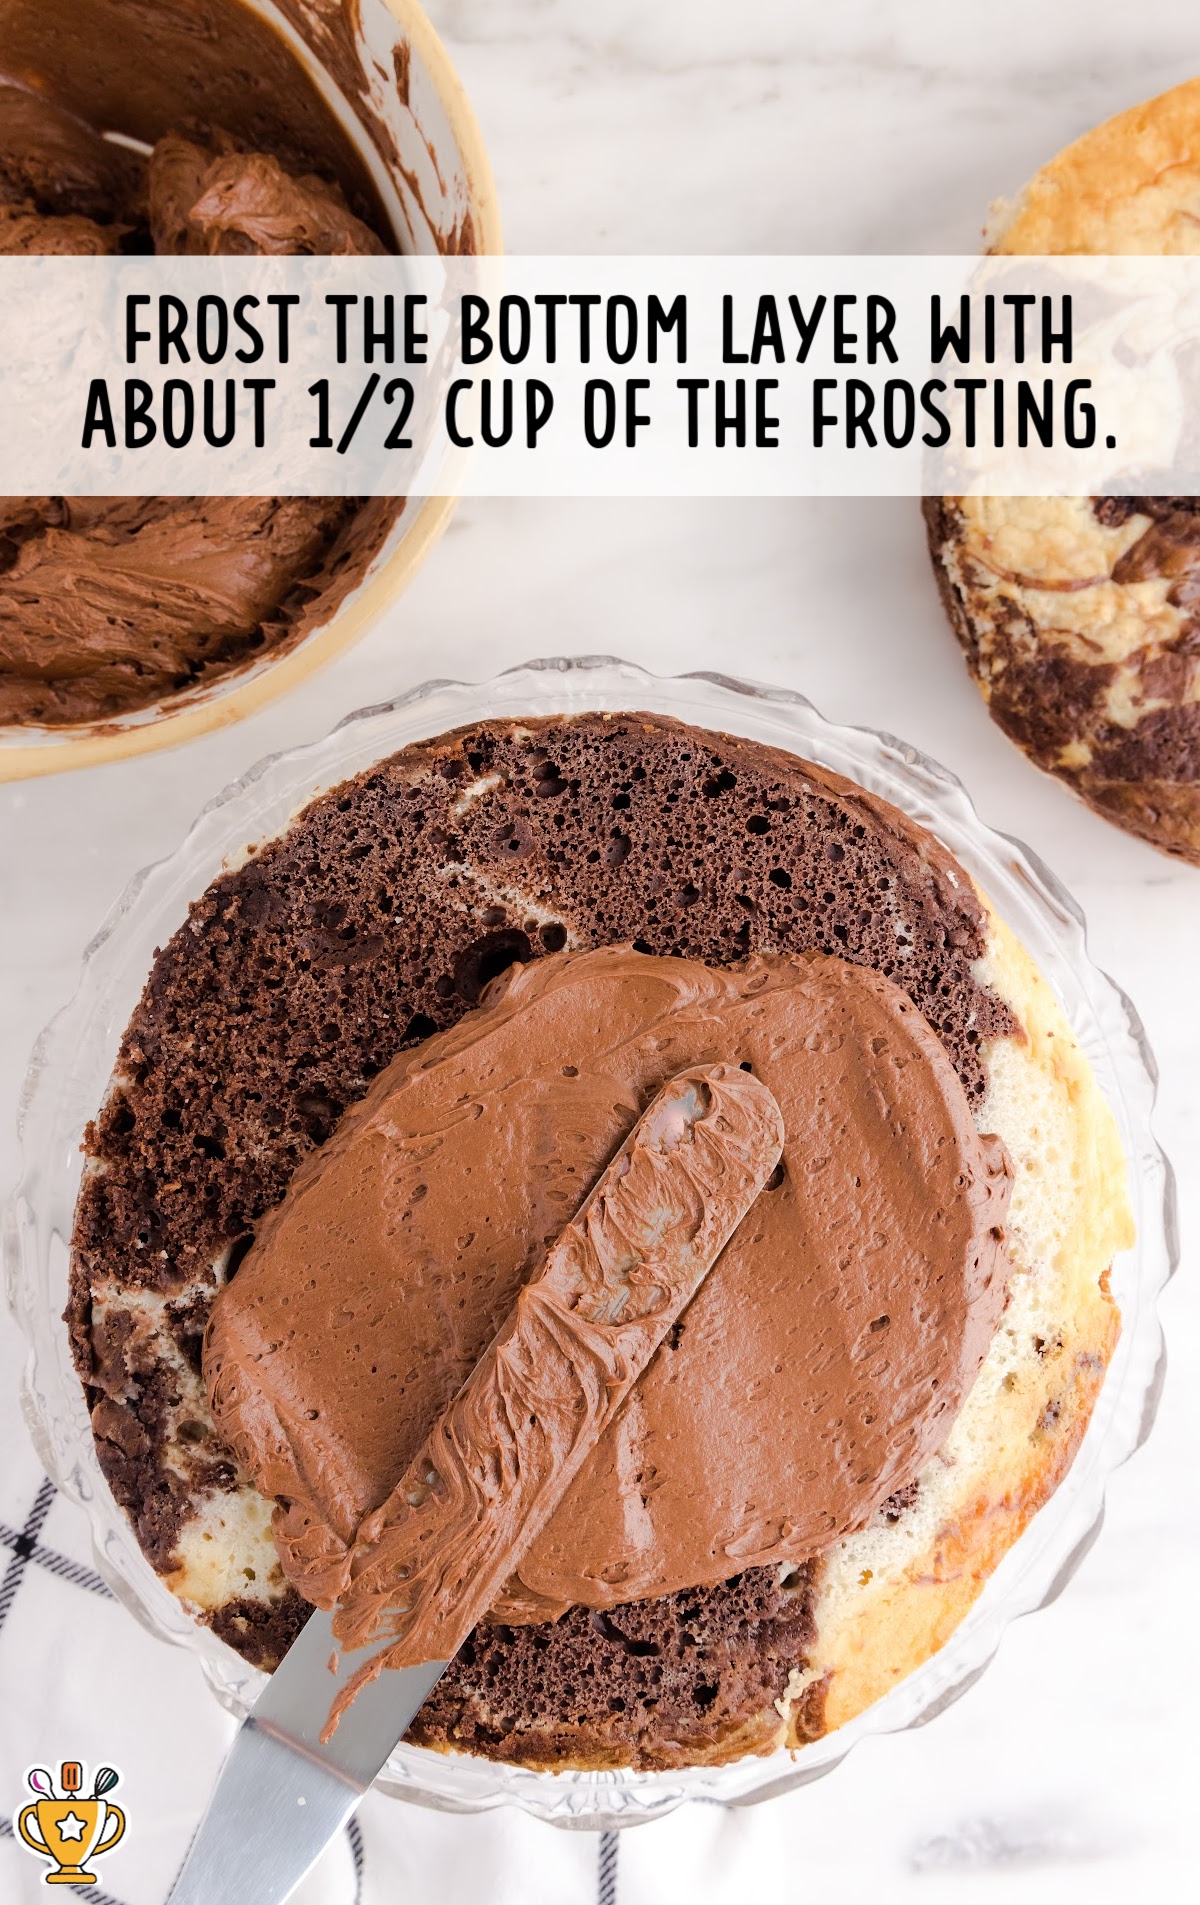
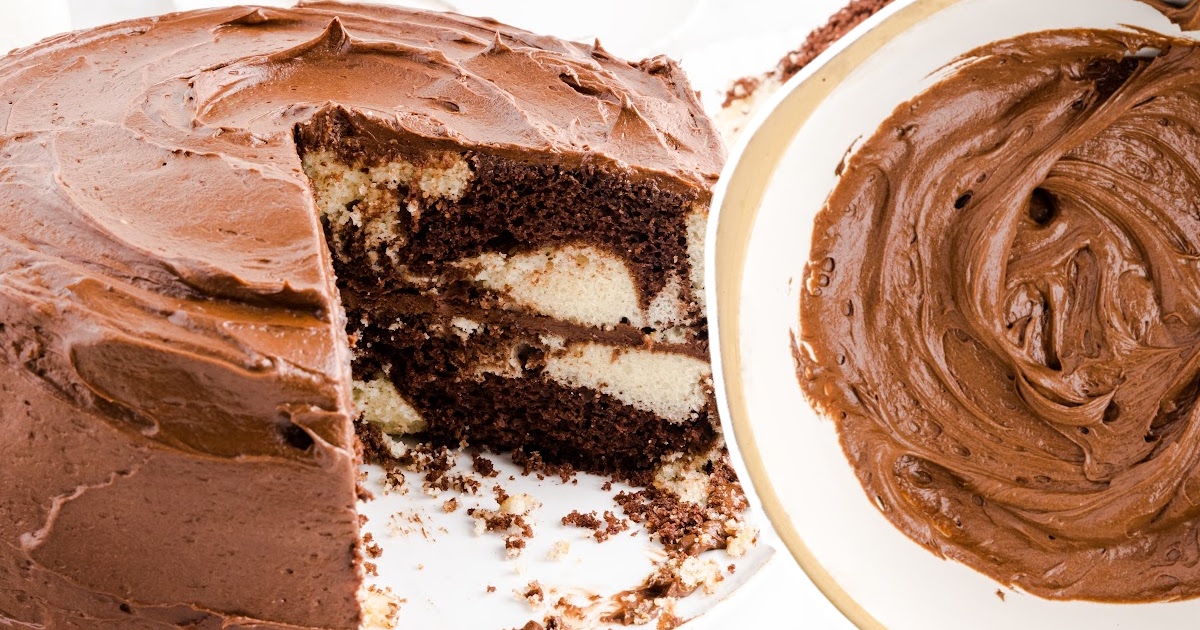
TWELFTH STEP: Using an offset spatula, frost the bottom cake layer with about ½ cup of chocolate frosting.
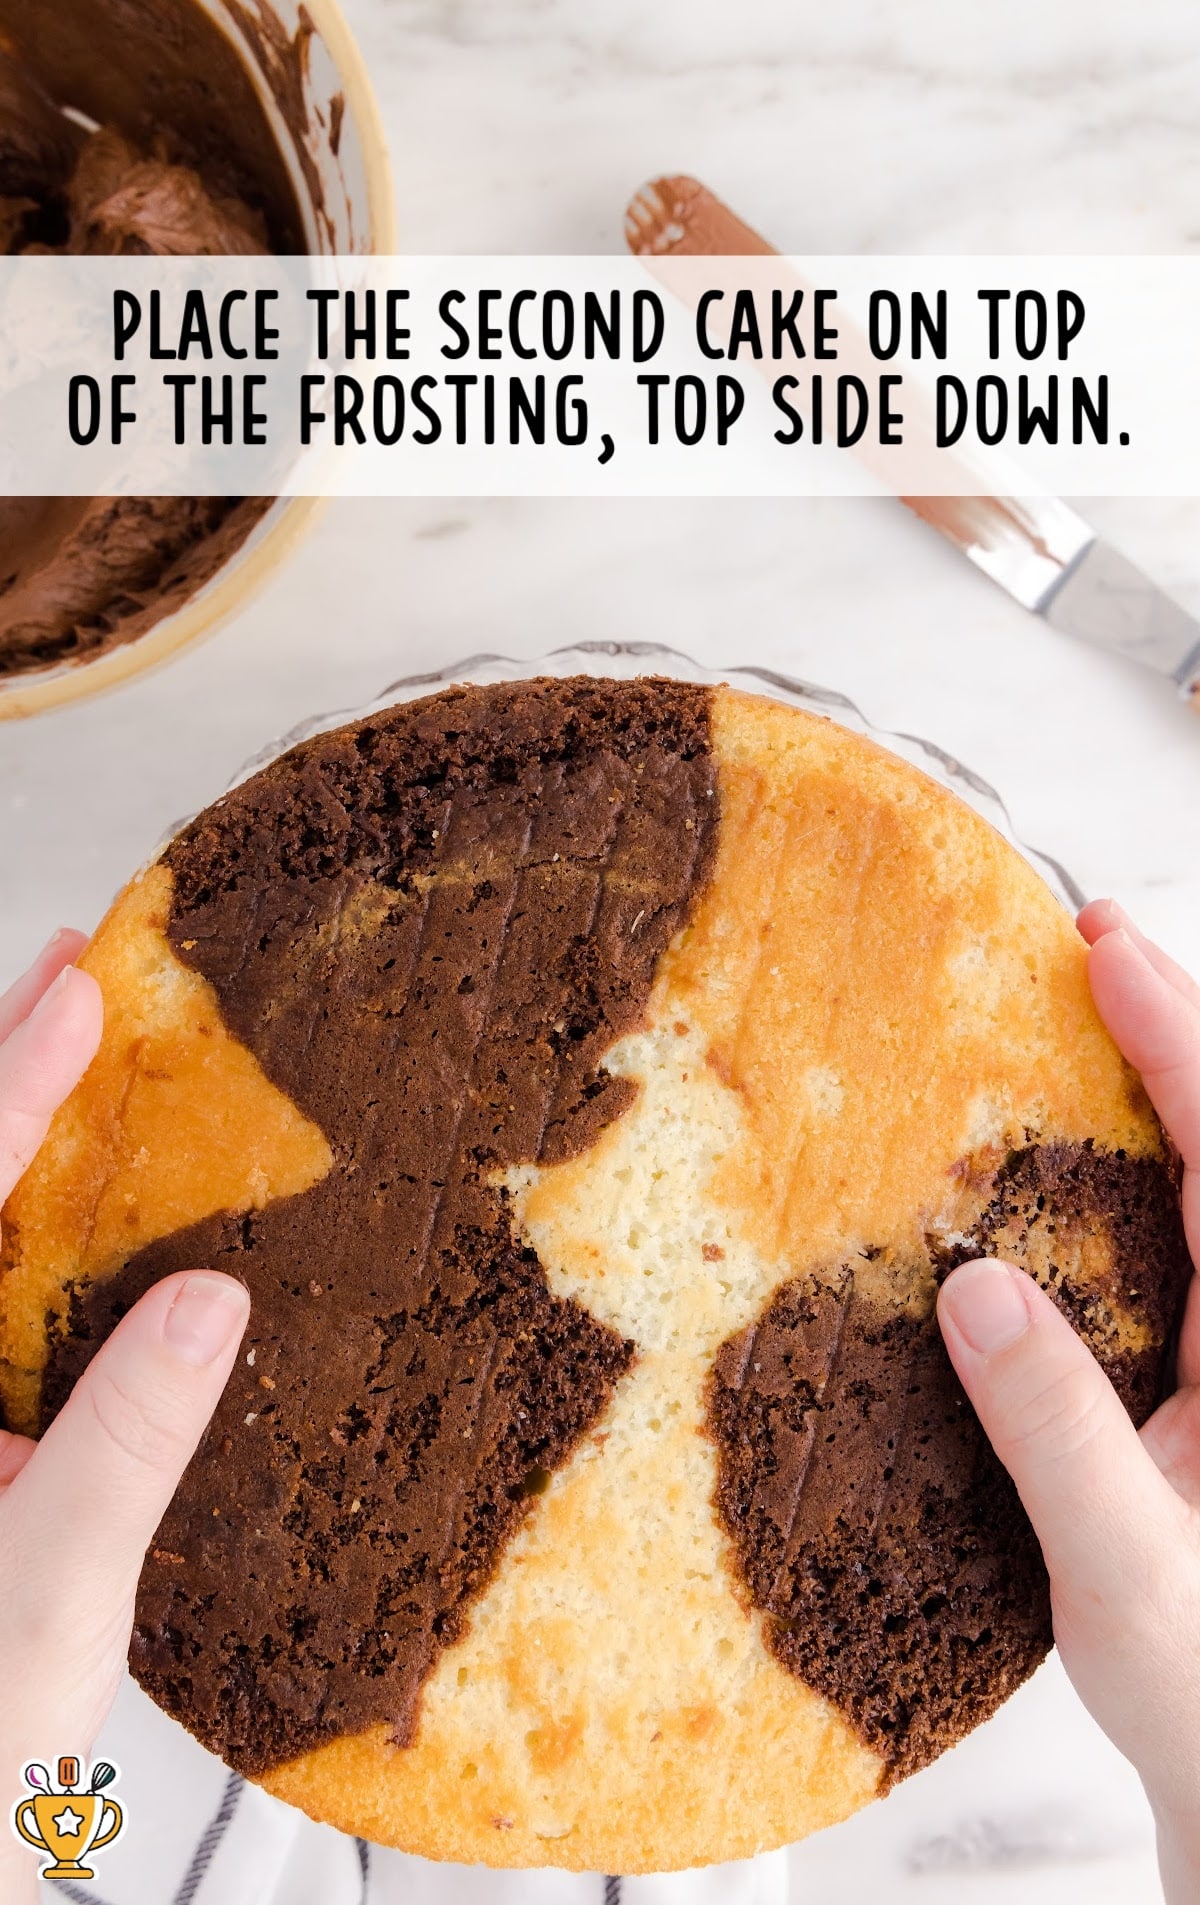
THIRTEENTH STEP: Stack the second cake layer on top of the first, top side down.
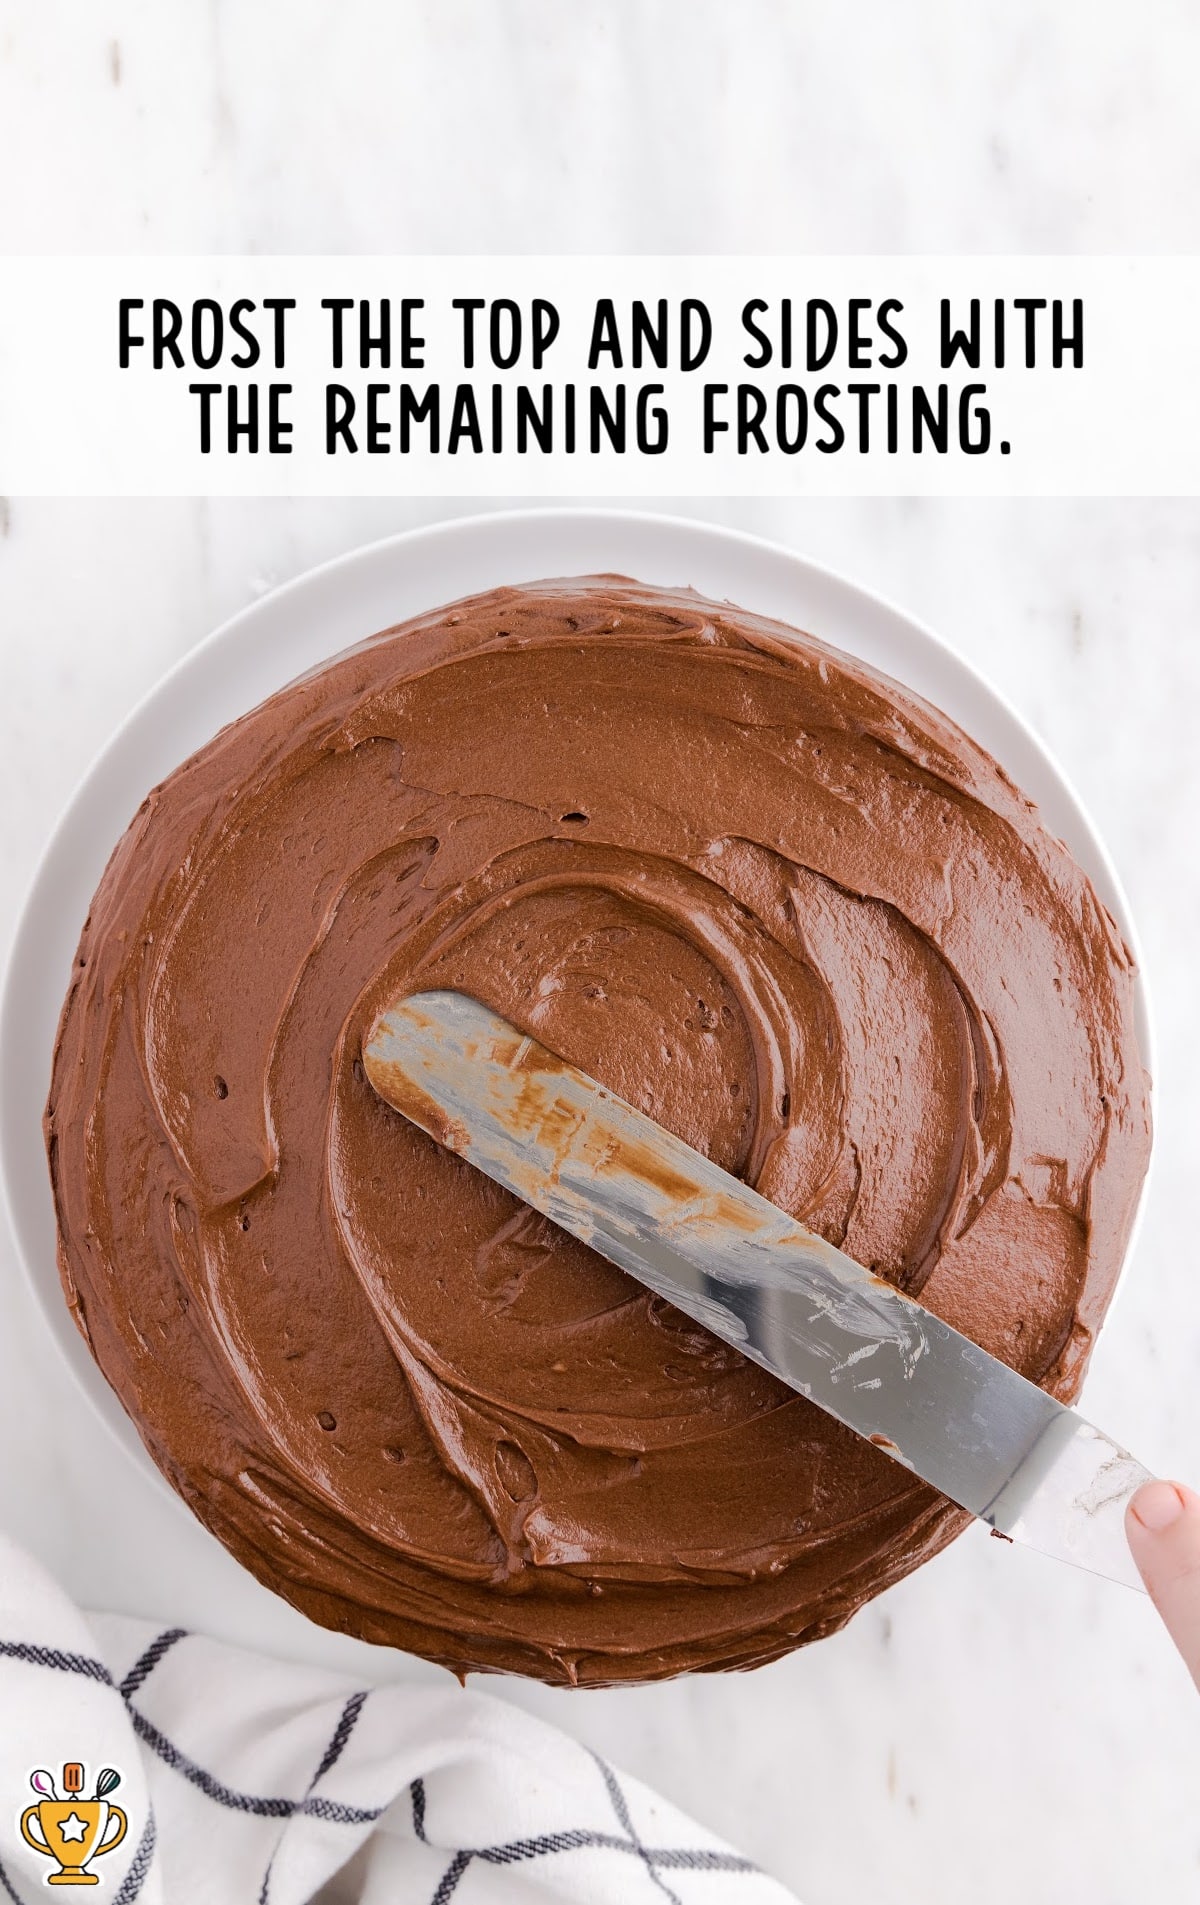
FOURTEENTH STEP: Frost the top and sides of the cake with the remaining frosting.
Pro Tip
The frosting can be chilled in the refrigerator if it is too soft or if you wish to prepare it in advance.
Give it another quick beat with a hand or stand mixer before using it to frost the cake.
The frosting is not shelf-stable – meaning that the cake should be kept chilled until serving and for storage.
How To Serve Chocolate and Vanilla Marble Cake
Serve marble cake for any occasion, any time of year! This sweet, swirled dessert is a hit with kids and adults. Pair it with other treats to make every slice even better.
- Birthday Parties: This cake makes birthdays extra special with its beautiful swirls and soft, moist texture. Kids love the mix of chocolate and vanilla in every bite. Serve it with homemade cool whip frosting or a scoop of cookie dough ice cream for an extra treat.
- Holiday Gatherings: Whether it’s Christmas, Thanksgiving, or Easter, this cake adds something special to the dessert table. The rich flavors pair well with warm drinks like frozen hot chocolate or coffee. Add a drizzle of toffee sauce or a side of bark for a festive touch.
- Weekend Treats: Bake this cake for a cozy weekend at home or a fun family dessert. It’s easy to make and perfect for sharing. Serve it with a tall glass of milk or a mug of homemade frozen hot chocolate.

Why You'll Love This Moist Marble Cake Recipe
Marble cake is a classic for a reason. It’s simple, fun to make, and always a crowd-pleaser. Whether for a birthday, holiday, or just because, this cake never disappoints.
Easy to Make: No special tools or tricky steps—just a few simple ingredients and a swirl of a fork.
Chocolate and Vanilla in Every Bite: Can’t decide between chocolate or vanilla? This cake gives you both in a perfect balance.
Beautiful Swirls: The marbled effect looks fancy but takes barely any effort. It’s the kind of cake that wows without stress.
Soft and Moist: Every bite is rich, soft, and never dry. No one wants a dry cake, and this one stays fresh.
Perfect for Any Occasion: Whether for birthdays, holidays, or weekend baking, this cake fits any celebration or cozy night in.
This cake is fun, delicious, and guaranteed to be a favorite. Once you try it, you’ll want to make it again!
Recipe FAQ
How do I get the best marble swirl in my cake?
To get the best marble swirl, use a butter knife or skewer and gently drag it through the batter. Don’t overmix, or the colors will blend too much.
Why is my marble cake dry?
Your marble cake may be dry if you overbake it or don’t measure ingredients correctly. Be sure to check the cake a few minutes before the baking time ends.
Can I use a different type of cocoa powder?
Yes, you can use Dutch-process cocoa for a deeper chocolate flavor. Just know that it may slightly change the cake’s texture.
What’s the best way to keep the cake from sticking to the pan?
Grease the pan well and line it with parchment paper. This makes it easier to lift the cake out without breaking it.
Why didn’t my cake rise properly?
If your cake didn’t rise, check that your baking powder and baking soda aren’t expired. Also, don’t overmix the batter, or it may not rise well.
Can I use a different kind of milk in this cake?
Yes, you can swap whole milk for buttermilk or half-and-half. Buttermilk adds a slight tang and makes the cake extra moist.

Serving FAQ
What’s the best way to slice marble cake for serving?
Use a sharp knife and wipe it clean between cuts for neat slices. Let the cake cool completely before slicing.
Should I serve marble cake warm or at room temperature?
Marble cake tastes best at room temperature. Let it sit out for fifteen minutes after chilling to bring out the flavors.
Can I add frosting or glaze to marble cake?
Yes, drizzle a simple chocolate ganache or vanilla glaze on top for extra sweetness. A dusting of powdered sugar works too.
How should I serve marble cake at a party?
Cut it into even squares or thin slices for easy grabbing. Arrange the pieces on a serving tray for a polished look.
Can I serve marble cake with ice cream?
Yes, a scoop of vanilla or chocolate ice cream pairs perfectly. The mix of warm cake and cold ice cream is delicious.
What’s the best way to make marble cake look fancy for a special occasion?
Top it with fresh berries, powdered sugar, or chocolate shavings. A dollop of whipped cream adds a nice finishing touch.
Storage FAQ
Storing Marble Cake
Keep your marble cake fresh with the right storage methods. Follow these simple tips to store leftovers, make it ahead, or freeze it for later. Proper storage keeps your cake soft and delicious for days.
Can I make marble cake ahead of time?
Yes, bake the cake a day in advance and keep it covered at room temperature. This helps maintain its moisture and texture.
What’s the best way to store leftover marble cake?
Store leftover cake in an airtight container at room temperature for up to three days. For longer storage, refrigerate it.
Should I refrigerate marble cake?
Refrigeration isn’t necessary, but it helps keep the cake fresh for up to a week. Wrap it tightly to prevent it from drying out.
Can I freeze marble cake?
Yes, wrap the cake tightly in plastic wrap and place it in a freezer-safe bag. It stays fresh for up to two months.
How do I thaw frozen marble cake?
Let the cake thaw at room temperature for a few hours. For quicker thawing, place it in the fridge overnight.
What’s the best way to reheat marble cake?
Warm slices in the microwave for ten to fifteen seconds to soften them. Avoid overheating to keep the cake from drying out.

Marble Cake
Marble cake combines rich chocolate and sweet vanilla in every bite with a soft, moist texture. This easy homemade cake looks impressive but takes little effort to make.
Did you try this recipe?Let our readers know how it turned out by Leaving a Review!
Ingredients
White Cake
- 1 box white cake mix (or yellow cake mix)
- ½ cup salted butter (softened)
- 3 large eggs
- ¼ cup sour cream
- 1 cup milk (or buttermilk)
- 1 teaspoon vanilla extract
Chocolate Cake
- 1 box chocolate cake mix
- ½ cup salted butter (softened)
- 3 large eggs
- ¼ cup sour cream
- 1 cup milk (or buttermilk)
- 1 teaspoon vanilla extract
Frosting
- 4 ounces German chocolate or semi-sweet baking bar (melted and cooled)
- ½ cup unsweetened cocoa powder
- ½ cup hot water (or heated heavy cream)
- 1 cup salted butter (softened)
- 2 cups powdered sugar
DIRECTIONS
- Preheat the oven to 325°F. Spray two 9-inch round cake pans with non-stick cooking spray or use the wrappers from the butter to grease them thoroughly.
- In one mixing bowl, combine the white cake ingredients: cake mix, butter, eggs, sour cream, buttermilk and vanilla extract. Beat on low speed for 1 minute and then on medium-high speed for two additional minutes. Set aside.
- In a second mixing bowl, combine the chocolate cake ingredients: chocolate cake mix, butter, eggs, sour cream, buttermilk and vanilla extract. Beat on low speed for 1 minute and then on medium-high speed for two additional minutes.
- Using an ice cream scoop or large spoon, pile dollops of cake batter into the pans, rotating between the white and chocolate cake mixes. Fill the pans about ⅔ of the way full to prevent overflowing. You may not use all of the batter.
- Use a knife to cut through the batter and swirl the two colors. Do not over swirl, which can result in the colors blending.
- Bake for about 40 minutes or until a toothpick inserted into the cakes comes out with just a few crumbs. The pans are going to be more full than with a single cake mix, so the cook time will likely be 5 to 10 minutes longer than indicated on the box of cake mix.
- Cool the cakes for 10 to 15 minutes and then remove the cakes from the pans and let them cool completely on a cooling rack.
- Meanwhile, prepare the frosting. Chop the German chocolate baking bar into small pieces. Use a double boiler or 30-second increments in the microwave to melt the chocolate. Stir until fully melted and set aside to cool.
- Use a whisk to stir together the cocoa powder and hot water (or hot cream) until smooth and shiny.
- In a large mixing bowl, beat together the softened butter, cooled German chocolate, cocoa powder mixture, and powdered sugar. Beat until fully combined and fluffy.
- Level the tops of the cakes (and any lip from overfilled cake pans) with a serrated knife.
- Frost the bottom cake layer with about ½ cup of chocolate frosting.
- Stack the second cake layer on top of the first, top side down.
- Frost the top and sides of the cake with the remaining frosting.
Notes
- I filled my pans quite full (¾ of the way full) to use up all the batter. I baked the cakes with a sheet pan on the shelf underneath in the oven to catch any spills. The cakes puffed over the rim. If you have deeper 9-inch cake pans, you can use those. I like the extra height on the cakes by filling the pans really full. You can just trim any overage with a bread knife before frosting.
- The marble effect comes from swirling the two cake colors into each other. There isn’t a specific pattern or movement; just let your knife flow all the way down to the bottom of the pan and swirl a few times in curved strokes throughout the batter.
- Freeze cake layers before frosting to make them firmer and easier to assemble and frost. Wrap with plastic wrap once cooled completely and then place in the freezer for 1 hour or up to 1 week. No need to defrost before assembling and frosting the cake.
- The frosting can be chilled in the refrigerator if it is too soft or if you wish to prepare it in advance. Give it another quick beat with a hand or stand mixer before using it to frost the cake. The frosting is not shelf-stable – meaning that the cake should be kept chilled until serving and for storage.
Nutrition
Calories: 791kcal | Carbohydrates: 92g | Protein: 10g | Fat: 45g | Saturated Fat: 25g | Polyunsaturated Fat: 4g | Monounsaturated Fat: 13g | Trans Fat: 1g | Cholesterol: 169mg | Sodium: 902mg | Potassium: 368mg | Fiber: 3g | Sugar: 57g | Vitamin A: 1160IU | Calcium: 243mg | Iron: 4mg
HAVE YOU TRIED THIS RECIPE?Follow me on Pinterest @bestblogrecipes

Comments
Hannah D. says
Baked this one yesterday and I really liked how visible the chocolate & vanilla swirls were. Texture was moist enough, not dry like some marble cakes I’ve had. My kids thought it looked fancy when I sliced it too.