
Last updated on
Rainbow Roll Cake

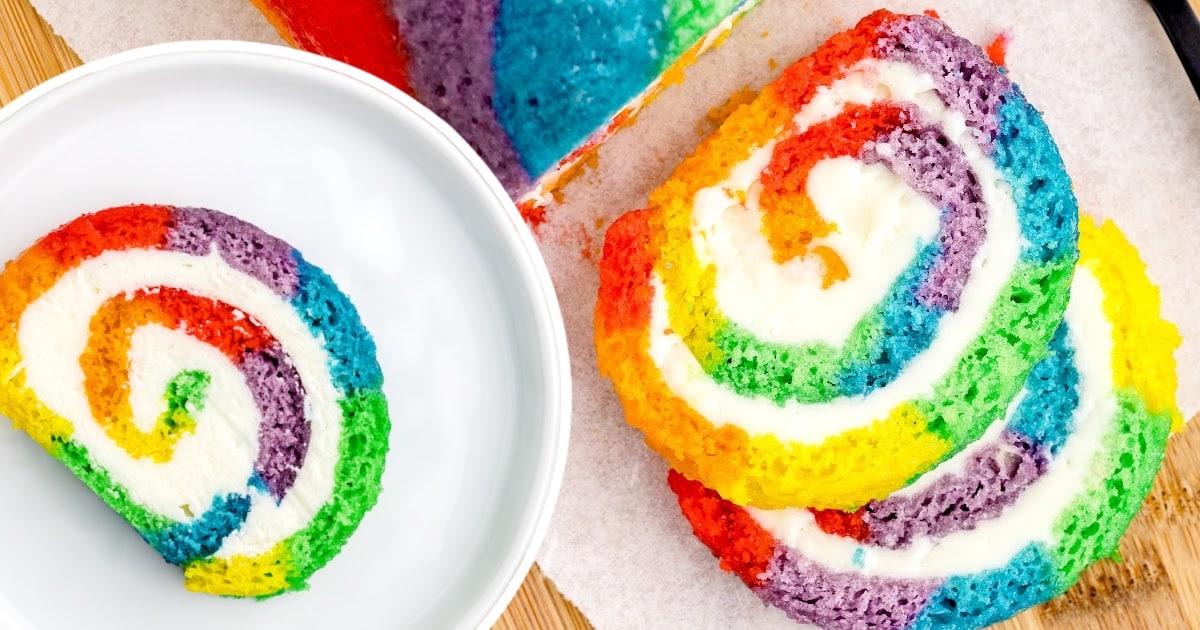
Rainbow roll cake is a colorful, fun dessert that’s perfect for parties and celebrations. Its vibrant swirls and creamy filling make it irresistible!
Jump to RecipeTable of Contents


Rainbow roll cake is a vibrant dessert that’s as fun to make as it is to eat. Bright colors swirl together in a fluffy sponge cake, creating a show-stopping centerpiece. Perfect for parties or celebrations, this treat will wow your family and friends. Add your favorite fillings and toppings to make it even more irresistible.
This recipe is easy to follow and includes step-by-step photos and clear directions for success. Discover pro tips and tricks that simplify the process and ensure great results. Plus, we’ve answered the most frequently asked questions so you can bake with confidence!

More Recipes ⭐ Rainbow Popcorn | Christmas Vanilla Roll Cake | Carrot Cake Roll
Whether you’re new to baking or a seasoned pro, making a stunning rainbow Swiss roll cake is surprisingly simple. Wow your family and friends with this delightful masterpiece!
Ingredients for Rainbow Roll Cake
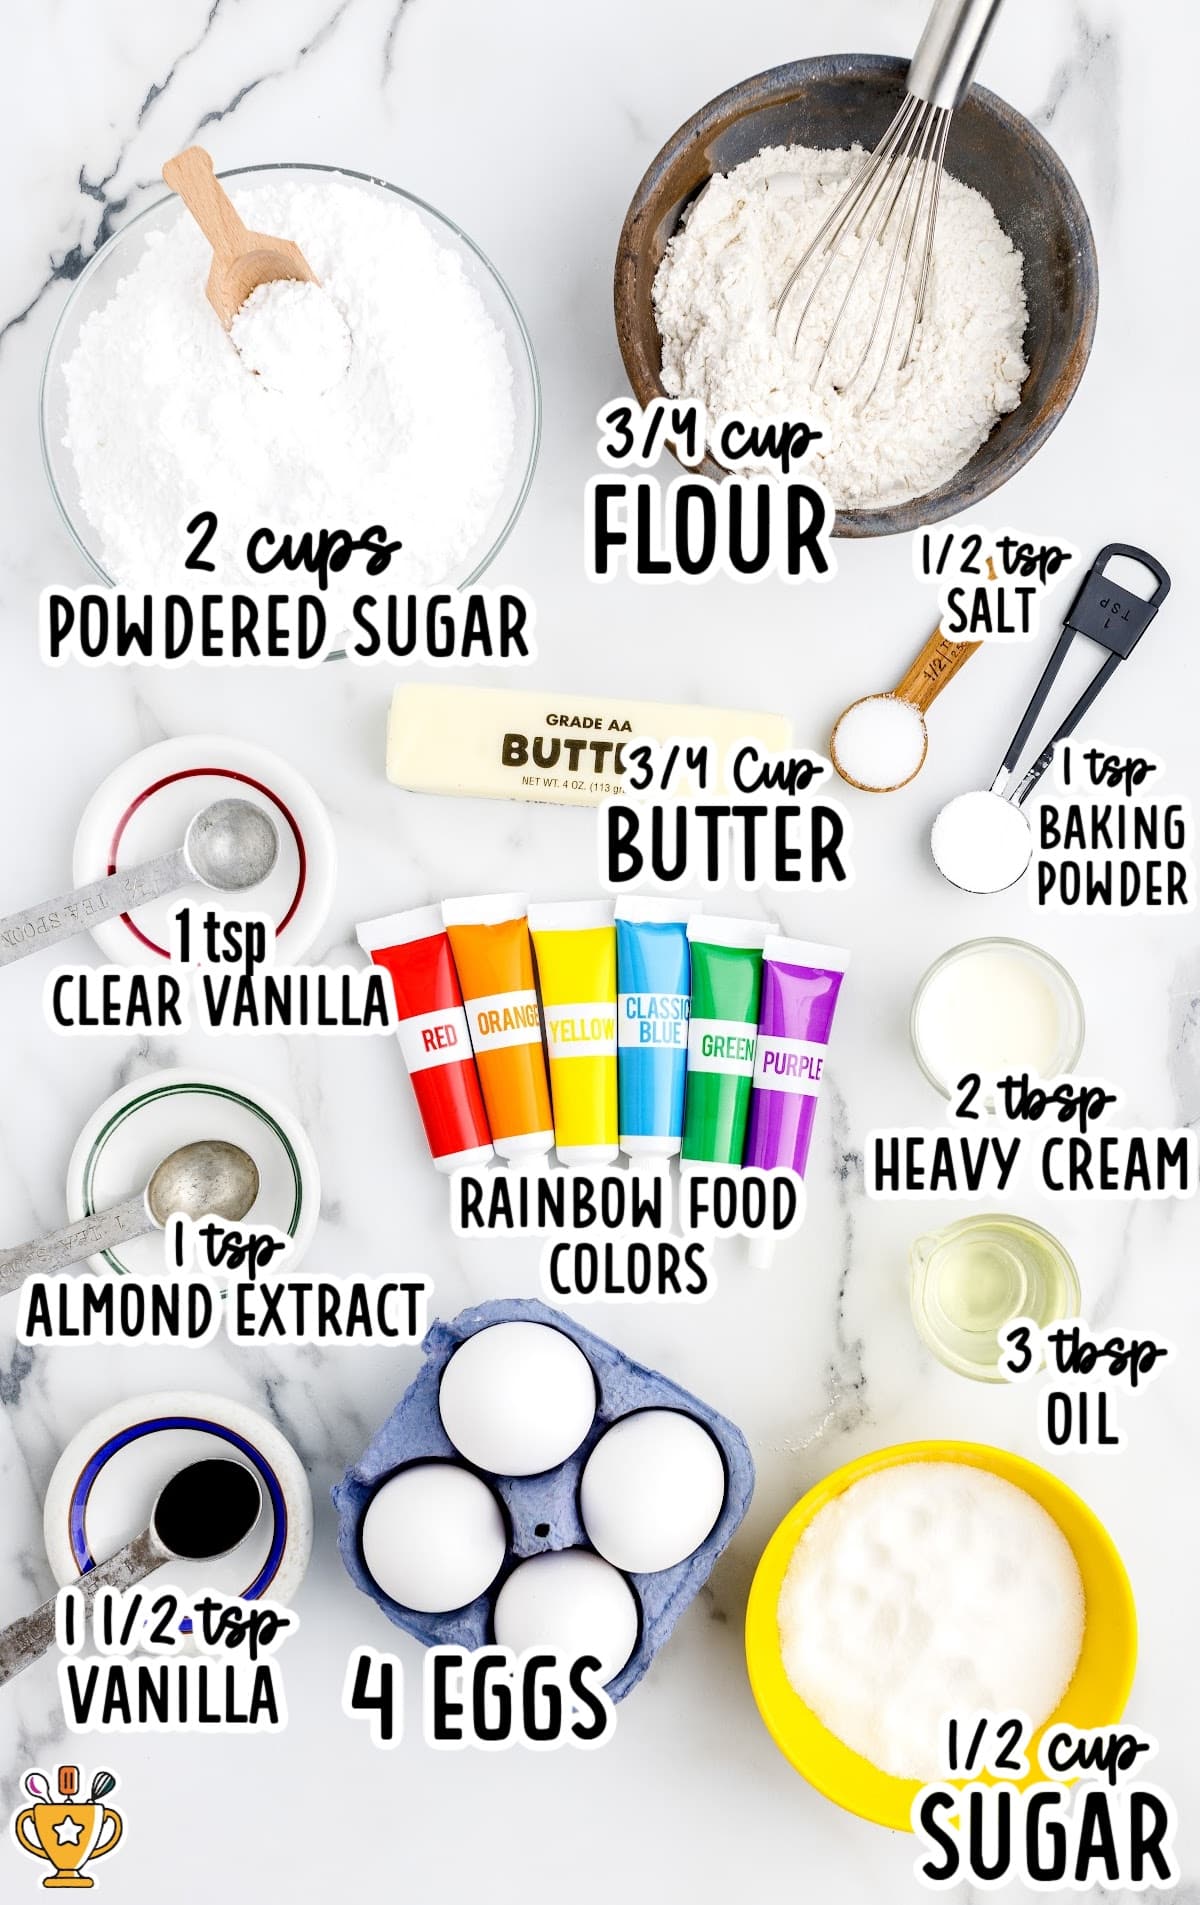
What you'll need to make this Rainbow Roll Cake recipe:
For The Rainbow Cake:
- ¾ cup of all-purpose flour
- 1 teaspoon of baking powder
- ½ teaspoon of salt
- 4 large eggs, room temperature
- ½ cup of granulated sugar
- 3 tablespoons of vegetable oil
- 1½ teaspoons of pure vanilla extract
- ½ teaspoon of pure almond extract
- Red, orange, yellow, green, blue, and purple gel food color
- Powdered sugar for dusting
For The Buttercream Filling:
- ¾ cup of salted sweet cream butter, softened
- 1 teaspoon of clear vanilla flavoring
- ½ teaspoon of almond extract
- 2 cups of powdered sugar
- 2 tablespoons of heavy cream
Substitutions and Additions
Food Coloring: Use gel food coloring for this rainbow cake roll recipe to achieve vibrant colors with just a few drops. Liquid food coloring requires much more to match the same brightness.
Sprinkles: Sprinkle rainbow sprinkles over the filling after spreading it to add a colorful surprise inside your cake.
Filling: Explore different filling options! Swap buttercream for flavored cream cheese, Nutella, or fruit preserves for a delicious twist. Fresh fruits like strawberries, raspberries, or kiwi make a perfect addition, adding both freshness and flavor.
Toppings: Enhance your cake by topping it with chopped nuts, shredded coconut, or chocolate shavings mixed into the whipped cream before rolling.
How to Make Rainbow Roll Cake
Follow our step-by-step pictures, instructions, and helpful tips to make this colorful cake roll recipe. You’ll learn easy tricks to create a dessert that looks amazing and tastes even better.
Rainbow Cake
FIRST STEP: Preheat the oven to 350°F. Line a 10x15x1-inch baking sheet (jelly roll pan) with parchment paper. Set it aside.
Pro Tip
Make sure you are using an actual jelly roll pan. You cannot substitute a cookie sheet for a jelly roll pan as it will not produce the cake you are hoping for.
SECOND STEP: Add the flour, baking powder, and salt to a small mixing bowl. Whisk to combine.
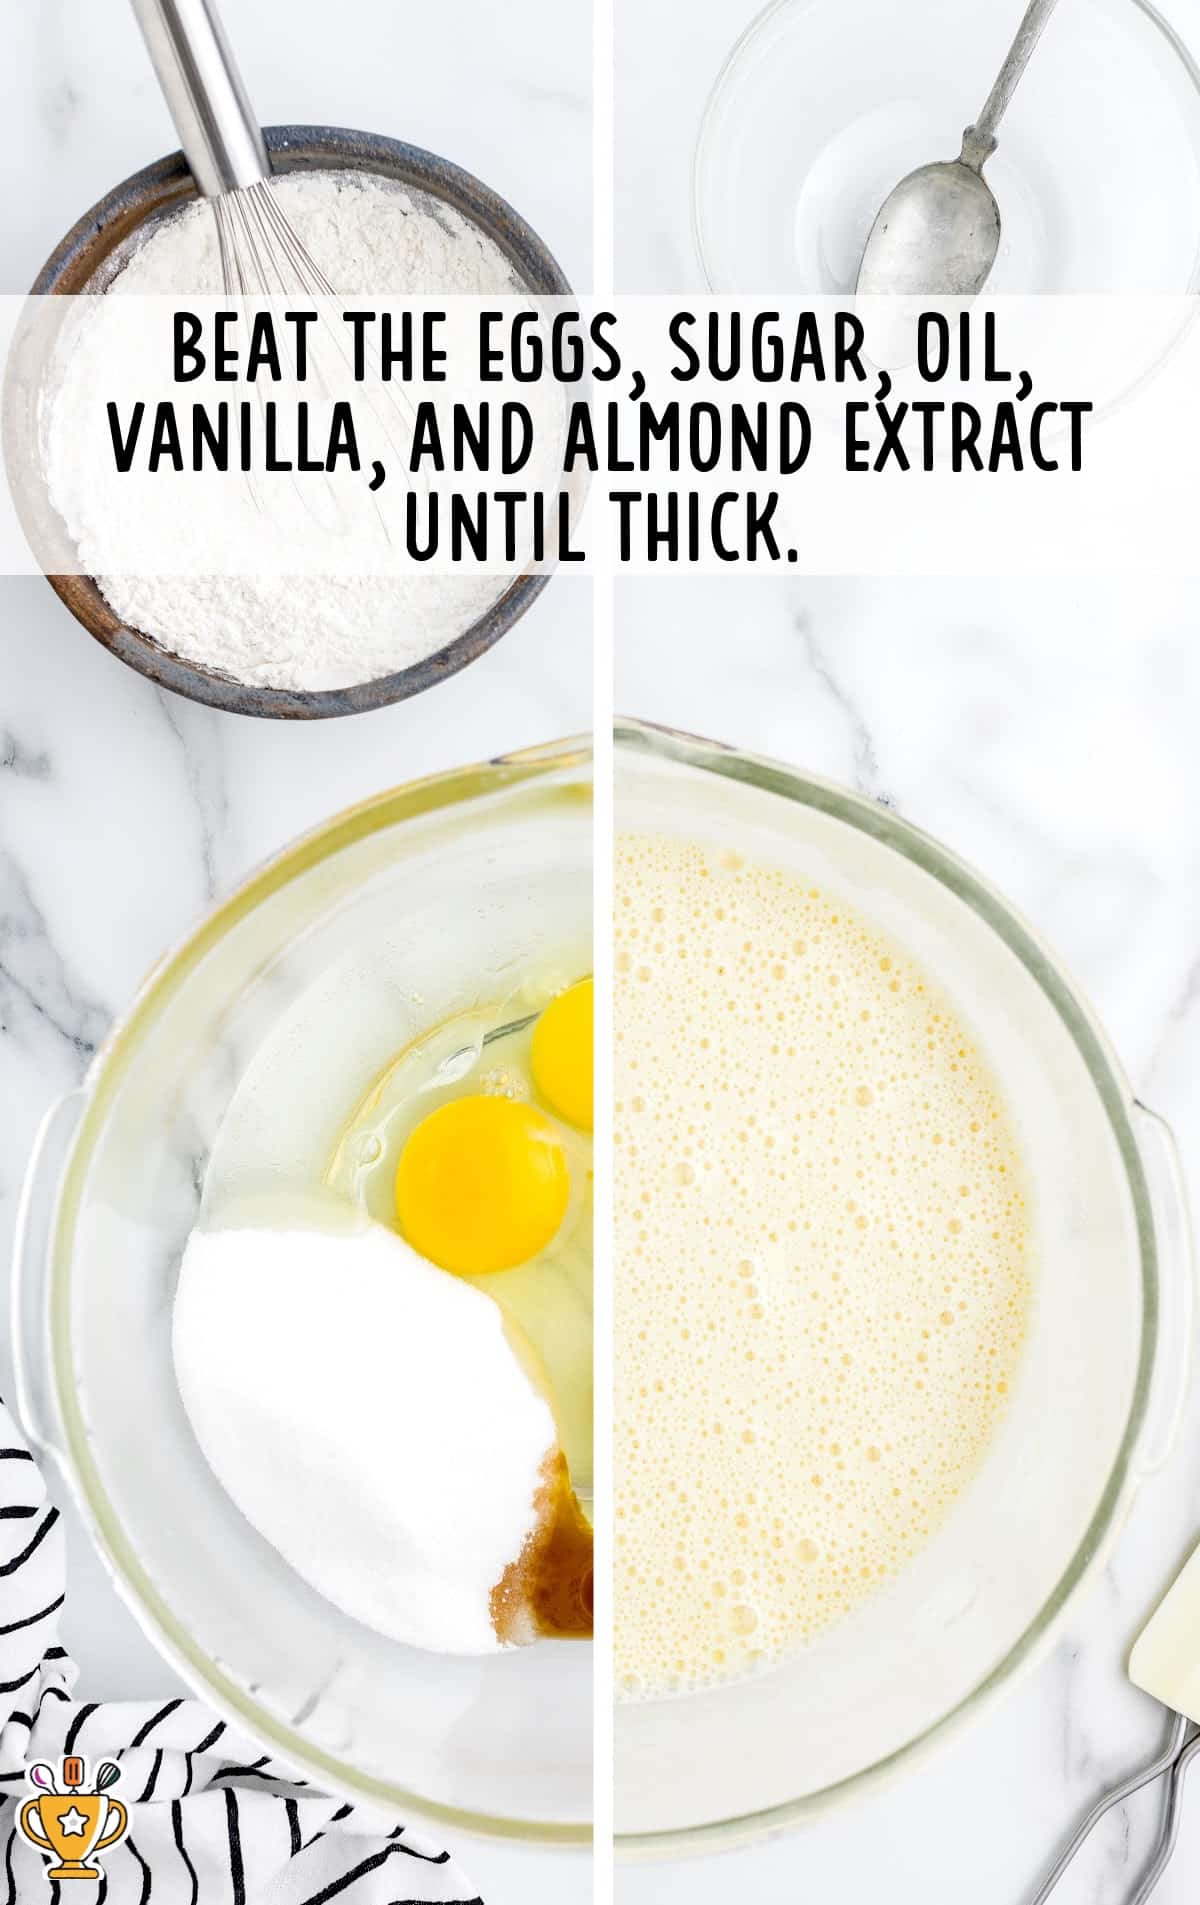
THIRD STEP: Using either a stand mixer or a medium-sized mixing bowl and a handheld mixer on high speed, beat together the eggs, sugar, vegetable oil, vanilla, and almond extract for 5 to 6 minutes, until thickened and light yellow.
FOURTH STEP: Gently fold in the flour mixture until combined.
Pro Tip
It is very important to be gentle when folding in the flour and the color. It’s important to keep as much of the air bubbles in the batter as possible to keep the cake fluffy.

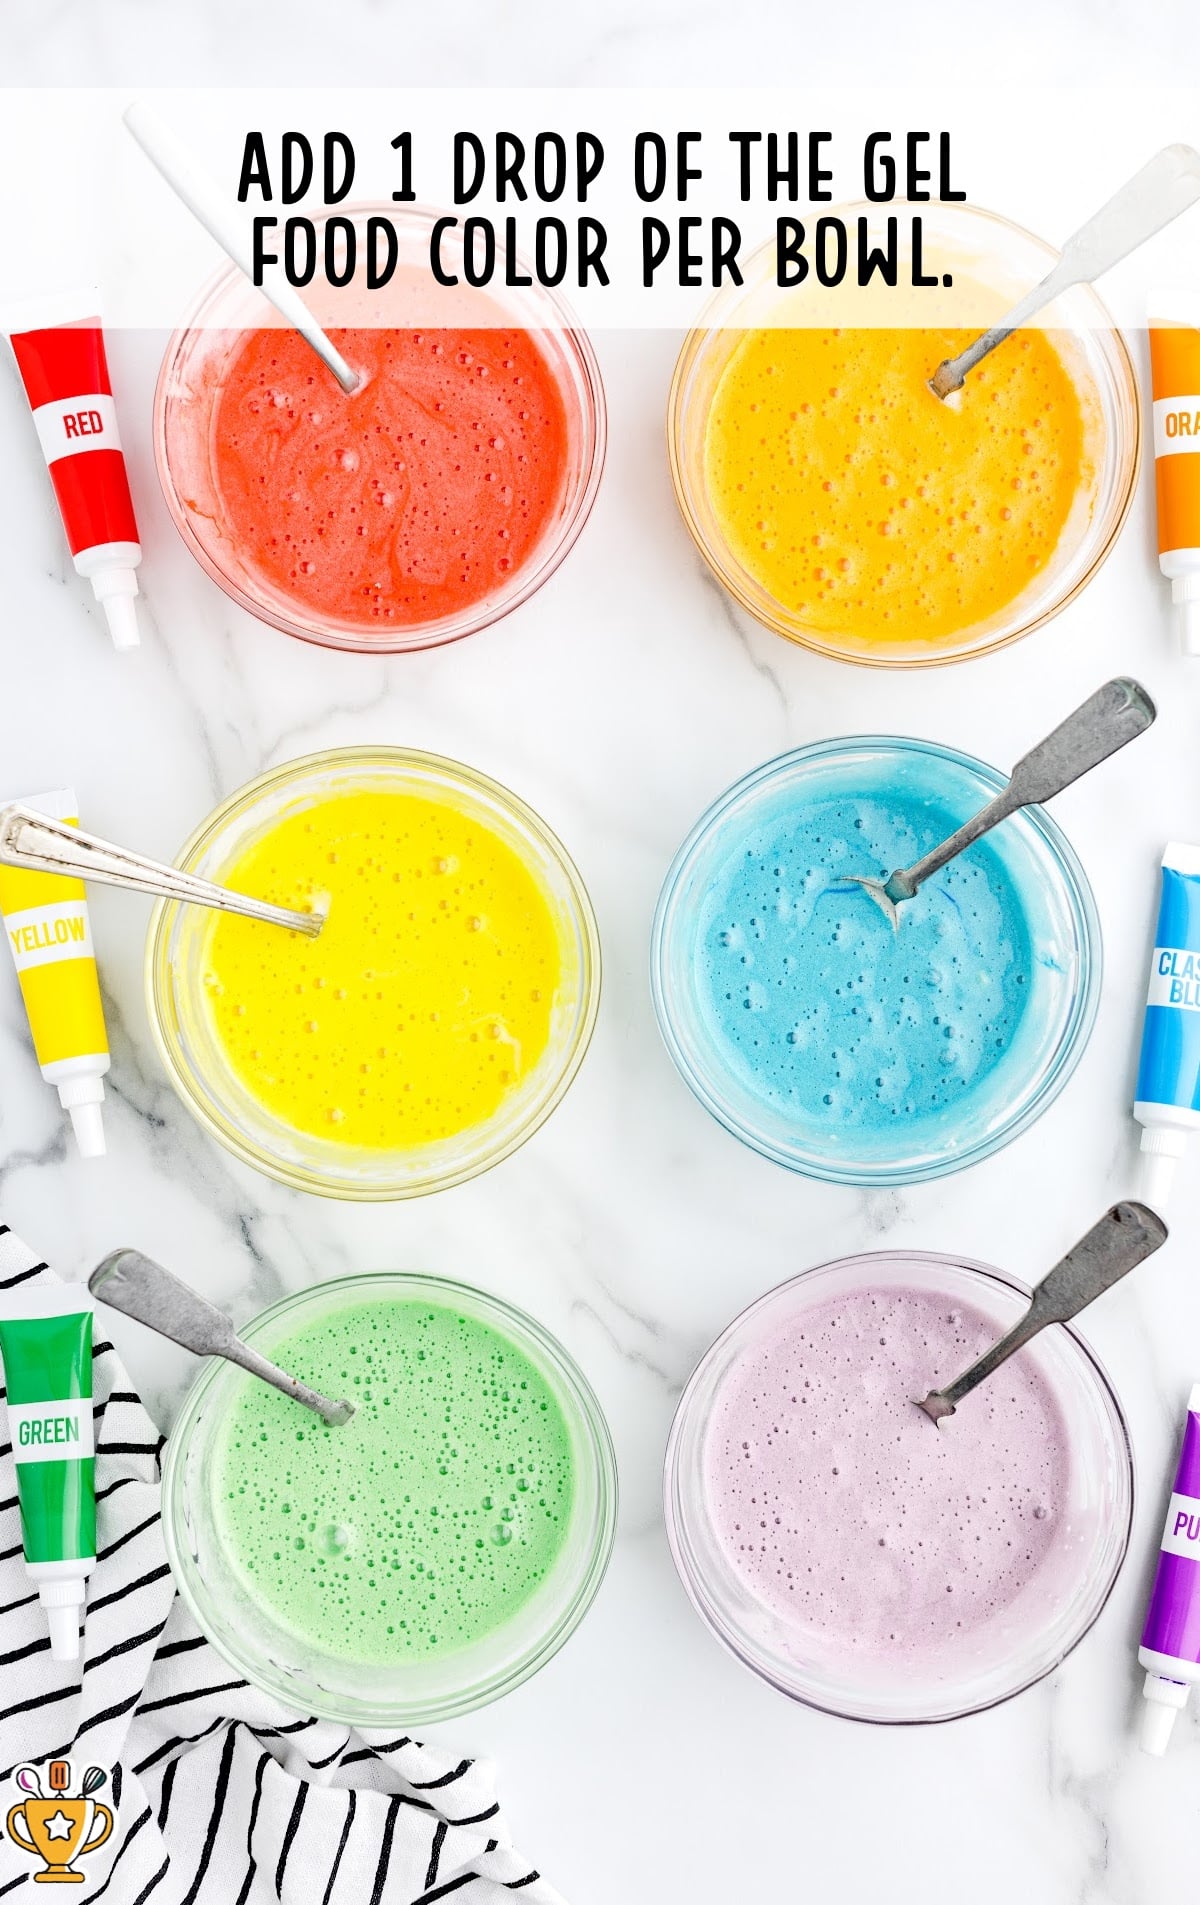
FIFTH STEP: Quickly and gently divide the batter between 6 bowls (about ⅔ cup each).
SIXTH STEP: Add 1 color of the gel food color per bowl. Depending on how dark you want to tint the batter, we recommend 3 to 5 drops. Gently fold the gel into the cake batter.
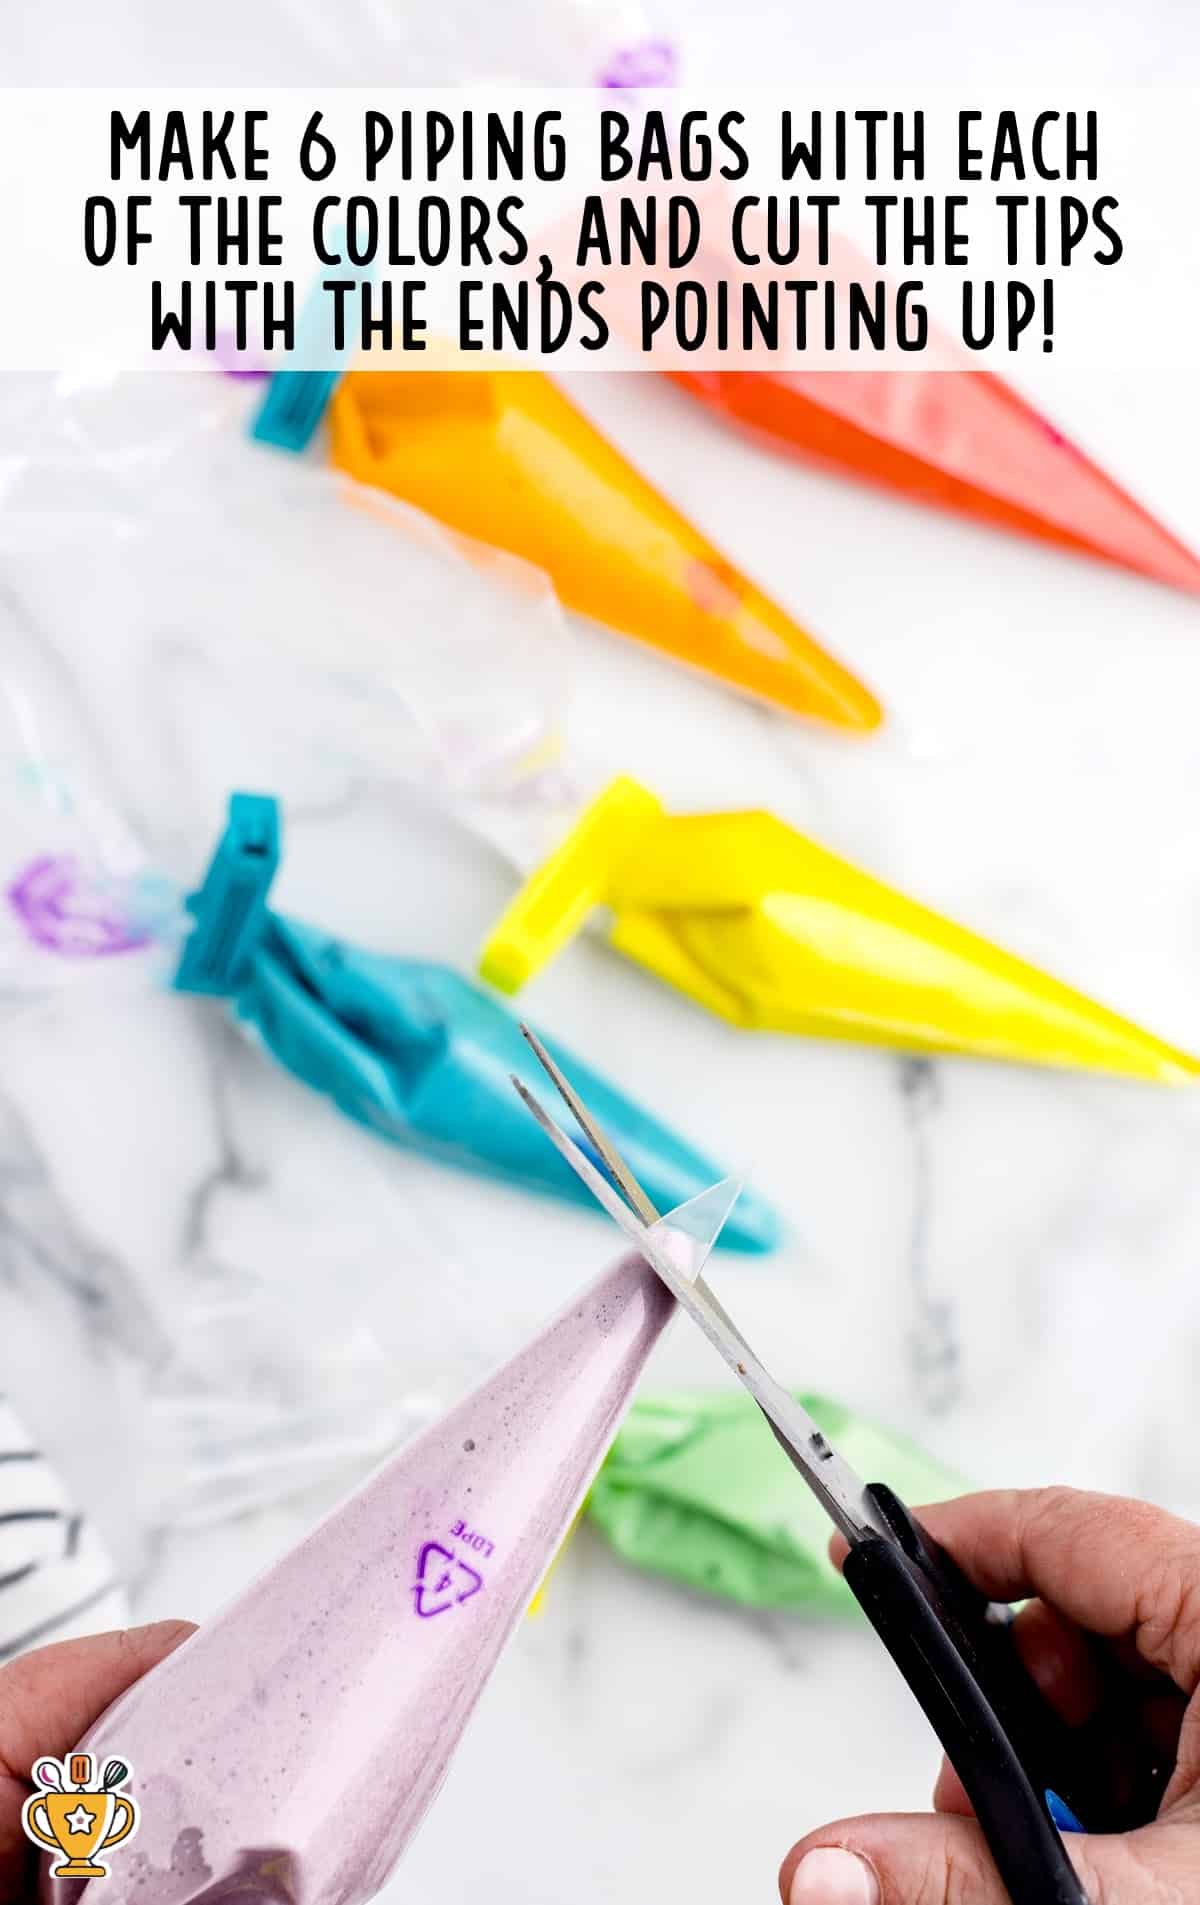
SEVENTH STEP: Spoon the individual colors into 6 disposable piping bags or quart-size ziplock bags. Secure the tops of the bags.
Pro Tip
Place each bag in a bowl or cup with the cut end up so the batter doesn’t spill out while piping the layers in the cake pan.
EIGHTH STEP: Lightly spray the prepared baking sheet with nonstick spray, paying close attention to the edges.
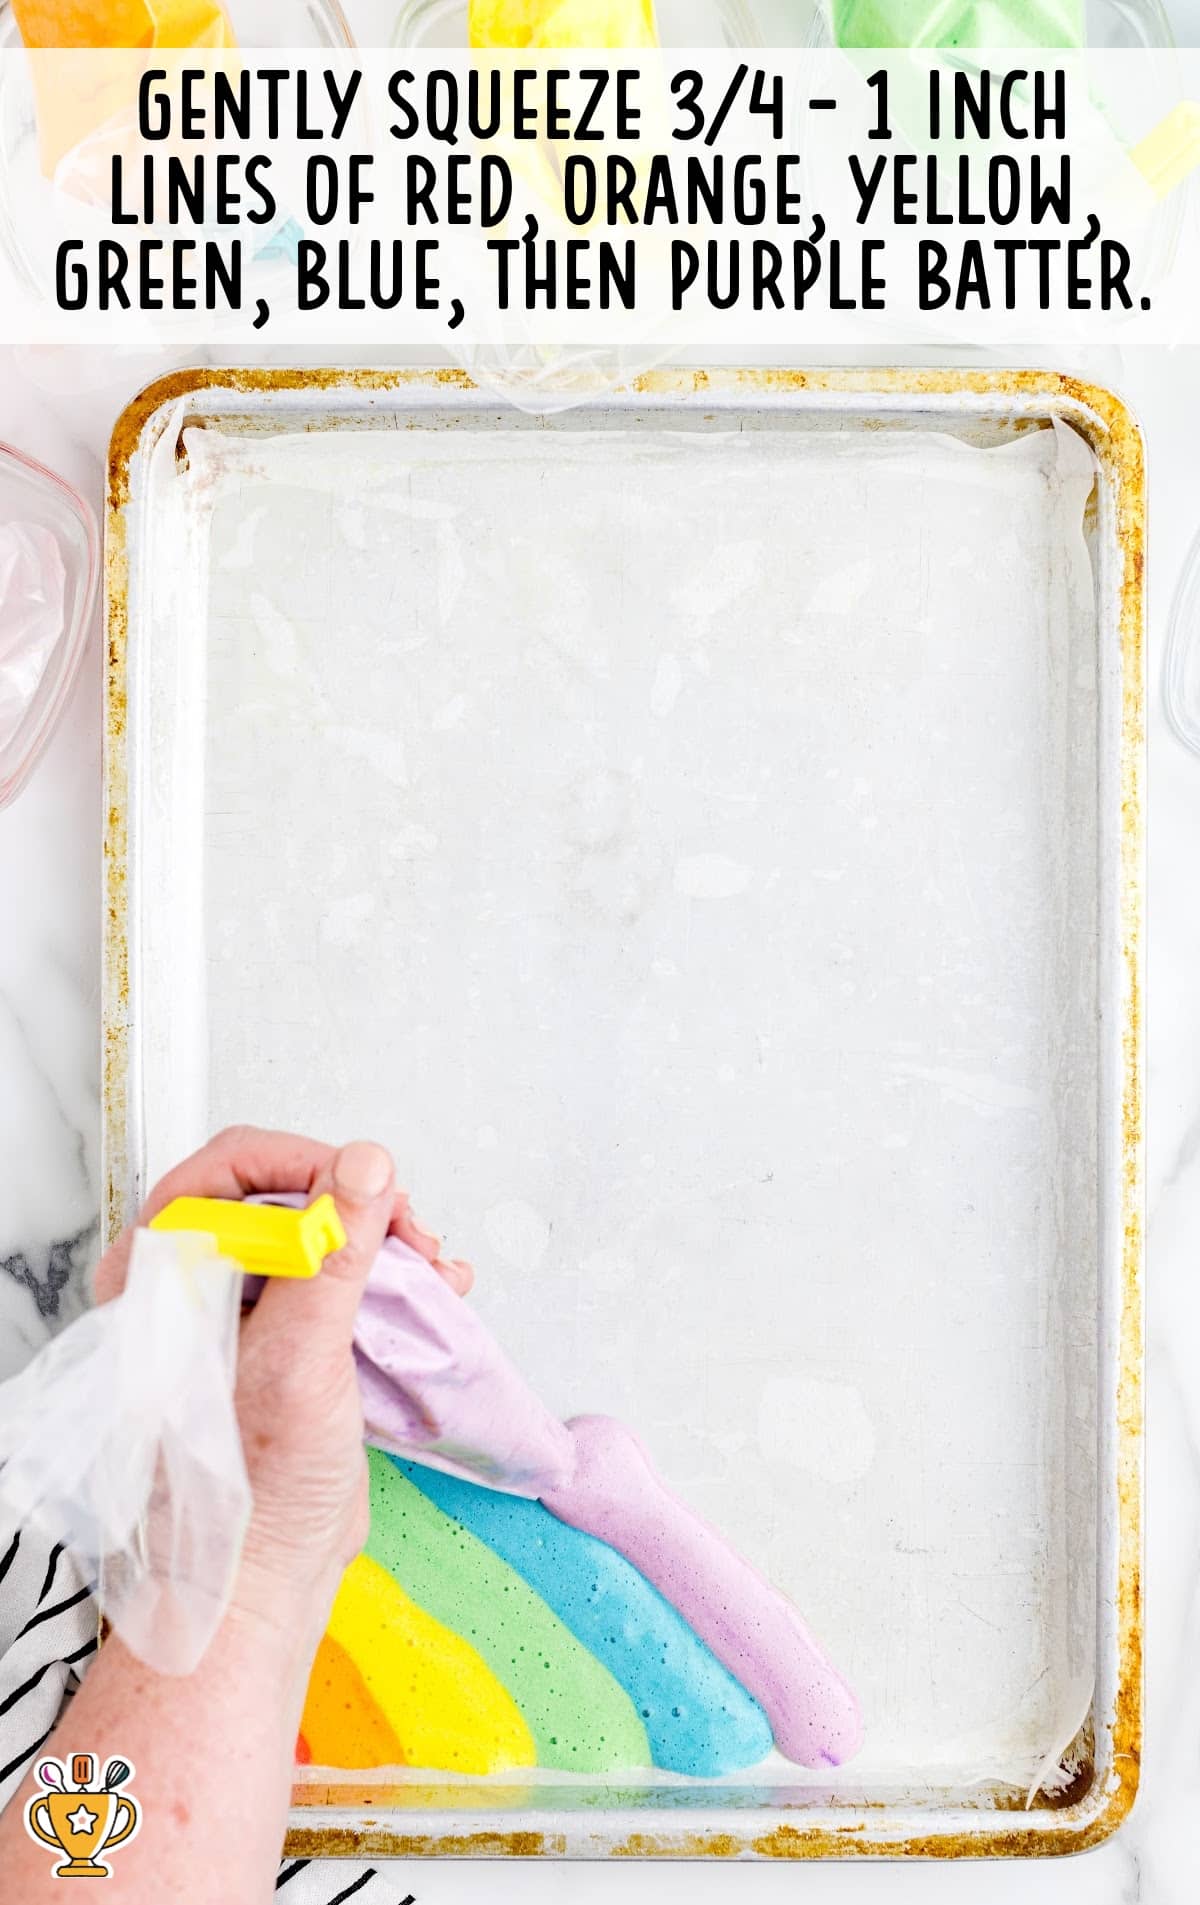
NINTH STEP: Snip off a small corner of the bag. Starting at 1 corner of the prepared baking sheet, gently squeeze a small amount of the red batter. Be sure to keep the line as straight as possible. Next, gently squeeze a line of orange batter ¾ inch-1 inch wide. Next, the yellow, green, blue, and purple. Continue until the pan has been covered. Lightly tap the pan on the counter to remove any air bubbles in the cake batter. Bake for 8 minutes.
Pro Tip
Oven temperatures vary and may need to be recalibrated periodically to ensure they are accurate. Make sure to keep a close eye on your cake as the suggested baking time approaches.
TENTH STEP: Remove the pan from the oven. Measure out a piece of parchment paper to roll the cake in.
Pro Tip
You can use a tea towel to wrap the warm cake roll in, but the rainbow colors will stain the tea towel. The parchment paper is disposable and will not stain.
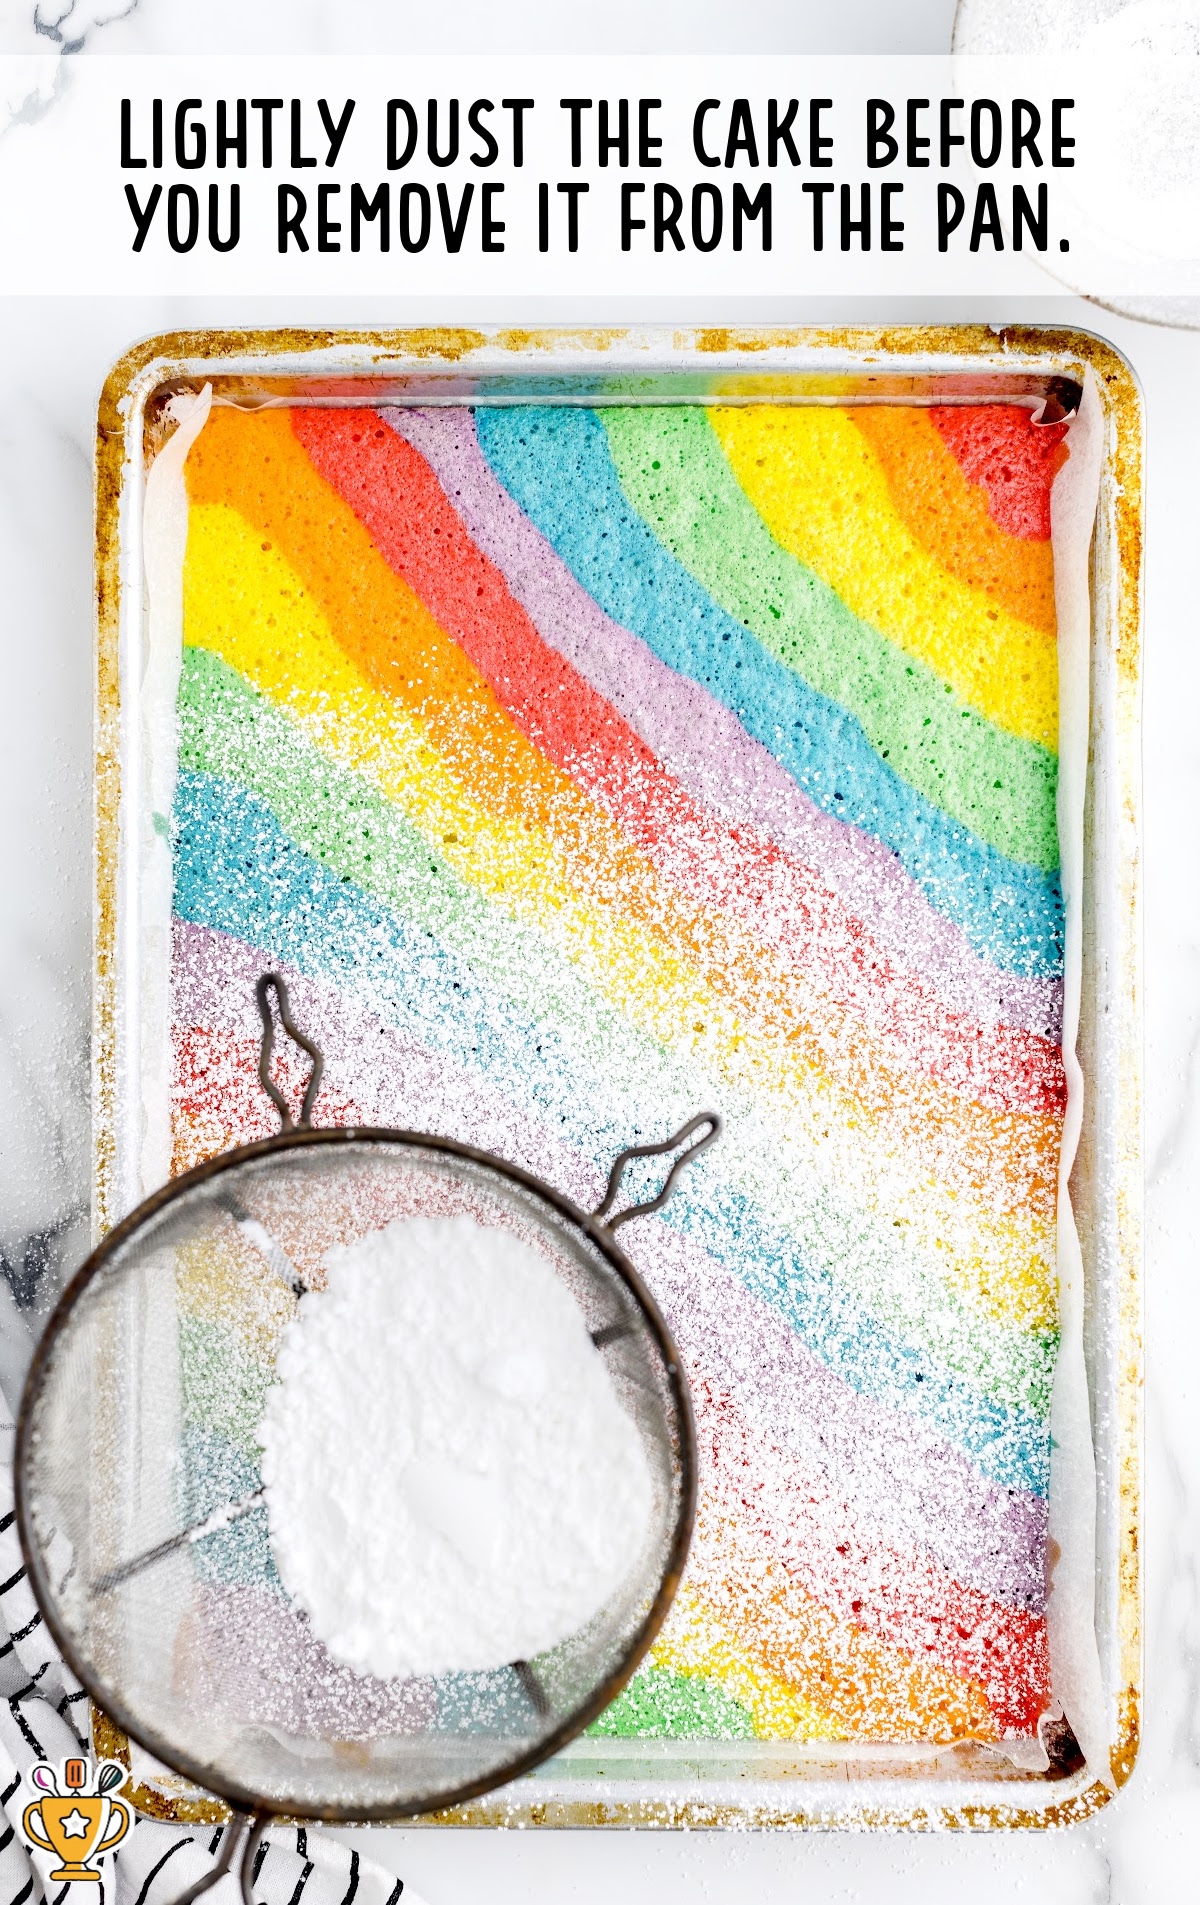
You will need to leave about a 2-inch overhang to begin the cake roll. Lightly dust the baked cake.
ELEVENTH STEP: Have a large cutting board or cooling rack ready to aid in the cake transfer.
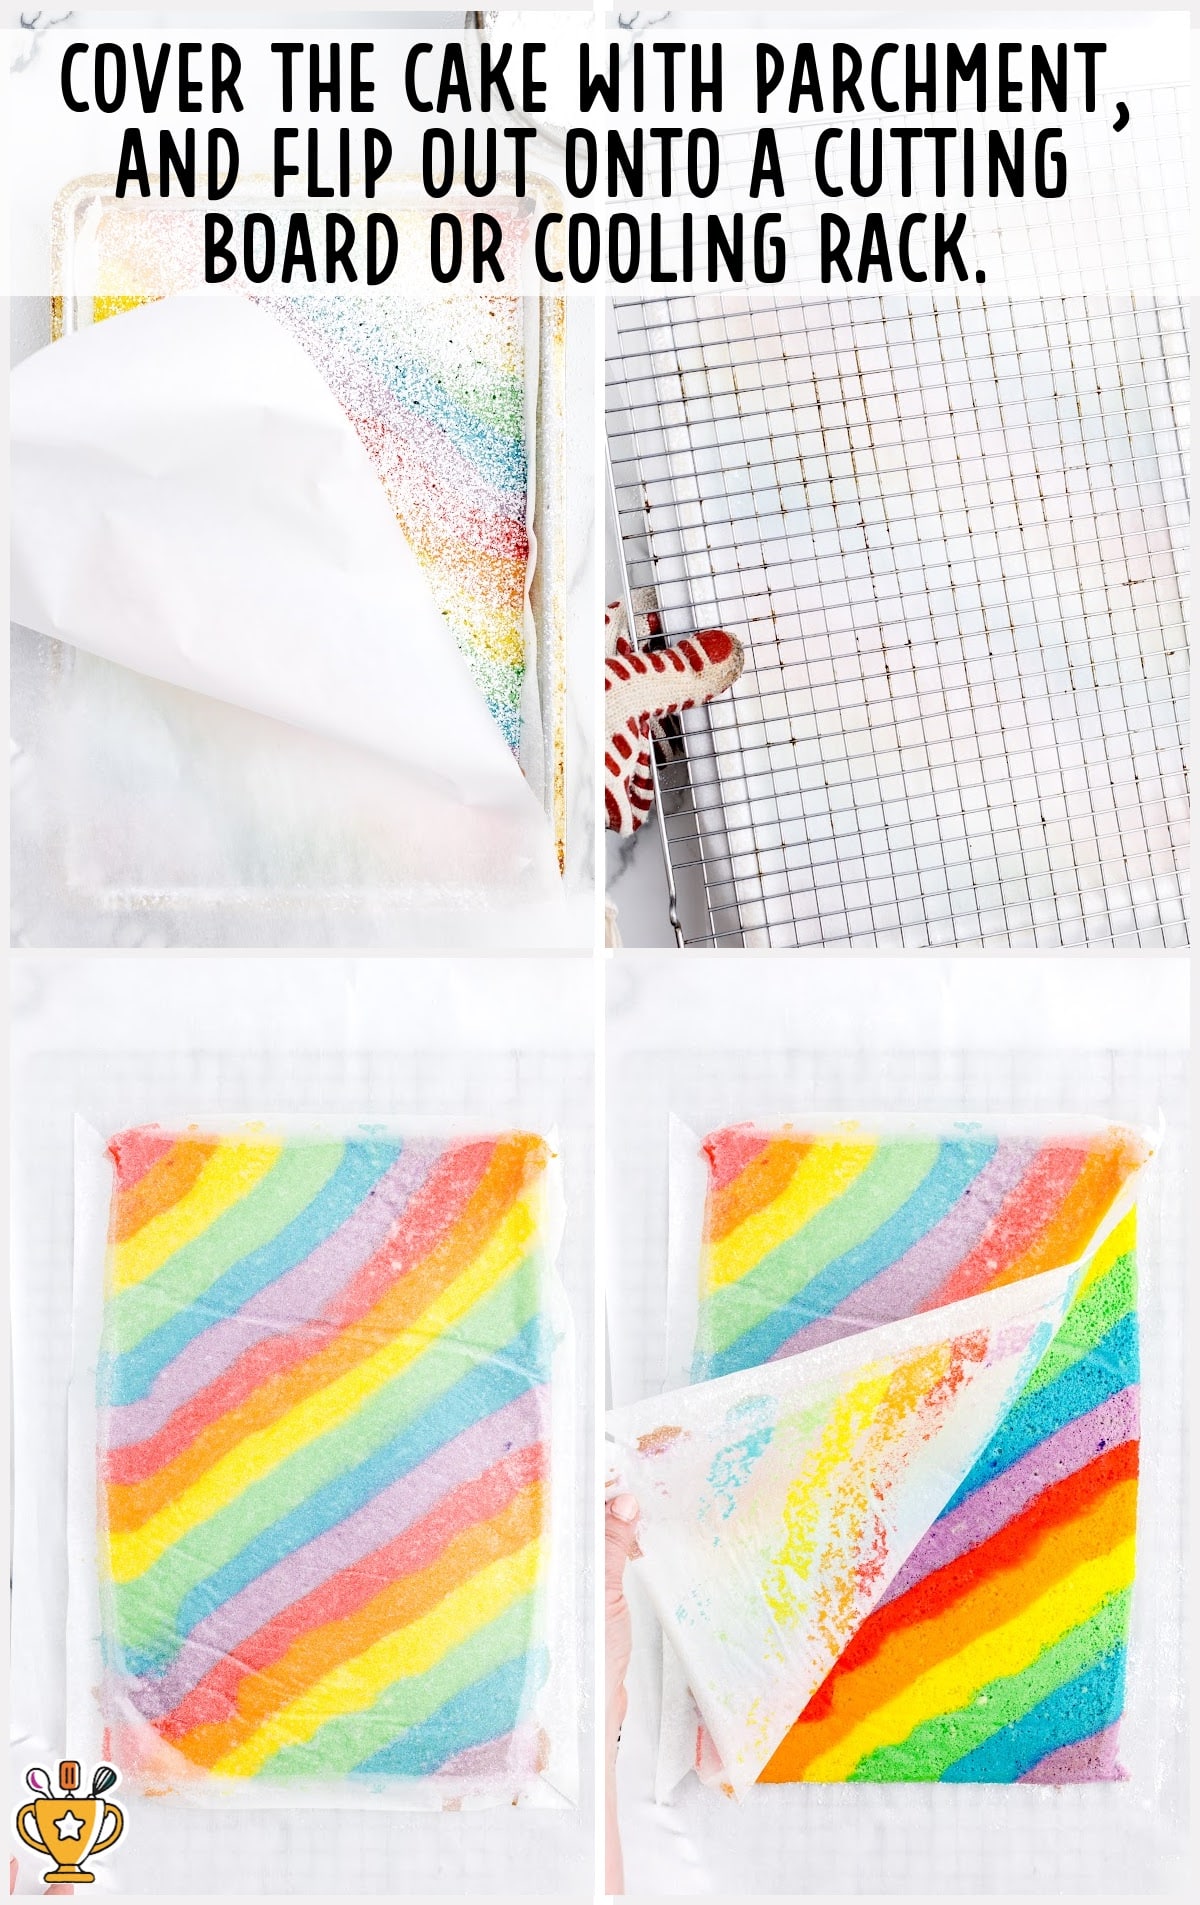
TWELFTH STEP: While the cake is warm, lay the piece of parchment paper over the powdered sugar-dusted cake. Place the cutting board (or cooling rack) on top of the parchment. Carefully flip the cake over so that the cake is resting on the dusted piece of parchment and cutting board/cooling rack.
THIRTEENTH STEP: Remove the upside-down cake pan, and carefully peel off the parchment paper that the cake was baked on.
FOURTEENTH STEP: Fold the overhanging end of the parchment paper up onto the cake and then gently and patiently start rolling the shorter side of the cake towards the other short side. The parchment paper will be rolled up inside the cake. Once rolled, transfer to a cooling rack to finish cooling completely.
Pro Tip
Be patient when rolling and unrolling the cake roll. Unrolling too quickly can cause cracks in the cake.
Buttercream Filling
FIFTEENTH STEP: Using either a stand mixer or a medium-sized mixing bowl and a handheld mixer on medium-high speed, beat the softened butter for 1 to 1½ minutes until smooth.
SIXTEENTH STEP: Add the clear vanilla and the almond extract and continue mixing for another 30 seconds.
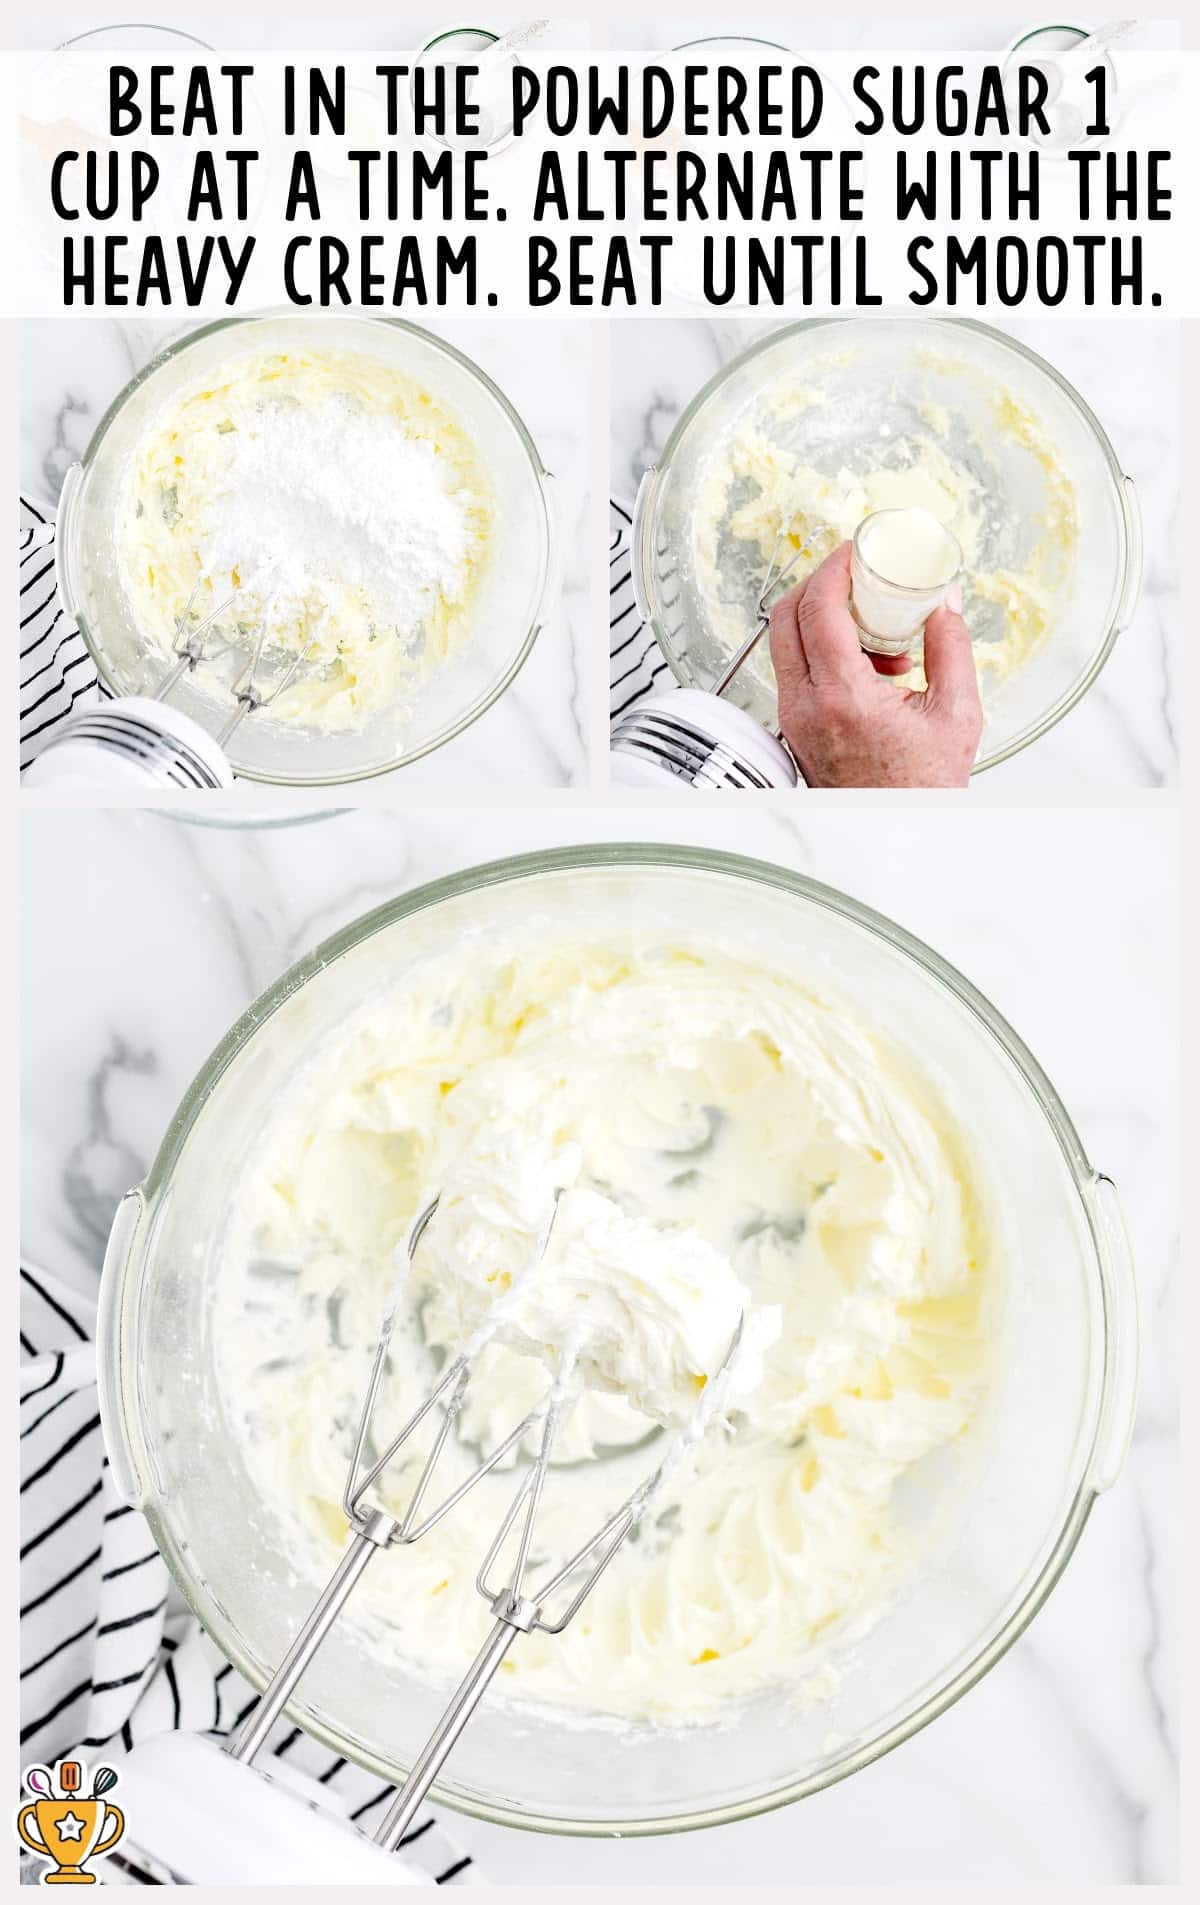
SEVENTEENTH STEP: Lower the mixer speed to low, and beat in the powdered sugar 1 cup at a time. Alternate with the heavy cream. Increase the speed back up to medium-high and continue mixing for 1 more minute until smooth.
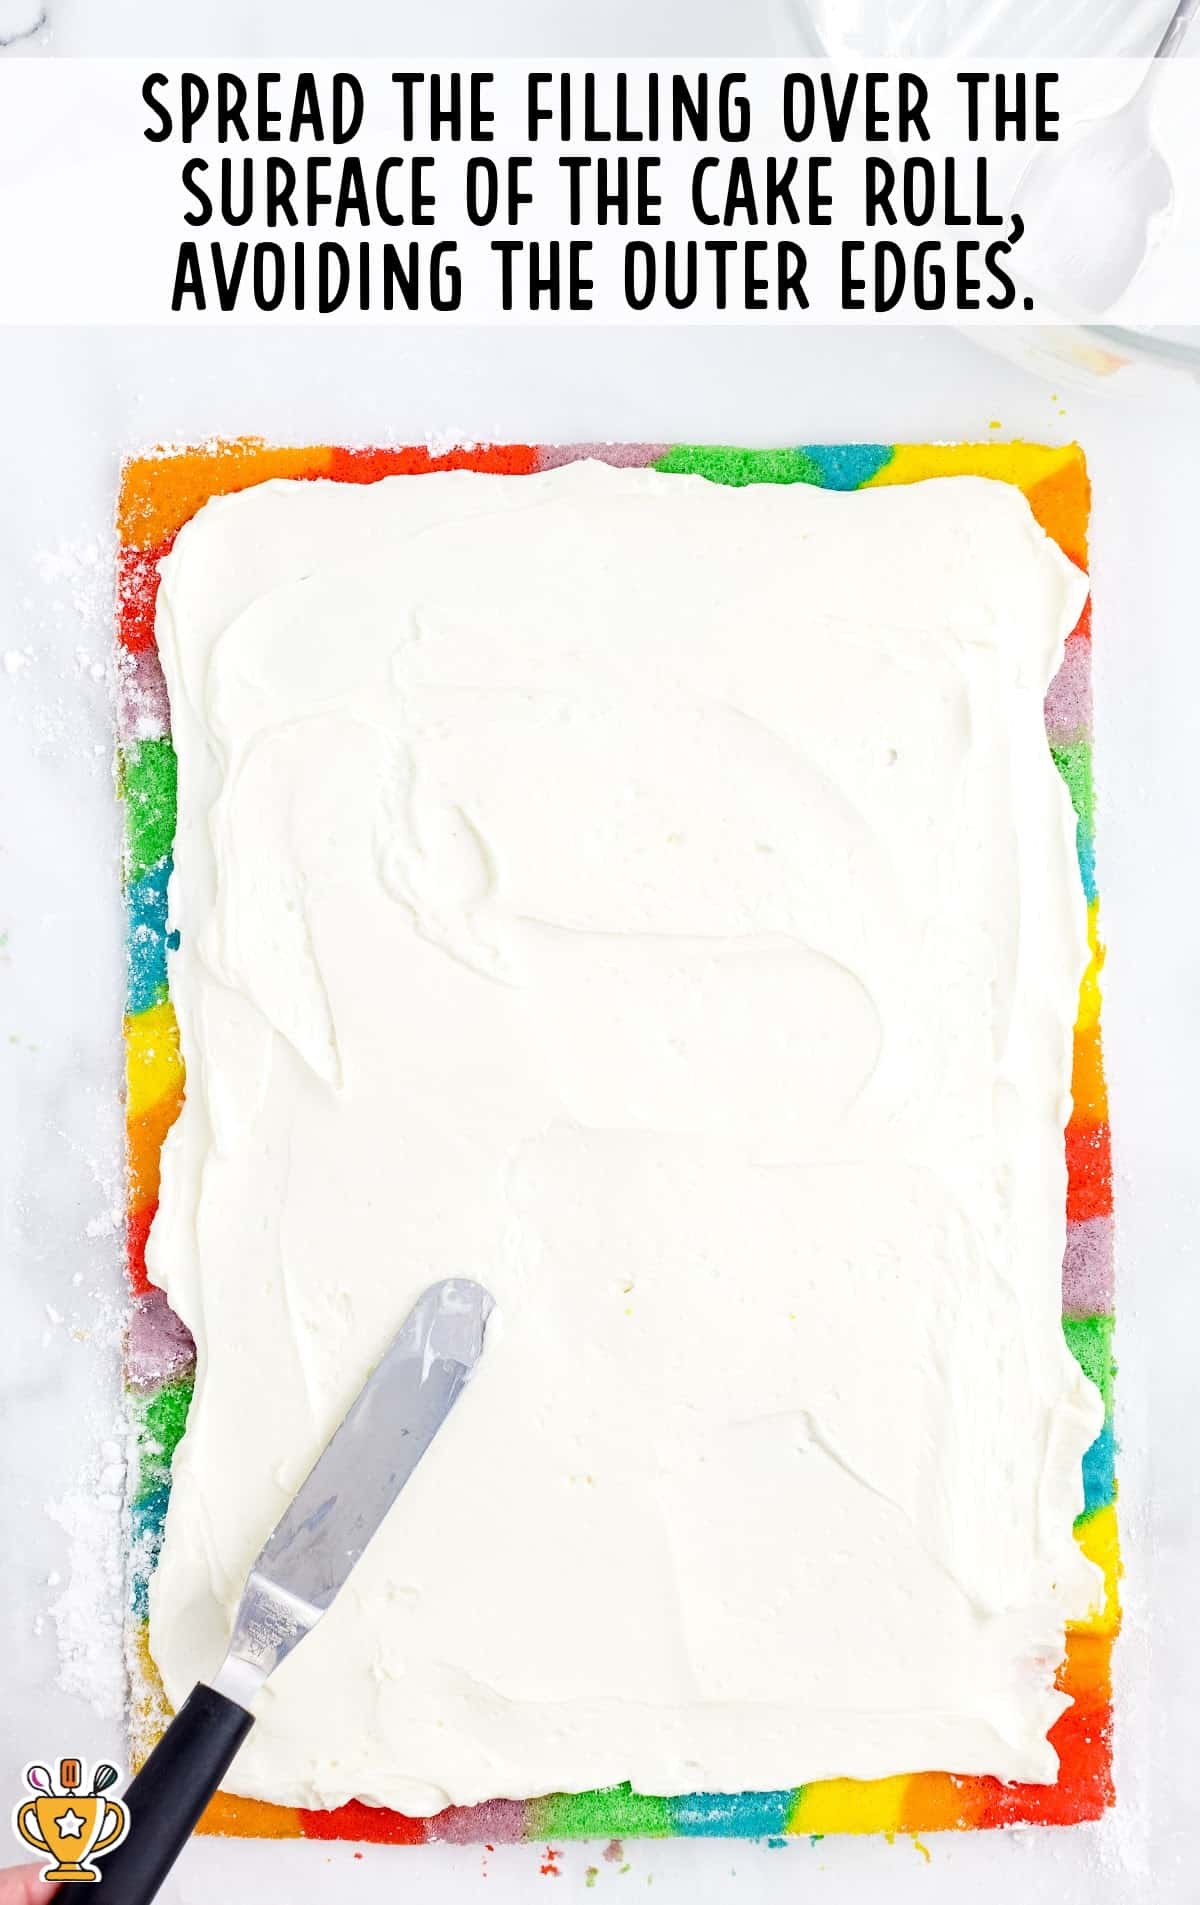
EIGHTEENTH STEP: Once the cake has completely cooled, gently unroll the cake. Using either a silicone spatula or an offset spatula, spread the filling over the surface of the cake roll, avoiding the outer edges.
NINETEENTH STEP: Tear off 2 sheets of plastic wrap to overlap the long edges and lightly spray with nonstick spray. This is for tightly wrapping the filled cake roll.
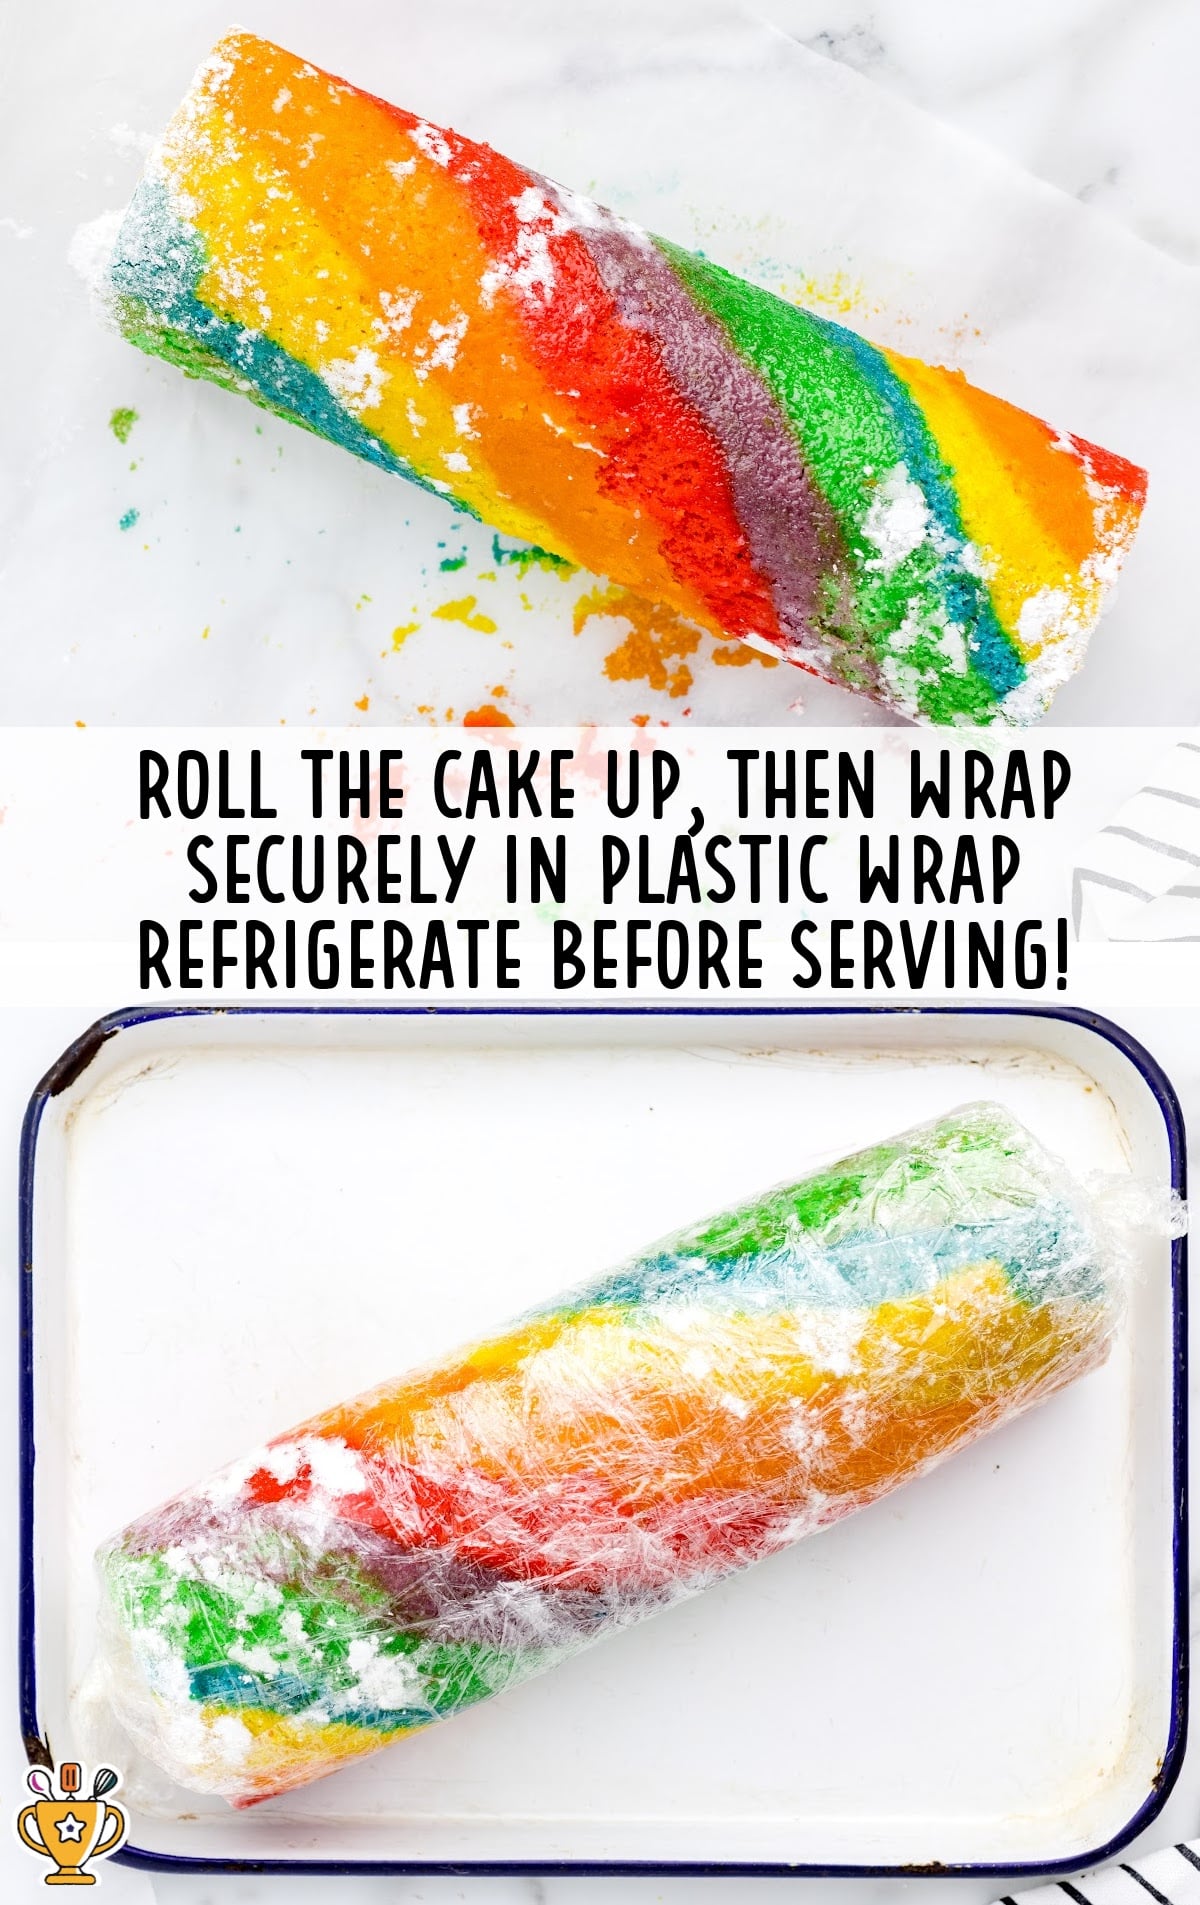
TWENTIETH STEP: Slowly roll the cake back up as before. Transfer the cake roll to the prepared plastic wrap. Roll the finished cake roll up in the plastic wrap. Once finished wrapping, twist the ends tightly to seal the cake roll securely. Chill in the refrigerator for 6 hours. Remove just before serving to slice the cake into ten ½-inch slices.
How To Serve this Rainbow Roll Cake
This tasty roll cake makes a fun switch from the usual special occasion cake! Here are some serving ideas:
- Special occasions: Add a scoop of banana ice cream and a dollop of whipped cream for a festive treat perfect for any celebration.
- Cozy pairings: Pair it with a cozy drink like homemade hot chocolate or a creamy pumpkin spice latte made in your slowcooker for the perfect combo.
- Dessert table: Once you’ve mastered roll cakes, be sure to try our strawberry roll cake and hot chocolate roll cake for more sweet inspiration.

Why You'll Love This Recipe
Visually Stunning: This cake is a treat for the eyes with its vibrant, colorful layers that steal the show at any celebration. It’s the ultimate dessert to brighten your table and wow your guests.
Light and Fluffy Texture: The sponge cake is delightfully light and fluffy, offering a soft, airy texture that pairs perfectly with the creamy filling.
Crowd-Pleaser: Kids and adults alike will adore this cake for its cheerful colors and irresistible flavor. It’s sure to be a favorite at any gathering.
Perfect for birthdays or special occasions, this dazzling dessert is surprisingly simple to make. Whether you’re new to baking or experienced, creating a stunning rainbow roll cake takes just a few easy steps.
Recipe FAQ
What’s the best way to get vibrant colors in the rainbow roll cake?
Use gel food coloring for bright, bold colors. A small amount creates vivid layers without altering the batter’s texture.
How do I prevent the cake from cracking when rolling it?
Roll the cake while it’s still warm with a clean towel. This helps it keep its shape without breaking.
Can I make the rainbow roll cake ahead of time?
Yes, prepare it a day in advance and refrigerate it. This allows the flavors to blend beautifully before serving.
How do I get an even swirl in the rainbow roll cake?
Spread the batter evenly and carefully roll the cake tightly to create a perfect, consistent swirl every time.

Serving FAQ
What’s the best way to serve rainbow roll cake at a party?
Slice the cake into even portions and arrange the pieces on a colorful platter for a stunning presentation.
Should I serve rainbow roll cake chilled or at room temperature?
Serve it chilled for the best texture and flavor. The creamy filling stays firm, and the cake holds its shape.
How can I make rainbow roll cake more fun for kids?
Add festive toppers or candles to each slice. The bright colors and decorations will make it extra exciting for kids.
What’s the ideal portion size for rainbow roll cake?
Cut slices about one inch thick. This size makes it easy to serve and enjoy without being too filling.

Storage FAQ
If you’re planning to make this delicious cake for a special occasion, prepare it ahead to save time later.
Make Ahead: Bake the colorful sponge cake layers in advance and store them in an airtight container at room temperature for up to two days. Prepare the filling separately and refrigerate it for the same duration. When you’re ready, follow the recipe’s steps to assemble the cake effortlessly.
In the Fridge: Keep any leftover rainbow Swiss roll in an airtight container in the refrigerator for up to five days.
In the Freezer: Freeze the cake roll for up to three months. Wrap it tightly in plastic wrap, then add a layer of aluminum foil for extra protection.

Rainbow Roll Cake
Rainbow roll cake is a colorful, fun dessert that’s perfect for parties and celebrations. Its vibrant swirls and creamy filling make it irresistible!
Did you try this recipe?Let our readers know how it turned out by Leaving a Review!
Ingredients
Rainbow Cake
- ¾ cup all-purpose flour
- 1 teaspoon baking powder
- ½ teaspoon salt
- 4 large eggs (room temperature)
- ½ cup granulated sugar
- 3 tablespoons vegetable oil
- 1½ teaspoons pure vanilla extract
- ½ teaspoon pure almond extract
- gel food coloring ((red, orange, yellow, green, blue, and purple))
- Powdered sugar (for dusting)
Buttercream Filling
- ¾ cup salted sweet cream butter (softened)
- 1 teaspoon clear vanilla flavoring
- ½ teaspoon almond extract
- 2 cups powdered sugar
- 2 tablespoons heavy cream
DIRECTIONS
Rainbow Cake
- Preheat the oven to 350°F. Line a 10x15x1-inch baking sheet (jelly roll pan) with parchment paper. Set it aside.
- Add the flour, baking powder, and salt to a small mixing bowl. Whisk to combine.
- Using either a stand mixer or a medium-sized mixing bowl and a handheld mixer on high speed, beat together the eggs, sugar, vegetable oil, vanilla, and almond extract for 5 to 6 minutes, until thickened and light yellow.
- Gently fold in the flour mixture until combined.
- Quickly and gently divide the batter between 6 bowls (about ⅔ cup each).
- Add 1 color of the gel food color per bowl. Depending on how dark you want to tint the batter, we recommend 3 to 5 drops. Gently fold the gel into the cake batter.
- Spoon the individual colors into 6 disposable piping bags or quart-size ziplock bags. Secure the tops of the bags.
- Lightly spray the prepared baking sheet with nonstick spray, paying close attention to the edges.
- Snip off a small corner of the bag. Starting at 1 corner of the prepared baking sheet, gently squeeze a small amount of the red batter. Be sure to keep the line as straight as possible. Next, gently squeeze a line of orange batter ¾ inch-1 inch wide. Next, the yellow, green, blue, and purple. Continue until the pan has been covered. Lightly tap the pan on the counter to remove any air bubbles in the cake batter. Bake for 8 minutes.
- Remove the pan from the oven. Measure out a piece of parchment paper to roll the cake in. You will need to leave about a 2-inch overhang to begin the cake roll. Lightly dust the baked cake.
- Have a large cutting board or cooling rack ready to aid in the cake transfer.
- While the cake is warm, lay the piece of parchment paper over the powdered sugar-dusted cake. Place the cutting board (or cooling rack) on top of the parchment. Carefully flip the cake over so that the cake is resting on the dusted piece of parchment and cutting board/cooling rack.
- Remove the upside-down cake pan, and carefully peel off the parchment paper that the cake was baked on.
- Fold the overhanging end of the parchment paper up onto the cake and then gently and patiently start rolling the shorter side of the cake towards the other short side. The parchment paper will be rolled up inside the cake. Once rolled, transfer to a cooling rack to finish cooling completely.
Buttercream Filling
- Using either a stand mixer or a medium-sized mixing bowl and a handheld mixer on medium-high speed, beat the softened butter for 1 to 1½ minutes until smooth.
- Add the clear vanilla and the almond extract and continue mixing for another 30 seconds.
- Lower the mixer speed to low, and beat in the powdered sugar 1 cup at a time. Alternate with the heavy cream. Increase the speed back up to medium-high and continue mixing for 1 more minute until smooth.
- Once the cake has completely cooled, gently unroll the cake. Using either a silicone spatula or an offset spatula, spread the filling over the surface of the cake roll, avoiding the outer edges.
- Tear off 2 sheets of plastic wrap to overlap the long edges and lightly spray with nonstick spray. This is for tightly wrapping the filled cake roll.
- Slowly roll the cake back up as before. Transfer the cake roll to the prepared plastic wrap. Roll the finished cake roll up in the plastic wrap. Once finished wrapping, twist the ends tightly to seal the cake roll securely. Chill in the refrigerator for 6 hours. Remove just before serving to slice the cake into ten ½-inch slices.
Notes
- Make sure you are using an actual jelly roll pan. You cannot substitute a cookie sheet for a jelly roll pan as it will not produce the cake you are hoping for.
- It is very important to be gentle when folding in the flour and the color. It’s important to keep as much of the air bubbles in the batter as possible to keep the cake fluffy.
- Place each bag in a bowl or cup with the cut end up so the batter doesn’t spill out while piping the layers in the cake pan.
- Oven temperatures vary and may need to be recalibrated periodically to ensure they are accurate. Make sure to keep a close eye on your cake as the suggested baking time approaches.
- You can use a tea towel to wrap the warm cake roll in, but the rainbow colors will stain the tea towel. The parchment paper is disposable and will not stain.
- Be patient when rolling and unrolling the cake roll. Unrolling too quickly can cause cracks in the cake.
Nutrition
Calories: 364kcal | Carbohydrates: 42g | Protein: 3g | Fat: 21g | Saturated Fat: 11g | Polyunsaturated Fat: 3g | Monounsaturated Fat: 5g | Trans Fat: 1g | Cholesterol: 105mg | Sodium: 253mg | Potassium: 84mg | Fiber: 0.3g | Sugar: 34g | Vitamin A: 565IU | Vitamin C: 0.02mg | Calcium: 35mg | Iron: 1mg
HAVE YOU TRIED THIS RECIPE?Follow me on Pinterest @bestblogrecipes


Leave a Comment