
Last updated on
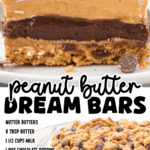
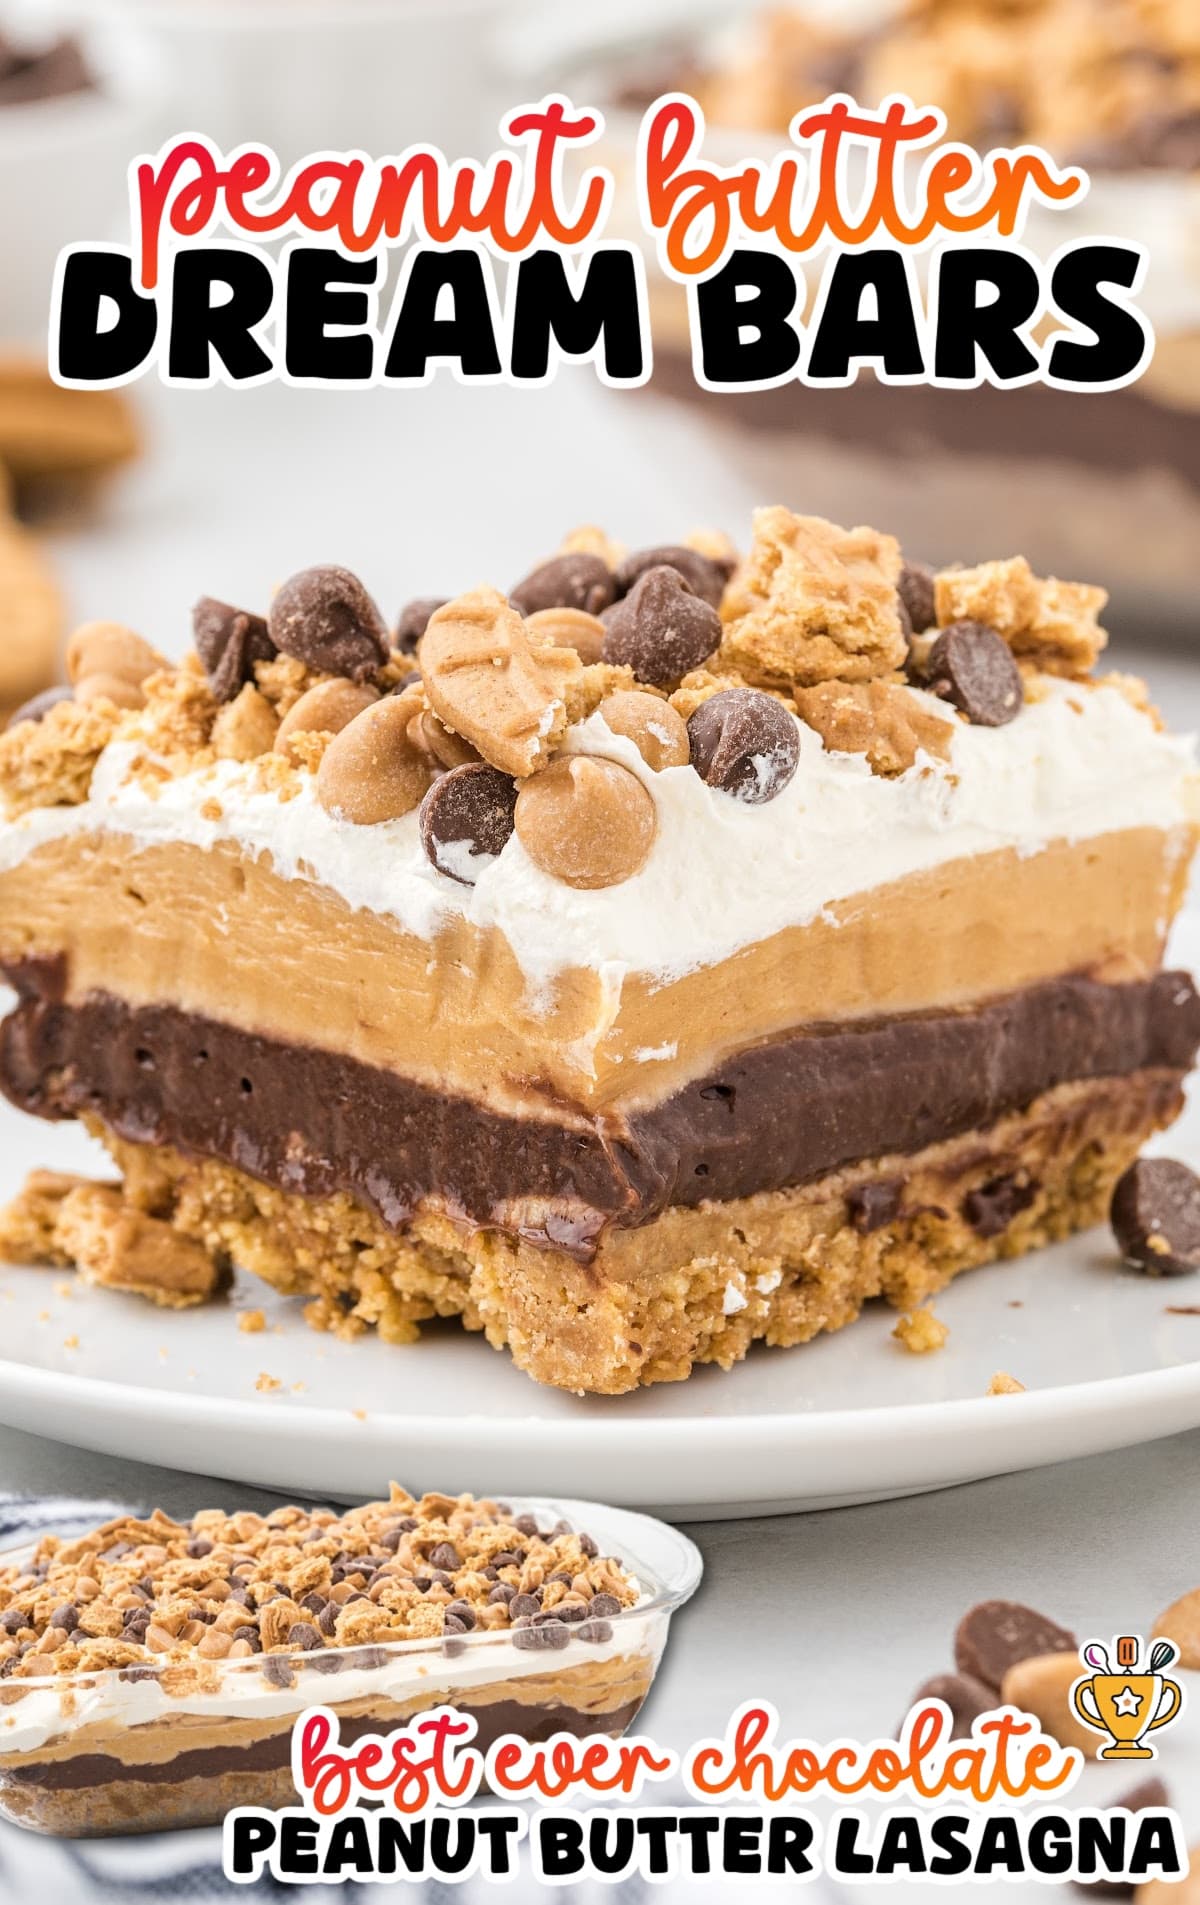
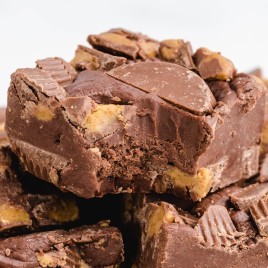
Peanut Butter Dream Bars
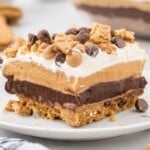
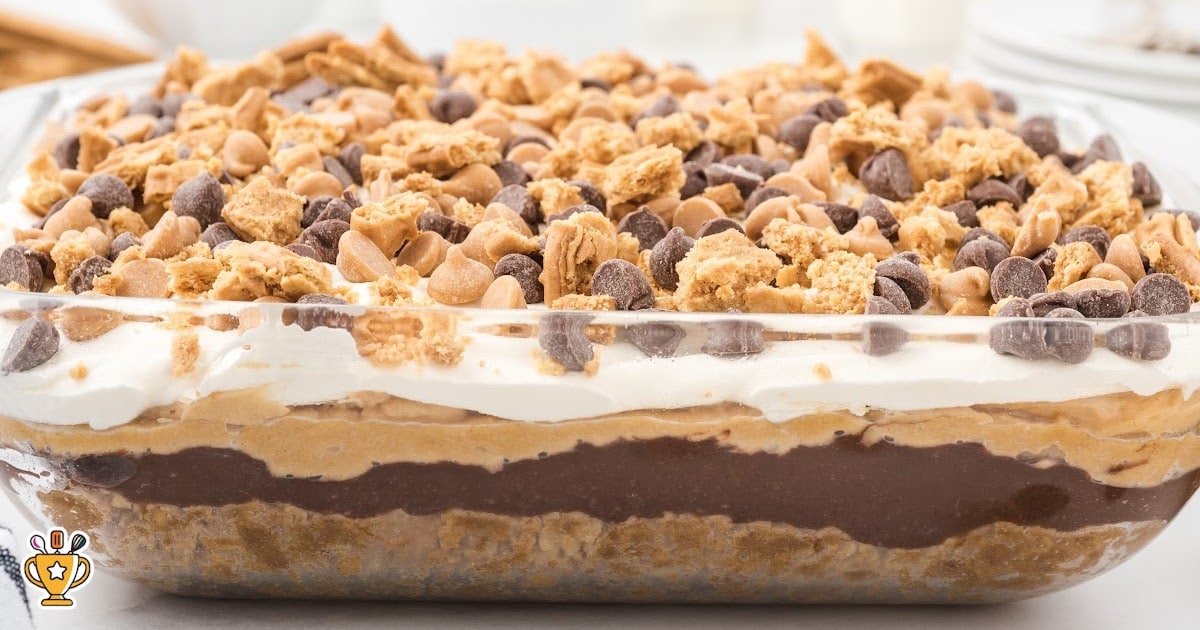
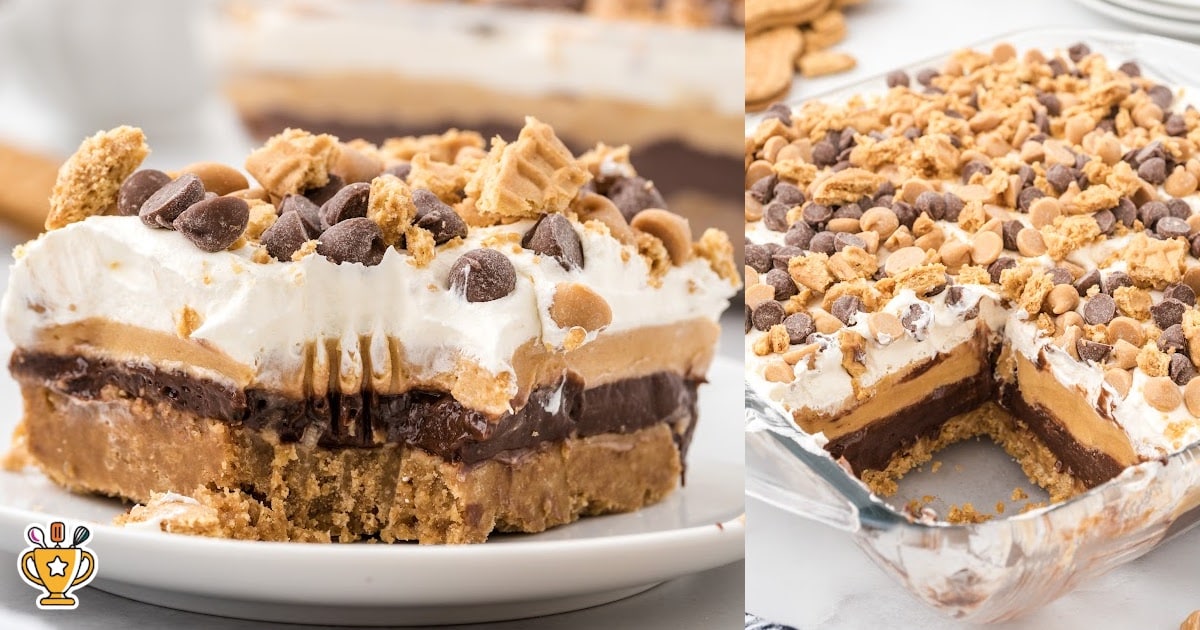
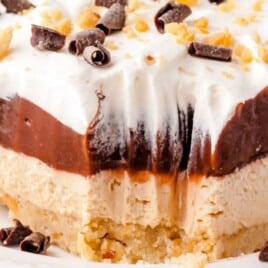
These Peanut Butter Dream Bars have a buttery cookie crust, creamy peanut butter filling, and silky chocolate layer topped with whipped cream. They’re rich, easy to make, and perfect for holidays, potlucks, or anytime you’re craving something sweet.
Jump to RecipeTable of Contents
Chocolate, peanut butter, and a creamy dreamy filling... is there anything more irresistible? These Peanut Butter Dream Bars are the kind of no-bake dessert that disappears before you even set down the pan.
More Recipes ⭐ Chocolate Peanut Butter Lasagna | Old Fashioned Peanut Butter Fudge | Chocolate Peanut Butter Ritz Cookies
🥜 Chocolate Peanut Butter Dessert Recipe Overview
⏲️ Prep Time: 20 minutes
⏲️ Total Time: 4 hours 30 minutes
🍽️ Servings: 9 (8×8-inch pan)
👍 Difficulty: Easy / Almost No-Bake
🛒 Main Ingredients: Nutter Butters, creamy peanut butter, instant chocolate pudding, cream cheese, powdered sugar, Cool Whip, milk chocolate & peanut butter chips
♥️ Perfect For: Potlucks, holidays, family gatherings, or make-ahead desserts
Chocolate and peanut butter are the kind of duo that never misses. These chocolate peanut butter dream bars are creamy, rich, and surprisingly easy to make.
You get that perfect mix of cookie crunch, smooth peanut butter filling, and silky chocolate pudding all in one bite. They’re the kind of dessert that makes everyone ask for seconds.
Great for potlucks, family get-togethers, or a make-ahead treat to keep in the fridge. In this post, I’ll walk you through the ingredients, simple steps, a few fun twists, and how to keep them fresh so you can enjoy them anytime.
Ingredients
What you'll need to make chocolate peanut butter lasagna (dream bars):
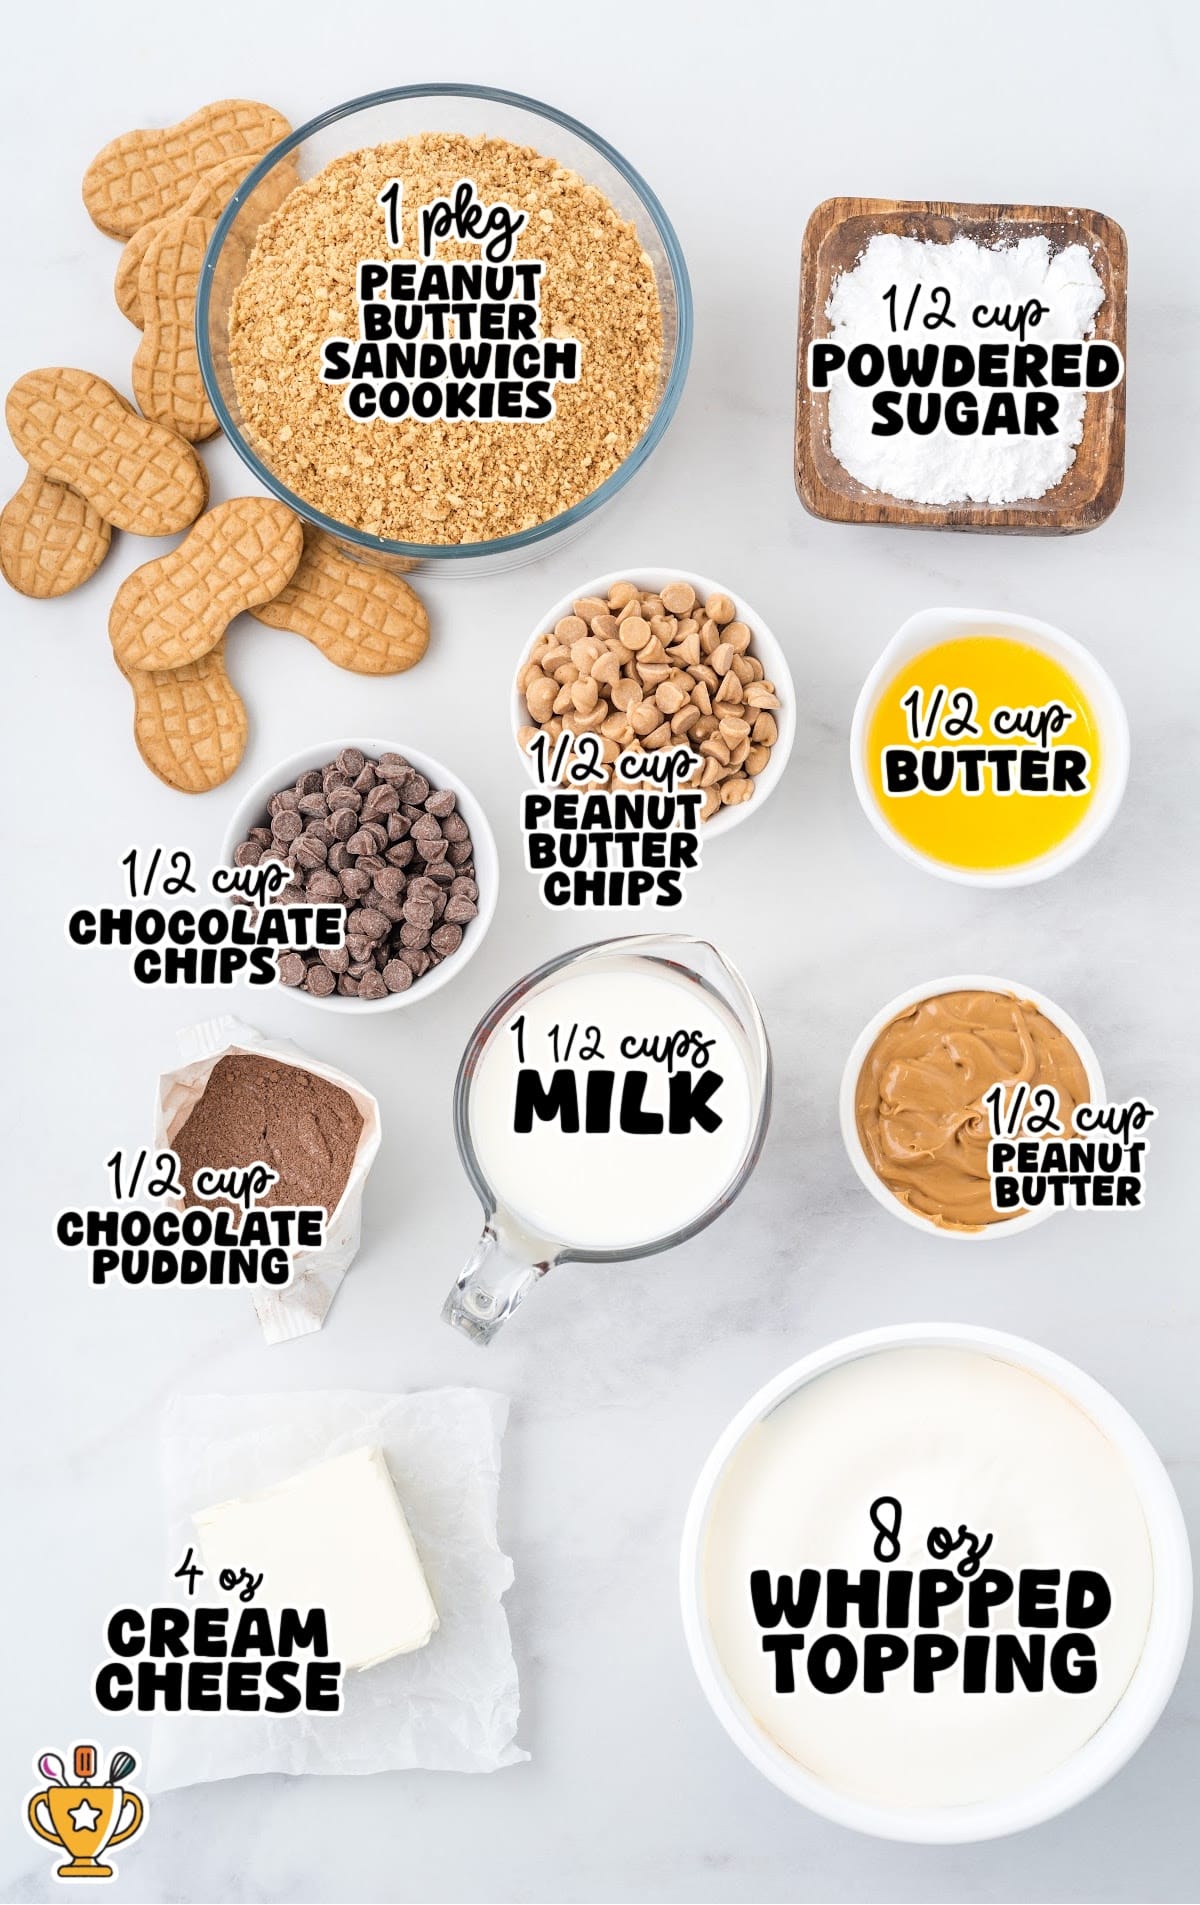
For the Crust:
- 16 ounce package of peanut butter sandwich cookies (crushed, reserve 8-9 cookies to crush for the toppping )
- 8 tablespoons (½ cup) unsalted butter, melted
Chocolate Layer:
- 1½ cups milk
- 3.9 ounce box instant chocolate pudding
Peanut Butter Cream Cheese Layer:
- 4 ounces cream cheese softened
- ½ cup powdered sugar
- ½ cup creamy peanut butter
Whipped Topping Layer:
- 8 ounce tub Cool Whip
- ½ cup milk chocolate chips
- ½ cup peanut butter chips
- reserved peanut butter sandwich cookies crushed
Ingredient Swaps and Smart Tips
Cookie Crust: You can use any peanut butter sandwich cookies, but Nutter Butters give the richest flavor. For a twist, try chocolate sandwich cookies or graham crackers.
Peanut Butter: Crunchy peanut butter adds a little bite if you like extra texture. Don't use natural peanut butter, because it will separate and make the filling too oily.
Pudding Mix: Cooked pudding mixes won't work, so make sure you grab a packet of instant. You can use dark chocolate or even white chocolate pudding for a flavor change, if you want.
Perfect Dessert Bar Tips
A few simple tools make this dessert come together smoothly.
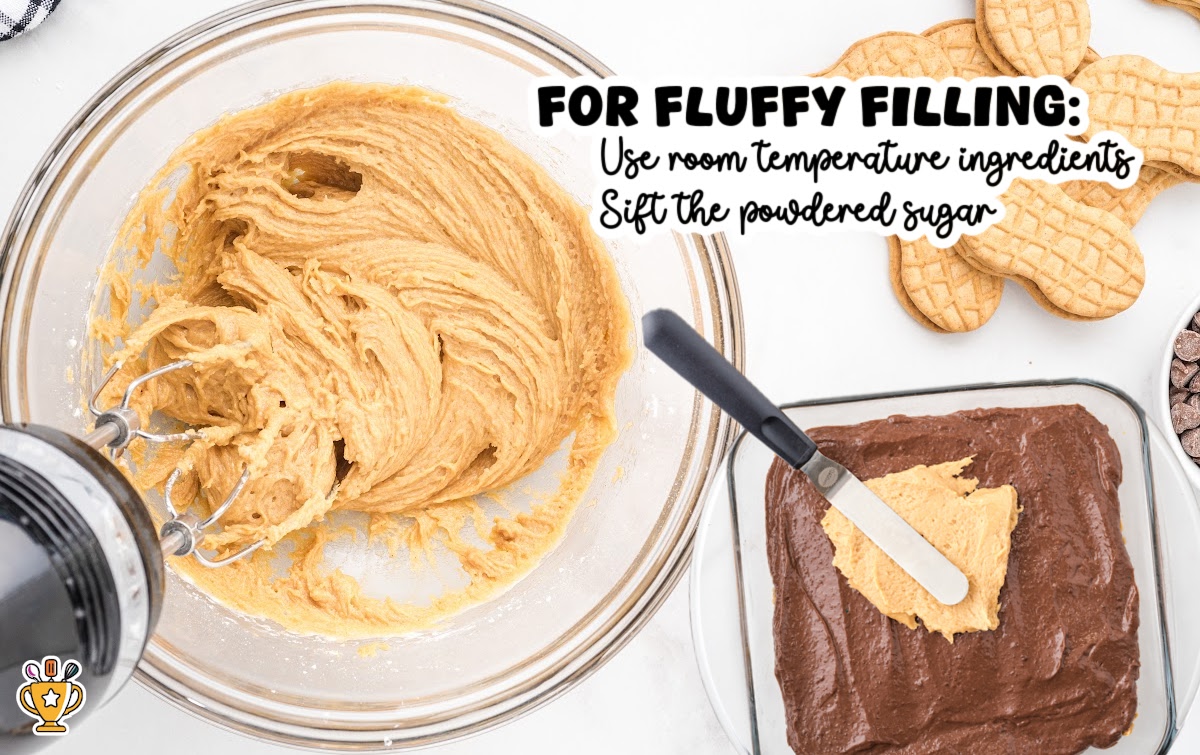
- CRITICAL Prep Ahead Tip: Let your cream cheese soften at room temperature for at least 30 minutes before mixing, or it won't blend well. We suggest sifting your powdered sugar as well, to prevent tiny lumps from forming in your filling.
- Baking Pan: Use an 8×8-inch pan for thick, bakery-style bars. If you’re feeding a crowd, double the recipe and use a 9×13-inch pan.
- Mixing Tools: You’ll need a few mixing bowls, a whisk, and a hand mixer to blend the layers until they’re light and creamy.
- Chilling Space: Make sure you have space in your refrigerator. These bars need a few hours to chill and set before slicing.
How to Make Peanut Butter Dream Bars
FIRST STEP: Preheat the oven to 350°F. Lightly spray an 8x8-inch square baking pan with nonstick cooking spray.
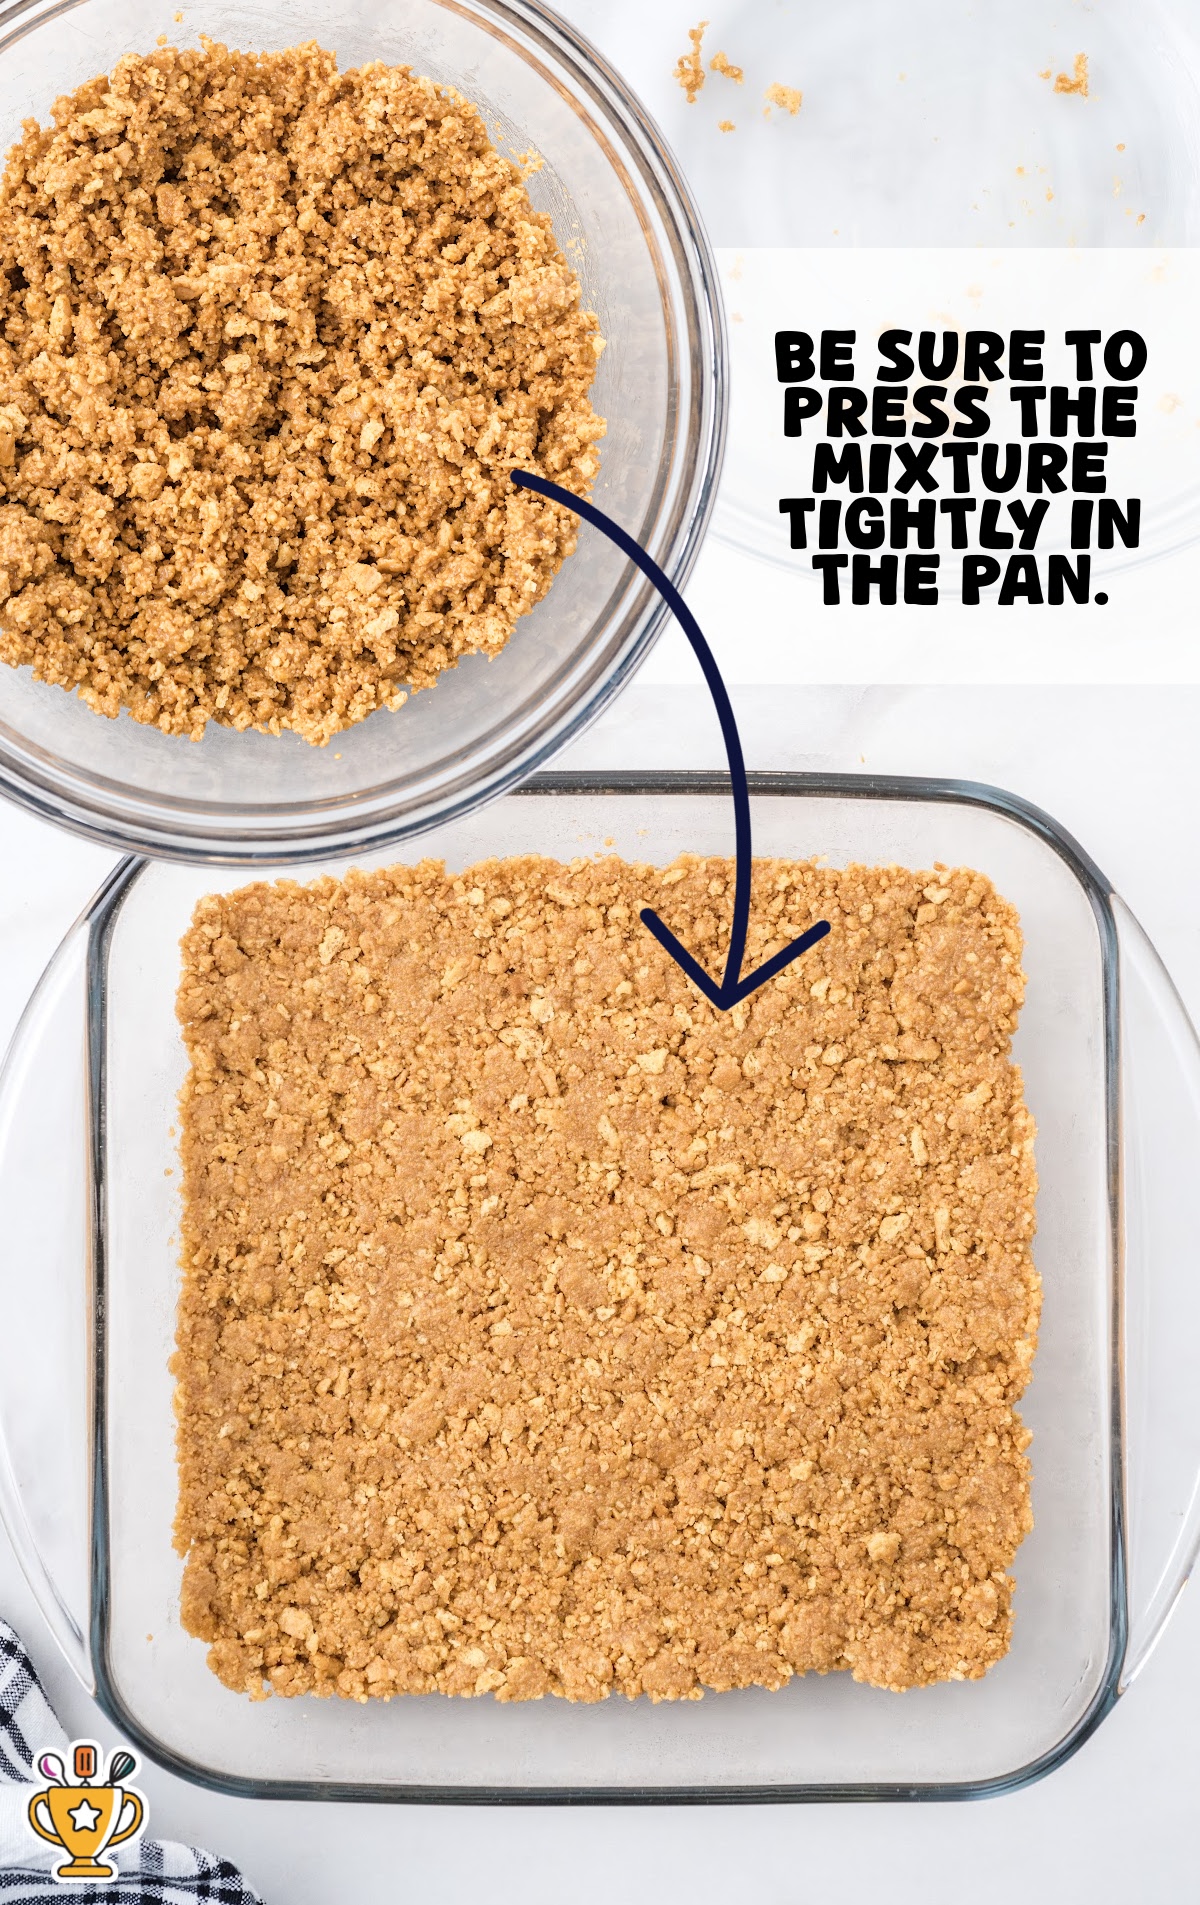
SECOND STEP: Combine the crushed cookies and the melted butter in a small mixing bowl. Make sure to completely coat all the crumbs.
THIRD STEP: Press the crumb mixture into the bottom of the pan. Bake for 10 minutes. Remove the baking dish from the oven and allow the baked crust to cool completely.
Pro Tip
You don't absolutely have to bake this crust, but it does help to solidify the bottom layer and it crumbles less when slicing and serving.
FOURTH STEP: Using a small bowl and a handheld electric mixer on medium speed or a wire whisk, beat together the chocolate pudding mix and the cold milk. Continue mixing until the pudding is thick.
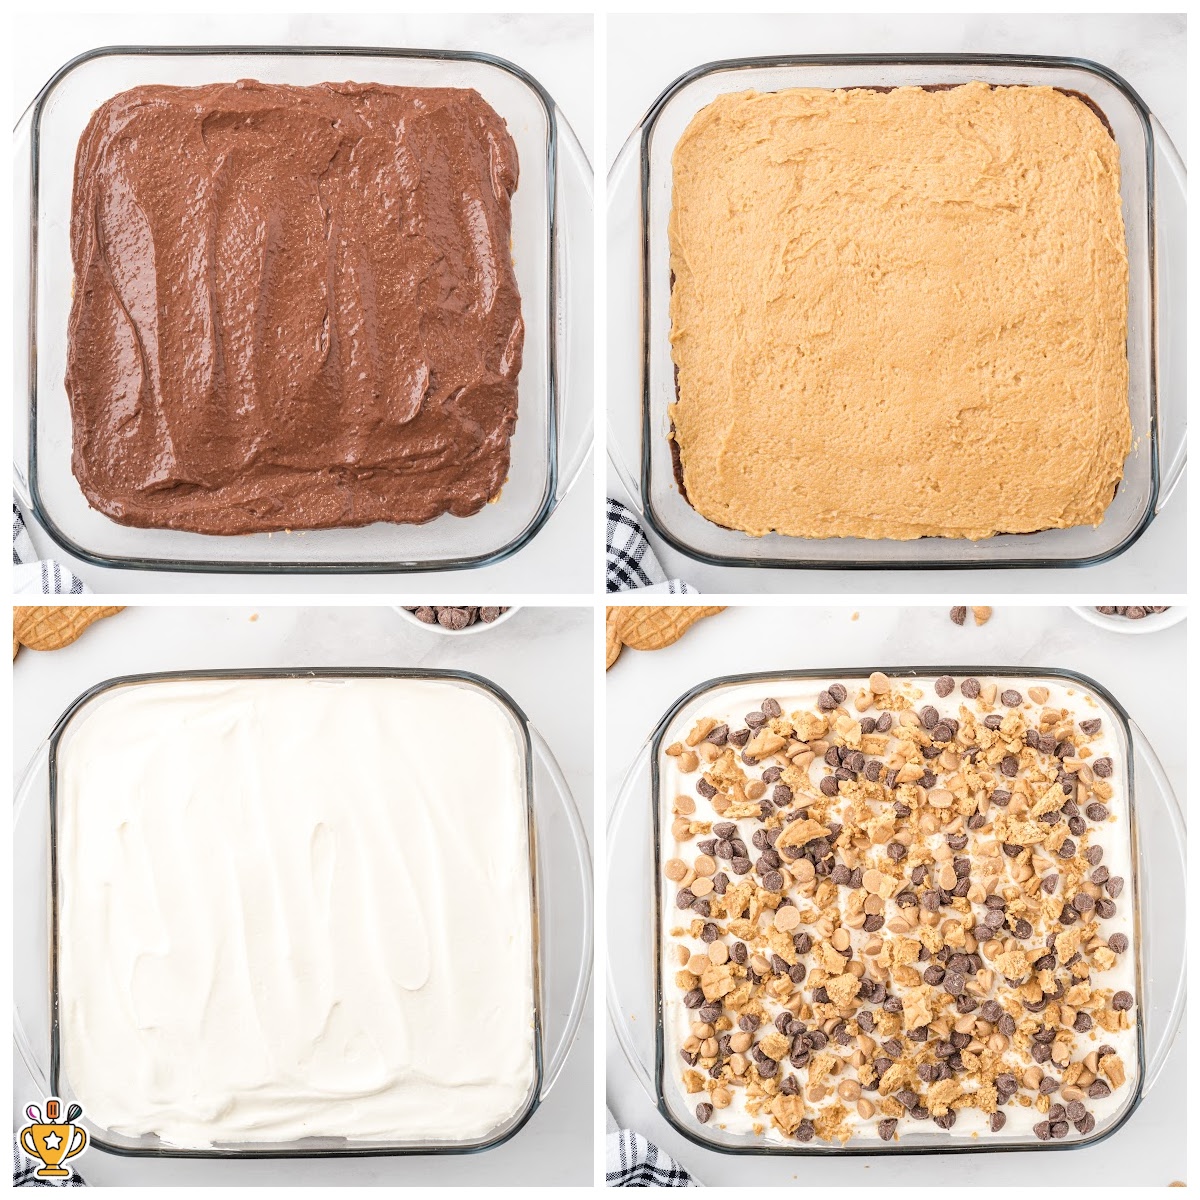
FIFTH STEP: Evenly spread the chocolate layer over the cooled crust. Set it in the refrigerator while you make the peanut butter layer.
SIXTH STEP: In a medium mixing bowl, use a hand mixer on medium-high speed to beat the cream cheese for about one minute, or until smooth and creamy.
Pro Tip
Don't rush this step! Beat the cream cheese until it's fluffy and smooth for the best texture.
SEVENTH STEP: Add the creamy peanut butter and continue mixing on medium-high for an additional thirty seconds to one minute, until smooth.
EIGHTH STEP: Reduce the mixer speed to low and slowly add in the confectioners' sugar. Continue to mix until completely incorporated.
NINTH STEP: Remove the baking dish from the refrigerator and evenly spread the peanut butter mixture over the top of the chocolate pudding layer.
TENTH STEP: Top the peanut butter layer with the 8-ounce tub of Cool Whip.
ELEVENTH STEP: Evenly sprinkle peanut butter and milk chocolate chips over the whipped topping.
TWELFTH STEP: Evenly sprinkle the crushed sandwich cookies over the peanut butter and chocolate chips.
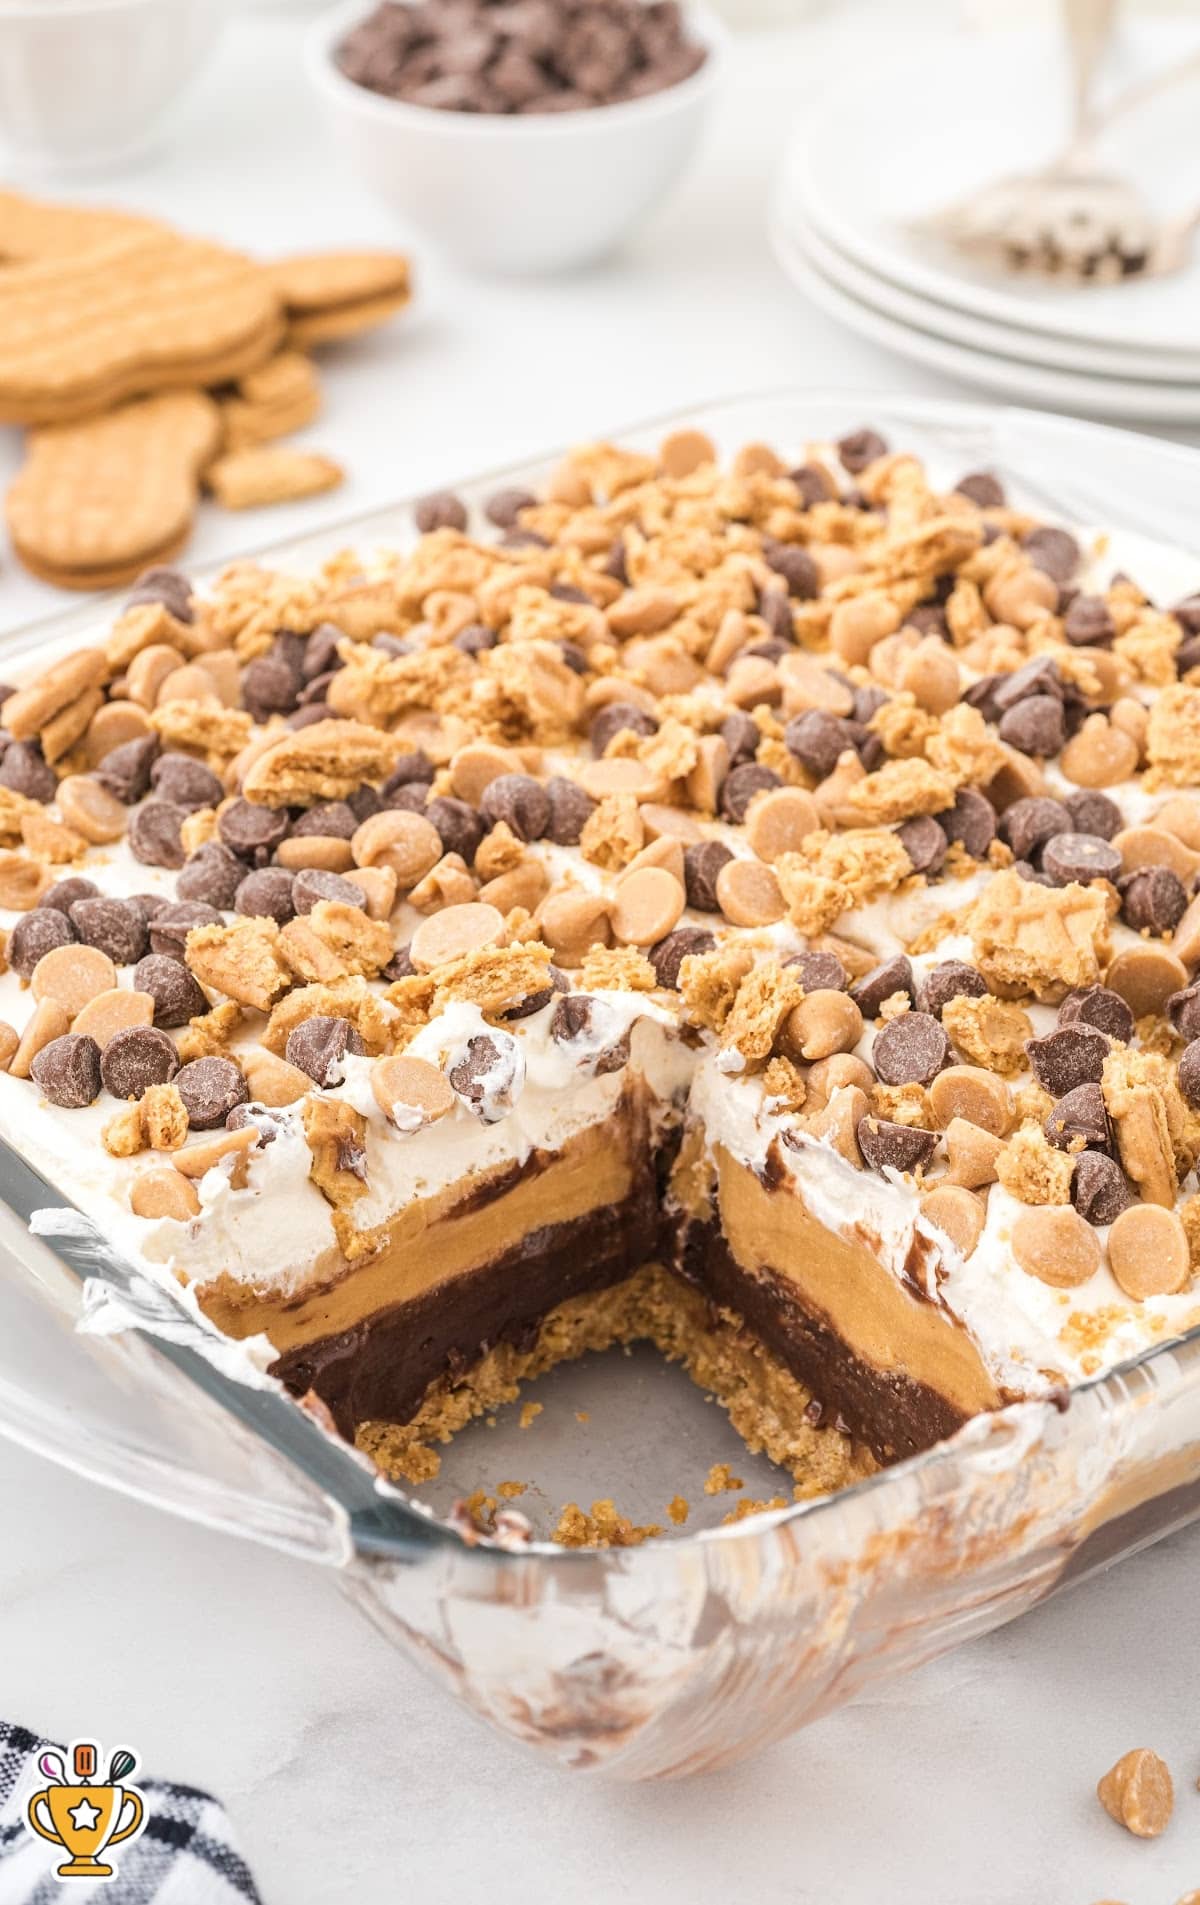
THIRTEENTH STEP: Return the baking dish to the refrigerator and chill for at least 2 hours.
FOURTEENTH STEP: Cut the dessert into 2-inch x 2-inch squares. Serve, and enjoy!
Make-Ahead & Storage Tips
Make Ahead: You can prepare this chocolate peanut butter lasagna up to two days in advance. Just keep them covered in the refrigerator until you’re ready to serve. The layers set beautifully overnight, making them easier to slice, and the flavors intensify overnight, too.
Refrigerate: Store leftovers tightly covered or in an airtight container in the fridge for up to five days. Because these bars contain cream cheese, we don't recommend you keep them at room temperature.
Freeze: To freeze peanut butter dream bars, slice the bars and put them slightly separated on a baking sheet. Freeze until solid, then transfer them to a freezer-safe container with parchment between the layers. They’ll keep for up to three months. Thaw in the fridge before serving.
For Potlucks: These travel well if kept cold. Pack the pan in a cooler or insulated bag until it’s time to serve them.
How To Serve
Once chilled, slice your bars into neat squares using a warm knife for clean edges. For a little extra flair, try:
- A drizzle of warm caramel or melted peanut butter
- A sprinkle of flaky sea salt on top for contrast
- Adding a scoop of ice cream for a plated dessert feel
- Fresh berries to cut through the richness
- Crushed cookies or chocolate shavings for an easy garnish
These bars are rich, creamy, and indulgent—so a small square goes a long way (but no one ever stops at one).
FAQs
Do I have to bake this dessert?
Well... Not really! This chocolate peanut butter layered dessert are considered almost no-bake. The crust can either be baked for 8–10 minutes for a firmer base or simply chilled in the freezer until set. Both methods work beautifully and give you that signature cookie crunch.
Can I double or halve the recipe?
Absolutely. Double the ingredients and use a 9×13-inch pan for parties or potlucks.
What’s the best way to cut neat bars?
Chill the bars completely before slicing. Use a sharp knife warmed under hot water and wiped dry between cuts. This keeps the layers clean and prevents the filling from smearing.


Peanut Butter Dream Bars
These Peanut Butter Dream Bars have a buttery cookie crust, creamy peanut butter filling, and silky chocolate layer topped with whipped cream. They’re rich, easy to make, and perfect for holidays, potlucks, or anytime you’re craving something sweet.
Did you try this recipe?Let our readers know how it turned out by Leaving a Review!
Ingredients
For the Crust:
- 16 ounce package of peanut butter sandwich cookies (crushed, reserve 8-9 cookies to crush for toppping )
- 8 tablespoons unsalted butter (melted (½ cup))
For the Chocolate Layer:
- 1½ cups milk
- 3.9 ounce box instant chocolate pudding
For the Peanut Butter Cream Cheese Layer
- 4 ounces cream cheese softened
- ½ cup powdered sugar
- ½ cup creamy peanut butter
For the Whipped Topping Layer
- 8 ounce tub cool whip
- ½ cup milk chocolate chips
- ½ cup peanut butter chips
- reserved peanut butter sandwich cookies crushed
DIRECTIONS
For the Crust
- Preheat the oven to 350°F. Lightly spray an 8x8-inch square baking pan with nonstick cooking spray.
- Using a small mixing bowl, combine the crushed cookies and the melted butter. Stir cookie base ingredients to completely coat all the crumbs.
- Press the crumb mixture into the bottom of the pan. Bake for 10 minutes. Remove the baking dish from the oven and allow the baked crust to cool completely.
For the Chocolate Pudding Layer
- Using a small bowl and a handheld electric mixer on medium speed or a wire whisk, beat together the chocolate pudding mix and the cold milk. Continue mixing until the pudding is thickened.
- Use either a silicone spatula or an offset spatula, evenly spread the chocolate layer over the cooled crust. Set it in the refrigerator while you make the peanut butter layer.
For the Peanut Butter Cream Cheese Layer
- Using a medium bowl and a hand mixer on medium-high speed, beat the cream cheese for about 1 minute until smooth.
- Add the creamy peanut butter and continue mixing on medium-high for an additional 30 seconds - 1 minute, until smooth.
- Reduce the mixer speed to low, slowly add in the confectioners' sugar and continue to mix until completely incorporated.
- Remove the baking dish from the refrigerator and evenly spread the peanut butter mixture over the top of the chocolate pudding layer.
- Top the peanut butter layer with the 8-ounce tub of whipped topping.
- Evenly sprinkle peanut butter and milk chocolate chips over the whipped topping
- Evenly sprinkle the crushed sandwich cookies over the peanut butter and chocolate chips.
- Return the baking dish to the refrigerator and chill for at least 2 hours
- Cut the dessert into 2-inch x 2-inch squares.
WATCH THIS RECIPE VIDEO
Notes
- You don’t absolutely have to bake the crust, but it does help to solidify the bottom layer and it crumbles less when slicing and serving.
- Don’t rush the step of beating the cream cheese. Make sure you mix until it’s fluffy and smooth for the best texture.
Nutrition
Calories: 501kcal | Carbohydrates: 54g | Protein: 7g | Fat: 29g | Saturated Fat: 13g | Polyunsaturated Fat: 4g | Monounsaturated Fat: 9g | Trans Fat: 1g | Cholesterol: 39mg | Sodium: 390mg | Potassium: 168mg | Fiber: 1g | Sugar: 33g | Vitamin A: 443IU | Calcium: 72mg | Iron: 1mg
HAVE YOU TRIED THIS RECIPE?Follow me on Pinterest @bestblogrecipes
More Easy Chocolate Peanut Butter Desserts You'll Love
- Homemade Peanut Butter Cups
- Chocolate Peanut Butter Lasagna
- Peanut Butter Balls
- Chocolate Peanut Butter Cookies
- Chocolate & Peanut Butter Christmas Trees
- Frozen Peanut Butter Hot Chocolate
- Mini Peanut Butter Cheesecakes
- Lunch Lady Peanut Butter Bars
- Peanut Butter Cookie Dough

Leave a Comment