
Last updated on
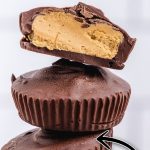
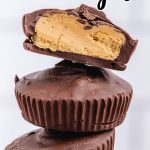
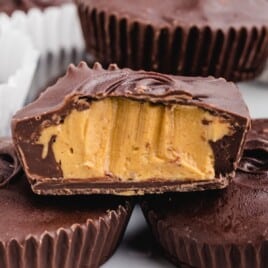
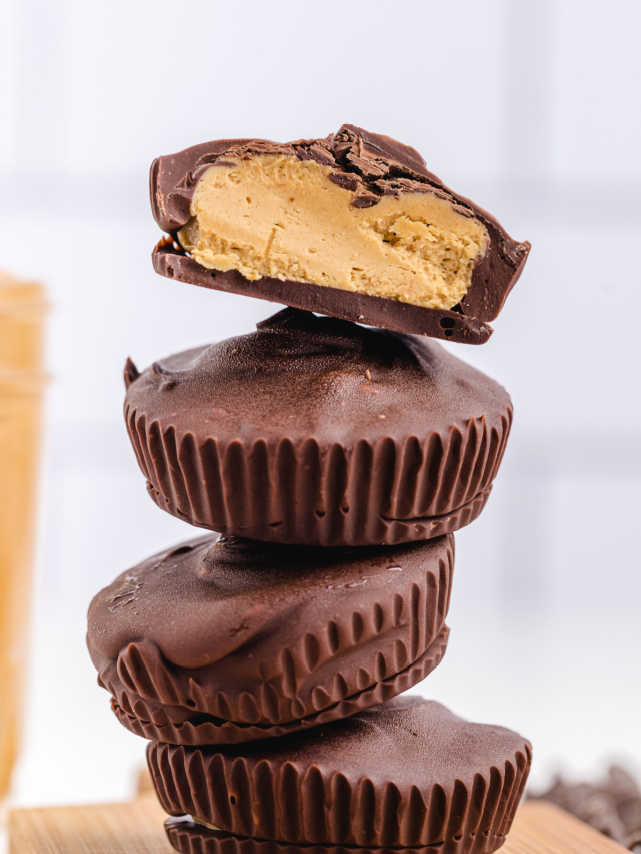
Homemade Peanut Butter Cups

Homemade peanut butter cups mix smooth peanut butter and rich chocolate for the perfect no-bake treat. They’re easy, fun, and always a hit.
Jump to RecipeTable of Contents


Make these homemade peanut butter cups with just a few simple ingredients and no baking needed. Each bite gives you sweet, rich chocolate and smooth, creamy peanut butter. They look store-bought but taste even better made fresh at home. Perfect for parties, snacks, or holiday treats any time of year.
This recipe is easy to make at home, and you can follow the guide below to get it just right. We include step-by-step photos and directions to help you along the way. Be sure to check out the pro tips and tricks, plus answers to the most frequently asked questions.

More Recipes ⭐ Keto Chocolate Peanut Butter Balls | Chocolate Peanut Butter Lasagna | Reese's Peanut Butter Fudge
These homemade Reese's peanut butter cups taste rich, creamy, and full of real peanut butter flavor in every bite. The smooth peanut butter and chocolate combo makes them way better than anything from the store.
Serve them at parties, potlucks, or holidays—everyone grabs more than one. Use this easy peanut butter cups recipe whenever you want something sweet and fun.
Ingredients for Peanut Butter Chocolate Cups

What you'll need to make this peanut butter cups recipe:
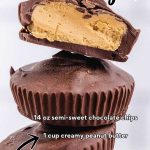
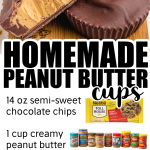
- 14 ounces of semi-sweet chocolate chips, divided in half
- 1 cup creamy peanut butter
- 6 tablespoons of powdered sugar
- 4 tablespoons butter, softened
Substitutions and Additions
Customize your no bake peanut butter cups by changing ingredients or adding a few extras! These simple swaps make your treats special. Here are some of the best substitutions and additions:
- Substitute Chocolate: Use white or dark chocolate for a sweeter or richer flavor in your peanut butter cups.
- Add Crushed Pretzels: Sprinkle crushed pretzels on top for a salty crunch that pairs perfectly with chocolate and peanut butter.
- Substitute Peanut Butter: Try almond or cashew butter for a different nutty flavor in the filling.
- Add Sea Salt: Sprinkle sea salt on top before chilling for a sweet and salty combo everyone will love.
- Substitute Filling: Add a layer of caramel for an extra gooey, sweet surprise in the center.
How to Make Homemade Peanut Butter Cups
Follow along with our step-by-step pictures, simple directions, and the helpful tips and tricks listed below. You’ll learn how to make sweet, smooth DIY peanut butter cups without stress. Let’s get started!
Pro Tip
This recipe is super easy to double, freezes really well, and makes excellent gifts to share.
FIRST STEP: Line twelve muffin cups with cupcake liners. Set aside.
SECOND STEP: In a small microwave-safe bowl, place half of the chocolate. Melt the chocolate by heating in 30-second intervals and stirring in between.
This should take 30 to 60 seconds in total. The chocolate should be smooth.

THIRD STEP: Scoop about ½ tablespoon of melted chocolate into each cupcake liner.
This can be done by scooping the chocolate with one spoon and scraping it off with another.

FOURTH STEP: Shake the pan periodically back and forth to help spread the chocolate so that it covers the bottom of the liner.

FIFTH STEP: Freeze for 15 minutes.
Pro Tip
Don’t rush the chilling process. You need to make sure the chocolate is set before adding the peanut butter.
SIXTH STEP: While the chocolate is freezing, prepare the peanut butter mixture. Measure the peanut butter, powdered sugar, and butter into a medium bowl.
Using a hand mixer, mix until creamy.

SEVENTH STEP: Put one tablespoon of the peanut butter filling on top of the frozen chocolate layer, making sure the filling does not touch the sides of the cupcake liner.

EIGHTH STEP: Freeze for five minutes.
NINTH STEP: In a microwave-safe bowl (use the one from step two), melt the remaining chocolate in the same way as explained in step two.
TENTH STEP: Cover the peanut butter layer with the melted chocolate.

ELEVENTH STEP: Freeze for 10 to 15 minutes or refrigerate for 15 to 20 minutes until hardened.
How To Serve Peanut Butter Cups
You can serve these no bake peanut butter cups any time you want something sweet, creamy, and totally fun to share. They work great for holidays, parties, or just because you want a treat that everyone loves.
- Serve at birthday parties: Kids go crazy for peanut butter and chocolate, so these treats always disappear fast at birthday parties. Pair them with peanut butter cookies or chocolate marshmallow fudge for a fun dessert table.
- Bring to holidays or potlucks: These homemade treats feel special but take very little effort to make and share. Add them to dessert trays with fun no bake monster cookies or Oreo truffles during Christmas or Thanksgiving.
- Keep on hand for snacks or movie nights: Stash these in the fridge for a sweet snack or fun dessert after dinner. Serve them with chocolate pudding pie or chewy brownies for the perfect night-in treat.

Why You'll Love This Recipe for Homemade Peanut Butter Cups
These easy peanut butter cups have a loyal fanbase—and for good reason. Readers love how easy, fun, and foolproof these treats turn out every time.
- Easy to Make: You only need a few ingredients and simple steps, so anyone can make these without breaking a sweat. With no oven needed, they're perfect for kids, busy parents, or hot days when you want something sweet.
- Better Than Store-Bought: You get that rich peanut butter and chocolate combo without the extra packaging or a trip to the store.
- Great for Sharing: You can make a whole batch and hand them out to friends, party guests, or snack-happy family members.
- Reader-Approved Favorite:
This recipe gets bookmarked and shared again and again because people love how well it turns out every time.
This peanut butter cup recipe keeps winning hearts, and we know you’ll see why once you try them.

Recipe FAQ
Do I need a special pan to make homemade peanut butter cups?
No, you don’t need a special pan. Standard muffin tins or mini muffin pans work great for homemade peanut butter cups.
How do I keep the layers from mixing together?
To keep layers separate, let the bottom chocolate set before adding the peanut butter and top chocolate layers according to the recipe steps.
Can I use natural peanut butter in this recipe?
No, natural peanut butter makes the filling too oily. Use regular creamy peanut butter for best results and smooth texture.
How do I get the top layer of chocolate smooth?
To smooth the top layer, gently tap the muffin pan on the counter right after pouring the chocolate.
Do I need to temper the chocolate for this recipe?
No, you don’t need to temper chocolate for homemade peanut butter cups. Just melt and cool slightly before pouring.
What’s the best way to fill the layers evenly?
To fill the layers evenly, use a small spoon or cookie scoop for each layer of chocolate and peanut butter.

Serving FAQ
What’s the best way to serve homemade peanut butter cups?
Unwrap each peanut butter cup and place them on a tray or tiered stand for an easy, grab-and-go dessert. They fit perfectly on any dessert table. Their small size and rich flavor make them easy to serve and share.
Do I need to serve homemade peanut butter cups cold?
No, you don’t need to serve them cold. Room temperature works fine unless the room is hot or humid.
Are homemade peanut butter cups good for kids’ parties?
Yes, kids love the chocolate and peanut butter combo. Serve them after cake or as a party favor treat. Mini liners work great for serving. They keep fingers clean and make each bite feel like a little treat.
Can I stack homemade peanut butter cups on a platter?
Yes, you can stack them with parchment between layers to keep them neat and ready to serve anytime.

Storage FAQ
Follow these easy tips to keep your homemade peanut butter cups fresh and tasty. Learn how to store, freeze, and reheat them the right way. You’ll also find helpful tricks below to make sure every bite stays just right.
What’s the best way to store leftover peanut butter cups?
Keep them in an airtight container in the fridge. They stay fresh and hold their shape for up to one week.
Is it possible to freeze homemade peanut butter cups?
Yes, you can freeze them in a sealed container or freezer-safe bag. They’ll keep their taste for up to three months.
How do I thaw frozen peanut butter cups?
Place them in the fridge overnight to thaw slowly. This helps them stay firm and taste like you just made them.
What’s the best way to serve peanut butter cups after freezing?
After thawing, let them sit out for 10 minutes. This helps the chocolate soften just enough for a smooth bite.
Homemade Peanut Butter Cups
Homemade peanut butter cups mix smooth peanut butter and rich chocolate for the perfect no-bake treat. They’re easy, fun, and always a hit.
Did you try this recipe?Let our readers know how it turned out by Leaving a Review!
Ingredients
- 14 ounces semi-sweet chocolate chips (divided in half)
- 1 cup creamy peanut butter
- 6 tablespoons powdered sugar
- 4 tablespoons butter (softened)
DIRECTIONS
- Line 12 muffin cups with cupcake liners. Set aside.
- In a small microwave-safe bowl, place half of the chocolate. Melt the chocolate by heating in 30-second increments and stirring in between. This should take 30 to 60 seconds total. The chocolate should be smooth.
- Scoop about ½ tablespoon of melted chocolate into each cupcake liner. This can be done by scooping the chocolate with one spoon and scraping it off with another.
- Shake the pan periodically back and forth to help spread the chocolate so that it covers the bottom of the liner.
- Freeze for 15 minutes.
- While the chocolate is freezing, prepare the peanut butter filling. Measure peanut butter, powdered sugar, and butter into a medium mixing bowl. Using a hand mixer, mix until creamy.
- Put 1 tablespoon of the peanut butter filling on top of the chocolate layer, making sure the filling does not touch the sides of the cupcake liner.
- Freeze for 5 minutes.
- In a microwave-safe bowl (use the one from step 2), melt the remaining chocolate in the same way as explained in step 2.
- Cover the peanut butter layer with the melted chocolate.
- Freeze for 10 to 15 minutes or refrigerate for 15 to 20 minutes until hardened.
WATCH THIS RECIPE VIDEO
Notes
- This recipe is super easy to double, freezes really well and makes excellent gifts to share.
- Don’t rush the chilling process. You need to make sure the chocolate is set before adding the peanut butter.
Nutrition
Calories: 369kcal | Carbohydrates: 26g | Protein: 7g | Fat: 27g | Saturated Fat: 12g | Polyunsaturated Fat: 3g | Monounsaturated Fat: 10g | Trans Fat: 0.2g | Cholesterol: 12mg | Sodium: 126mg | Potassium: 310mg | Fiber: 4g | Sugar: 18g | Vitamin A: 133IU | Calcium: 32mg | Iron: 2mg
HAVE YOU TRIED THIS RECIPE?Follow me on Pinterest @bestblogrecipes
More Recipes

Comments
Jackie Hunter says
I tried these really great ! The 2nd time I made them I put chopped pecans in the chocolate WOW ! That was great too !!