
Last updated on
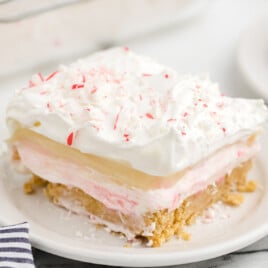
Candy Cane Dessert

Candy cane dessert combines creamy peppermint layers and a crunchy cookie crust for the ultimate festive holiday treat. This no-bake recipe is quick to make and perfect for adding cheer to any holiday gathering!
Jump to RecipeTable of Contents

This creamy candy cane dessert is perfect for the holidays with its sweet peppermint flavor and festive layers. The crunchy cookie crust and fluffy filling make every bite irresistible and fun to share. Add this no-bake treat to your holiday table and enjoy its easy-to-make, crowd-pleasing magic. Whip it up in no time and spread some holiday cheer!
This recipe is super simple to make, and you can follow the step-by-step guide below. We've included photos and detailed directions, plus pro tips to ensure success. Check out the FAQs for quick answers to all your dessert-making questions!

More Recipes ⭐ Peach Cobbler Cheesecake | Hot Chocolate Roll Cake | Magic Custard Cake
This candy cane dessert comes together quickly, making it perfect for busy holiday gatherings or last-minute treats. The crunchy cookie crust and fluffy peppermint filling create a deliciously festive combination that everyone loves. Ideal for parties, potlucks, or cozy family dinners, this no-bake recipe adds holiday cheer to any table. Try it at home for an easy and impressive dessert that stands out with its sweet, refreshing flavor!
Ingredients

What you'll need to make this Candy Cane Dessert:
For The Oreo Crust:
- 1 family-size package of golden Oreos (about 540 grams)
- ¾ cup of unsalted butter, melted
For The Cream Cheese Layer:
- ½ cup of crushed peppermint candy canes
- 1 (8-ounce) package of cream cheese, softened
- ¼ cup of white sugar
- 1 cup of powdered sugar
- 1 (16-ounce) container of Cool Whip, thawed and divided into 2 cups, and the remainder for the topping
For The Vanilla Pudding Layer:
- 2 (3.4-ounce) boxes of instant vanilla pudding mix
- 2¾ cups of cold milk
For The Whipped Topping:
- ¼ cup of crushed peppermint candy canes
- Remainder of Cool Whip, thawed
Substitutions and Additions
This festive dessert can easily be personalized by swapping out ingredients and adding festive extras! These simple changes make it uniquely yours. Here are some top substitutions and additions:
Incorporate festive sprinkles: Add red and green sprinkles on top for a colorful holiday look that pops at parties.
Substitute the crust: Swap the cookie crust with graham crackers or chocolate wafer crumbs for a fun twist on the classic base.
Add a chocolate layer: Spread a thin layer of melted chocolate over the crust before adding the filling for extra indulgence.
Swap peppermint candies: Use crushed Andes mints or mini candy canes for a slightly different but equally festive peppermint flavor.
Top with whipped cream: Replace or layer the whipped topping with fresh whipped cream for a creamier, homemade touch.
How to Make this Candy Cane Dessert
Follow along with our step-by-step instructions and pictures to create this festive candy cane dessert. Check out the tips and tricks below for pro advice to make it perfect every time. Let’s get started and bring some holiday magic to your kitchen!
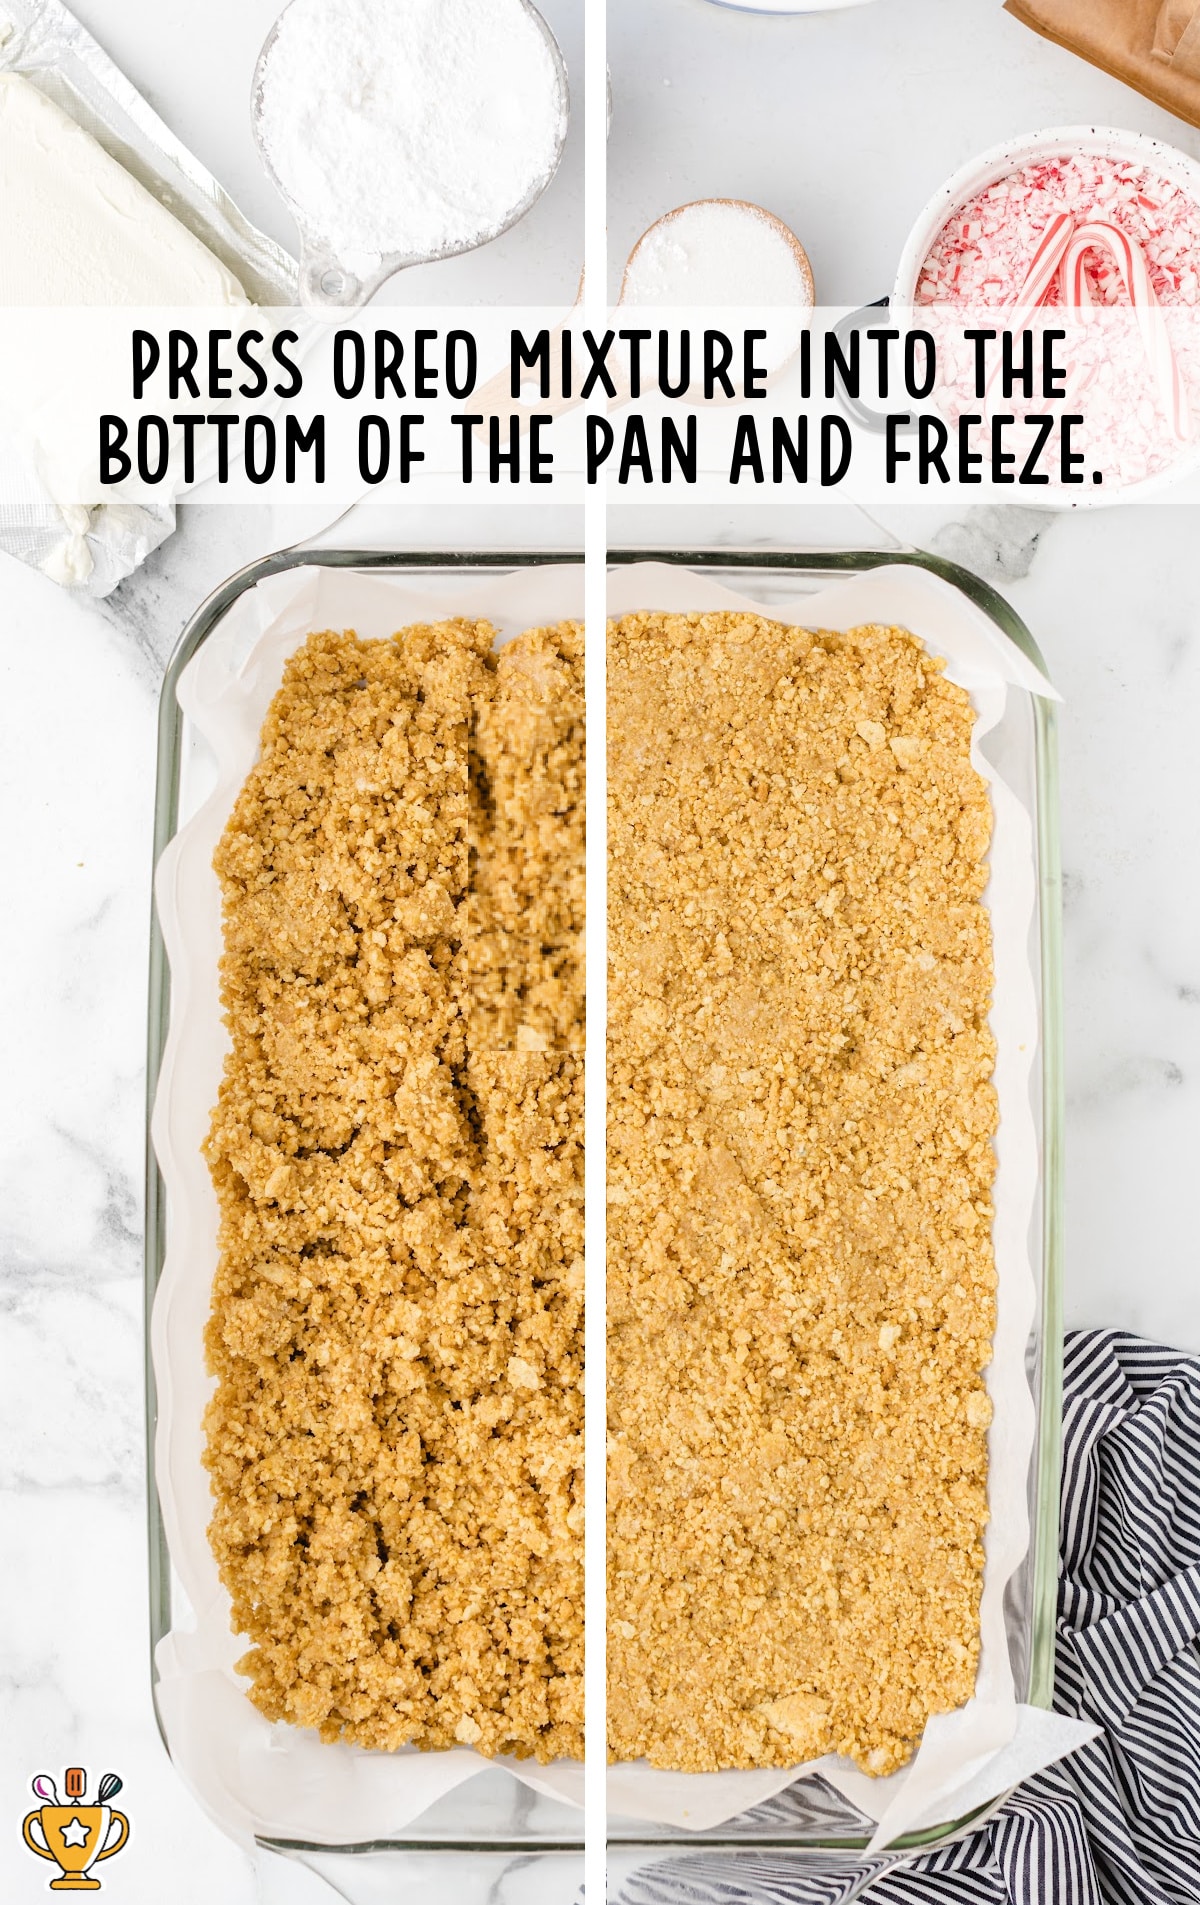
FIRST STEP: Line a 9×13-inch baking dish with parchment paper or spray with nonstick cooking spray.
SECOND STEP: Use a food processor to crush the candy canes until coarsely crushed and three-quarters of a cup in volume. Set aside.
THIRD STEP: Use a food processor to turn the Oreos into fine crumbs. Add the melted butter and mix.
FOURTH STEP: Press the mixture into the baking dish. Store in the freezer while you prepare the next layer.
FIFTH STEP: In a large bowl, beat the cream cheese with an electric mixer.
Pro Tip
Make sure your cream cheese is at room temperature; otherwise, you will end up with lumps in your cheesecake mixture.
Make sure your cream cheese is at room temperature; otherwise, you will end up with lumps in your cheesecake mixture.

SEVENTH STEP: Stir half a cup of the crushed candy canes into the cream cheese mixture. Set aside the remaining quarter cup for the topping.
Pro Tip
When stirring in the candy cane bits, don’t mix too much, or this layer will turn pink or green, depending on the color of the candy canes you use.

EIGHTH STEP: Use a spatula to smooth this layer over the prepared crust. Put the baking dish back into the freezer while you prepare the next layer.
NINTH STEP: Combine the dry pudding mix and milk and beat for two minutes until it starts to thicken.
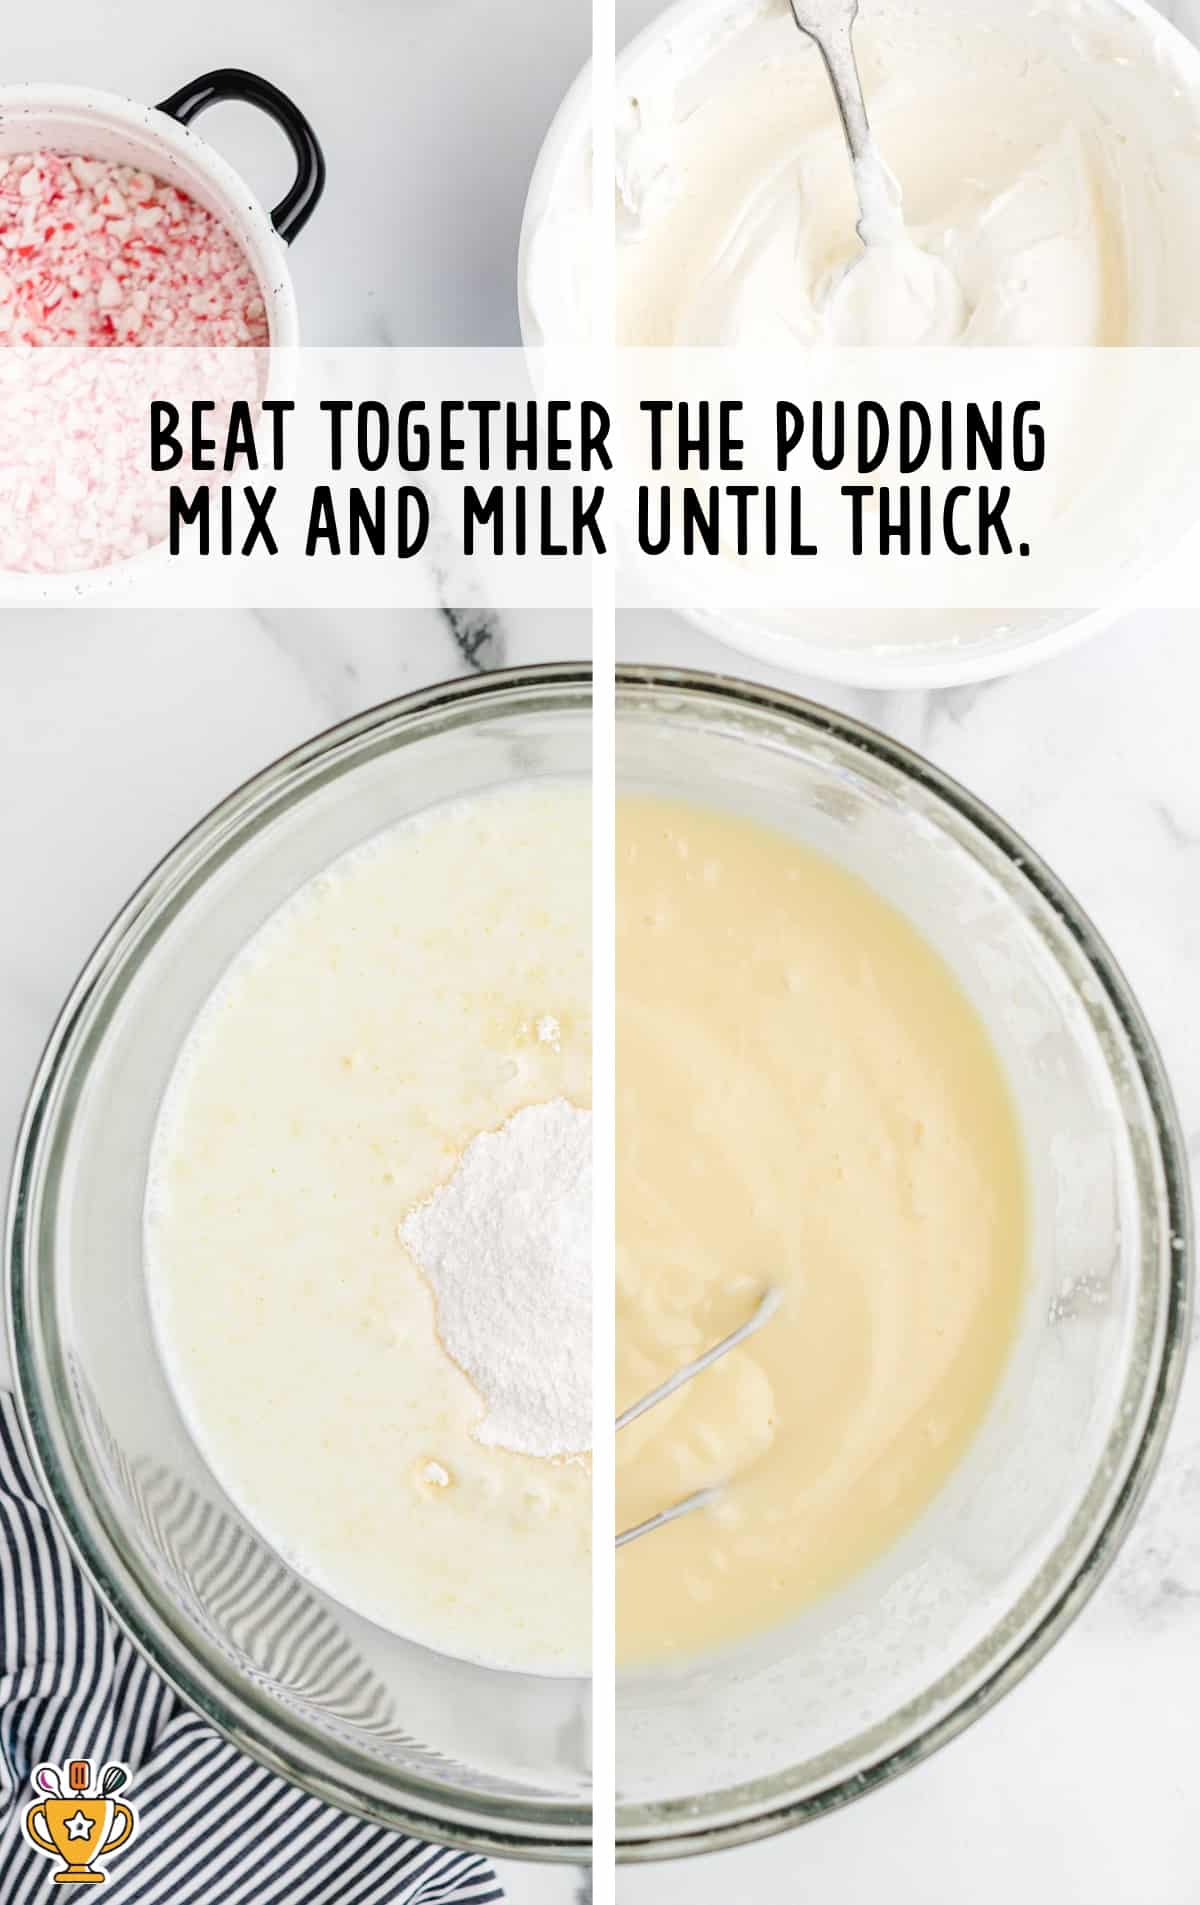
TENTH STEP: Use a spatula to evenly smooth the pudding layer over top of the cream cheese layer. Put it back into the freezer for ten minutes.
ELEVENTH STEP: Smooth the remaining Cool Whip over the top of the dessert and sprinkle with the remaining crushed candy cane pieces.

TWELFTH STEP: Place the dish into the refrigerator for at least six hours before slicing and serving. For the best layers, it should chill overnight.
Pro Tip
The long chill time allows all the flavors to mingle and blend together even more!
How To Serve Candy Cane Dessert
This candy cane dessert is perfect for so many occasions and seasons. Its festive flavors make it a hit for all ages. Whether serving at a party or enjoying it as a family treat, this dessert always spreads cheer.
- Holiday Parties: This dessert shines at holiday parties with its peppermint flavor and cheerful colors. Serve it alongside orange sugar cookies and hot cocoa for a sweet, festive spread. It’s a no-bake treat that’s easy to make and fun to share!
- Family Gatherings: Bring this dessert to family dinners or potlucks, and watch everyone ask for seconds. Pair it with dishes like baked ham and sweet potato casserole for a delicious holiday meal. Kids and adults alike love its creamy, crunchy layers.
- Winter Treats for Kids: Kids adore this dessert as a fun winter snack or special treat after school. Serve it with mugs of warm milk or a batch of homemade caramel brownies for extra sweetness. The peppermint flavor adds a playful twist they’ll enjoy!

Why You'll Love This Candy Cane Dessert Recipe
Candy cane dessert is a festive favorite for so many festive reasons:
- A Festive Delight: This recipe combines creamy peppermint flavor with a crunchy cookie crust, creating a dessert that screams holiday magic. Its vibrant colors and layers make it as visually stunning as it is delicious, perfect for any celebration.
- Simple Yet Impressive: With minimal prep and no baking required, this dessert offers big rewards without extra effort. The fluffy, creamy filling and peppermint topping make every bite feel like a holiday indulgence.
- Loved by All Ages: Kids adore the fun peppermint crunch, and adults appreciate the nostalgic holiday flavor. It’s a dessert that brings everyone together with its cheerful charm.
Candy cane dessert is a recipe that’s a holiday tradition in the making. Share it with loved ones and create memories!

Recipe FAQ
Can I make candy cane dessert ahead of time?
Yes, you can prepare this dessert up to a day in advance. Chill it until you’re ready to serve.
How do I crush candy canes for the topping?
Place candy canes in a sealed plastic bag and use a rolling pin to crush them into small pieces.
What is the best way to layer this dessert?
Spread the crust evenly, then layer the filling smoothly, and finish with crushed candy canes for a festive touch.
Does this dessert need to be chilled before serving?
Yes, chilling the dessert for at least two hours helps the layers set and enhances the flavor and texture.

Serving FAQ
How should I serve candy cane dessert at a holiday party?
Serve it chilled on a festive platter to highlight its vibrant colors and layers. Slice into squares for easy sharing.
What size should I cut the dessert for individual servings?
Cut the dessert into small, even squares or rectangles to make it easy for guests to enjoy single portions.
Can I garnish candy cane dessert differently for special occasions?
Yes, you can add extra crushed candy canes, festive sprinkles, or a drizzle of chocolate for a fun holiday presentation.
What is the best way to transport this dessert to a party?
Keep it in its pan with a lid or plastic wrap, and use an insulated bag to maintain its chilled temperature.

Storage FAQ
Follow the directions below for the best ways to store your candy cane dessert. From making ahead to serving leftovers, we’ve included tips and tricks to keep it fresh and delicious. Let’s make sure your holiday treat is perfect every time!
Can I prepare candy cane dessert ahead of time?
Yes, you can prepare it the day before. Assemble it completely, cover it tightly, and store it in the fridge until serving.
What is the best way to store leftover candy cane dessert?
Store leftovers in an airtight container in the refrigerator. It stays fresh and delicious for up to three days.
Can I freeze candy cane dessert?
No, freezing is not recommended. The creamy layers and crushed candy canes do not hold their texture well when frozen.
How do I keep the candy cane topping from getting sticky?
Add the crushed candy canes just before serving. This keeps them fresh and prevents them from melting into the creamy layers.

Candy Cane Dessert
Candy cane dessert combines creamy peppermint layers and a crunchy cookie crust for the ultimate festive holiday treat. This no-bake recipe is quick to make and perfect for adding cheer to any holiday gathering!
Did you try this recipe?Let our readers know how it turned out by Leaving a Review!
Ingredients
Oreo Crust
- 540 grams golden Oreos (1 family-size package)
- ¾ cup unsalted butter (melted)
Cream Cheese Layer
- ½ cup peppermint candy canes (crushed)
- 8 ounces cream cheese (softened)
- ¼ cup white sugar
- 1 cup powdered sugar
- 16 ounces Cool Whip (thawed and divided into 2 cups, and the remainder)
Vanilla Pudding Layer
- 2 boxes instant vanilla pudding mix (3.4-ounce boxes)
- 2¾ cups cold milk
Whipped Topping
- ¼ cup peppermint candy canes (crushed)
- Remainder of Cool Whip (thawed)
DIRECTIONS
- Line a 9×13-inch baking dish with parchment paper or spray with nonstick cooking spray.
- Use a food processor to crush the candy canes until coarsely crushed and ¾ cup in volume. Set aside.
- Use a food processor to turn the Oreos into fine crumbs. Add the melted butter and mix.
- Press the mixture into the baking dish. Store in the freezer while you prepare the next layer.
- In a large bowl, beat the cream cheese with an electric mixer.
- Add the white sugar, powdered sugar, and Cool Whip to the cream cheese and mix until combined. Make sure not to over-mix the cream cheese layer.
- Stir ½ cup of the crushed candy canes to the cream cheese mixture. Set aside the remaining ¼ cup for the topping.
- Use a spatula to smooth this layer over the prepared crust. Put the baking dish back into the freezer while you prepare the next layer.
- Combine the dry pudding mix and milk and beat for two minutes until it starts to thicken.
- Use a spatula to evenly smooth the pudding layer over top of the cream cheese layer. Put it back into the freezer for ten minutes.
- Smooth the remaining Cool Whip over the top of the dessert and sprinkle with the remaining crushed candy cane pieces.
- Place the dish into the refrigerator for at least six hours before slicing and serving. For the best layers, it should chill overnight.
Notes
- Make sure your cream cheese is at room temperature; otherwise, you will end up with lumps in your cheesecake mixture.
- When stirring in the candy cane bits, don’t mix too much, or this layer will turn pink or green, depending on the color of the candy canes you use.
- The long chill time allows all the flavors to mingle and blend together even more!
Nutrition
Calories: 265kcal | Carbohydrates: 30g | Protein: 3g | Fat: 15g | Saturated Fat: 7g | Polyunsaturated Fat: 2g | Monounsaturated Fat: 5g | Trans Fat: 0.2g | Cholesterol: 31mg | Sodium: 143mg | Potassium: 97mg | Fiber: 0.4g | Sugar: 21g | Vitamin A: 383IU | Calcium: 72mg | Iron: 1mg
HAVE YOU TRIED THIS RECIPE?Follow me on Pinterest @bestblogrecipes


Comments
Mikee L. says
Super easy to throw together, love that there’s no baking. I used graham crackers instead of Oreos and still got good flavor. Worth the wait in the fridge.