
Published on
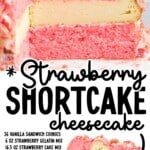
Strawberry Crunch Cake
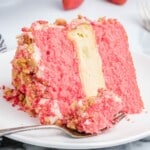
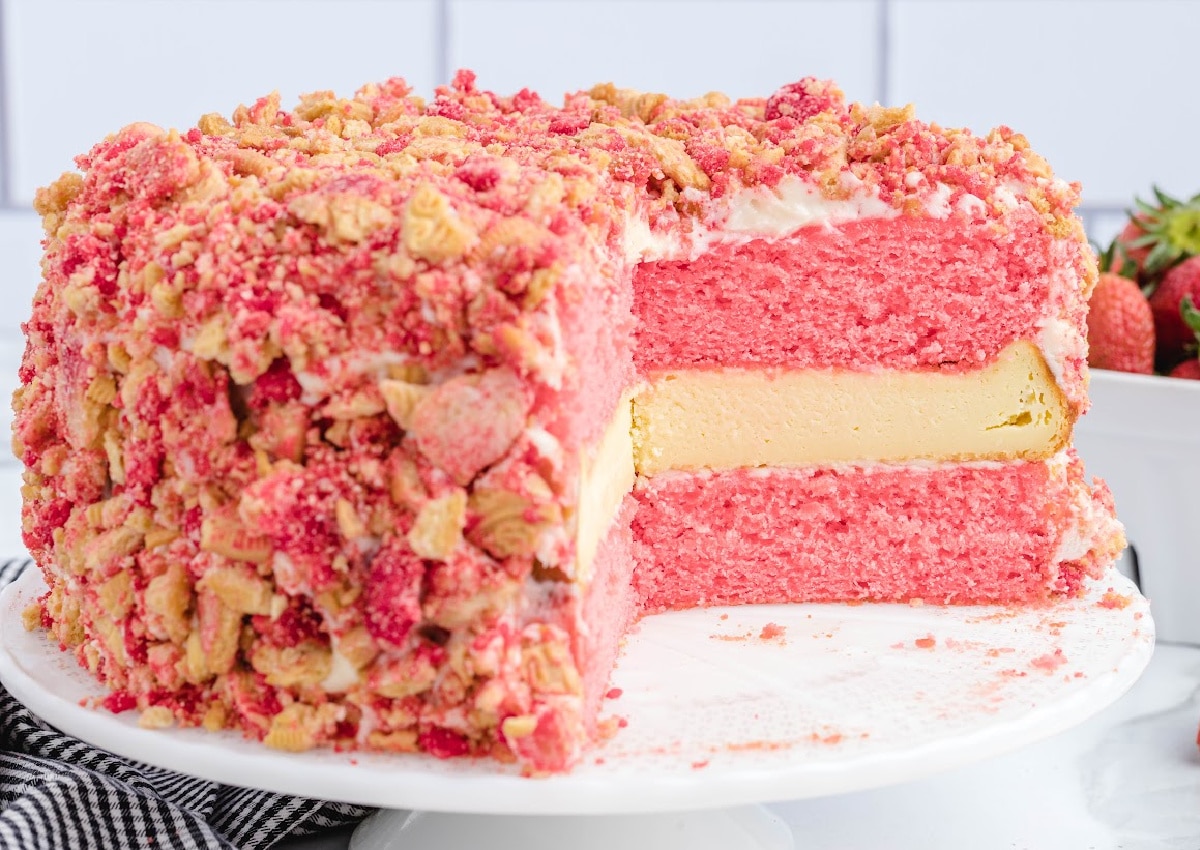
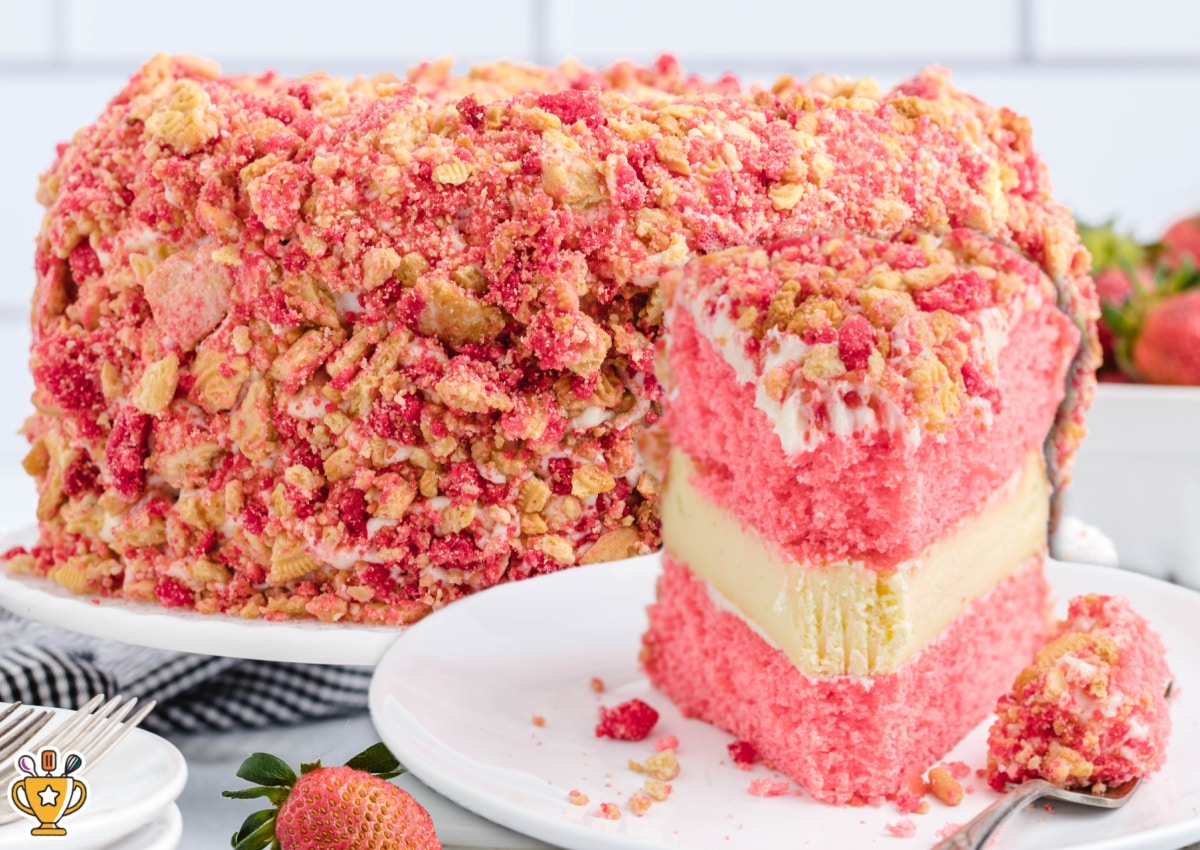
This strawberry crunch cake combines soft strawberry cake layers, a baked cheesecake center, and a crisp cookie crumb coating. The layers hold their shape once chilled, creating clean slices and a balanced texture that serves well for make-ahead desserts.
Jump to RecipeTable of Contents
- What This Strawberry Crunch Cake Is Like
- Why This Strawberry Crunch Cake Recipe Works
- Ingredients For Strawberry Crunch Cake
- Substitutions and Additions
- How to Make Strawberry Crunch Cake
- Tips for a Clean, Stable Strawberry Crunch Cake
- Desserts to Serve Alongside
- Storage
- Strawberry Crunch Cake FAQs
- JUMP TO RECIPE

Strawberry Crunch Cake is a layered cake built around contrast. Soft strawberry cake on the top and bottom. A firm, creamy cheesecake set cleanly through the center. The outside is finished with a strawberry cookie crumb coating that adds texture without overpowering the cake.

This strawberry crunch cake bakes in clear stages and assembles with intention. The cake layers stay plush. The cheesecake holds its shape. The crumb coating covers the frosting and gives a finished bakery-style cake look that slices neatly and serves beautifully.
What This Strawberry Crunch Cake Is Like
This strawberry crunch cake cuts cleanly once chilled. The slices stay upright on the plate without sliding or cracking.
The crumb coating gives a light texture without making the cake dry while the cheesecake center stays smooth and mildly sweet. This keeps the strawberry flavor from feeling too heavy.
This is a cake that holds its shape, travels well, and serves easily for gatherings where you want your dessert to look pretty on the plate. Perfect for birthdays and parties.
Why This Strawberry Crunch Cake Recipe Works
- Built in stages so each layer sets before stacking, which keeps the cake stable.
- Strawberry gelatin strengthens flavor and color in the cake and crumb coating without softening the texture.
- The cheesecake layer stays neutral, giving structure without overpowering the strawberry.
- The cookie crumb coating adds contrast and hides frosting imperfections for a clean finish.
This balance makes the strawberry crunch cake reliable to assemble and easy to serve.
Ingredients For Strawberry Crunch Cake
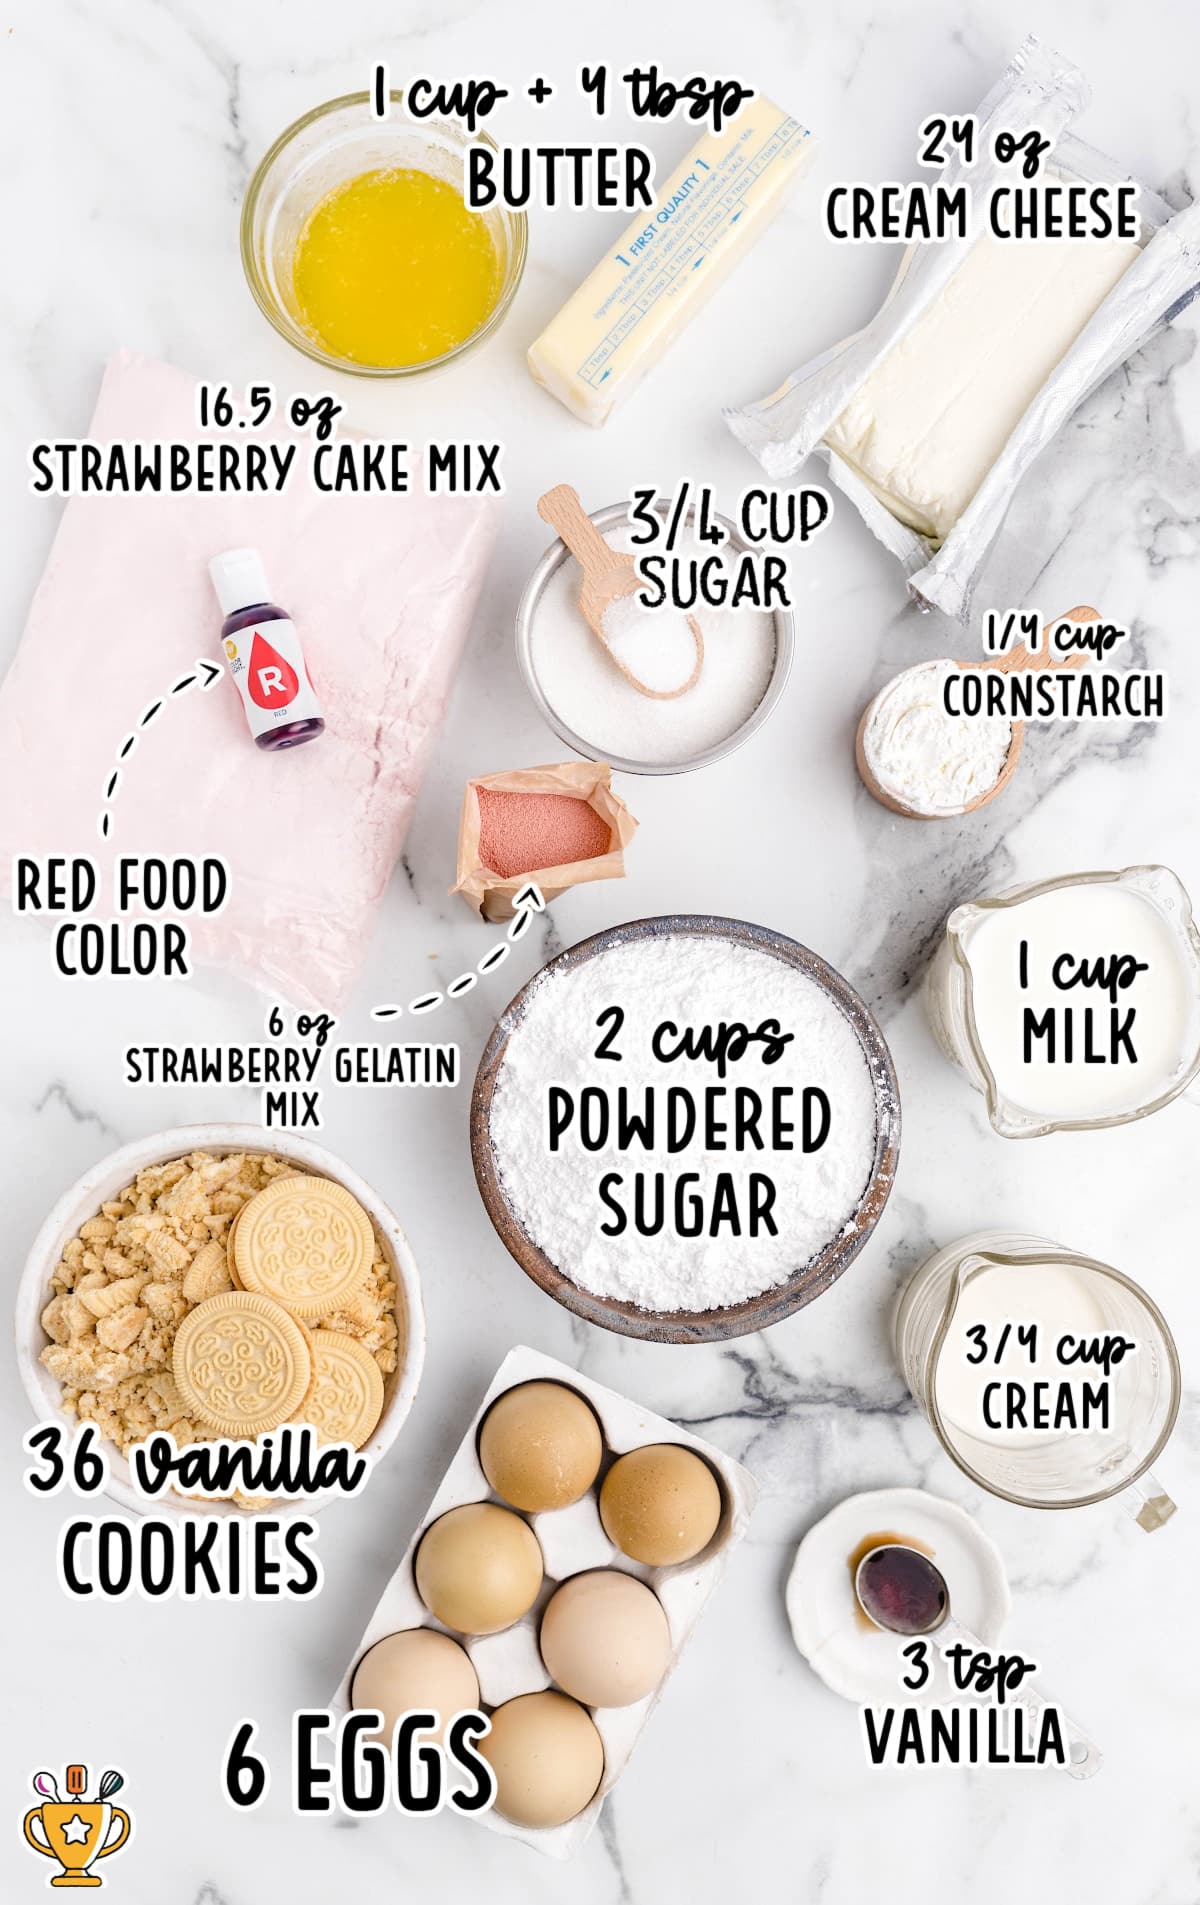
What you'll need to make this strawberry crunch layer cake:
FOR THE COOKIE CRUMB LAYER
- 36 Golden Oreos, coarsely crushed
- 3-ounce box of strawberry Jello (or strawberry gelatin mix)
- 4 tablespoons of unsalted butter, melted, divided
- 5 to 6 drops of red food color gel
TO MAKE THE STRAWBERRY CAKE LAYERS
- 16.5-ounce box of Strawberry Supreme cake mix
- 3 large eggs, room temperature
- ½ cup (1 stick, 113 grams) of unsalted butter, melted
- 1 cup of whole milk
- 3-ounce box of strawberry Jello (or strawberry gelatin mix)
FOR THE CHEESECAKE LAYER
- ¾ cup of sugar
- ¼ cup of cornstarch
- 2 (8-ounce) packages of cream cheese, softened
- ¼ cup of heavy cream
- 2 teaspoons of pure vanilla extract
- 3 large eggs, room temperature
FOR THE FROSTING
- 8 ounces of cream cheese, softened
- ½ cup of heavy cream
- ½ cup (1 stick, 113 grams) of unsalted butter, softened
- 1 teaspoon of vanilla extract
- 2 cups of powdered sugar
Substitutions and Additions
Golden Oreos - You can substitute Oreos with generic vanilla sandwich cookies.
Strawberry Jello - You can substitute a generic brand for Jello.
Food coloring - The food color gel is optional - you can omit it, but your strawberry crunch topping may have less of a vibrant red tone.
How to Make Strawberry Crunch Cake
How this strawberry crunch cake with cheesecake lay comes together
We developed this strawberry crunch cake so you can prepare it in clear stages. Prepare each part on its own, then assemble once fully set.
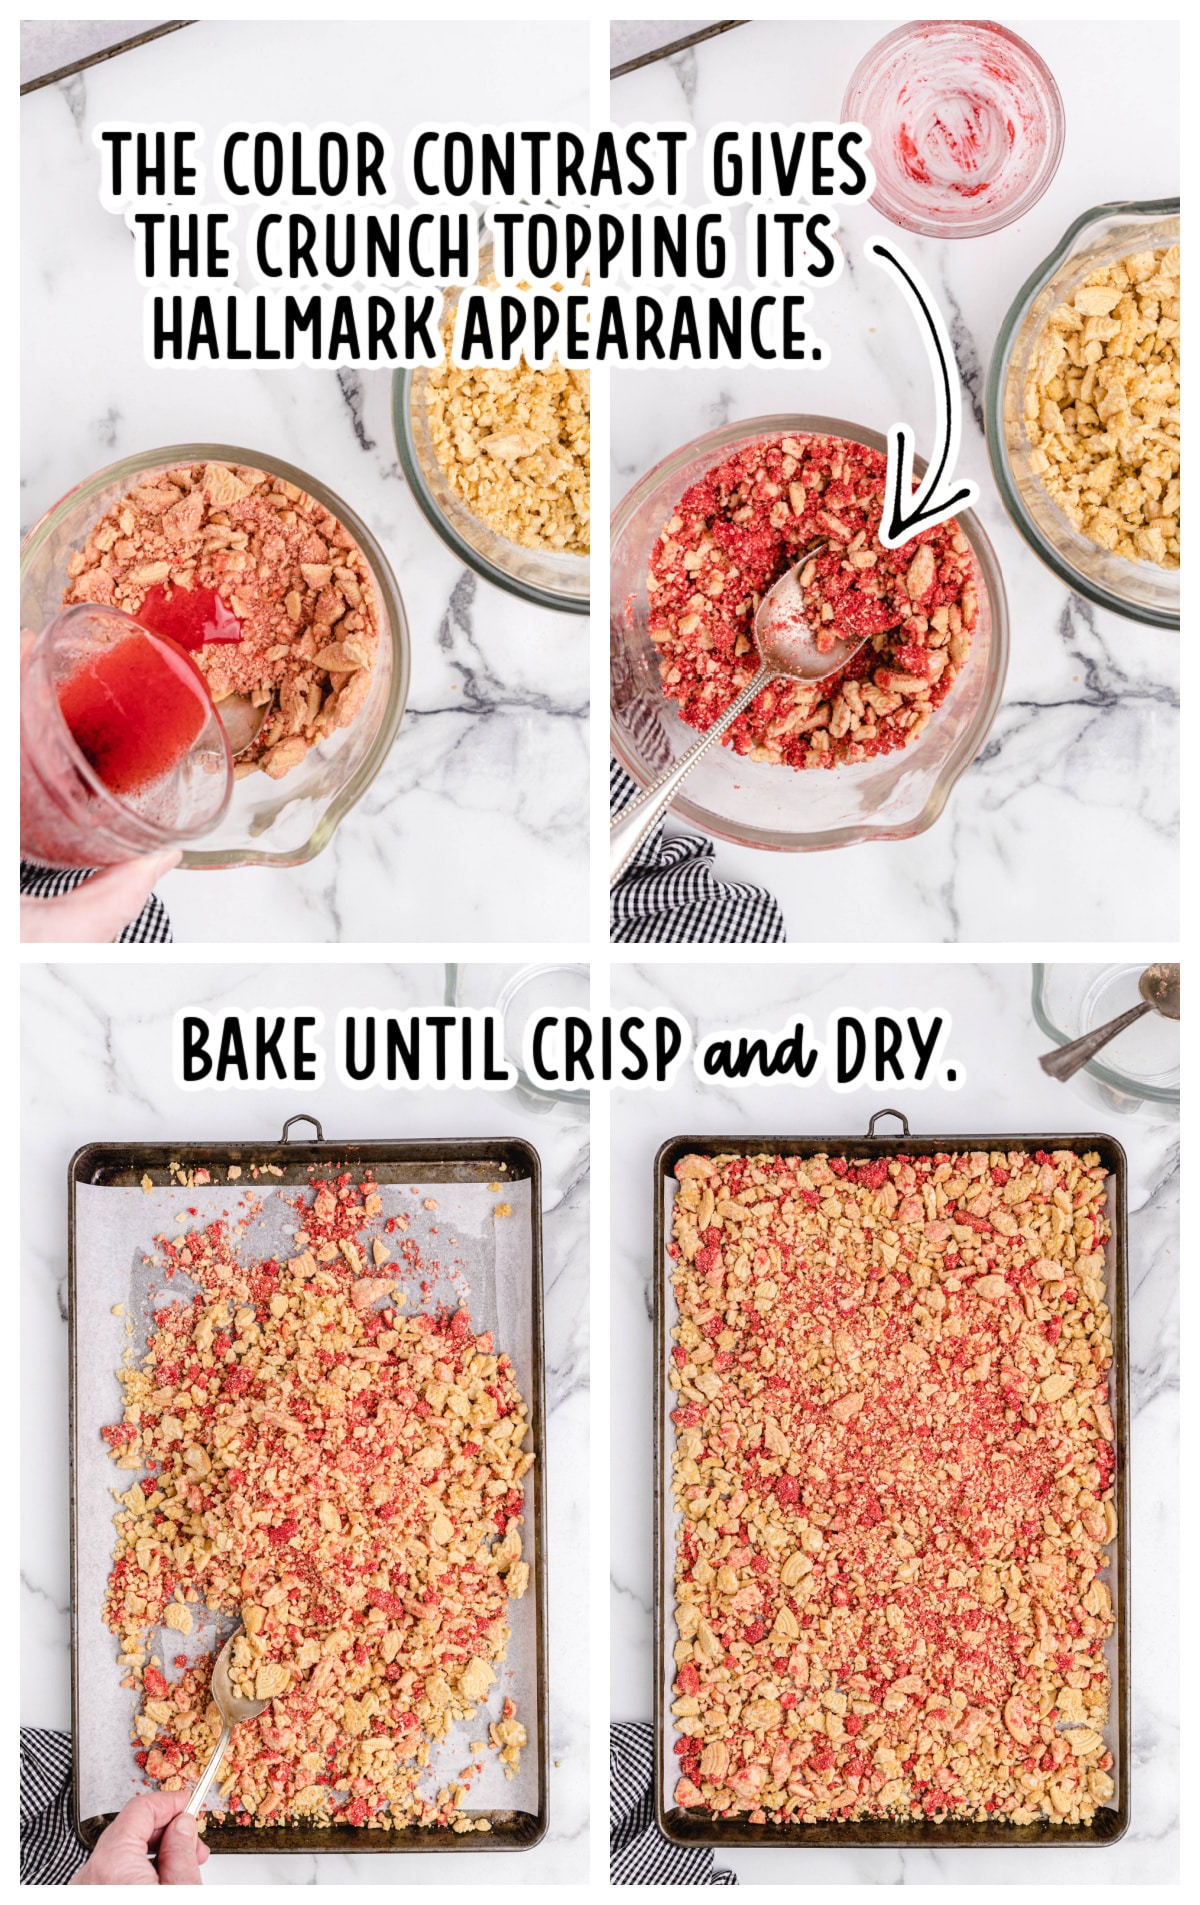
1. Prepare the cookie crumb coating
The vanilla and strawberry crumbs are baked briefly, then cooled completely so they stay crisp during assembly.
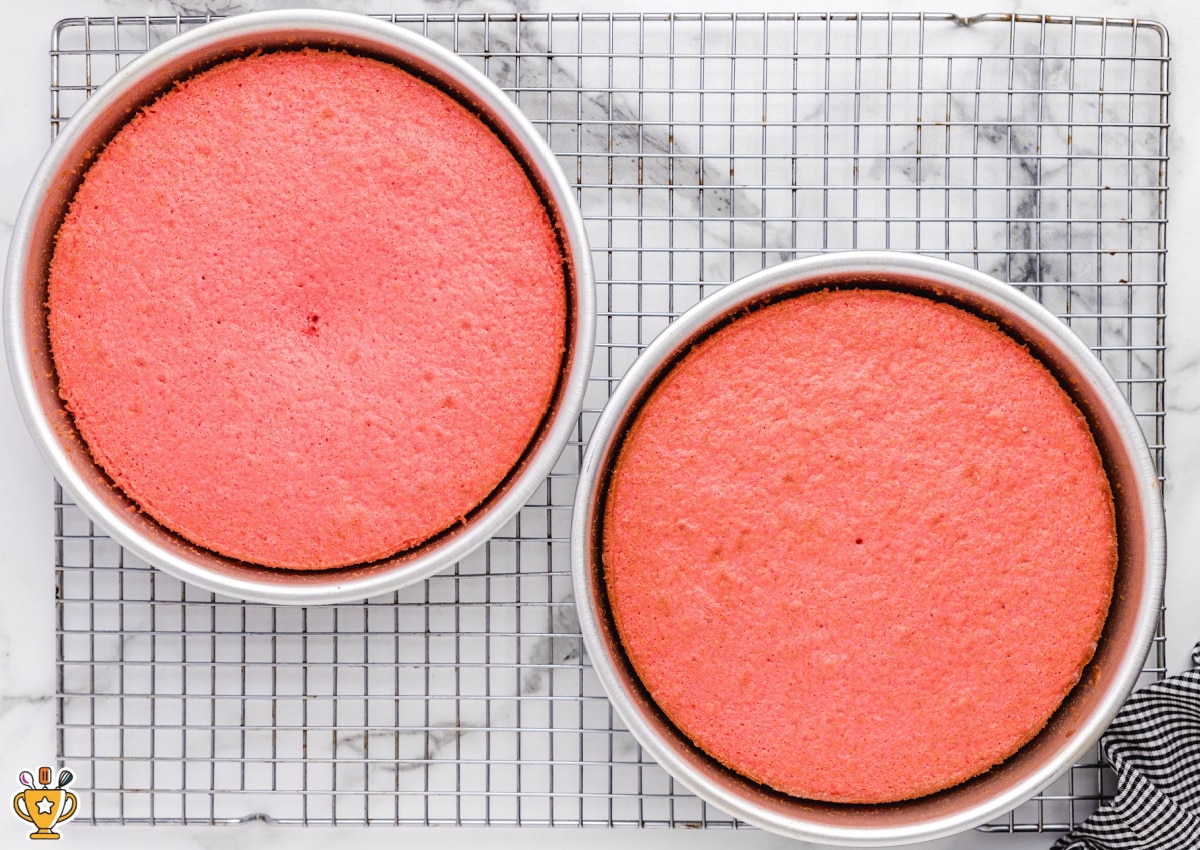
2. Bake the strawberry cake layers
The cake layers bake evenly and are cooled before stacking to prevent sliding.
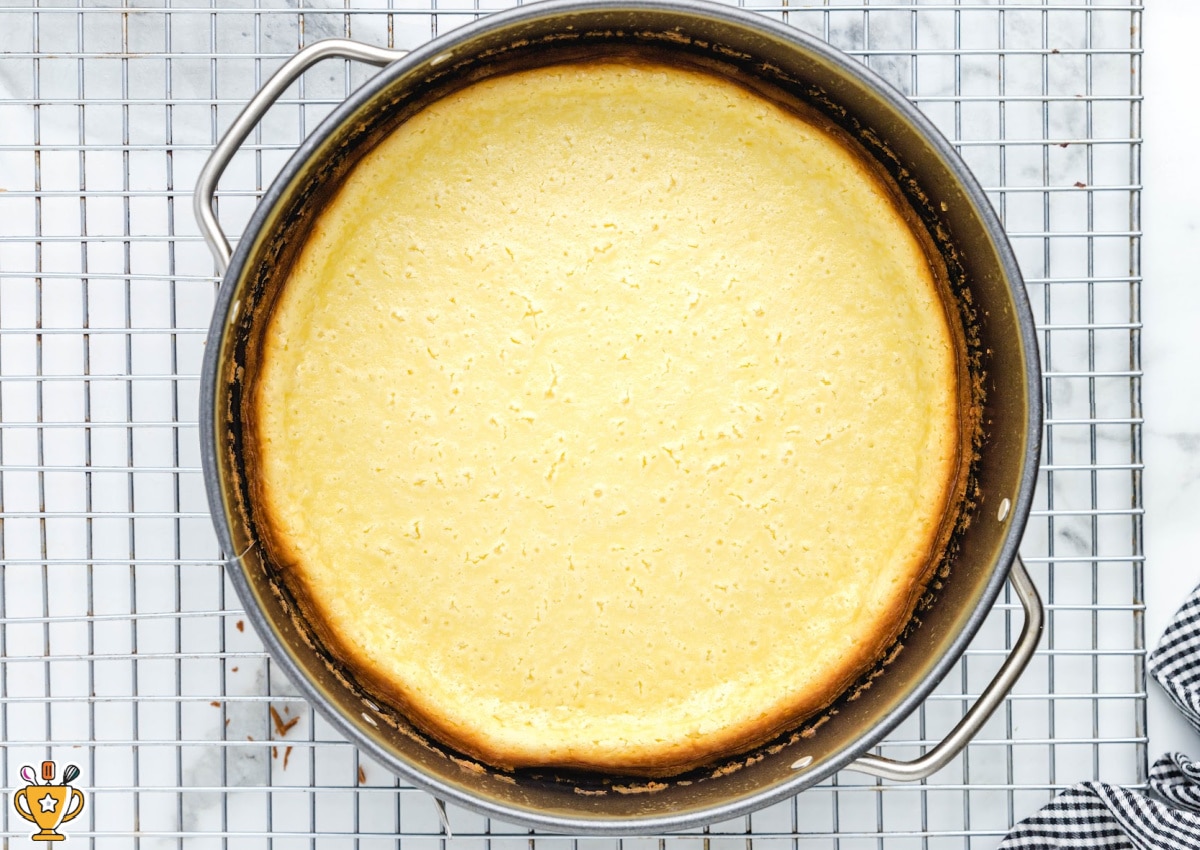
3. Bake the cheesecake layer
The cheesecake is baked until set, then chilled so it holds its shape when layered.
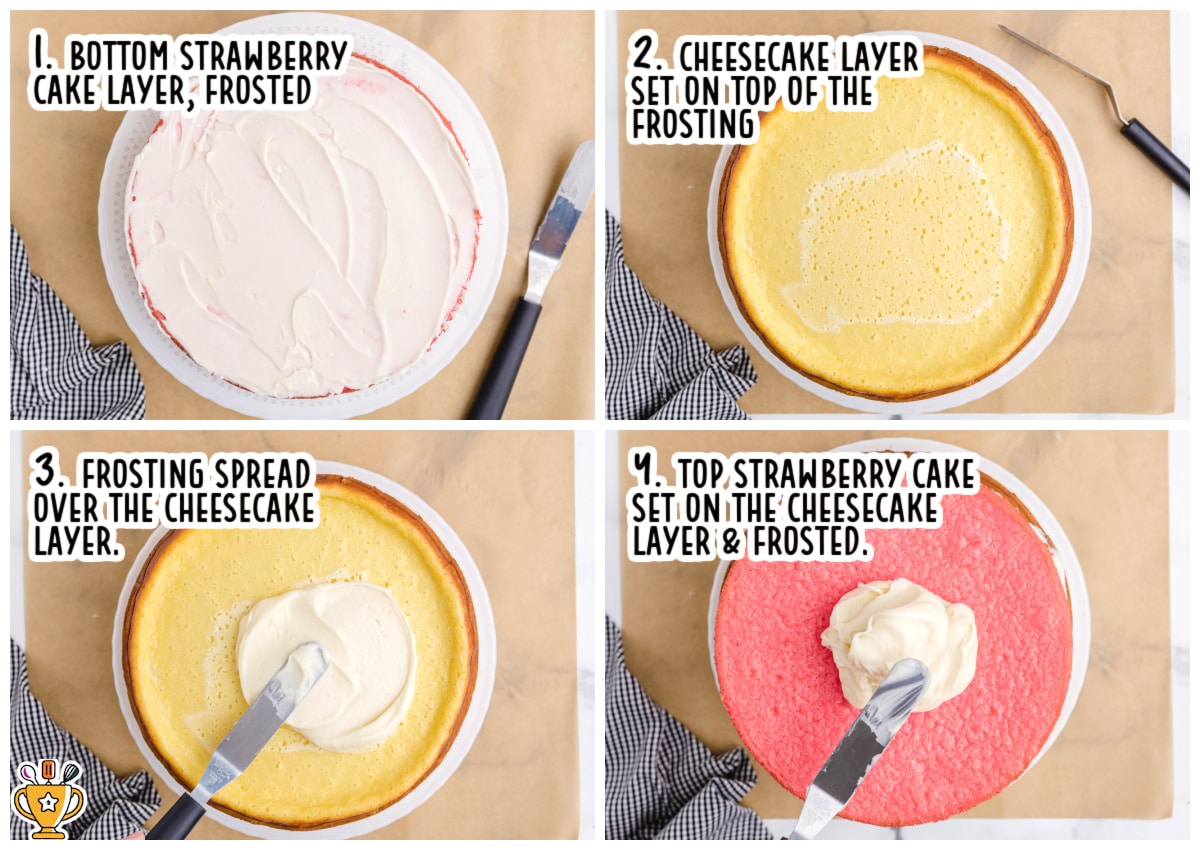
4. Make the frosting and assemble the layers
Mix together a classic cream cheese frosting. Then, the layers are stacked with frosting in between them.
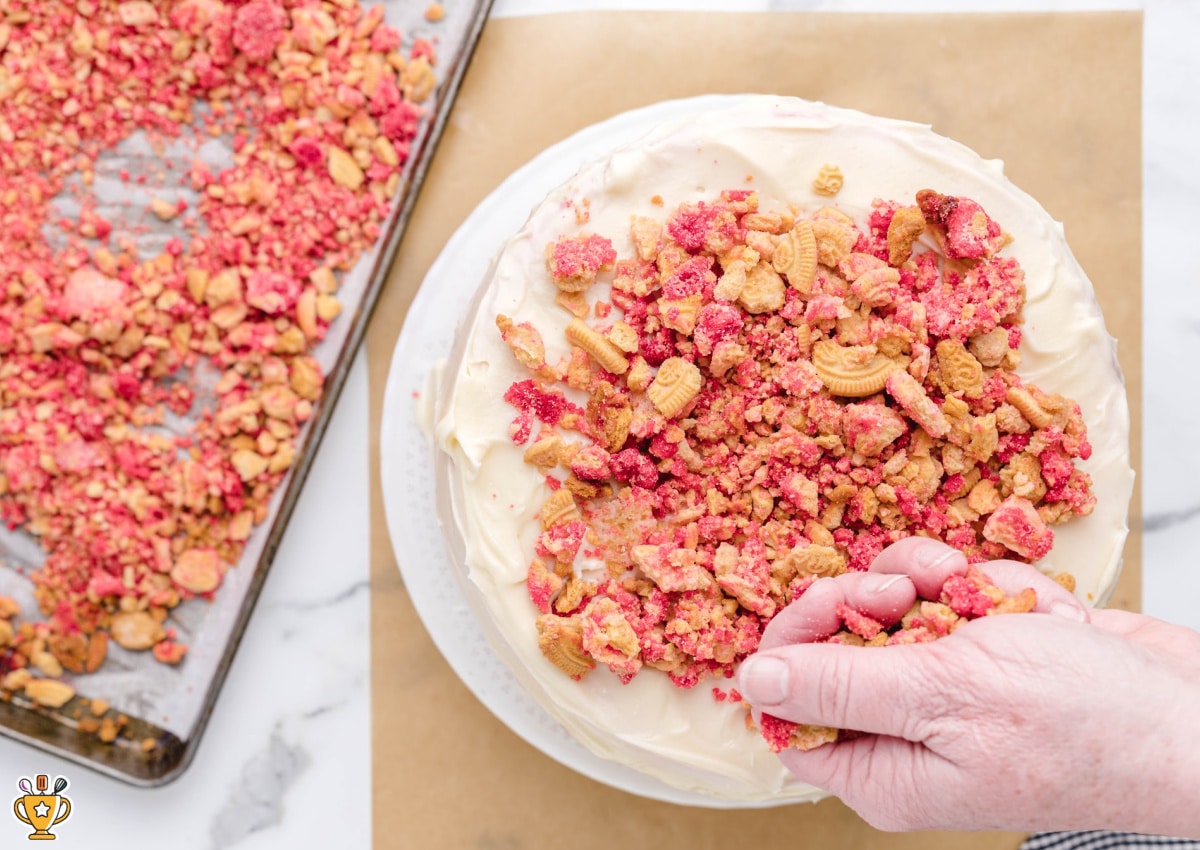
5. Decorate with strawberry crunch
Coat the frosting with the strawberry crunch crumbs for a clean finish.
For full measurements, timing, and temperatures for this homemade strawberry crunch cake, see the recipe card at the bottom of the post.
Tips for a Clean, Stable Strawberry Crunch Cake
Let each layer cool fully before assembly
Fully cooled layers stack cleanly and hold their shape (unlike warm cake or cheesecake, which softens the frosting and causes shifting).
Chill the cheesecake briefly before stacking
A short freeze firms the cheesecake just enough to lift and place without bending. This keeps the center level and prevents cracking.
Use a thin layer of frosting between layers
Frosting works best as a binder, not a cushion. A thin layer keeps the cake stable once the crumb coating goes on.
Center the cheesecake carefully
Set the cheesecake in place without pressing. Gentle placement keeps the layers even and avoids pushing frosting out the sides.
Press the crumb coating on by hand
Hands give better control than tools. Light pressure helps the crumbs stick without compressing them into the frosting.
Chill before slicing
Cold cake cuts cleanly. The layers stay defined, and the crumb coating stays intact.
More Strawberry Crunch Recipes ⭐ Strawberry Crunch Poke Cake | Strawberry Crunch Cupcakes | Strawberry Crunch Cheesecake
Desserts to Serve Alongside
If you’re building a dessert table, these pair well without overlapping flavors:
Storage
REFRIGERATION: Store the strawberry crunch cake covered in the refrigerator. The cheesecake layer needs refrigeration, and the cake holds its structure best when cold.
For short-term storage, keep the cake whole if possible. This protects the crumb coating and keeps the layers from drying out.
If it's already sliced, cover the exposed edges tightly with plastic wrap.
The cake keeps well in the refrigerator for up to 4 days. The crumb coating stays crisp, and the cake layers remain tender.
FREEZER: Strawberry crunch cake freezes well once fully assembled and chilled.
- Wrap the cake or individual slices tightly in plastic wrap
- Add a second layer of foil for protection
- Freeze for up to 1 month
- Thaw overnight in the fridge before serving
Strawberry Crunch Cake FAQs
What is strawberry crunch cake?
Strawberry crunch cake (sometimes called a Strawberry Shortcake Cheesecake) is a layered dessert made with strawberry cake, a creamy center, and a crunchy strawberry cookie crumb coating. It is known for its color contrast, texture, and clean slices rather than a soft shortcake-style crumb.
Can strawberry crunch cake be made ahead?
Yes. This cake benefits from time in the refrigerator. Making it a day ahead allows the layers to set and makes slicing easier when ready to serve.
Can strawberry crunch cake be frozen?
Yes. The fully assembled cake or individual slices freeze well when wrapped tightly. Thaw overnight in the refrigerator before serving for the cleanest texture.
Why is strawberry gelatin used in strawberry crunch cake?
Strawberry gelatin strengthens both color and flavor in the cake and crumb coating. It adds intensity without changing the structure of the layers.


Strawberry Crunch Cake
This strawberry crunch cake combines soft strawberry cake layers, a baked cheesecake center, and a crisp cookie crumb coating. The layers hold their shape once chilled, creating clean slices and a balanced texture that serves well for make-ahead desserts.
Did you try this recipe?Let our readers know how it turned out by Leaving a Review!
Ingredients
FOR THE COOKIE CRUMB LAYER
- 36 Golden Oreos
- 3 ounce Strawberry Jello
- 4 tablespoons unsalted butter (melted)
- 5 to 6 drops red food color gel
FOR THE STRAWBERRY CAKE LAYERS
- 16.5 ounce Strawberry Supreme cake mix
- 3 large eggs (room temperature)
- ½ cup unsalted butter (melted)
- 1 cup whole milk
- 3 ounce Strawberry Jello
FOR THE CHEESECAKE LAYER
- ¾ cup granulated sugar
- ¼ cup cornstarch
- 16 ounce cream cheese (softened to room temperature, 2 packages)
- ¼ cup heavy cream
- 2 teaspoons pure vanilla extract
- 3 large eggs (room temperature)
FOR THE FROSTING
- 8 ounces cream cheese (softened to room temperature, 1 package)
- ½ cup heavy cream
- ½ cup unsalted butter (softened)
- 1 teaspoon vanilla extract
- 2 cups powdered sugar
DIRECTIONS
- Preheat the oven to 350°F. Line a standard baking sheet with parchment paper and set it aside.
- Evenly divide the coarsely crushed cookies into 2 small mixing bowls.
- Pour one of the 3 ounce boxes of dry strawberry gelatin mix over one of the bowls of cookie crumbs and stir to combine. Leave the other crushed cookies plain.
- Pour 2 tablespoons of the melted, unsalted butter over the plain cookie crumb bowl and mix well.
- Drop 5 to 6 drops of the red food coloring gel into the remaining 2 tablespoons of butter and stir to mix the coloring. Pour the tinted melted butter over the gelatin crumb mixture. Stir very well to ensure the color is evenly distributed.
- Evenly arrange the vanilla and strawberry buttered cookie crumbs on the prepared baking sheet. Bake for 10 minutes. Allow the crumbs to completely cool while you prepare the cakes.
- Preheat the oven to 350 degrees. Generously spray two 9 inch round cake pans with bakers spray (Baker's Joy or similar). Set them aside.
- Using a stand mixer or an electric handheld mixer and a medium-size mixing bowl add the cake mix, 3 eggs, 4 tablespoons of melted unsalted butter, 1 cup of milk, and one of the 3-ounce boxes of strawberry gelatin mix. Mix all ingredients together on medium speed until well incorporated and smooth.
- Evenly divide the cake batter between the 2 prepared round cake pans. Bake for 24 to 28 minutes, or until a toothpick inserted comes out clean.
- Allow the cakes to completely cool on a cooling rack. Once cooled, remove the cakes from the pans, and set them aside.
- Reduce the oven temperature to 325 degrees.
- In a small mixing bowl, whisk together ¾ cup granulated sugar and ¼ cup cornstarch. Set this aside.
- Line the bottom of a 9 inch springform pan with parchment paper, and generously spray the springform pan with nonstick spray. Set it aside.
- Using a stand mixer or an electric handheld mixer on medium-high speed to cream together 16 ounces of cream cheese, ½ cup of heavy cream, and 2 teaspoons of vanilla extract.
- Reduce the mixer speed to low. Add 3 large eggs, one at a time, until all eggs are well incorporated.
- Leaving the mixer on low, slowly add the granulated sugar and the cornstarch mixture. Increase the speed to medium and mix until the batter is smooth.
- Pour the cheesecake batter into the springform pan.
- Bake at 325 degrees for 40 minutes. Leave the oven door closed and turn the oven off. Allow the cheesecake to sit in the oven for 20 additional minutes.
- Remove the cheesecake and allow it to cool on a cooling rack for 30 minutes.
- Tightly cover the cheesecake, and place in the freezer for 1 hour.
- Using either a stand mixer or a handheld mixer and a medium-size mixing bowl, on medium-high speed, cream together 8 oz cream cheese, ½ cup heavy cream, and ½ cup unsalted butter for 1 ½ to 2 minutes. Be sure to scrape down the sides of the bowl with a silicone spatula.
- Lower the mixer to low and slowly add the vanilla.
- Keeping the mixer speed low, slowly add 2 cups of powdered sugar, 1 cup at a time. Increase the speed to medium and mix until smooth.
- Using your choice of serving plate, center one of the strawberry cake layers.
- Scoop out ¼ cup of frosting and place in the center of the bottom cake layer. Using either an offset spatula or a silicone spatula, evenly smooth out the frosting. Don’t worry if there are crumbs in the frosting.
- Remove the cheesecake from the freezer. Carefully run a sharp, flexible knife along the inside edge of the cheesecake. Slowly release the springform sides. Line a flat plate with wax paper, and place it on top of the cheesecake. Securely turn the cheesecake upside down to remove the base of the springform pan and the parchment paper. Carefully turn the cheesecake right side up and place it on top of the bottom layer of strawberry cake.
- Scoop out another ¼ cup of frosting to smooth over the cheesecake layer.
- Place the top strawberry cake layer on top of the cheesecake layer.
- Evenly spread the remaining frosting over the rest of the cake. Again, do not worry if there are crumbs, the cookie crumb coating will hide the crumbs in the frosting.
- Break the cooled cookie crumbs up into small pieces if they've stuck together.
- Sprinkle the top of the cake with cookie crumbs. Using your hands, gently press/pat the cookie crumbs on the sides of the cake.
Notes
Let each layer cool fully before assembly
Warm cake or cheesecake softens the frosting and causes shifting. Fully cooled layers stack cleanly and hold their shape. Chill the cheesecake briefly before stacking
A short freeze firms the cheesecake just enough to lift and place without bending. This keeps the center level and prevents cracking. Use a thin layer of frosting between layers
Frosting works best as a binder, not a cushion. A thin layer keeps the cake stable once the crumb coating goes on. Center the cheesecake carefully
Set the cheesecake in place without pressing. Gentle placement keeps the layers even and avoids pushing frosting out the sides. Press the crumb coating on by hand
Hands give better control than tools. Light pressure helps the crumbs stick without compressing them into the frosting. Chill before slicing
Cold cake cuts cleanly. The layers stay defined, and the crumb coating stays intact.
Nutrition
Calories: 992kcal | Carbohydrates: 110g | Protein: 11g | Fat: 57g | Saturated Fat: 30g | Polyunsaturated Fat: 5g | Monounsaturated Fat: 15g | Trans Fat: 1g | Cholesterol: 209mg | Sodium: 693mg | Potassium: 191mg | Fiber: 1g | Sugar: 81g | Vitamin A: 1721IU | Vitamin C: 0.1mg | Calcium: 191mg | Iron: 2mg
HAVE YOU TRIED THIS RECIPE?Follow me on Pinterest @bestblogrecipes

Comments
Elaina says
Love this cake. Comes out like the photos and tastes incredible.