
Published on
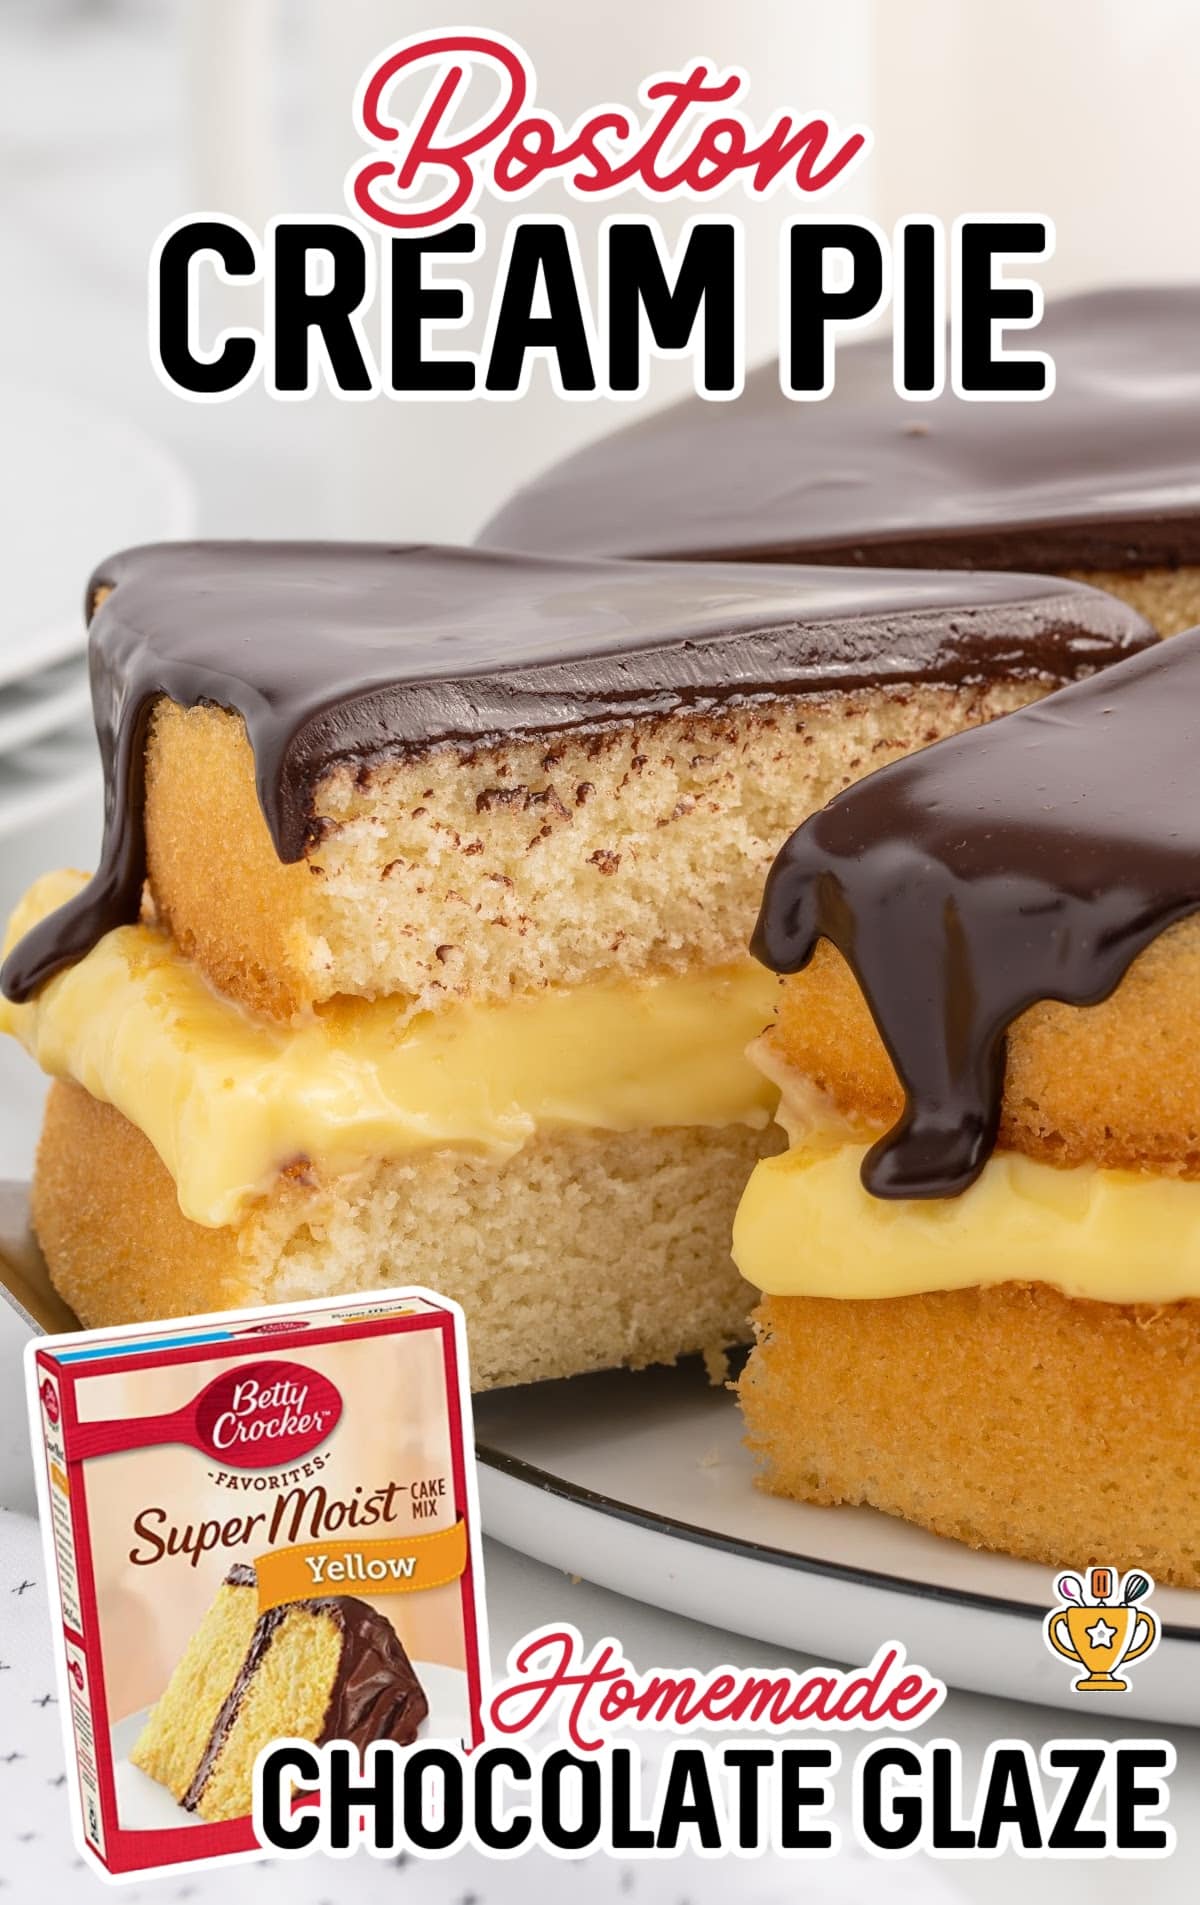
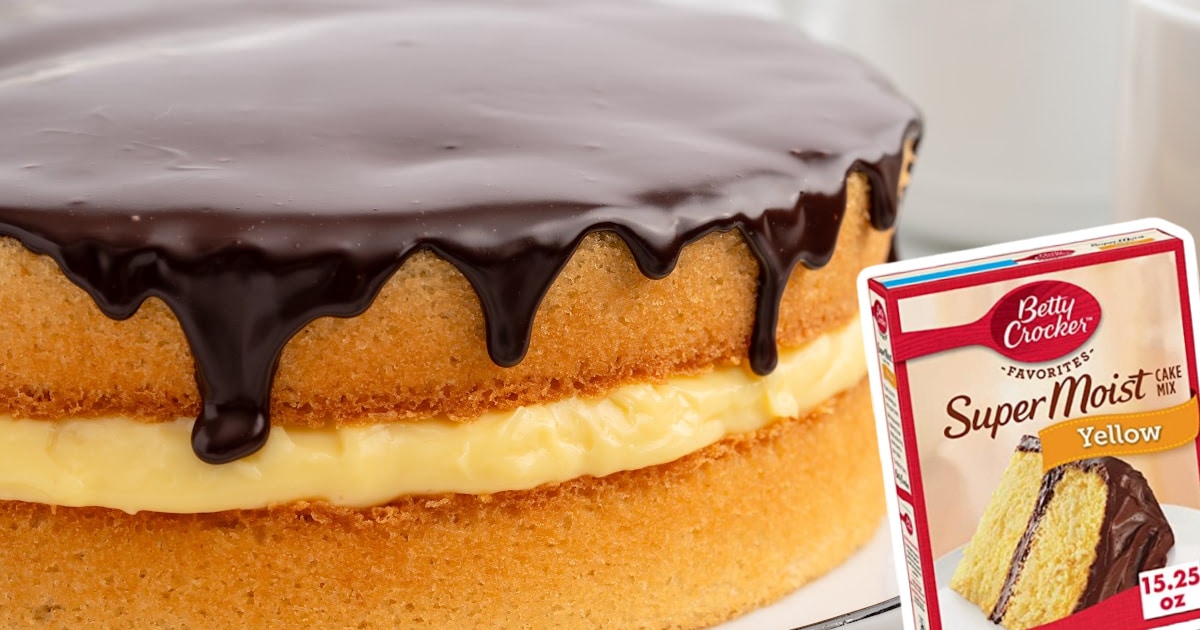
Boston Cream Pie

Boston Cream Pie combines fluffy cake layers, rich vanilla custard, and smooth chocolate ganache for a classic, indulgent dessert. It's easy to make and perfect for any special occasion!
Jump to RecipeTable of Contents

This classic Boston Cream Pie is a decadent dessert filled with creamy custard and topped with rich chocolate ganache. With its light, fluffy cake layers and indulgent filling, it’s the perfect treat for any occasion. Easy to make and absolutely irresistible, this dessert will impress your family and friends. Get ready to enjoy a delicious blend of flavors in every bite!
This recipe is simple to follow! Check out the step-by-step photos and directions below. We also include pro tips, tricks, and frequently asked questions to make your baking experience even easier.
More Recipes ⭐ White Chocolate Raspberry Cake | No Bake Coconut Cream Pie | Cream Puffs
Boston Cream Pie takes about an hour to make and is perfect for special occasions or family gatherings. The light, airy cake layers, smooth vanilla custard, and rich chocolate ganache make every bite unforgettable. This classic dessert stands out with its delicious mix of textures and flavors that everyone will love. It’s a must-try recipe for anyone who enjoys an impressive homemade treat!
Ingredients
What you'll need to make this Recipe for Boston Cream Pie:
For the Pastry Cream:
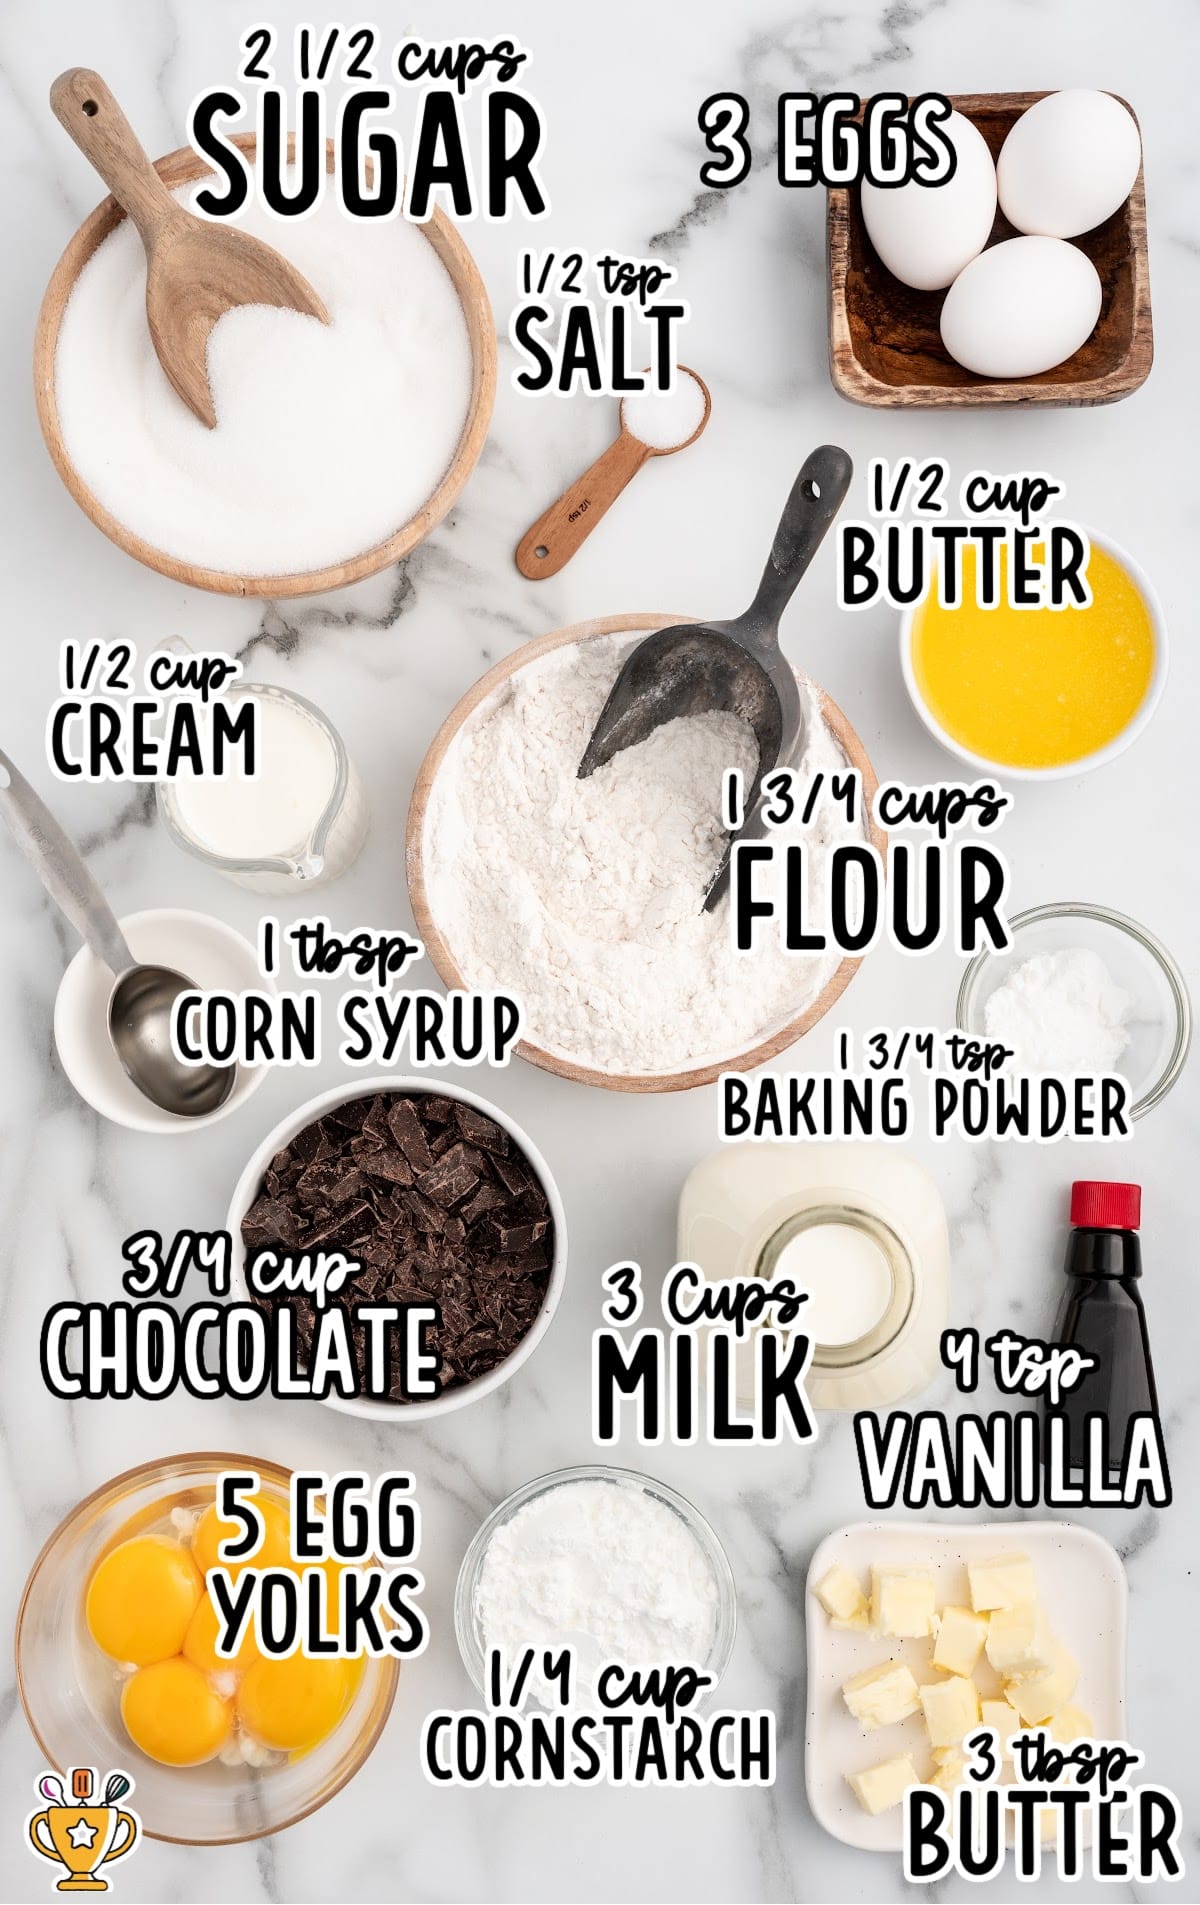
- 2 cups whole milk
- ¾ cup granulated sugar
- ¼ cup cornstarch
- 5 large egg yolks, room temperature
- 3 tablespoons unsalted butter, cold and cubed
- 1 ½ teaspoons vanilla extract
To Make the Cake:
- 1 ¾ cups all-purpose flour
- 1 ¾ teaspoons baking powder
- ½ teaspoon salt
- 1 ¾ cups granulated sugar
- 3 large eggs, room temperature
- 2 teaspoons vanilla extract
- 1 cup whole milk, heated to approximately 165-170°F
- ½ cup unsalted butter, melted
For the Chocolate Glaze:
- ¾ cup finely chopped bittersweet chocolate baking bar (60% cacao)
- ½ cup heavy cream
- 1 tablespoon clear corn syrup
- ½ teaspoon vanilla extract
Substitutions and Additions
Personalize your Boston Cream Pie recipe by swapping out ingredients and adding delicious extras! These simple changes can make it uniquely yours. Here are some top substitutions and additions:
- Substitute Chocolate Ganache: Use a rich caramel sauce or white chocolate ganache for a different topping that adds a fun twist.
- Substitute Vanilla Custard: Swap the custard with a creamy pastry cream or pudding for a smoother texture and flavor variation.
- Add Fresh Fruit: Layer fresh berries or sliced bananas between the cake layers for a fruity burst that complements the rich custard.
These substitutions and additions can easily be swapped out while still maintaining the deliciousness of this Homemade Bosston Cream Pie Recipe.
How to Make this Bostom Cream Cake Recipe
Follow along with our step-by-step pictures and instructions to make the perfect Boston Cream Pie. We’ve included helpful tips and tricks to ensure success. Let’s get started on this delicious dessert!
TO MAKE THE BOSTON CREAM CAKE FILLING:
FIRST STEP: You’ll begin by making the Boston cream filling, so gather and measure out the ingredients you’ll need before you begin.
Pro Tip
Measure and cut your butter into cubes, but keep it in the fridge until your ready to use it. Remove the eggs from the fridge beforehand so they begin to come to room temperature. Separate the yolks and the whites. You can discard the whites, or save them to make an omelette.
SECOND STEP: Set a medium saucepan over medium-high. Add the milk and use a candy thermometer to keep an eye on the temperature, bringing it to 170-180°F. Tiny bubbles will form along the edges of the saucepan, but you don’t want to allow the milk to boil. You only want to scald it. Remove the milk from the heat.
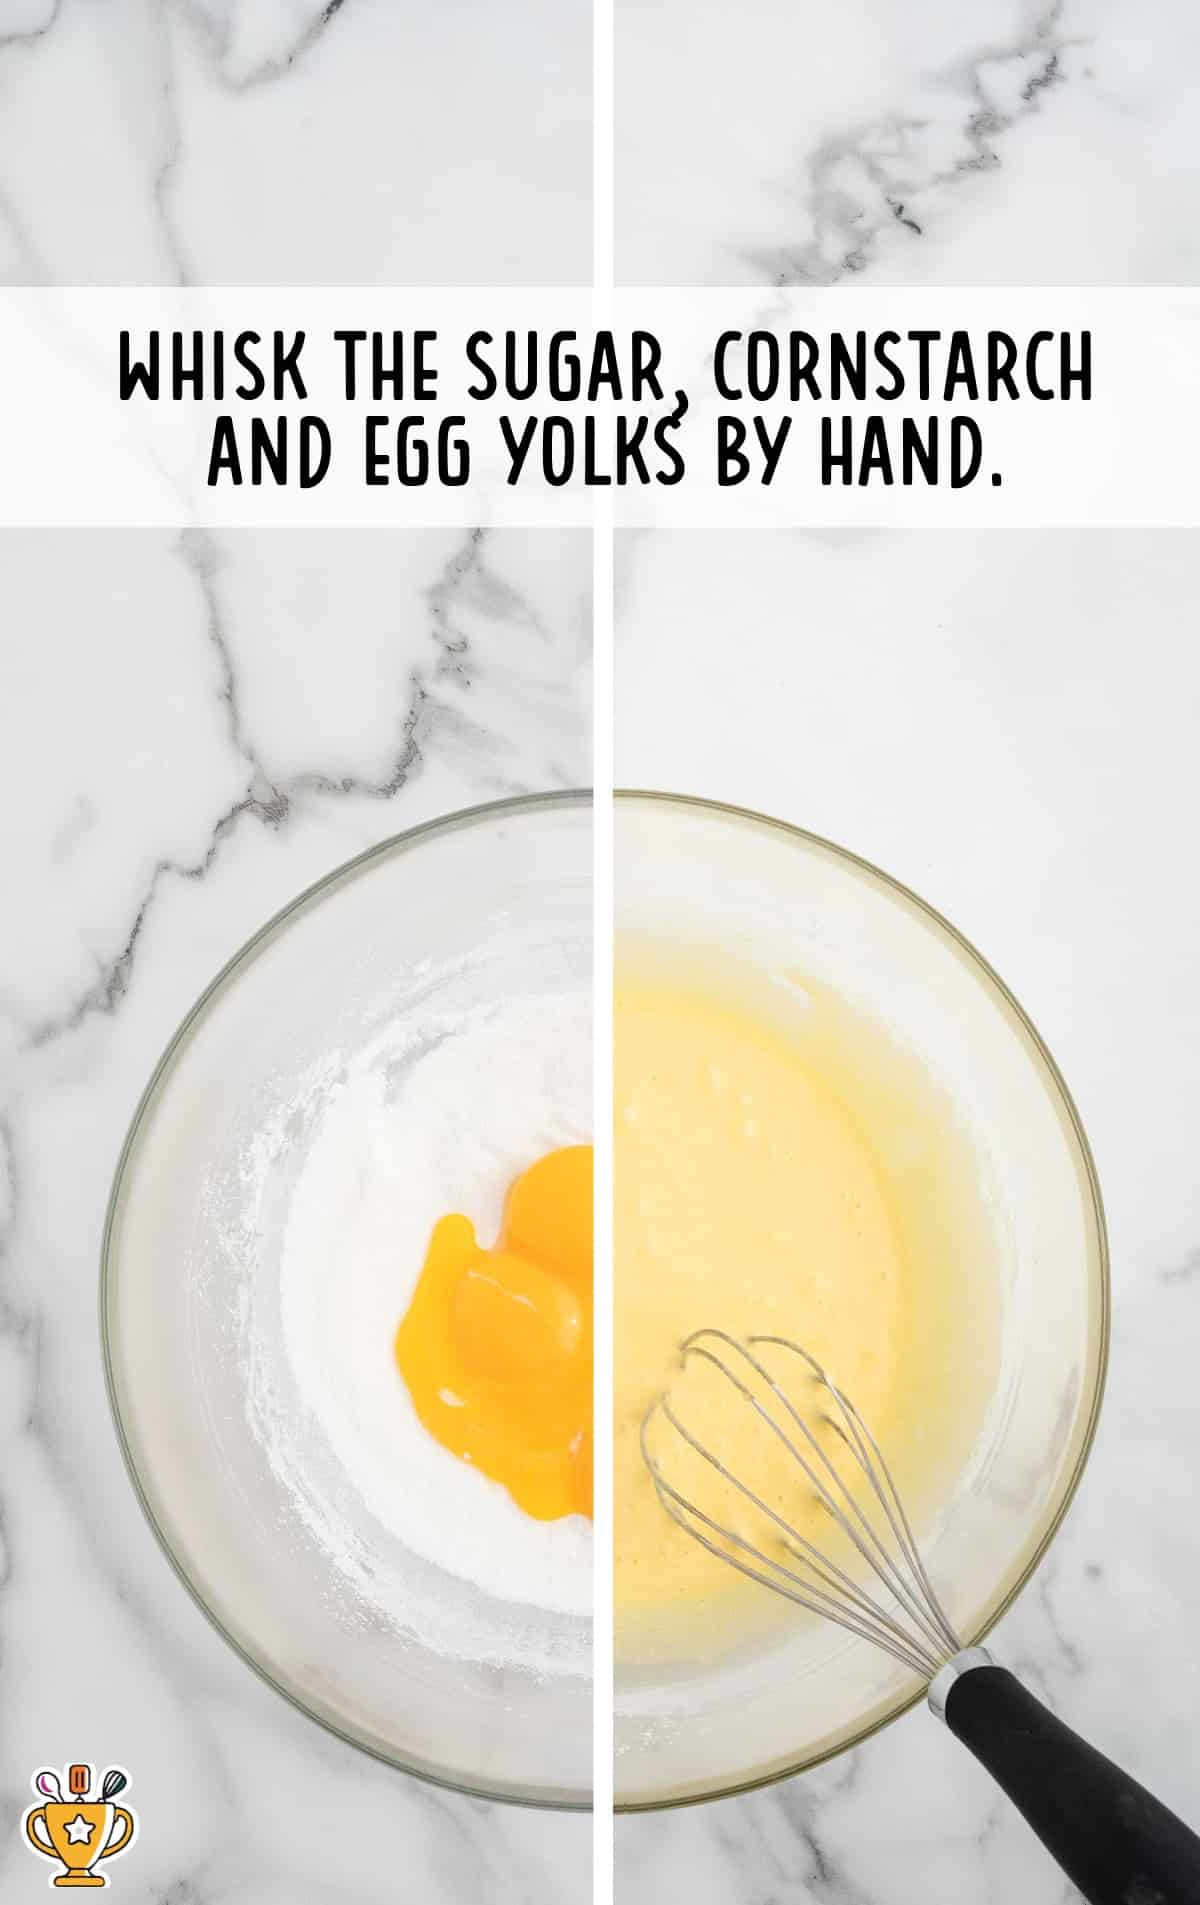
THIRD STEP: Using a large mixing bowl, whisk together the granulated sugar and cornstarch until fully combined. Be sure no lumps from the cornstarch remain. Use a hand whisk to incorporate in the egg yolks. Whisk for a few minutes until smooth.
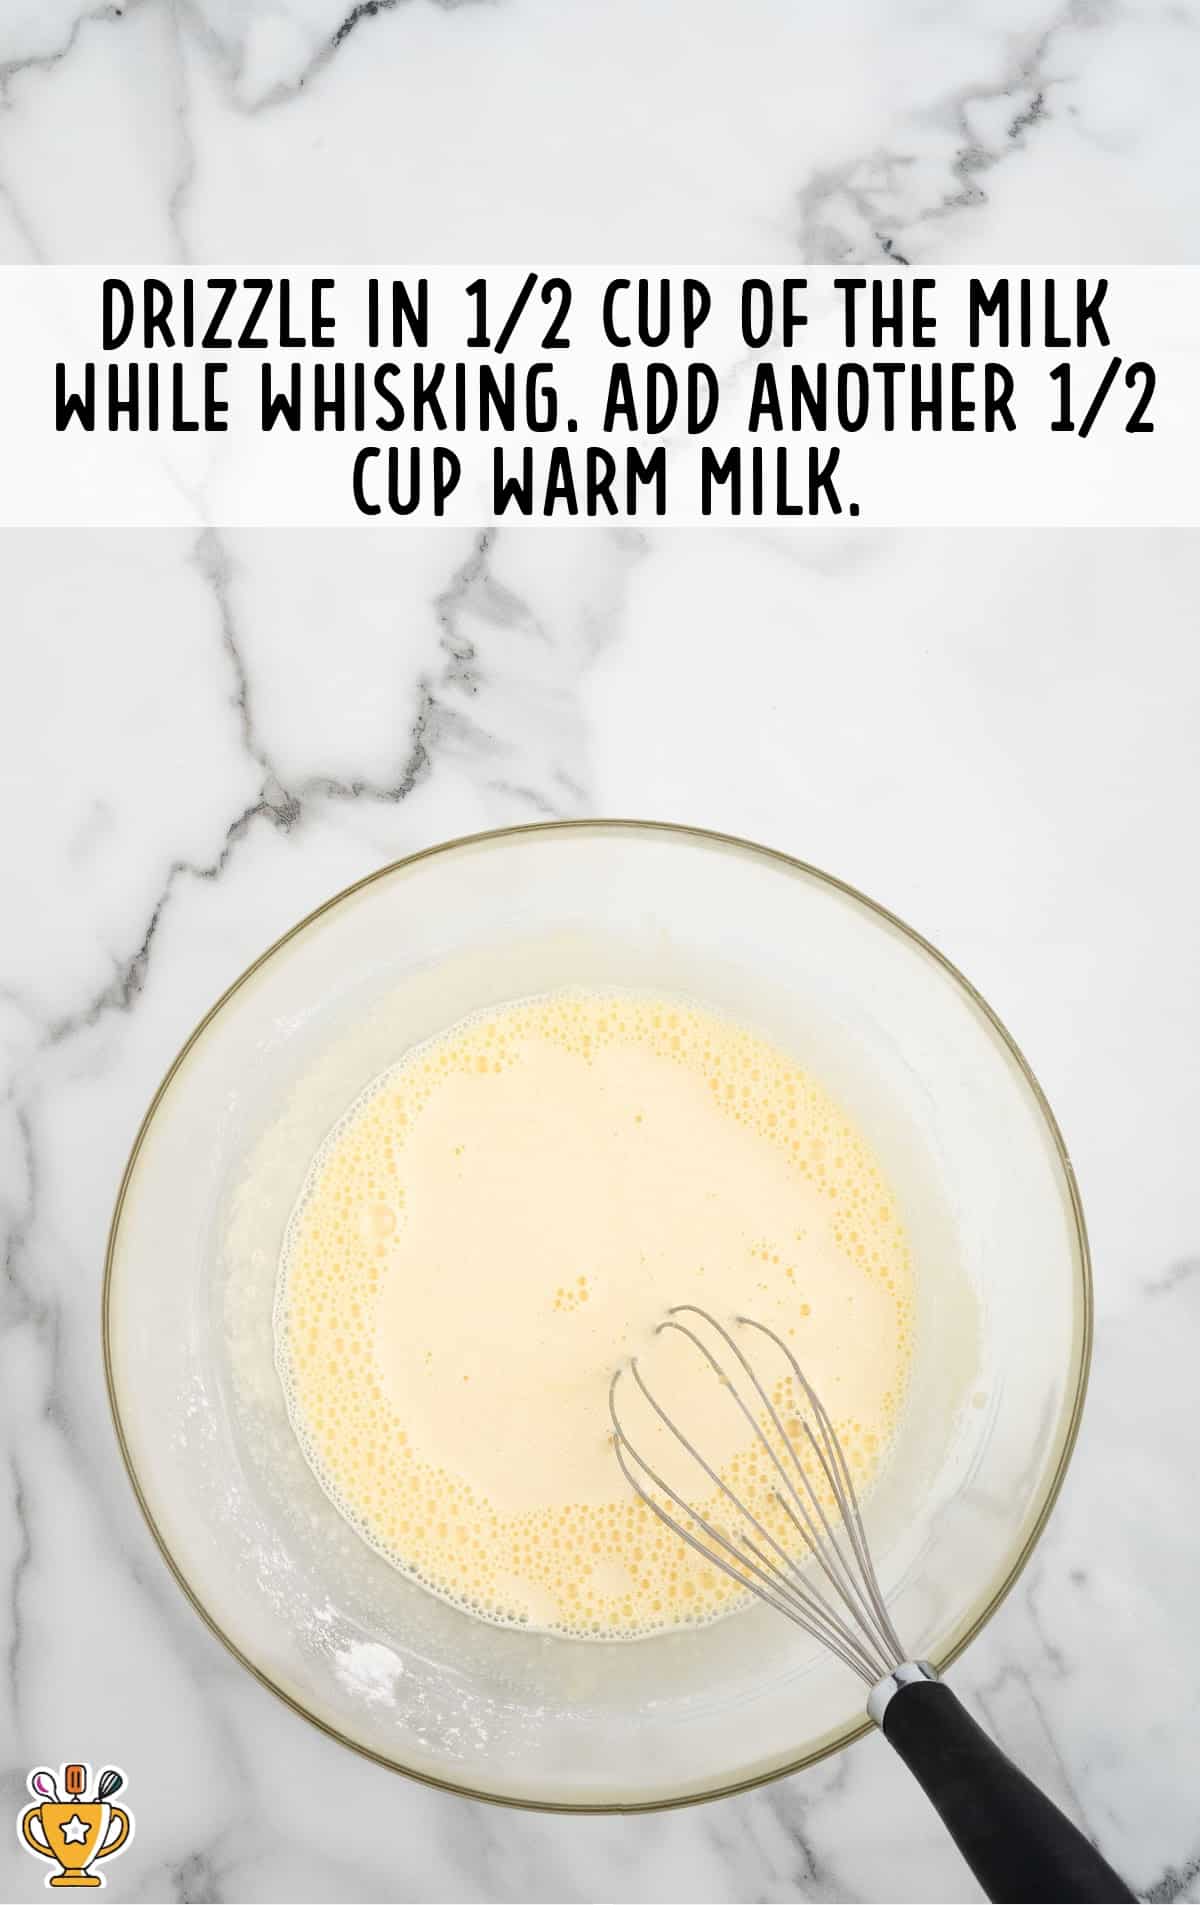
FOURTH STEP: Slowly drizzle ½ cup of the scalded milk while whisking vigorously. Add another ½ cup while continuing to whisk again.
Pro Tip
This step is critical to temper the egg yolks. You’re slowly raising the temperature of the eggs so that they don’t scramble when you add them to the sauce.
FIFTH STEP: Place the saucepan containing the hot milk back on the stove over medium heat. Before the milk gets too hot, slowly pour the bowl containing the milk and egg mixture into the pot while whisking constantly.
SIXTH STEP: Cook the pastry cream mixture for 8-10 minutes while whisking constantly to avoid burning, or until the hot milk mixture comes to a rolling boil and thickens a lot.
Pro Tip
Don’t walk away from the stove! The mixture will very quickly thicken once the pot begins to boil.
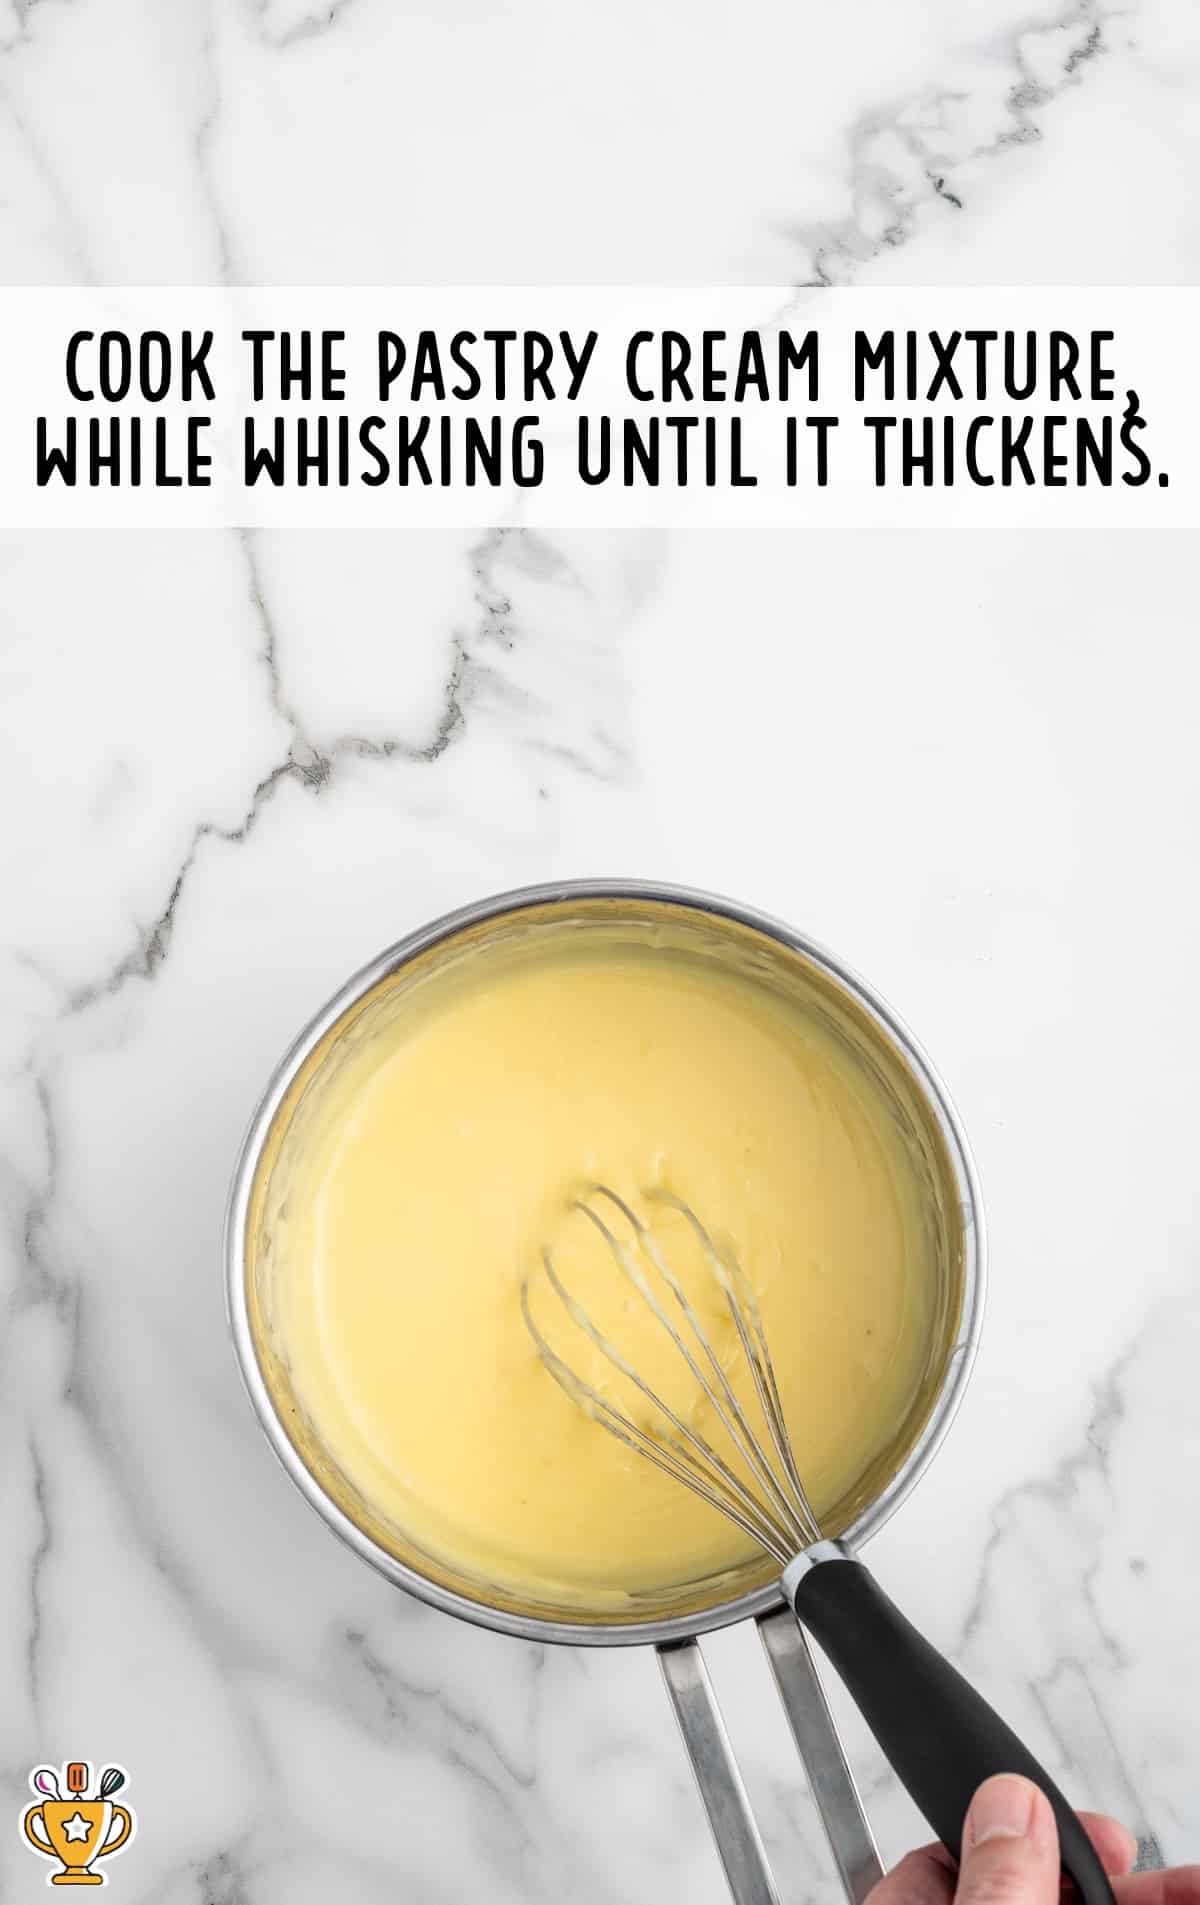
SEVENTH STEP: Cook for 30 to 60 seconds more, and allow the mixture to thicken, then remove from the heat.
EIGHTH STEP: Add the butter and vanilla extract to the cream and whisk vigorously until the butter is fully incorporated and the cream looks glossy and smooth.
NINTH STEP: Use a spatula to scoop the pastry cream into a clean bowl. Cover with plastic wrap. Press the plastic wrap directly onto the entire surface of the pastry cream so that a ‘skin’ doesn’t form on the surface of the cream as it cools.
TENTH STEP: Refrigerate the pastry cream for 2-4 hours of until it’s fully chilled before adding it to the cooled cake layers.
MAKING THE CAKE LAYERS:
FIRST STEP: Prepare the cake ingredients so they’re ready for use. Heat the milk to 165-170°F. Your eggs should be at room temperature, and your butter should be melted and cooled slightly.
SECOND STEP: Preheat your oven and prepare your cake pans by spraying them with cooking spray and lining them with parchment paper, then set them aside for now.
THIRD STEP: In a small bowl, whisk together the all-purpose flour, baking powder, and salt.
FOURTH STEP: Next, in a large mixing bowl, use a hand mixer on medium-high speed to beat together the sugar, eggs, and vanilla extract. Continue to beat until thick and fluffy.

FIFTH STEP: In a small bowl with a pour spout (or a glass measuring cup), whisk together the warm milk and melted butter. Set a hand mixer on low and slowly drizzle the warm milk mixture into the large bowl of beaten eggs and sugar. Mix until fully incorporated.
SIXTH STEP: Continue mixing on low while you add the flour mixture to the bowl. Add it in small amounts and mix just until the flour has been fully incorporated. Your batter should resemble pancake batter with lots of bubbles, but it shouldn’t have any lumps.
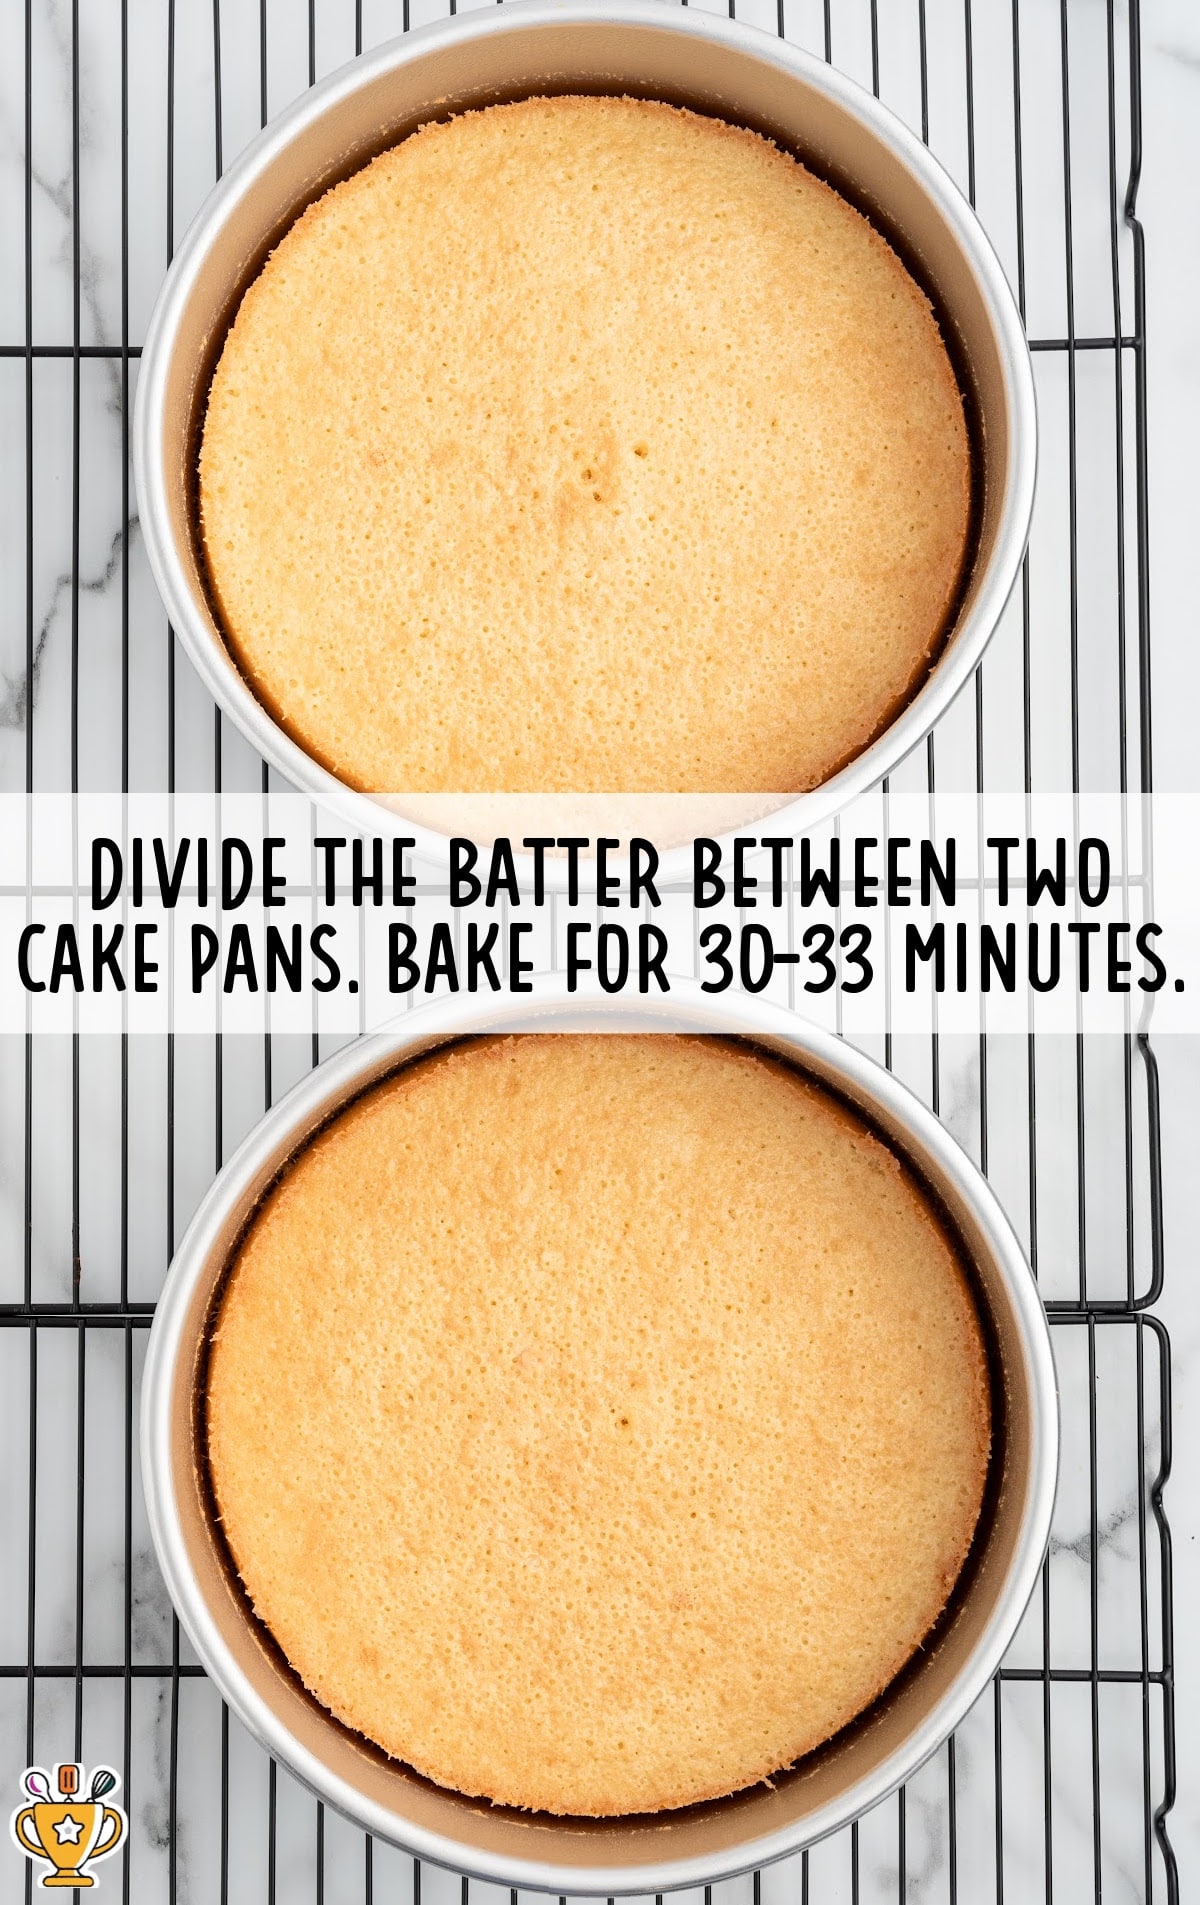
SEVENTH STEP: Divide the cake batter evenly between the two prepared pans and bake until lightly golden around the edges. The centers should be set, and a toothpick inserted into the middle of the cakes should come out clean.
EIGHTH STEP: Allow the cakes to cool in the pan for 10-15 minutes. Then, turn them out onto a wire cooling rack. Remove the parchment paper from the bottom and allow them to finish cooling completely.
TO MAKE THE BOSTON CREAM PIE GANACHE:
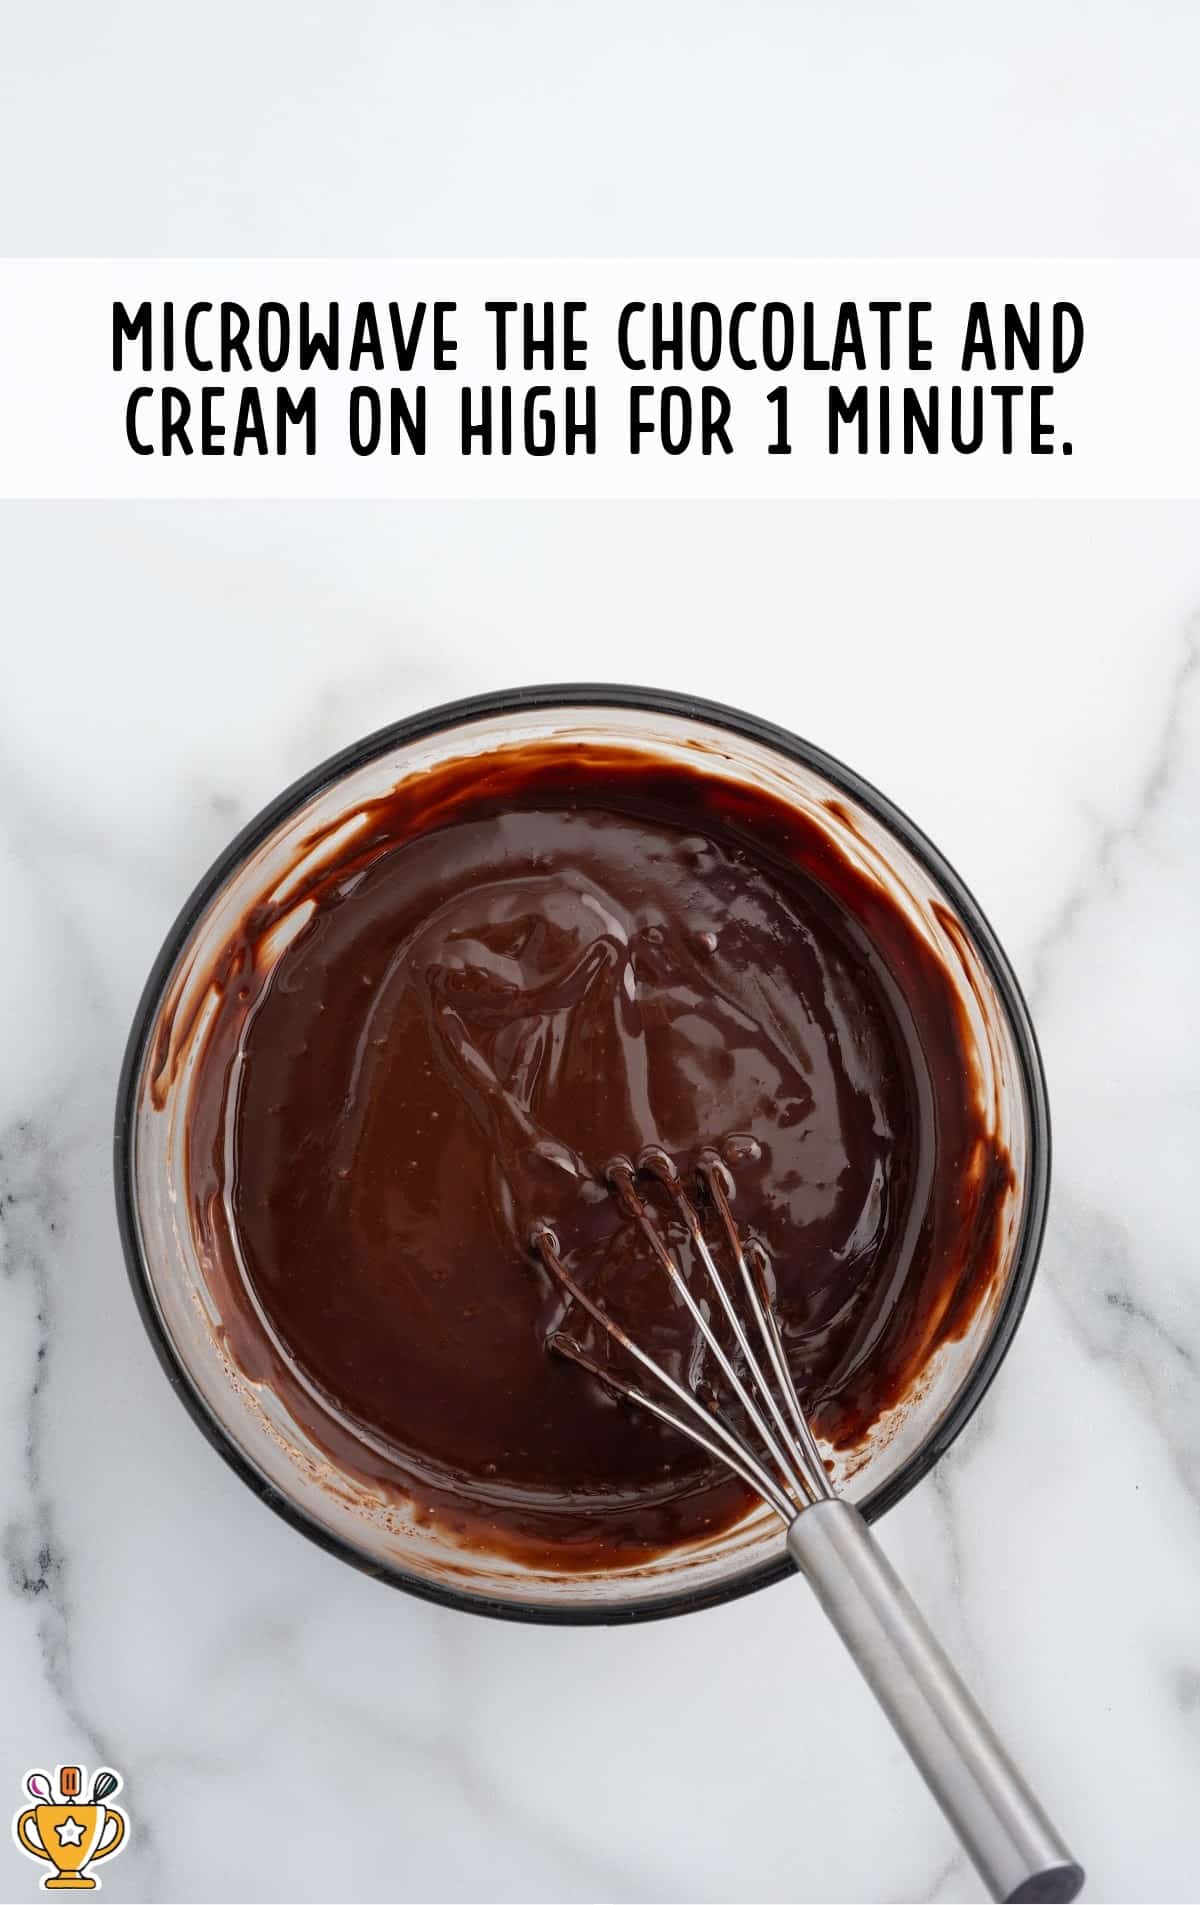
FIRST STEP: Measure the chopped bittersweet chocolate and heavy cream into a microwave safe bowl. Be sure the chocolate is submerged in the heavy cream, then microwave on high for 1 minute. Remove from the microwave and let it sit for 1 minute.
SECOND STEP: Add the clear corn syrup and vanilla extract to the melted chocolate. Whisk the mixture until smooth.
THIRD STEP: Allow the chocolate glaze mixture to cool for 15-20 minutes before you pour it over the top of the cake.
Pro Tip
We recommend serving this pie soon after you apply the ganache. If needed, assemble the rest of the cake up to a day ahead, but make the ganache just before serving.
TO ASSEMBLE THE CAKE:
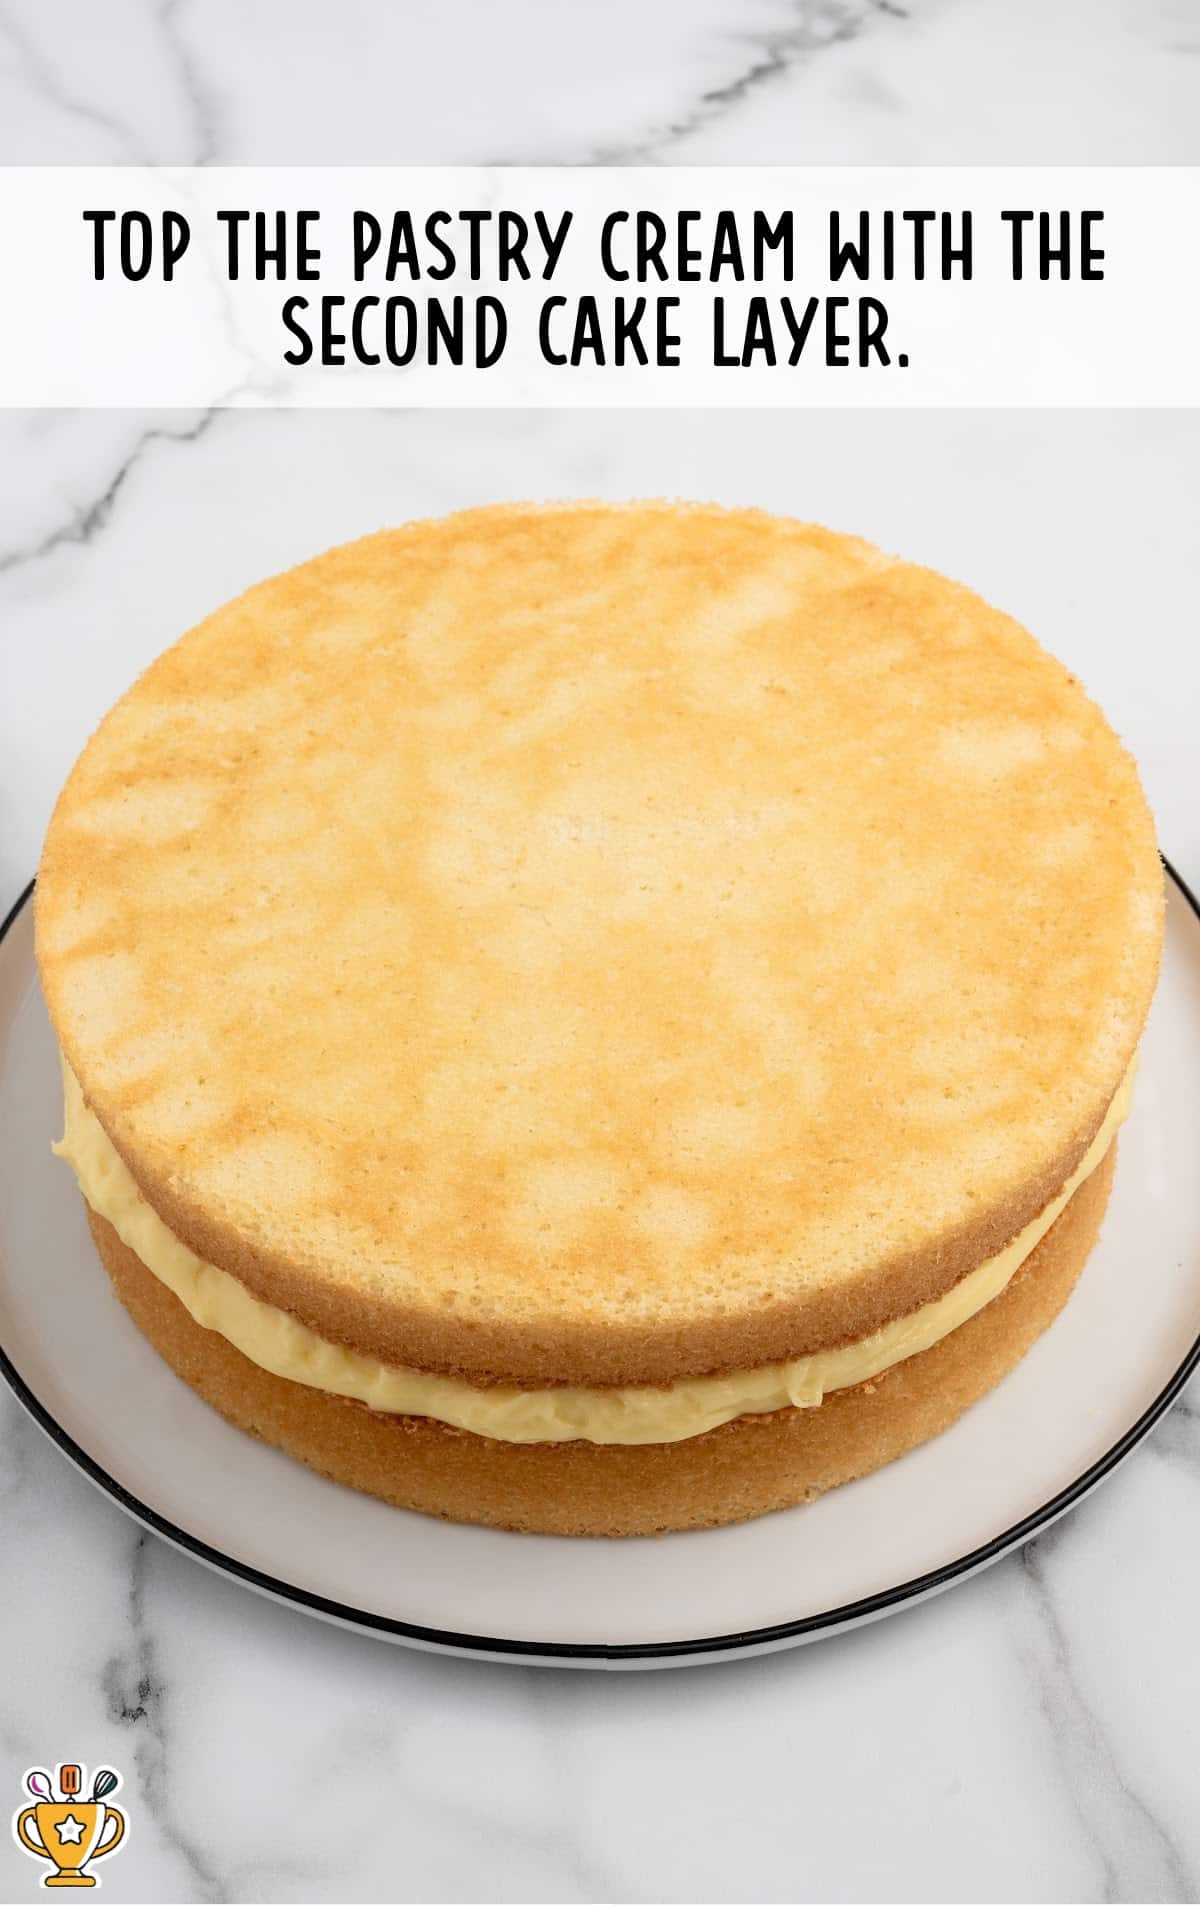
FIRST STEP: Place one of the cake layers onto a large cake plate.
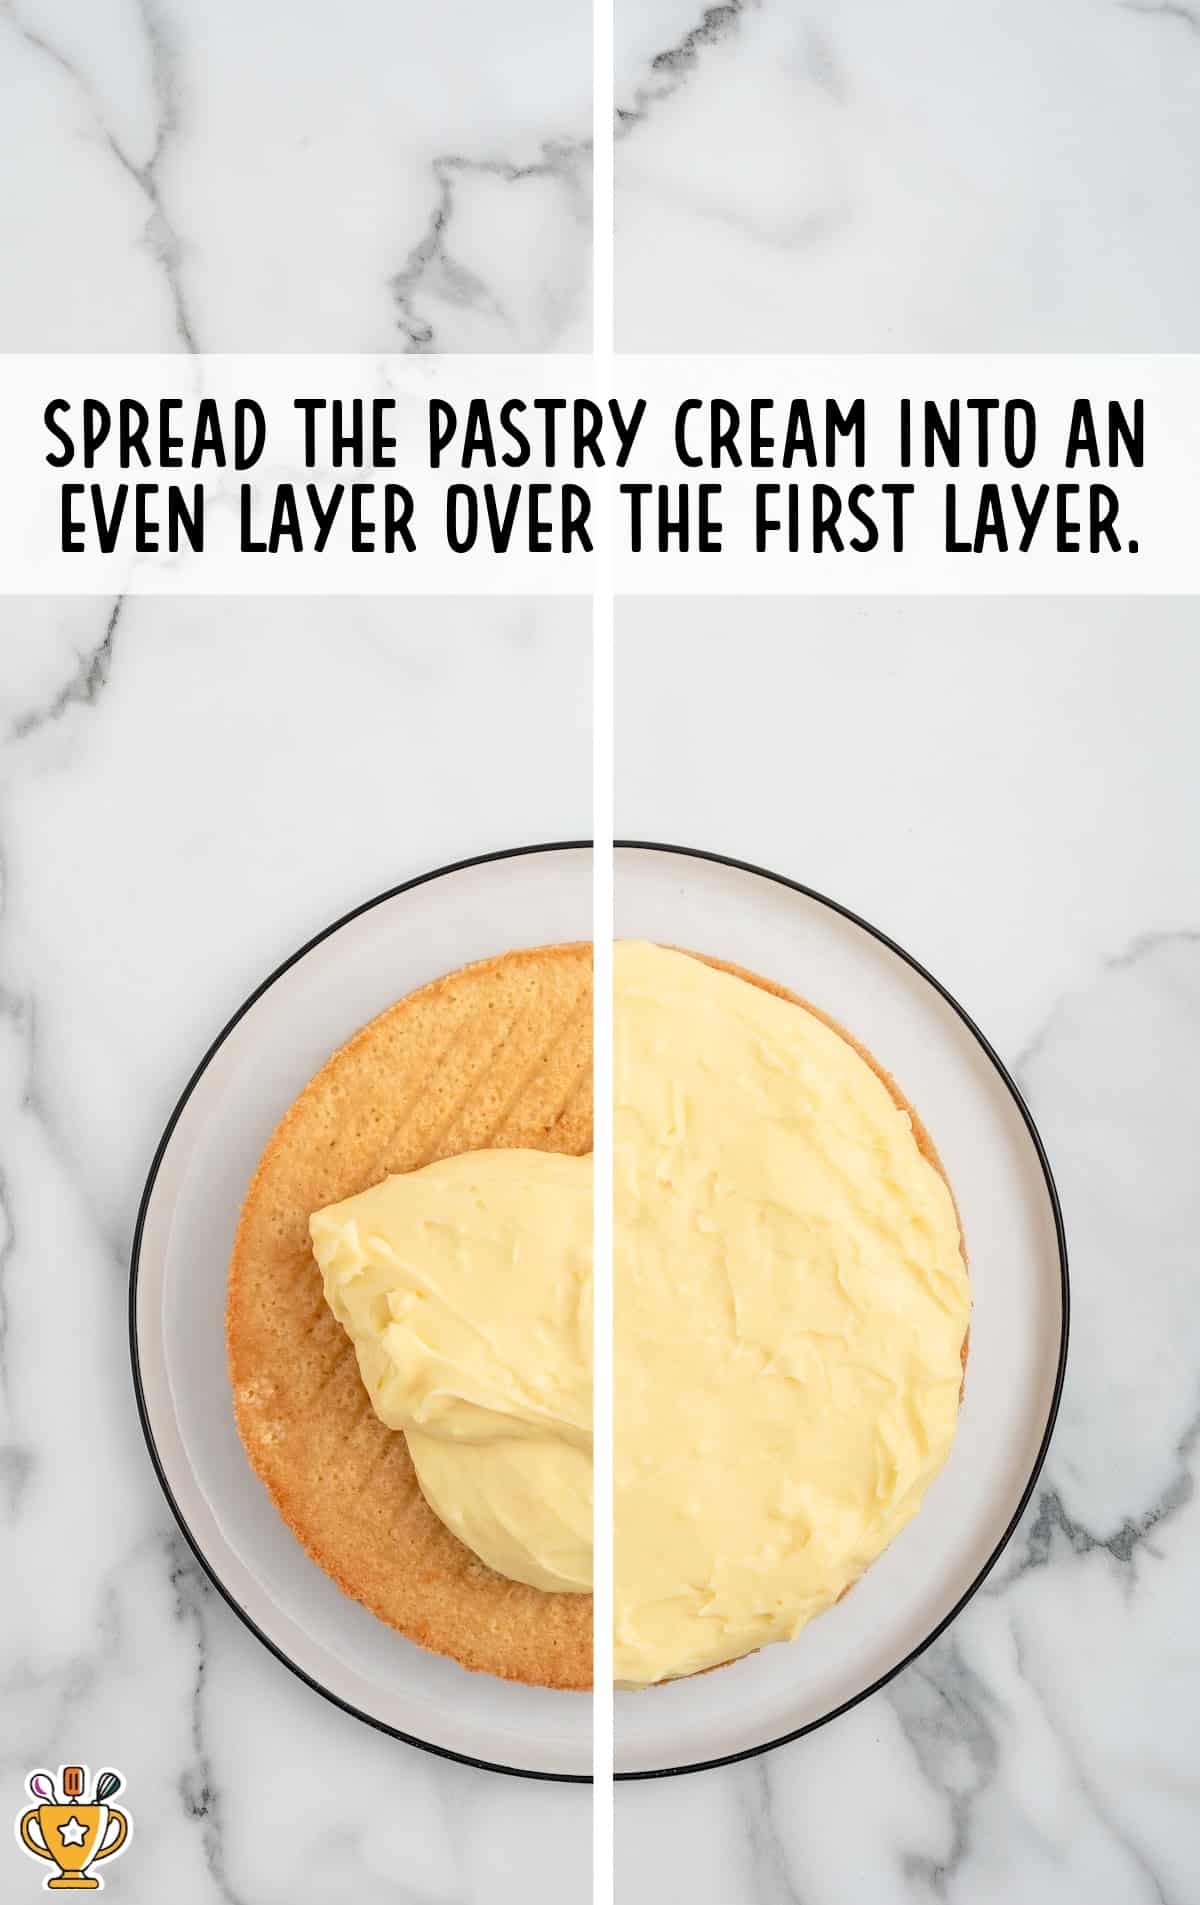
SECOND STEP: Then, spread the chilled cream pie filling over the first layer of cake.
Pro Tip
If your pastry cream is really thick from being in the fridge for a long time, whisk it for a minute or two to loosen it up to a spreadable consistency.
THIRD STEP: Set the second cake layer on top of the custard filling. Set it gently on top but don’t press too hard!
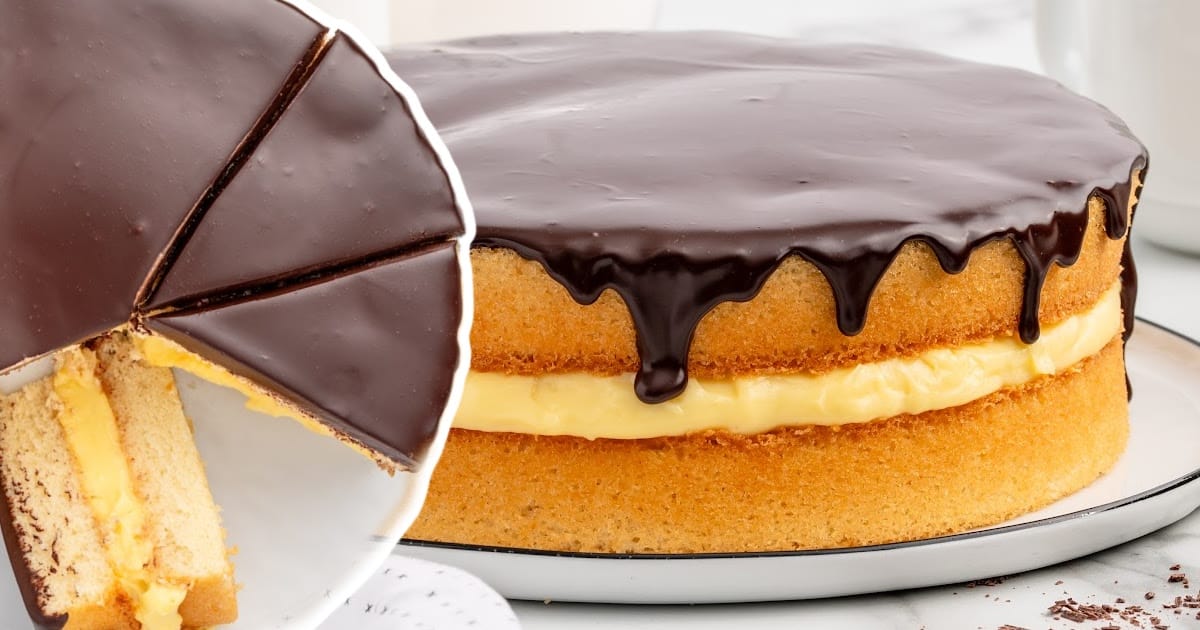
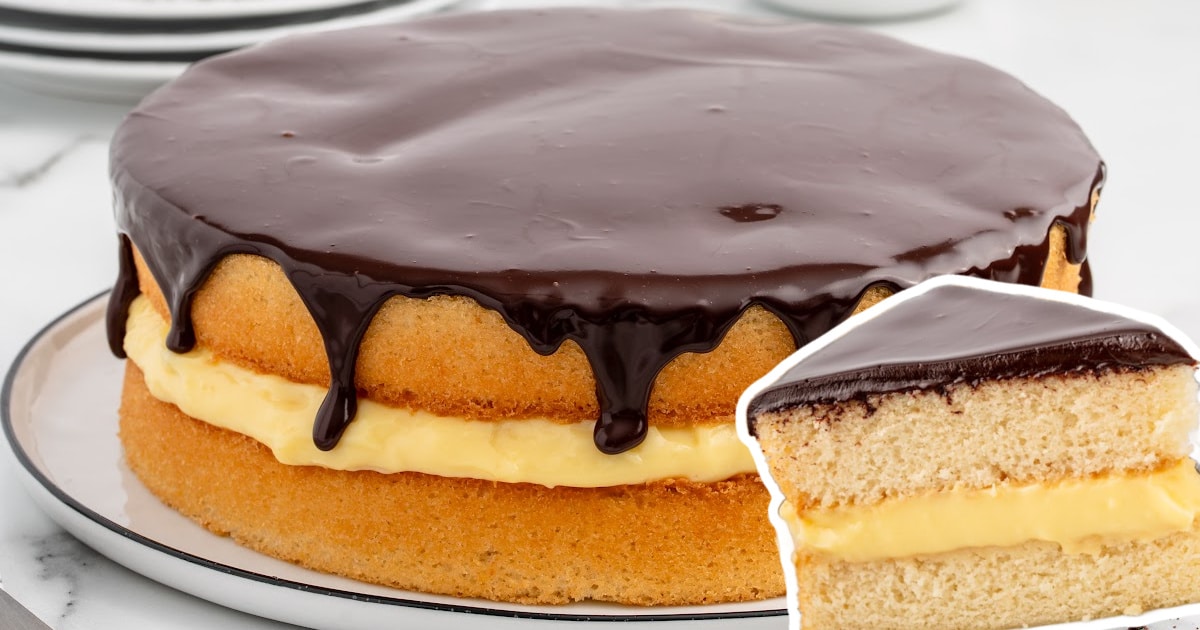
FOURTH STEP: Very slowly, pour the chocolate ganache directly onto the center of the cake. Some of the glaze will drip over the sides, and that’s ok! But you don’t want to completely cover the outside, as you’ll want the yummy layers to be seen. If you need to, use an offset spatula to gently spread the ganache outward nearer to the edges of the cake.

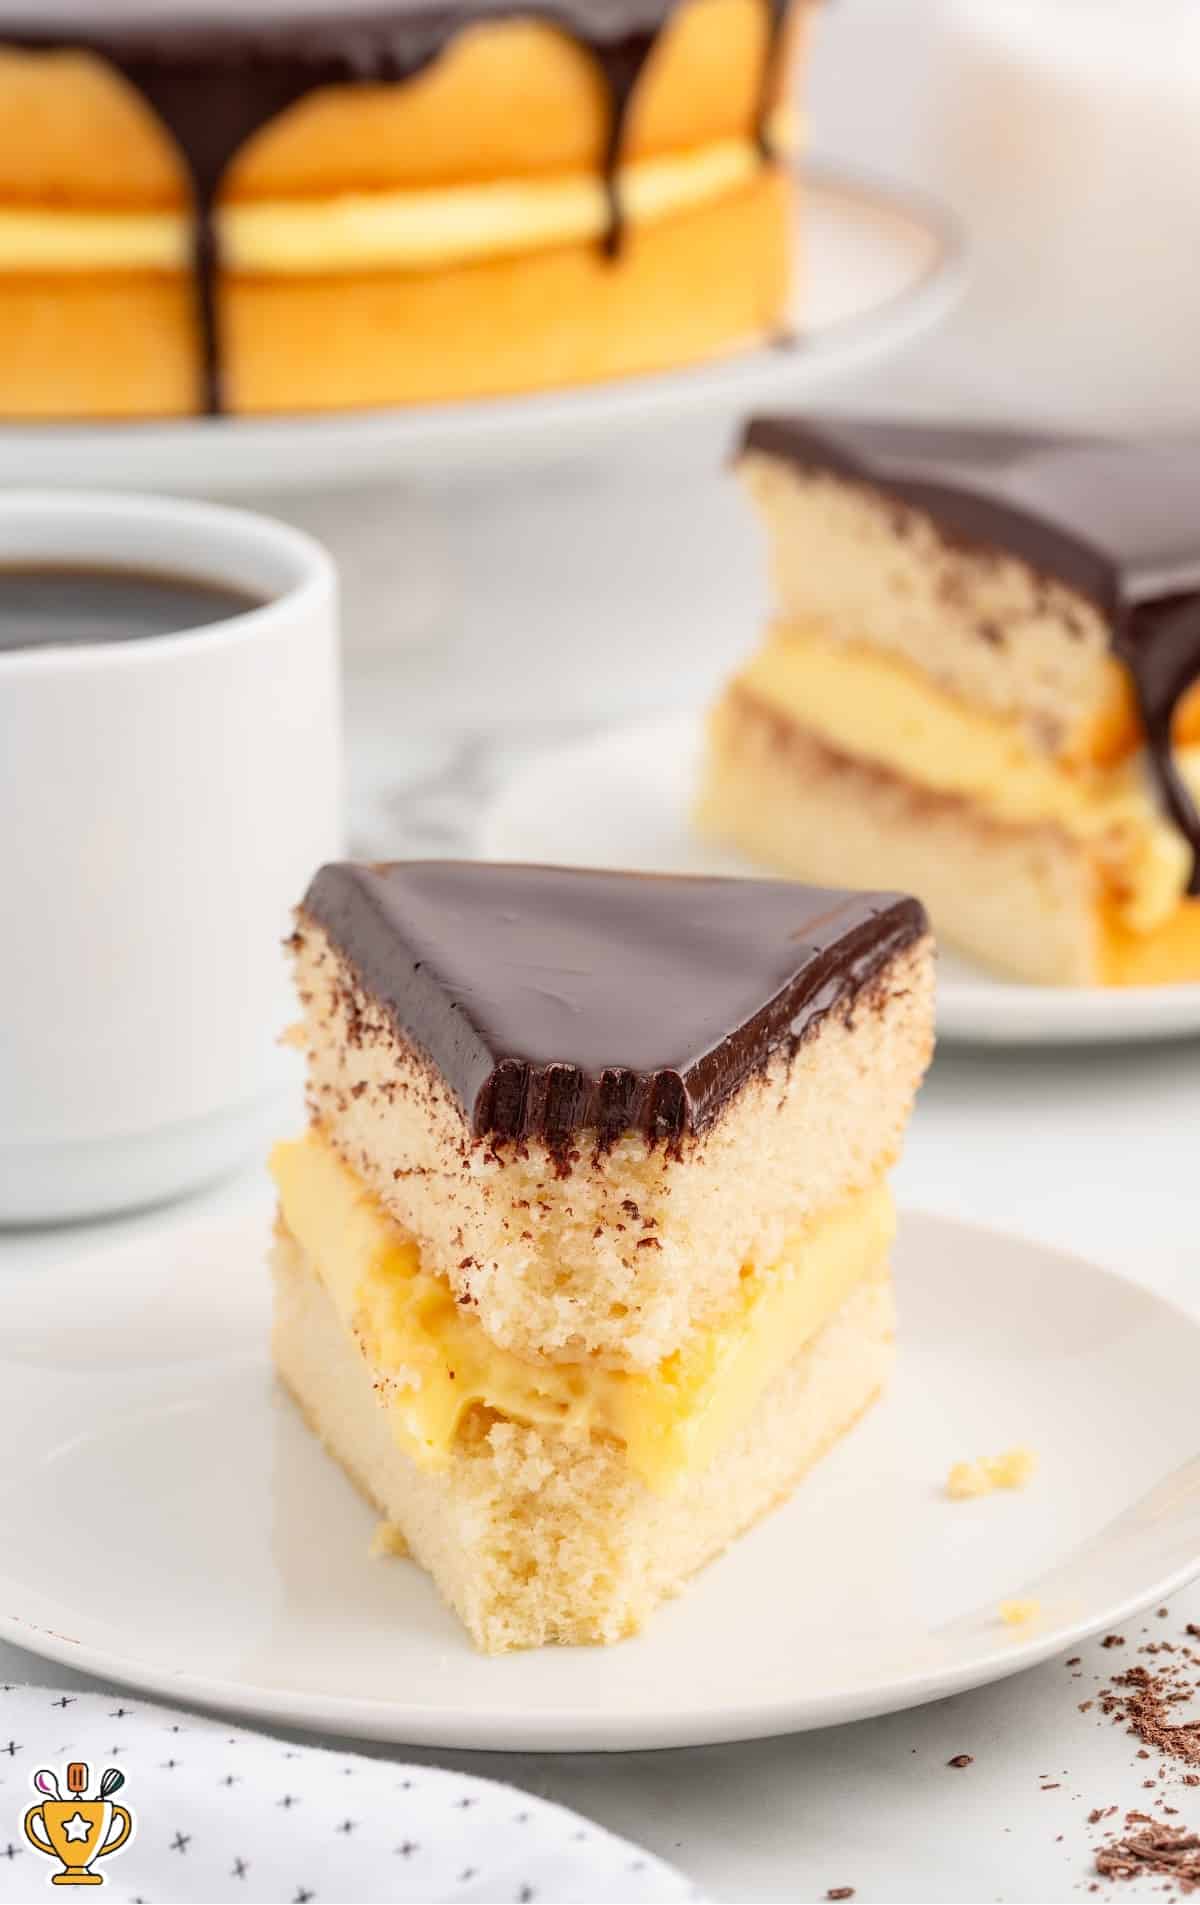
FIFTH STEP: Slice and serve the cake while the pastry cream is still chilled, and before the ganache sets completely.
Pro Tip
This cake is best served within 20-60 minutes after assembling. See below how to make ahead and assemble quickly before serving.
How To Serve Boston Cream Pie
Boston Cream Pie is a versatile dessert that’s perfect for many occasions and loved by both kids and adults. Here are some fun ways to serve this classic recipe:
- Birthdays and Celebrations: This rich, creamy dessert is ideal for birthdays or special gatherings. Its beautiful layers and decadent flavors make it a party favorite. Pair it with banana ice cream for an extra indulgent treat!
- Holidays and Family Dinners: Serve Boston Cream Pie during the holidays or for a cozy family dinner. Its classic flavors work wonderfully for festive meals. It’s a great addition alongside a warm apple pie or pumpkin pie during fall and winter.
- Summer BBQs and Potlucks: Boston Cream Pie is a refreshing, light dessert that’s great for summer BBQs or potlucks. The creamy custard and chocolate topping make it a hit! Complement it with lemon brownies or fresh fruit salad for a sweet summer spread.
This dessert fits any occasion and brings excitement with every bite!
Why You'll Love This Homemade Boston Cream Pie Recipe
Boston Cream Cake is a beloved favorite for many reasons:
- A Classic Combination of Flavors: This recipe perfectly blends soft cake layers, smooth vanilla custard, and rich chocolate ganache. Every bite is a delightful contrast of creamy and sweet.
- Nostalgic and Comforting: Many readers love this recipe because it brings back memories of family gatherings and celebrations. It’s a timeless dessert that feels both familiar and special.
- Perfect for Any Occasion: Whether for a casual family dinner or a fancy event, Boston Cream fits any occasion. Its impressive presentation and delicious taste make it a showstopper every time.
Boston Cream Pie isn’t just a dessert—it’s a cherished treat that adds joy to any celebration!
Recipe FAQ
Can I make Boston Cream Pie in advance?
Yes, you can make it a day ahead. The flavors blend beautifully when chilled overnight before serving.
How long does it take to make Boston Cream Pie?
This recipe takes about an hour, including prep and baking time. Allow extra time for chilling before serving.
What type of chocolate works best for the ganache?
Use semi-sweet or dark chocolate for the ganache to balance the sweetness of the custard and cake layers.
How thick should the custard filling be?
The custard should be thick enough to hold its shape when layered between the cakes, ensuring a creamy, stable filling.
Serving FAQ
How should I serve Boston Cream Pie for the best presentation?
Serve Boston Cream Pie chilled, with even slices to showcase the custard layers and glossy chocolate ganache topping.
Can I serve Boston Cream Pie for special occasions?
Yes, Boston Cream Pie is perfect for special occasions like birthdays or holidays. Its elegant presentation makes it a crowd favorite.
Should Boston Cream Pie be served chilled or at room temperature?
Serve Boston Cream Pie chilled for the best texture and flavor. The custard stays firm, and the ganache holds its shine.
How do I keep the slices clean when serving?
Use a sharp knife, wiped clean between cuts, to keep the slices neat and prevent smudging the custard and chocolate.
Storage FAQ
Follow the directions, tips, and tricks below for optimal storage of your Boston Cream Pie. From making it ahead to reheating, we’ve got you covered to keep it fresh and delicious!
Can I make Boston Cream Pie ahead of time?
Yes, you can prepare it a day in advance. Chill the pie overnight to enhance the flavor before serving.
What’s the best way to store leftover pie?
Store leftovers in an airtight container in the fridge. It will stay fresh for up to two days.
Can Boston Cream Pie be frozen?
Freezing is not recommended as the custard may separate when thawed, affecting the texture of the pie.
How should I reheat cream pie?
It’s best served cold, but if you prefer, gently warm individual slices in the microwave for ten to fifteen seconds.

Boston Cream Pie
Boston Cream Pie combines fluffy cake layers, rich vanilla custard, and smooth chocolate ganache for a classic, indulgent dessert. It's easy to make and perfect for any special occasion!
Did you try this recipe?Let our readers know how it turned out by Leaving a Review!
Ingredients
For the Pastry Cream
- 2 cups whole milk
- ¾ cup granulated sugar
- ¼ cup cornstarch
- 5 large egg yolks (room temperature)
- 3 tablespoons unsalted butter (cold and cubed)
- 1 ½ teaspoons vanilla extract
For the Cake
- 1 ¾ cups all-purpose flour
- 1 ¾ teaspoons baking powder
- ½ teaspoon salt
- 1 ¾ cups granulated sugar
- 3 large eggs (room temperature)
- 2 teaspoons vanilla extract
- 1 cup whole milk (heated to approximately 165* – 170* F)
- ½ cup unsalted butter (melted)
For the Chocolate Glaze
- ¾ cup finely chopped bittersweet chocolate baking bar (60% cacao)
- ½ cup heavy cream
- 1 tablespoon clear corn syrup
- ½ teaspoon vanilla extract
DIRECTIONS
To Make the Pastry Cream
- In a 3-4 quart saucepan, over medium-high heat, add the milk and bring to a temperature of 170*-180* F and you have tiny bubbles forming along the edges of the saucepan. You are scalding the milk, not bringing it to a boil. Remove from the heat.
- In a large mixing bowl whisk together the granulated sugar and cornstarch until fully combined and no lumps from the cornstarch remain. Whisk in the egg yolks by hand for 1-2 minutes or until smooth.
- Slowly drizzle in ½ cup of the warm milk while whisking vigorously. Add another ½ cup warm milk while whisking vigorously again. This is to temper the egg yolks so they do not scramble when added to the sauce pot and cooked.
- Place the saucepan with the remaining warm milk back to the stovetop, over medium-high heat, and slowly pour the egg mixture into the pot while whisking constantly.
- Cook the pastry cream mixture for 8-10 minutes, while whisking constantly to avoid burning, or until the mixture comes to a rolling boil and thickens quite a bit. The pastry cream will get very thick very quickly once it comes to a boil so do not walk away from the saucepan on the stove.
- Cook for an additional 30 seconds – 1 minute once it thickens then remove from the heat.
- Add the cubed unsalted butter and vanilla extract and whisk vigorously until the butter is fully incorporated and the pastry cream is thick and smooth.
- Transfer the pastry cream to a bowl and cover with plastic wrap, being sure to place the plastic wrap directly onto the entire surface of the pastry cream. This will prevent a skin from forming on the surface of the pastry cream while it cools.
- Refrigerate the pastry cream for 2-4 hours, or until fully chilled before adding to the cooled cake layers for assembly.
To Make the Cake
- Preheat oven to 325* F. Spray 2 – 9 inch round cake pans with baker’s spray and line each pan with a piece of parchment round. Set aside.
- In a small bowl combine together the all-purpose flour, baking powder and salt. Set aside.
- In a large mixing bowl, using a handheld mixer on medium-high speed, beat the granulated sugar, eggs and vanilla extract for 3-4 minutes or until thick and fluffy.
- In a small bowl, with a pour spout (a 2 cup glass measure cup works great for this) whisk together the warm milk and melted butter. With the mixer on low speed, slowly drizzle the warm milk mixture into the large bowl of beaten eggs until fully incorporated.
- With the mixer on low speed, add the flour mixture slowly to the bowl and mix just until all the flour has been fully incorporated. Your cake batter should resemble pancake batter without any lumps.
- Divide the batter evenly between the two prepared cake pans. Bake for 30-33 minutes or until lightly golden around the edges and the center is set. A toothpick inserted into the center of the cake should come out clean.
- Allow the cakes to cool in the pan for 10 – 15 minutes before turning them out onto a wire cooling rack to cool completely. Be sure to remove the parchment paper from the bottom of each cake layer while cooling.
To Make the Chocolate Glaze
- In a medium, microwave safe, bowl add the chopped bittersweet chocolate and heavy cream. Be sure that the chocolate is covered by the heavy cream, and microwave on high for 1 minute. Remove from the microwave and let sit for 1 minute.
- Add the clear corn syrup and vanilla extract to the melted chocolate and whisk until smooth.
- Allow the chocolate glaze mixture to cool for 15-20 minutes in the bowl before pouring over the top of the assembled cake.
To Assemble the Cake
- Place one of the cake layers onto a large cake plate.
- Spread the chilled pastry cream into an even layer over the first cake layer. If your pastry cream is very thick from a long chill, be sure to whisk it for 1-2 minutes to loosen it up to a spreadable consistency before adding to the cake.
- Top the pastry cream with the second cake layer. Be careful to not press too hard as you do not want the pastry cream to come out the sides of the cake.
- Slowly pour the chocolate glaze into the center of the top cake layer. It is ok if some of the chocolate glazes drips down the sides, but you do not want to cover the sides completely as you want to be able to see the layers.
- Slice and serve the cake while the pastry cream is still chilled.
Notes
- Measure and cut your butter into cubes, but keep it in the fridge until your ready to use it. Remove the eggs from the fridge before you start to bake so they come to room temperature.
- You can discard the egg whites from the custard or save them to make an omelette.
- Warm the milk for the cake layers in a microwave-safe bowl instead of the stovetop if you prefer. A 2-cup glass measure cup works great! Microwave for 1 minute and 30 seconds or until it starts to get little bubbles around the edges of the milk. Just be very careful not to boil the milk.
- Don’t walk away from the stove when making your custard filling! The mixture will very quickly thicken once the pot begins to boil.
- We recommend serving this pie soon after you apply the ganache, so make the ganache just before serving.
- If your pastry cream is really thick from setting up in the fridge for a long time, whisk it for a minute or two to loosen it up before you try to spread it over the cake.
- This cake is best served within 20-60 minutes of assembly.
Nutrition
Calories: 5333kcal | Carbohydrates: 741g | Protein: 82g | Fat: 233g | Saturated Fat: 134g | Polyunsaturated Fat: 15g | Monounsaturated Fat: 64g | Trans Fat: 5g | Cholesterol: 2020mg | Sodium: 1741mg | Potassium: 2505mg | Fiber: 6g | Sugar: 541g | Vitamin A: 8832IU | Vitamin C: 1mg | Calcium: 1550mg | Iron: 16mg
HAVE YOU TRIED THIS RECIPE?Follow me on Pinterest @bestblogrecipes

Comments
Nancy says
I was looking for something to do with my 9 grandchildren when they visited. And this looks like it will give each one of us an important part in putting this yummy pie together. Thank you 😊