
Last updated on
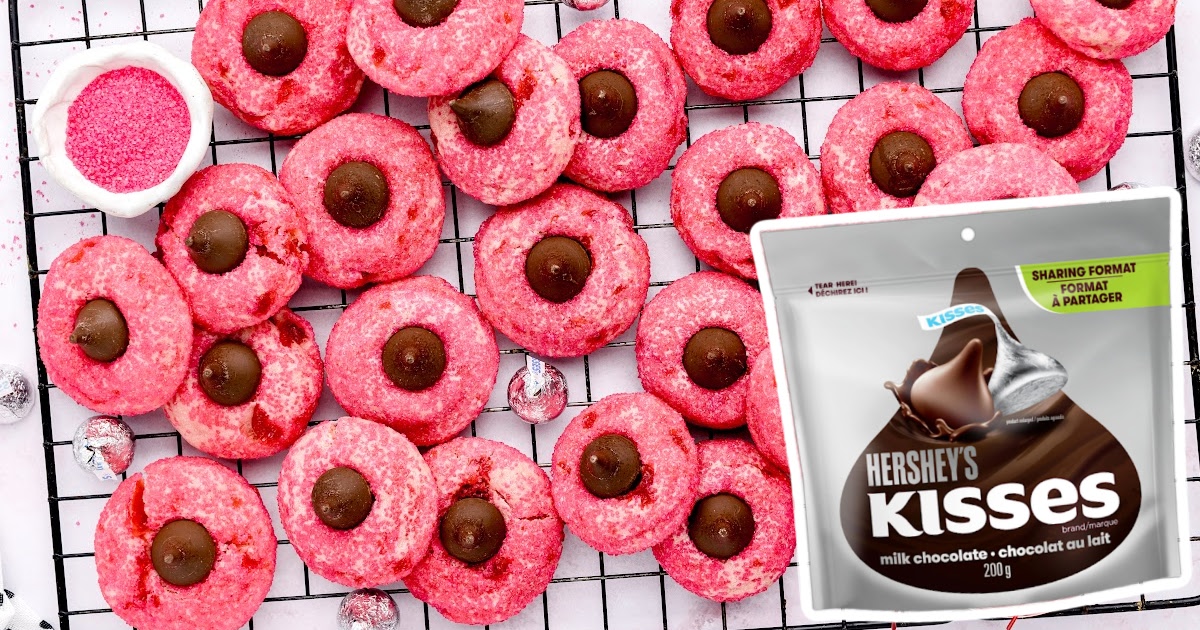
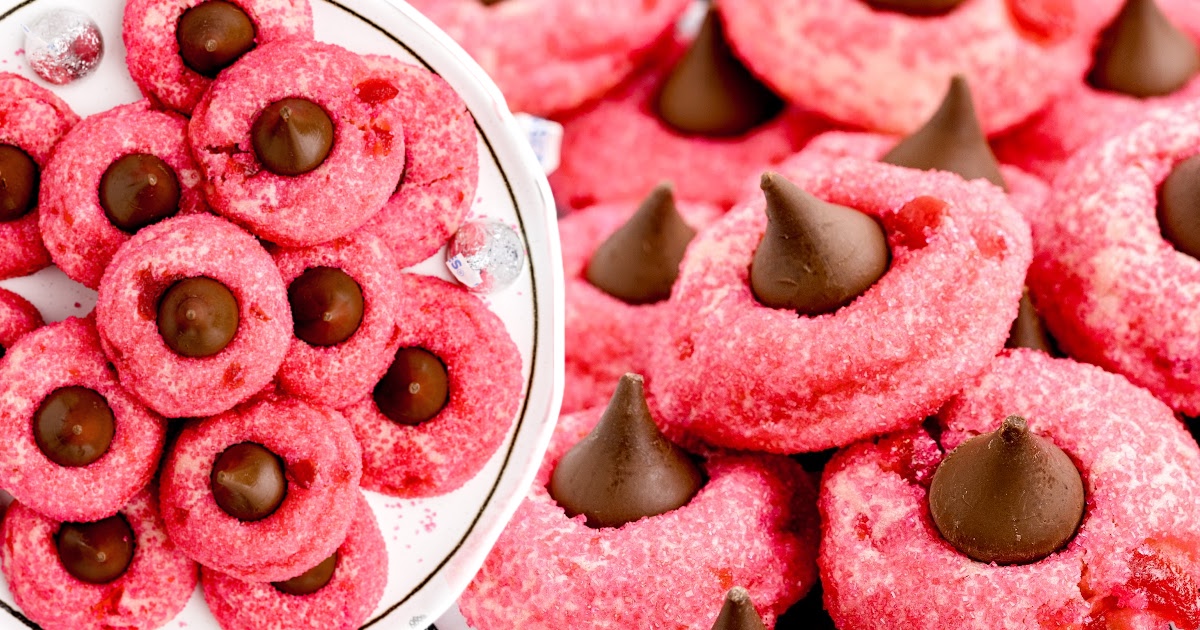
Cherry Kiss Cookies

Cherry kiss cookies combine buttery, cherry-flavored dough with a sweet chocolate kiss for a festive and delicious treat. Perfect for holidays, parties, or anytime you crave a fun and easy dessert!
Jump to RecipeTable of Contents


Cherry kiss cookies are a delightful holiday treat with a buttery base and sweet cherry flavor. Topped with a classic Hershey's kiss, these vibrant cookies look as amazing as they taste. They’re perfect for cookie exchanges, festive gatherings, or a simple dessert to enjoy at home. Whip up a batch and bring some cheer to your table today!
This recipe is super easy to make, and you can follow the step-by-step guide below. We’ve included detailed photos, pro tips, and tricks to help you bake the perfect cookies. Plus, we’ve answered the most frequently asked questions to ensure your baking experience is stress-free and fun!

More Recipes ⭐ Cherry Pie Bombs | Cherry Bread | Orange Cookies
Cherry kiss cookies are the perfect treat for holiday parties, potlucks, or a fun family baking day. You can make these festive cookies in under an hour, and their bright cherry flavor and Chocolatey center always impress!
What makes this recipe so good is the soft, buttery cookie base paired with a sweet cherry twist. These cookies stand out on any dessert table and are an easy way to spread holiday cheer!
Ingredients For Cherry Kiss Cookies
What you'll need to make this Cherry Kiss Cookies recipe:
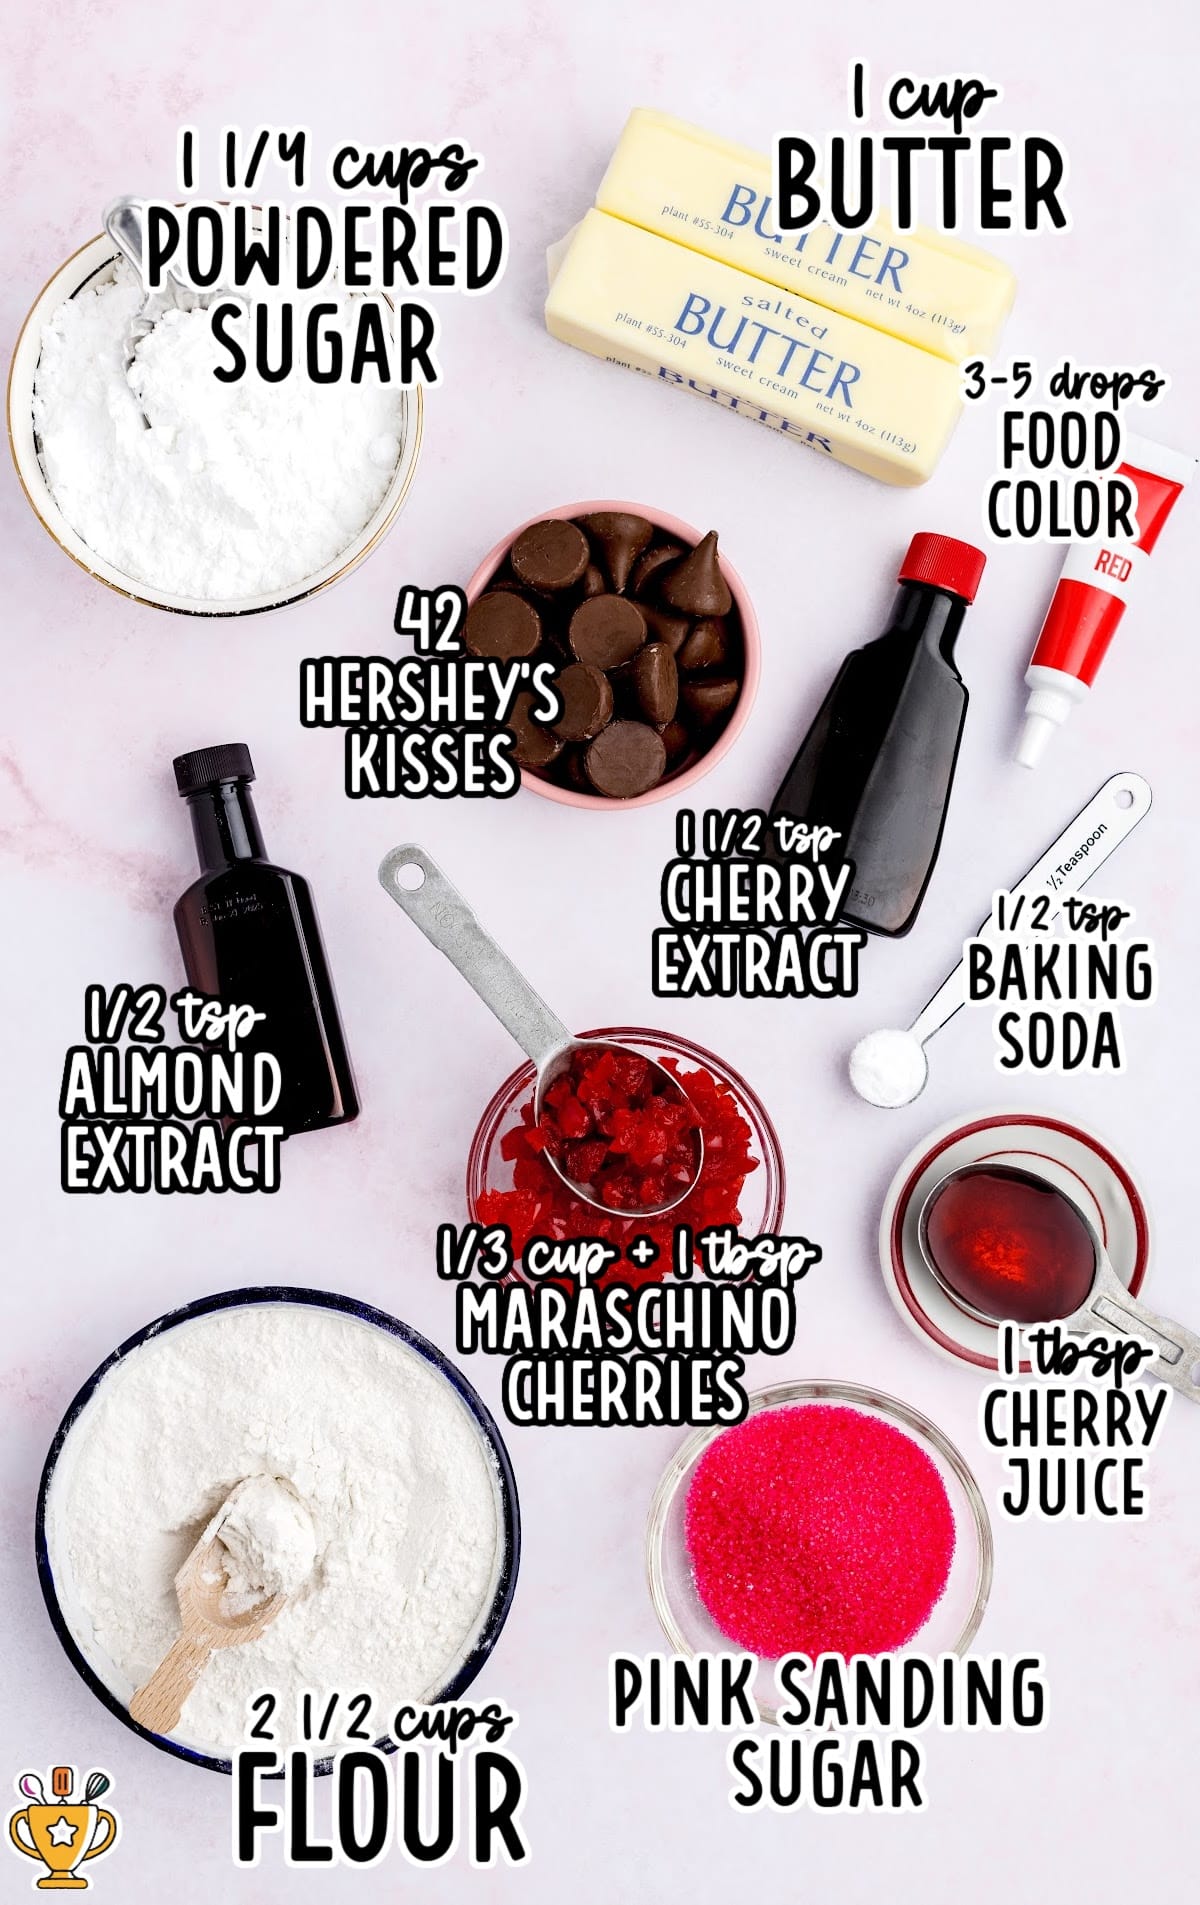
- 2½ cups of all-purpose flour, spooned and leveled
- ½ teaspoon of baking soda
- 1 cup of salted sweet cream butter, softened
- 1¼ cups of powdered sugar
- 1 tablespoon of maraschino cherry juice
- 1½ teaspoons of cherry extract
- ½ teaspoon of almond extract
- 3–5 drops of red food coloring gel
- ⅓ cup plus 1 tablespoon of finely chopped maraschino cherries
- Pink sanding sugar (for rolling the dough balls in. I used a 2.46-ounce container)
- 42 unwrapped chocolate kisses
Substitutions and Additions
Personalize your cherry kiss cookies by swapping out ingredients and adding fun extras! These easy changes make your cookies uniquely yours. Here are some top substitutions and additions:
- Substitute Maraschino Cherries: Use fresh cherries or cherry preserves for a natural, less-sweet flavor in your cookies.
- Add Almond Extract: Mix in a teaspoon of almond extract for a nutty flavor that pairs perfectly with cherries.
- Add Sprinkles: Roll the dough in colorful sprinkles for an extra festive and cheerful touch to your cookies.
These swaps and additions bring new flavors and make your cherry kiss cookies stand out even more!
How to Make Cherry Kiss Cookies
Follow along with our step-by-step instructions and pictures to make these delicious cherry kiss cookies. Don’t forget to check out the tips and tricks below for perfect results every time. Let’s get started and bake something amazing together!
FIRST STEP: Preheat the oven to 350°F. Line 2 baking sheets with parchment paper. Set them aside.
SECOND STEP: Whisk together the flour and baking soda in a small mixing bowl. Set it aside.
Pro Tip
The baking soda is what helps make this recipe so soft and chewy. If you omit the baking soda, you will end up with a crunchy and crisp cookie.
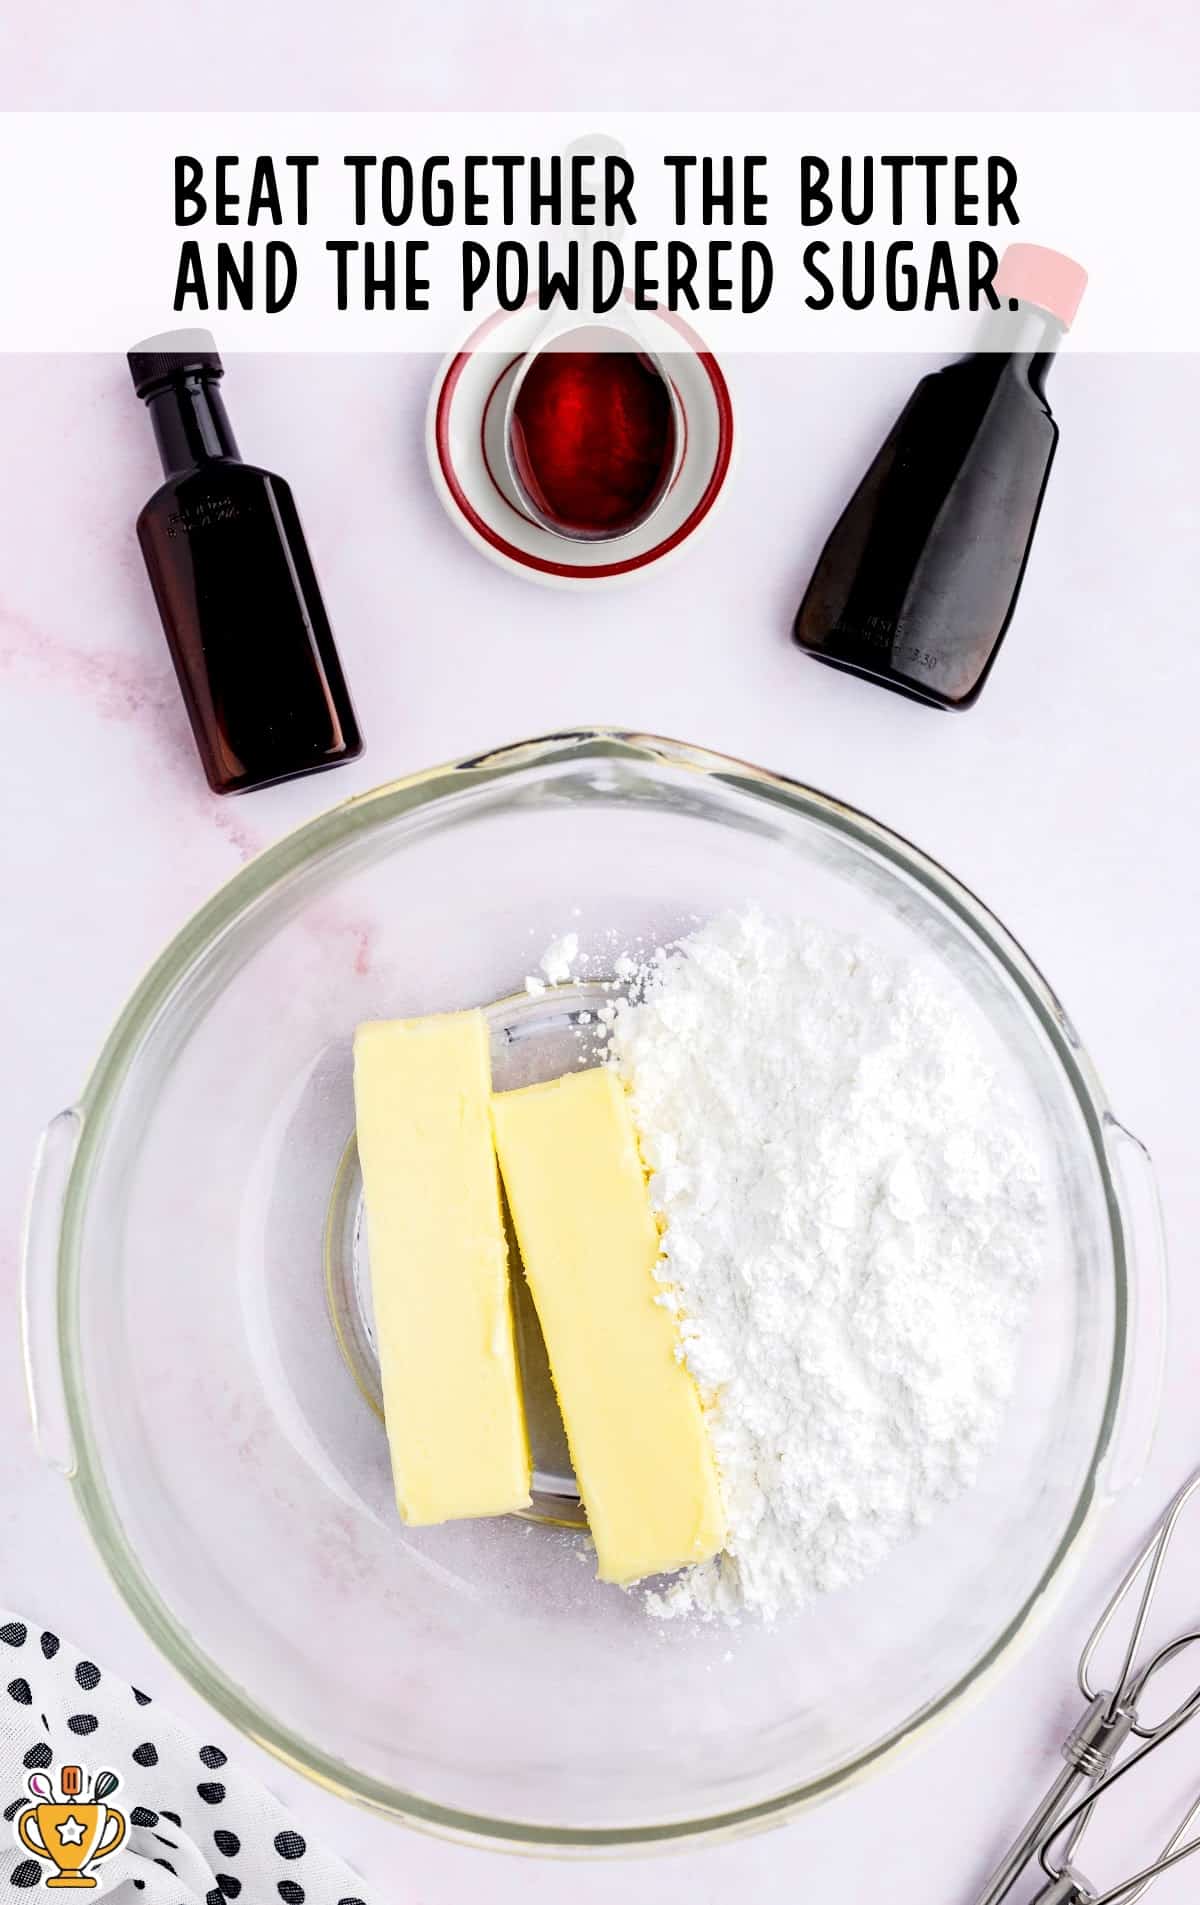
THIRD STEP: Beat together the softened butter and the powdered sugar for 1½ to 2 minutes until smooth and fluffy.
Use a stand mixer or a medium-sized mixing bowl and a hand mixer on medium-high speed.
FOURTH STEP: Add the cherry juice, cherry extract, and almond extract.
Continue beating for another one minute until the cherry juice and extracts are well incorporated.
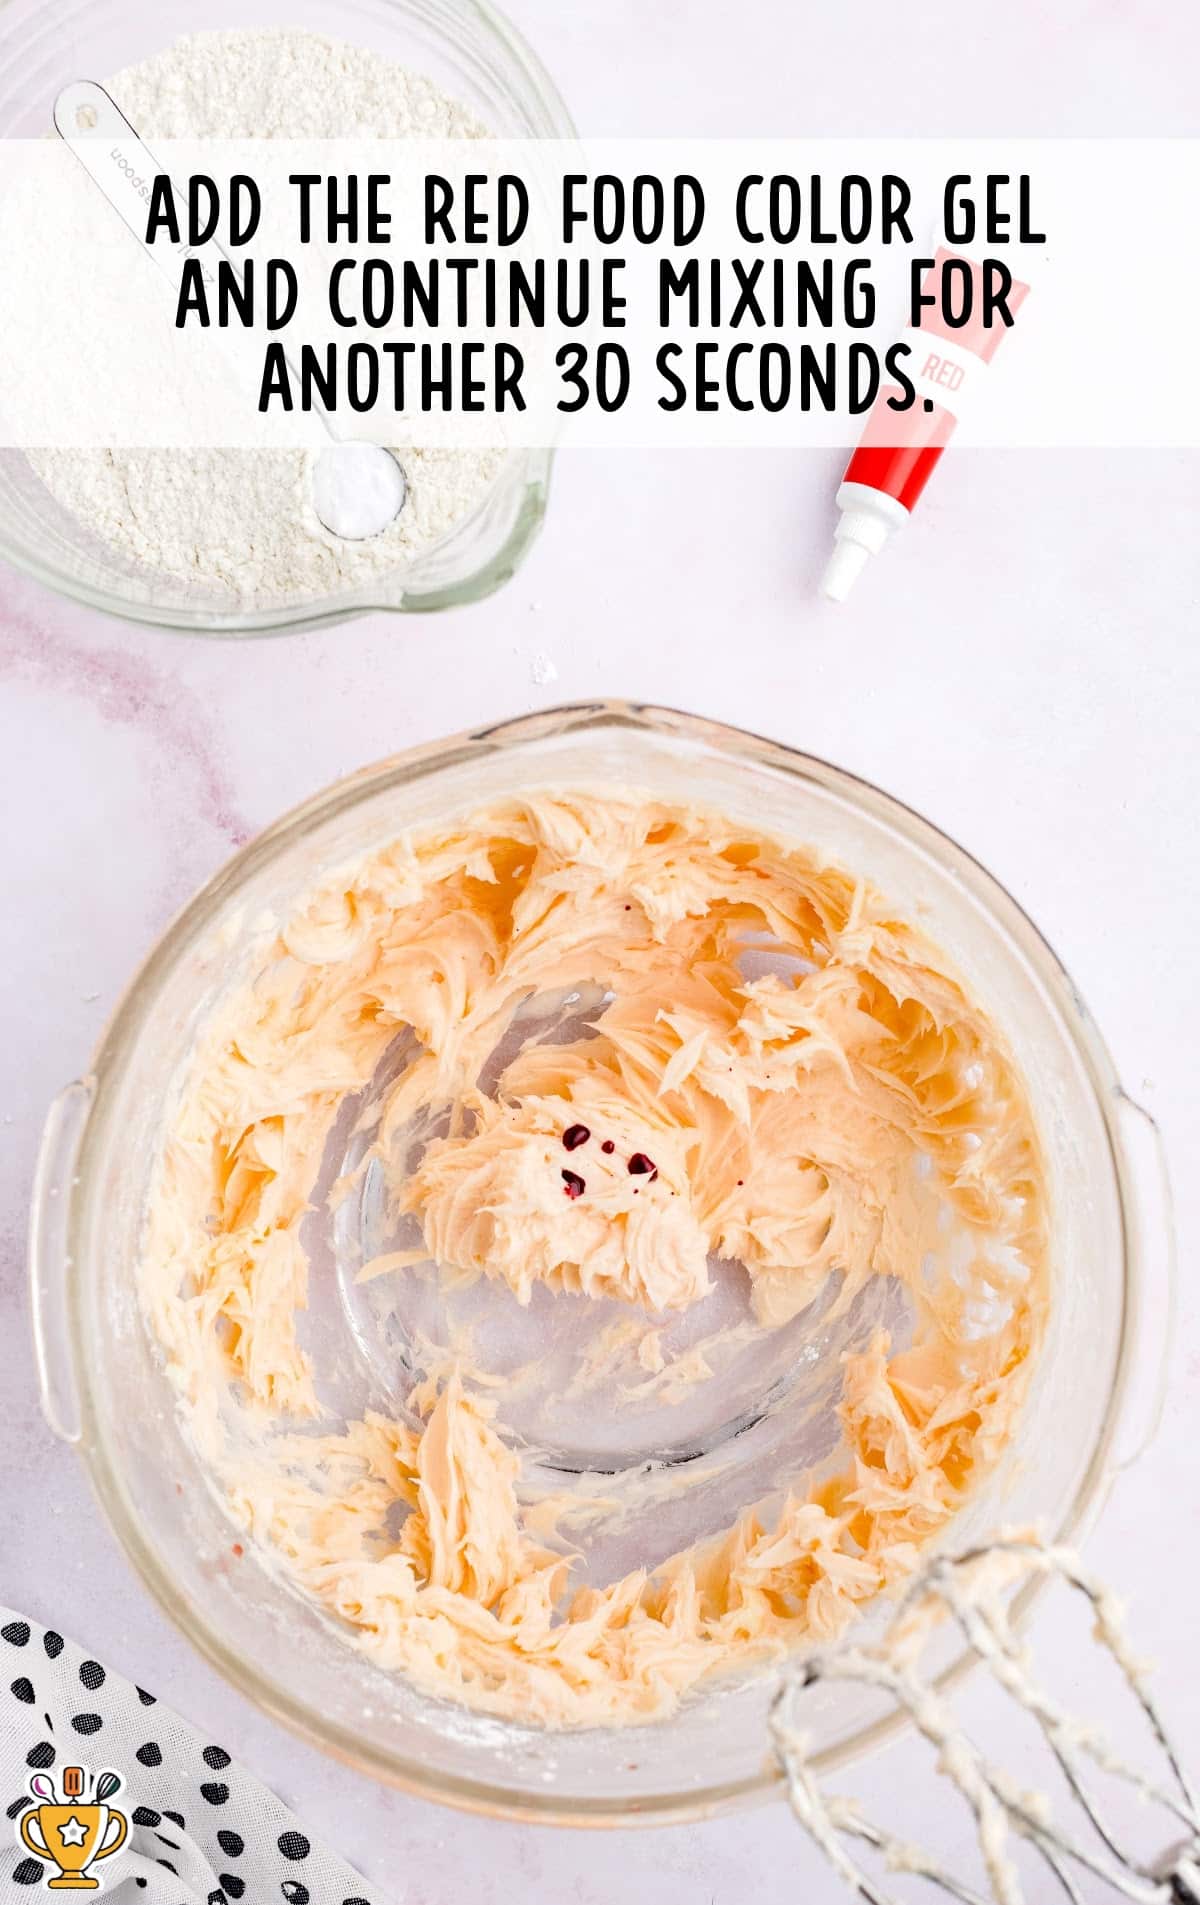
FIFTH STEP: Add the red food color gel and continue mixing for another 30 seconds, or until the color is uniform and no streaks appear.
SIXTH STEP: Lower the mixer to medium speed, add the flour mixture, and continue mixing until the flour is well combined.
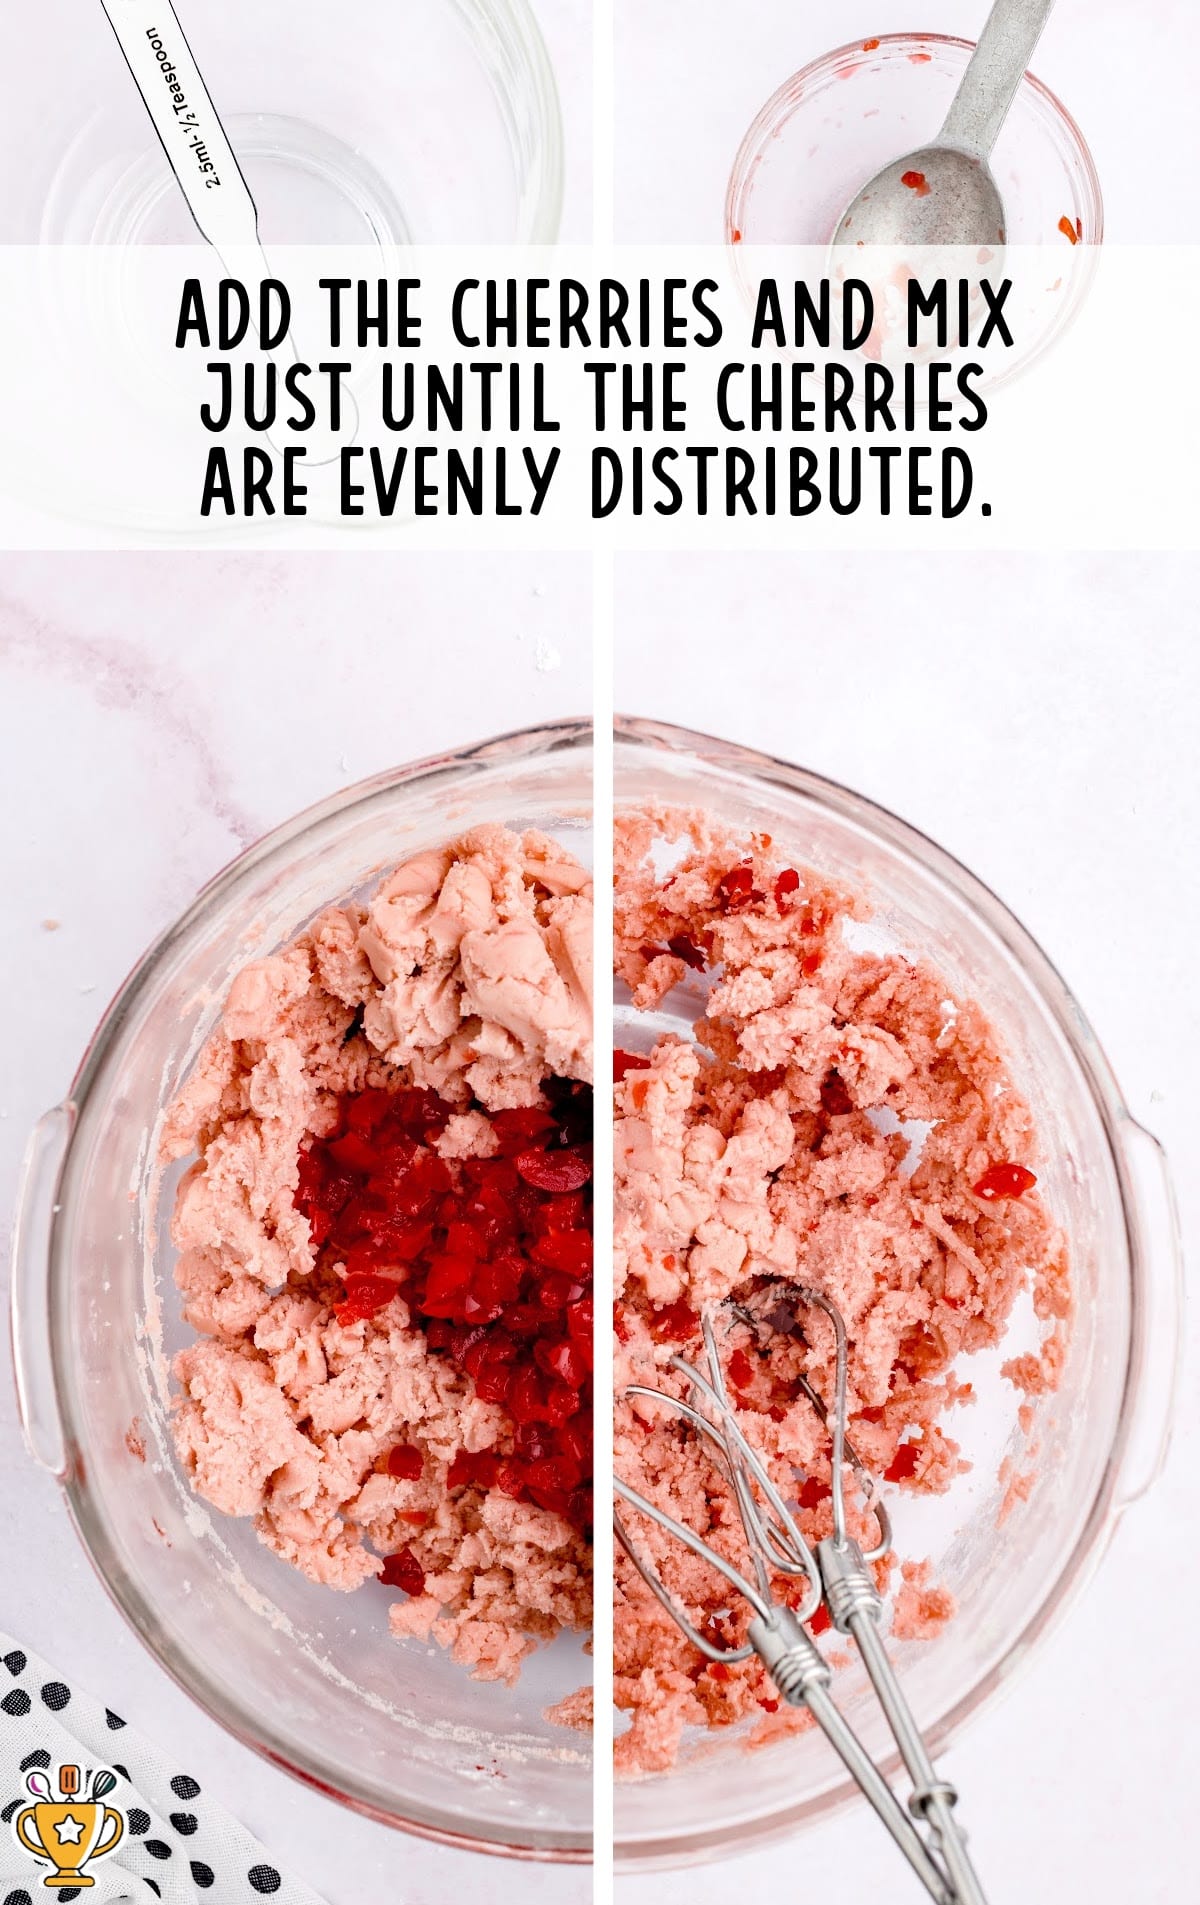
SEVENTH STEP: Add the chopped cherries and mix just until the cherries are evenly distributed.
EIGHTH STEP: Add the pink sanding sugar to a small mixing bowl. Set it aside.
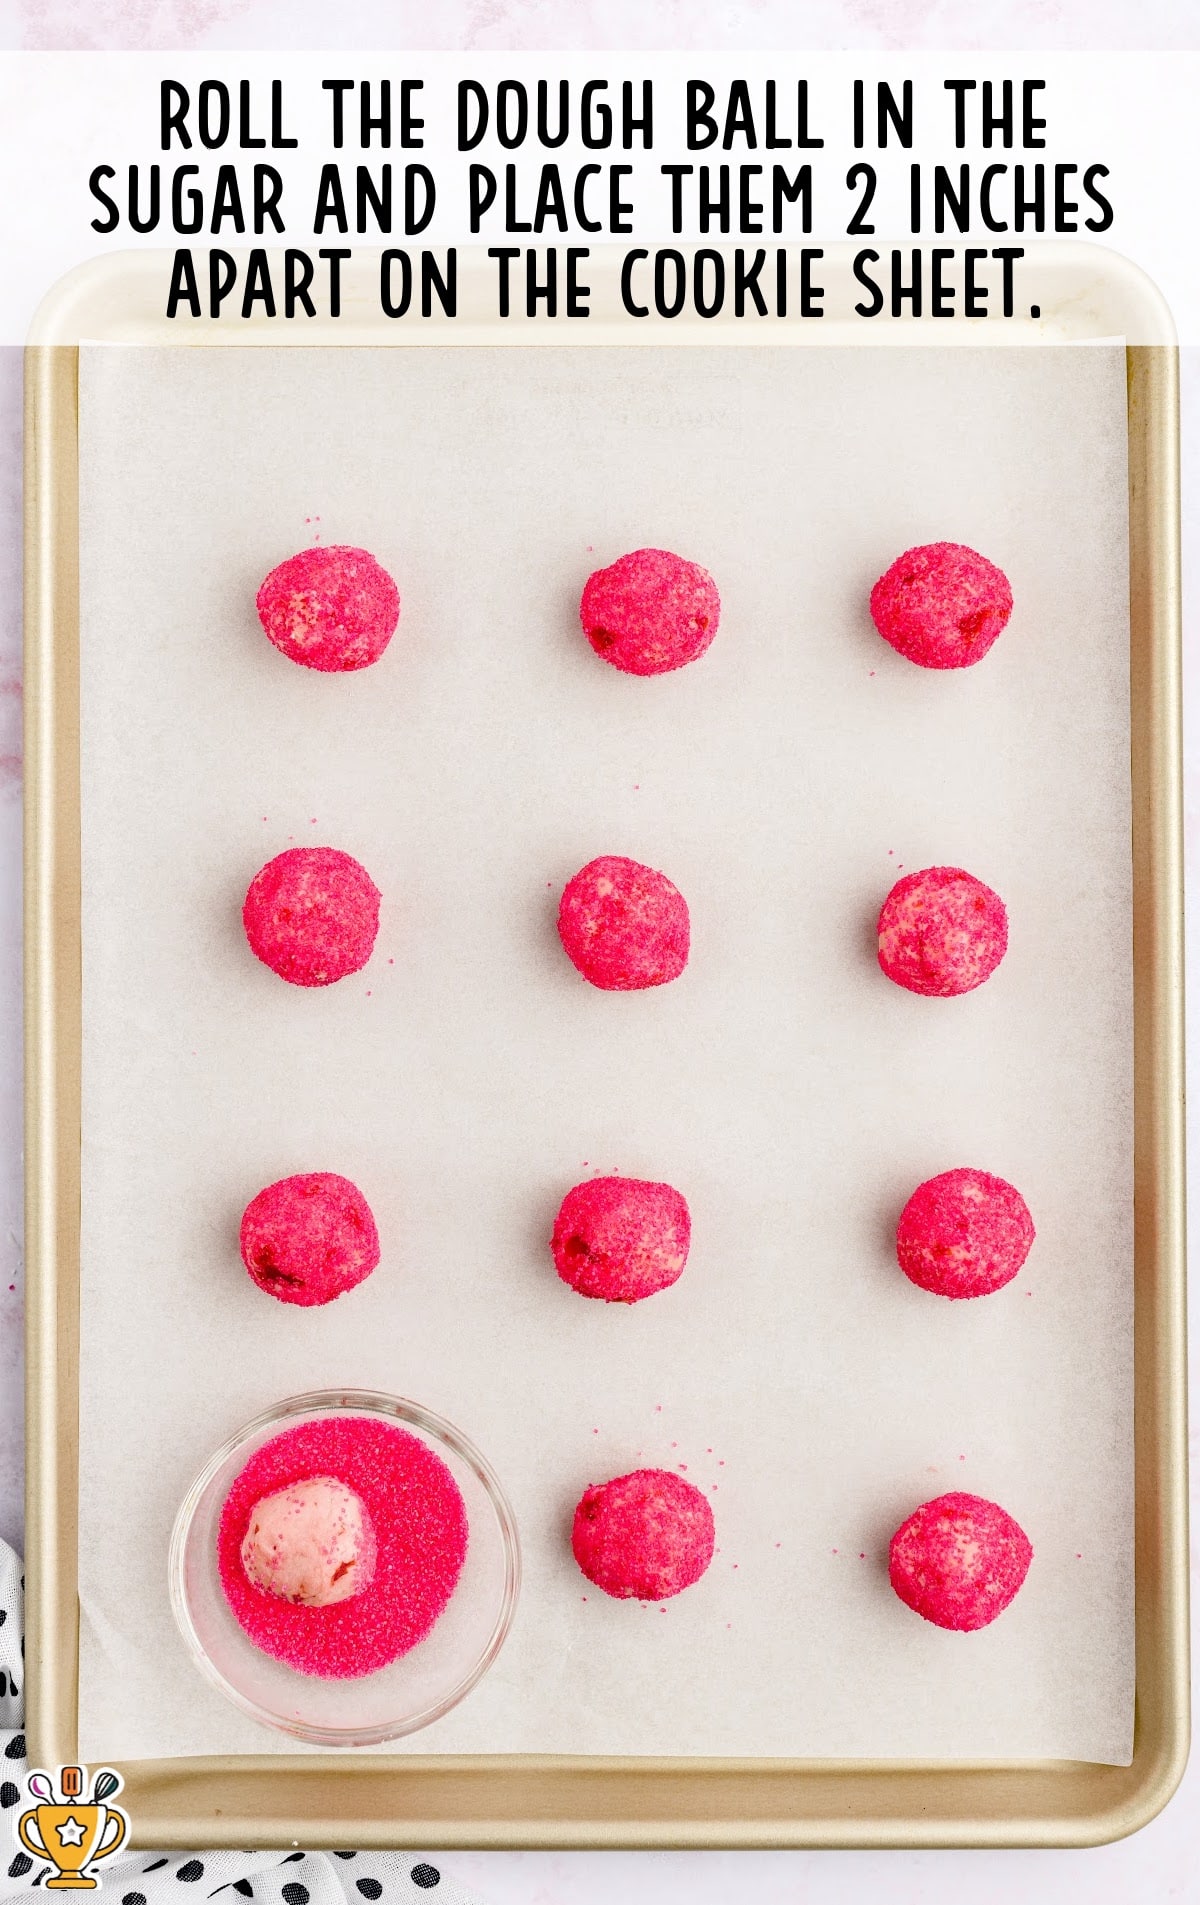
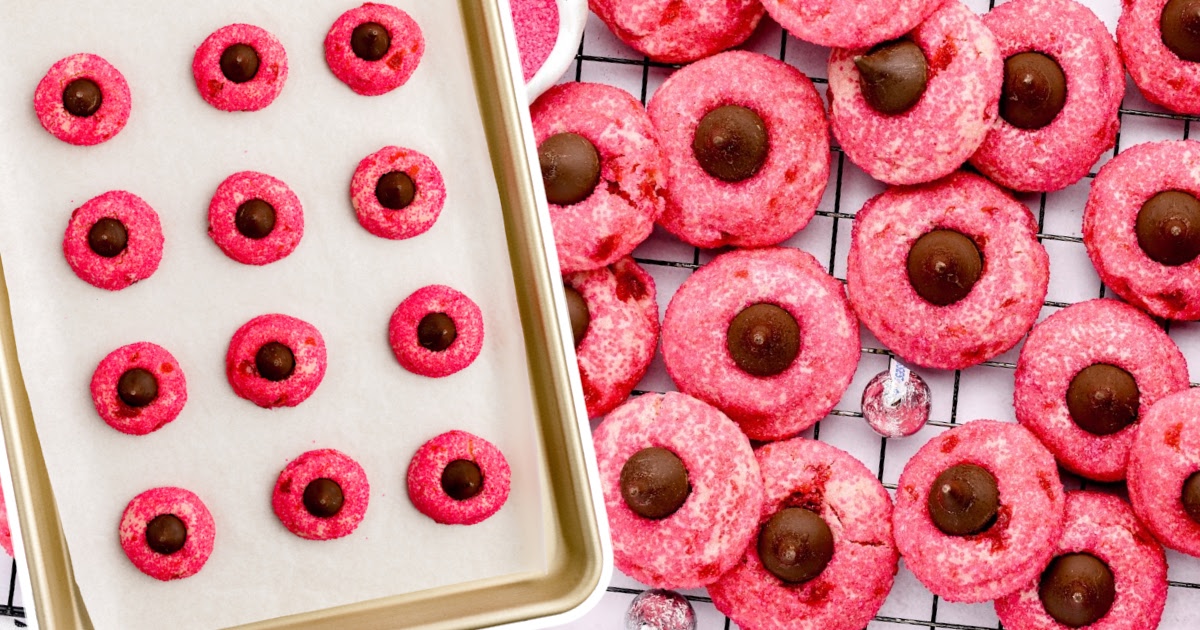
NINTH STEP: Scoop out the dough using a 1-tablespoon cookie scoop. Roll into a ball.
TENTH STEP: Roll the dough ball in the sanding sugar. Gently shake off the excess sanding sugar.
Place the coated cookie dough ball on the prepared baking sheet. Space the cookie dough balls two inches apart.
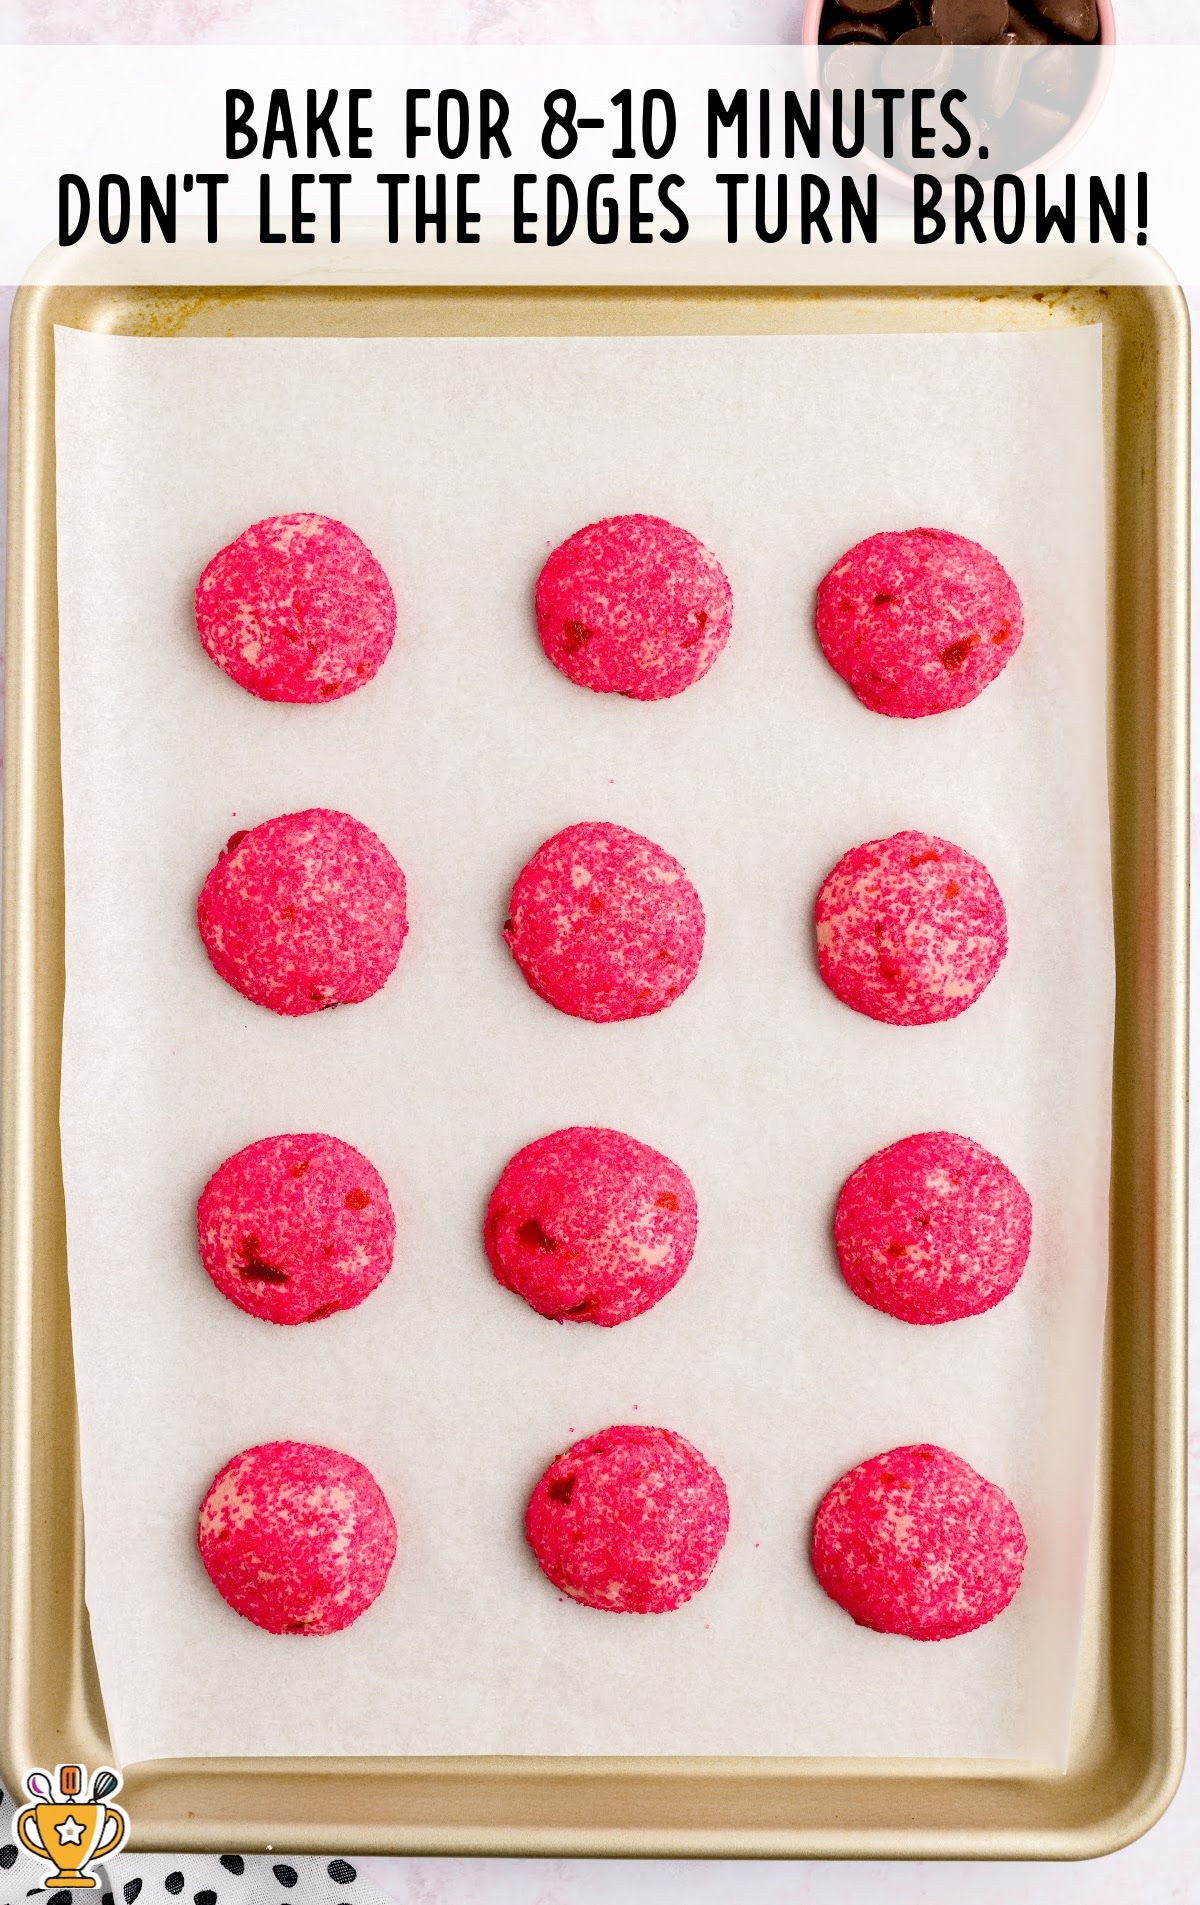
ELEVENTH STEP: Bake in the preheated oven for eight to ten minutes, paying close attention so that the edges do not turn brown. The edges may crack just slightly.
Pro Tip
Oven temperatures vary and may need to be recalibrated periodically to ensure they are accurate. Make sure to check your cookies at the lower end of the recommended baking time.
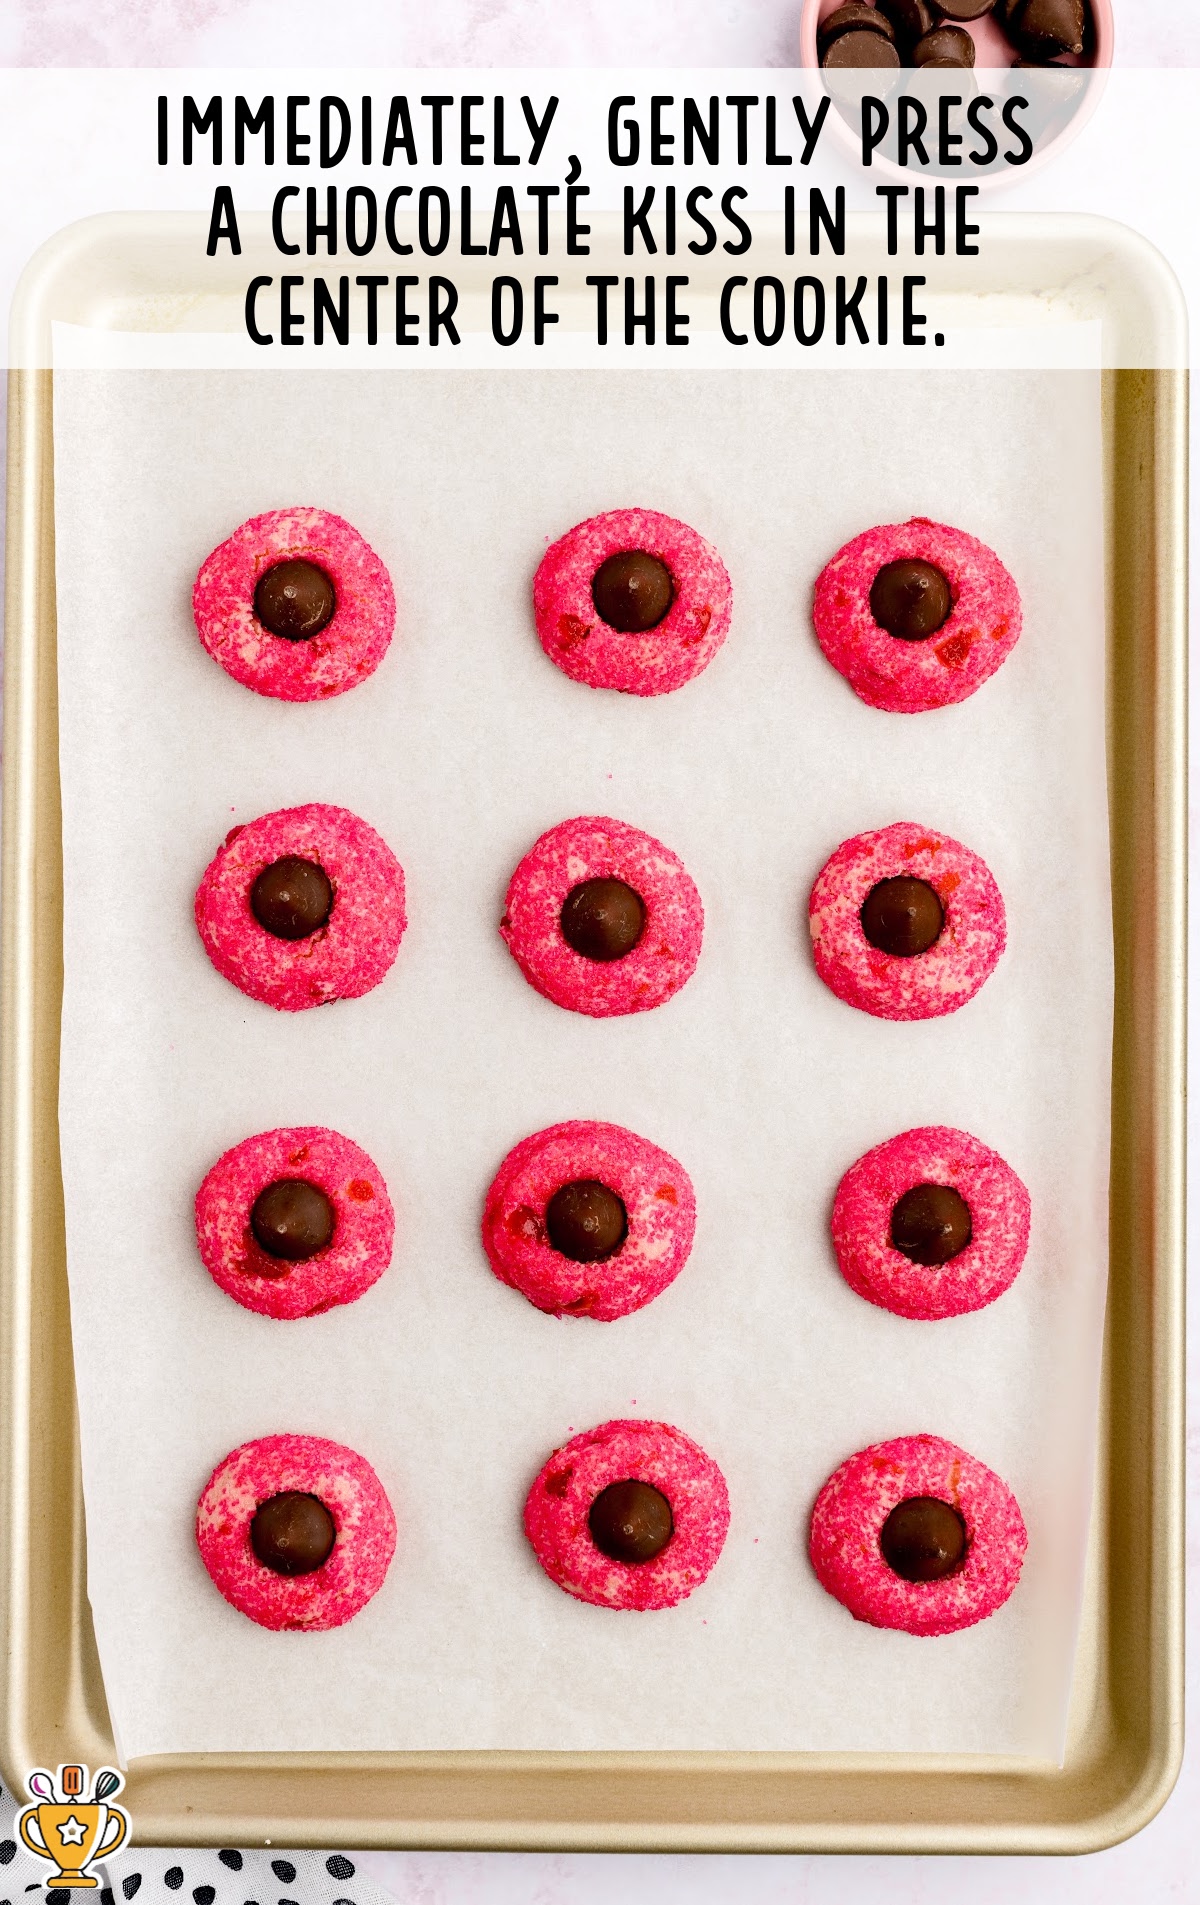
TWELFTH STEP: Once you remove the cookies from the oven, immediately gently press an unwrapped chocolate kiss in the center of the cookie.
The edges may crack when depressed, but that is normal.
Allow the cookies to rest on the cookie sheet for two to three minutes before transferring them to a wire rack to finish cooling completely.
Pro Tip
Make sure to add the kiss to the middle of each cookie base while the cookies are still warm. You want them to stick to the top of the cookie, and they won’t do that if the cookies are already cooled.
How To Serve Cherry Cookies with Hershey Kisses
Cherry kiss cookies are versatile and perfect for all kinds of occasions. Whether it’s a holiday, celebration, or casual day, these cookies always shine! Here are some fun ways to serve them:
- Holiday Parties: These vibrant cookies make a festive addition to any holiday spread. Their cheerful red color and chocolaty center fit Christmas, Valentine's Day, or any celebration. Pair them with hot cocoa or Greek yogurt bark for an irresistible dessert table.
- Kid-Friendly Gatherings: Kids love these cookies with their sweet cherry flavor and fun Hershey's kiss on top. Serve them at birthday parties or school events with homemade raspberry lemonade or chocolate milk for a kid-approved treat.
- Potluck Favorites: Cherry kiss cookies are easy to transport and always a crowd-pleaser. Bring them to potlucks, family reunions, or casual get-togethers. Pair them with no-bake cheesecake bites or cookie dough pretzel bites for a sweet variety everyone will love.

Why You'll Love This Recipe for Cherry Kiss Cookies
Cherry kiss cookies are a beloved favorite for so many delightful reasons. Here’s why our readers can’t get enough:
- A Perfect Blend of Flavors: These cookies combine the soft, buttery cookie base with a sweet cherry twist and a chocolatey kiss. Each bite delivers a balance of textures and flavors that feels like a little piece of joy.
- Festive and Fun: With their bright red hue and playful chocolate topping, these cookies make every occasion feel special. Whether it’s a holiday or a casual day, they add a cheerful touch to any table.
- Easy to Make, Hard to Resist: This recipe is simple enough for beginners yet impressive enough for seasoned bakers. The straightforward steps make these cookies a go-to choice for quick, delicious treats.
Cherry kiss cookies are a celebration of flavor, color, and simplicity that will delight everyone!
Recipe FAQ
What makes cherry kiss cookies soft and chewy?
The butter and maraschino cherry juice create a rich, moist dough that bakes into soft and chewy cookies every time.
Can I use a different type of chocolate for the center?
Yes, milk, dark, or white chocolate kisses work perfectly and add a fun twist to the classic flavor.
How do I keep the cookies from spreading too much?
Chill the dough for twenty to thirty minutes before baking. This helps the cookies hold their shape while baking.
What is the best way to get the bright red color in these cookies?
The maraschino cherry juice adds natural red color, but you can enhance it with a few drops of red food coloring.
Serving FAQ
What’s the best way to serve cherry kiss cookies at a holiday party?
Arrange the cookies on a festive platter. Their bright red color and chocolate topping make them a stunning centerpiece.
Should I serve cherry kiss cookies warm or cooled?
Serve them fully cooled so the chocolate kiss stays firm. This makes them easy to handle and enjoy.
Can I serve cherry kiss cookies for a casual gathering?
Absolutely! These cookies are great for game nights or potlucks. Their vibrant look and flavor always impress guests.
How many cookies should I plan per person when serving?
Plan for two to three cookies per person. Their small size makes them easy to enjoy without overwhelming your guests.
Storage FAQ
Follow the directions, tips, and tricks below for optimal storage of cherry kiss cookies. From making them ahead to reheating, we’ve got you covered to keep your cookies fresh and delicious!
Can I prepare cherry kiss cookies ahead of time?
Yes, you can prepare the dough a day ahead. Chill it in the refrigerator, then bake fresh when you're ready.
What’s the best way to store leftover cherry kiss cookies?
Store cooled cookies in an airtight container at room temperature. They’ll stay fresh and chewy for up to five days.
Can I freeze cherry kiss cookies for later?
Yes, freeze the baked cookies in an airtight container for up to three months. Thaw at room temperature before serving.
How do I keep the cookies fresh for a party?
Store them in a tightly sealed container until serving. Add a slice of bread to the container to maintain softness.

Cherry Kiss Cookies
Cherry kiss cookies combine buttery, cherry-flavored dough with a sweet chocolate kiss for a festive and delicious treat. Perfect for holidays, parties, or anytime you crave a fun and easy dessert!
Did you try this recipe?Let our readers know how it turned out by Leaving a Review!
Ingredients
- 2½ cups all-purpose flour (spooned and leveled)
- ½ teaspoon baking soda
- 1 cup salted sweet cream butter (softened)
- 1¼ cups powdered sugar
- 1 tablespoon maraschino cherry juice
- 1½ teaspoons cherry extract
- ½ teaspoon almond extract
- 3 to 5 drops red food color gel
- ⅓ cup maraschino cherries
- 1 tablespoon maraschino cherries (finely chopped)
- Pink sanding sugar (for rolling the dough balls in. I used a 2.46-ounce container)
- 42 unwrapped chocolate kisses
DIRECTIONS
- Preheat the oven to 350°F. Line 2 baking sheets with parchment paper. Set them aside.
- In a small mixing bowl, whisk together the flour and baking soda. Set it aside.
- Using a stand mixer or a medium-sized mixing bowl and a handheld mixer on medium-high speed, beat together the softened butter and the powdered sugar for 1½ to 2 minutes, until smooth and fluffy.
- Add the cherry juice, cherry extract, and almond extract. Continue beating for another 1 minute until the cherry juice and extracts are well incorporated.
- Add the red food color gel and continue mixing for another 30 seconds, or until the color is uniform and no streaks appear.
- Lower the mixer speed to medium, add the flour mixture, and continue mixing until the flour is well combined.
- Add the chopped cherries and mix just until the cherries are evenly distributed.
- Add the pink sanding sugar to a small mixing bowl. Set it aside.
- Using a 1 tablespoon cookie scoop, scoop out the dough. Roll into a ball.
- Roll the dough ball in the sanding sugar. Gently shake off the excess sanding sugar. Place the coated cookie dough ball on the prepared baking sheet. Space the cookie dough balls 2 inches apart.
- Bake for 8 to 10 minutes, paying close attention that the edges do not turn brown. The edges may crack just slightly.
- Once you remove the cookies from the oven, immediately gently press an unwrapped chocolate kiss in the center of the cookie. The edges may crack when depressed, but that is normal. Allow the cookies to rest on the cookies for 2 to 3 minutes before transferring them to a cooling rack to finish cooling completely.
Notes
- The baking soda is what helps make this recipe so soft and chewy. If you omit the baking soda, you will end up with a crunchy and crisp cookie.
- Oven temperatures vary and may need to be recalibrated periodically to ensure they are accurate. Make sure to check your cookies at the lower end of the recommended baking time.
- Make sure to add the kiss to the middle of each cookie base while the cookies are still warm. You want them to stick to the top of the cookie, and they won’t do that if the cookies are already cooled.
Nutrition
Calories: 159kcal | Carbohydrates: 20g | Protein: 2g | Fat: 9g | Saturated Fat: 5g | Polyunsaturated Fat: 0.3g | Monounsaturated Fat: 2g | Trans Fat: 0.3g | Cholesterol: 19mg | Sodium: 78mg | Potassium: 16mg | Fiber: 1g | Sugar: 11g | Vitamin A: 204IU | Calcium: 19mg | Iron: 1mg
HAVE YOU TRIED THIS RECIPE?Follow me on Pinterest @bestblogrecipes

Leave a Comment