
Last updated on
Peppermint Cheesecakes

These mini peppermint cheesecakes are creamy, festive, and perfect for the holidays. Quick to make, they deliver a delicious minty treat!
Jump to RecipeTable of Contents

These mini peppermint cheesecakes are the perfect holiday treat! With a creamy cheesecake filling and a crunchy Oreo crust, every bite is packed with minty goodness. You can whip them up in under an hour, making them great for parties or festive gatherings. Top with whipped cream and crushed candy canes for a deliciously fun dessert!
This recipe is easy to make, and you can follow the detailed guide below. We’ve included step-by-step photos and directions, along with pro tips and tricks. Plus, check out our frequently asked questions section for any extra help you might need!

More Recipes ⭐ Cheesecake in a Jar | Strawberry Crunch Cheesecake | Peppermint Brownies
These mini peppermint cheesecakes are ready in just under an hour, making them perfect for any holiday party or gathering. The combination of creamy cheesecake and a crunchy Oreo crust creates an irresistible texture in every bite. These festive treats stand out with their refreshing peppermint flavor, topped with whipped cream and crushed candy canes. They're fun to make and even more fun to eat, so you’ll want to try them at home!
Ingredients

What you'll need to make this Peppermint Cheesecake recipe:
For The Crust:
- 1½ cups of honey graham crumbs
- 1¼ cups of butter, melted
To Make The Cream Cheese Filling:
- 2 (8-ounce) packages of cream cheese, room temperature
- ⅓ cup of granulated sugar
- 2 eggs, room temperature
- ¼ cup of sour cream
- 1 teaspoon of peppermint extract
- 1 cup of Hershey’s Kisses in peppermint flavor, quartered + 12 whole Hershey’s Kisses (optional)
For The Whipped Cream (optional)
- 1 cup of heavy whipping cream
- ¾ cup of powdered sugar
Substitutions and Additions
Personalize your Mini Peppermint Cheesecake bites by swapping out ingredients and adding delicious extras! These simple changes make your cheesecakes uniquely yours. Here are some top substitutions and additions.
Top with Hot Fudge: Drizzle hot fudge sauce over the cheesecakes for a decadent topping that complements the mint. These easy substitutions and additions can easily be swapped out while still maintaining the deliciousness of this delicious mini mint cheesecakes.
Substitute Oreo Crust: Swap the Oreo crust for a graham cracker or chocolate wafer crust for a different base flavor.
Substitute Peppermint: Use vanilla extract instead of peppermint for a classic cheesecake twist.
Add Chocolate Chips: Stir in mini chocolate chips to the cheesecake filling for extra richness and texture.
How to Make Peppermint Cheesecakes
Follow along with our step-by-step pictures, instructions, and helpful tips and tricks listed below. Let’s get started making these festive peppermint cheesecake cups! You'll have fun creating this delicious treat in no time.
FIRST STEP: Preheat the oven to 350°F. Line the muffin pan with cupcake liners.
Pro Tip
Parchment paper or foil-lined liners are the easiest to peel from the cheesecake filling.
SECOND STEP: In a mixing bowl, combine the honey graham crumbs and melted butter until well mixed.
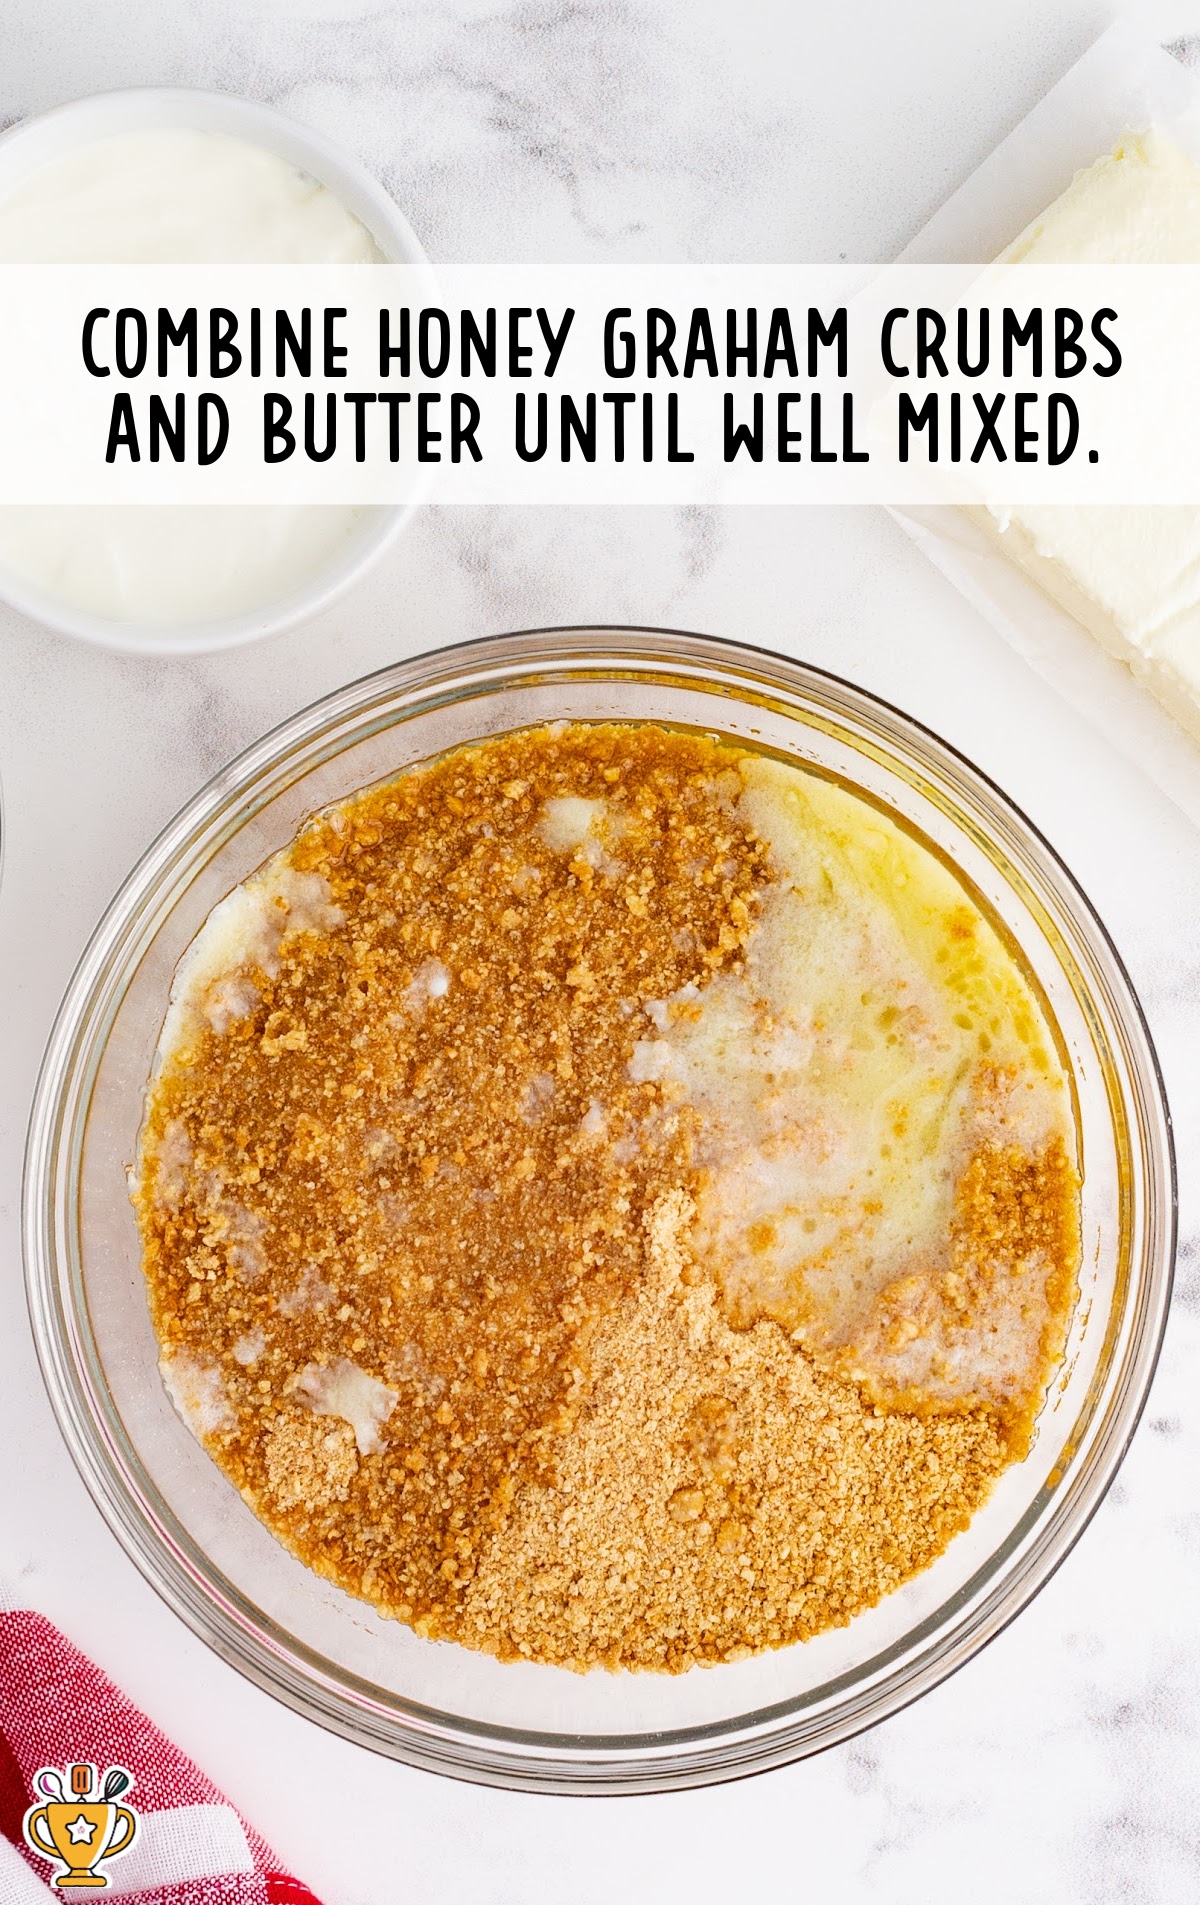
THIRD STEP: Scoop about one tablespoon of the cookie crumb mixture into each muffin tin.
Using your fingertips, press the mixture into an even layer until it’s evenly packed.
FOURTH STEP: Bake the cookie crust for five minutes. Allow it to cool on the countertop while you prepare the cheesecake batter.
Pro Tip
Oven temperatures vary and may need to be recalibrated periodically to ensure they are accurate. Make sure to keep a close eye on your crust as the suggested baking time approaches.
FIFTH STEP: Reduce the oven to 325°F.
SIXTH STEP: In a large bowl, combine the cream cheese and sugar until well incorporated using a hand mixer on low speed.
Pro Tip
Make sure the cream cheese is fully warmed to room temperature. This is important! If you choose to use it while it’s cold or even chilled, it will cause lumps in the batter mixture.
SEVENTH STEP: Add in the eggs, sour cream, and peppermint extract.
Beat for about one minute. Mix in the quartered peppermint kisses with a wooden spoon.
Pro Tip
Be careful not to over beat the cream cheese mixture because you don’t want to incorporate air into the mixture. Make sure you always beat at l ow speed. Over beating can cause cracks in the cheesecake once baked.

EIGHTH STEP: Using a cookie scoop, scoop the cream cheese filling into each cupcake liner until it lines right at the top of the cupcake liner.

NINTH STEP: Bake cheesecakes in the oven for 20 to 22 minutes. Cool cheesecake on top of the countertop.
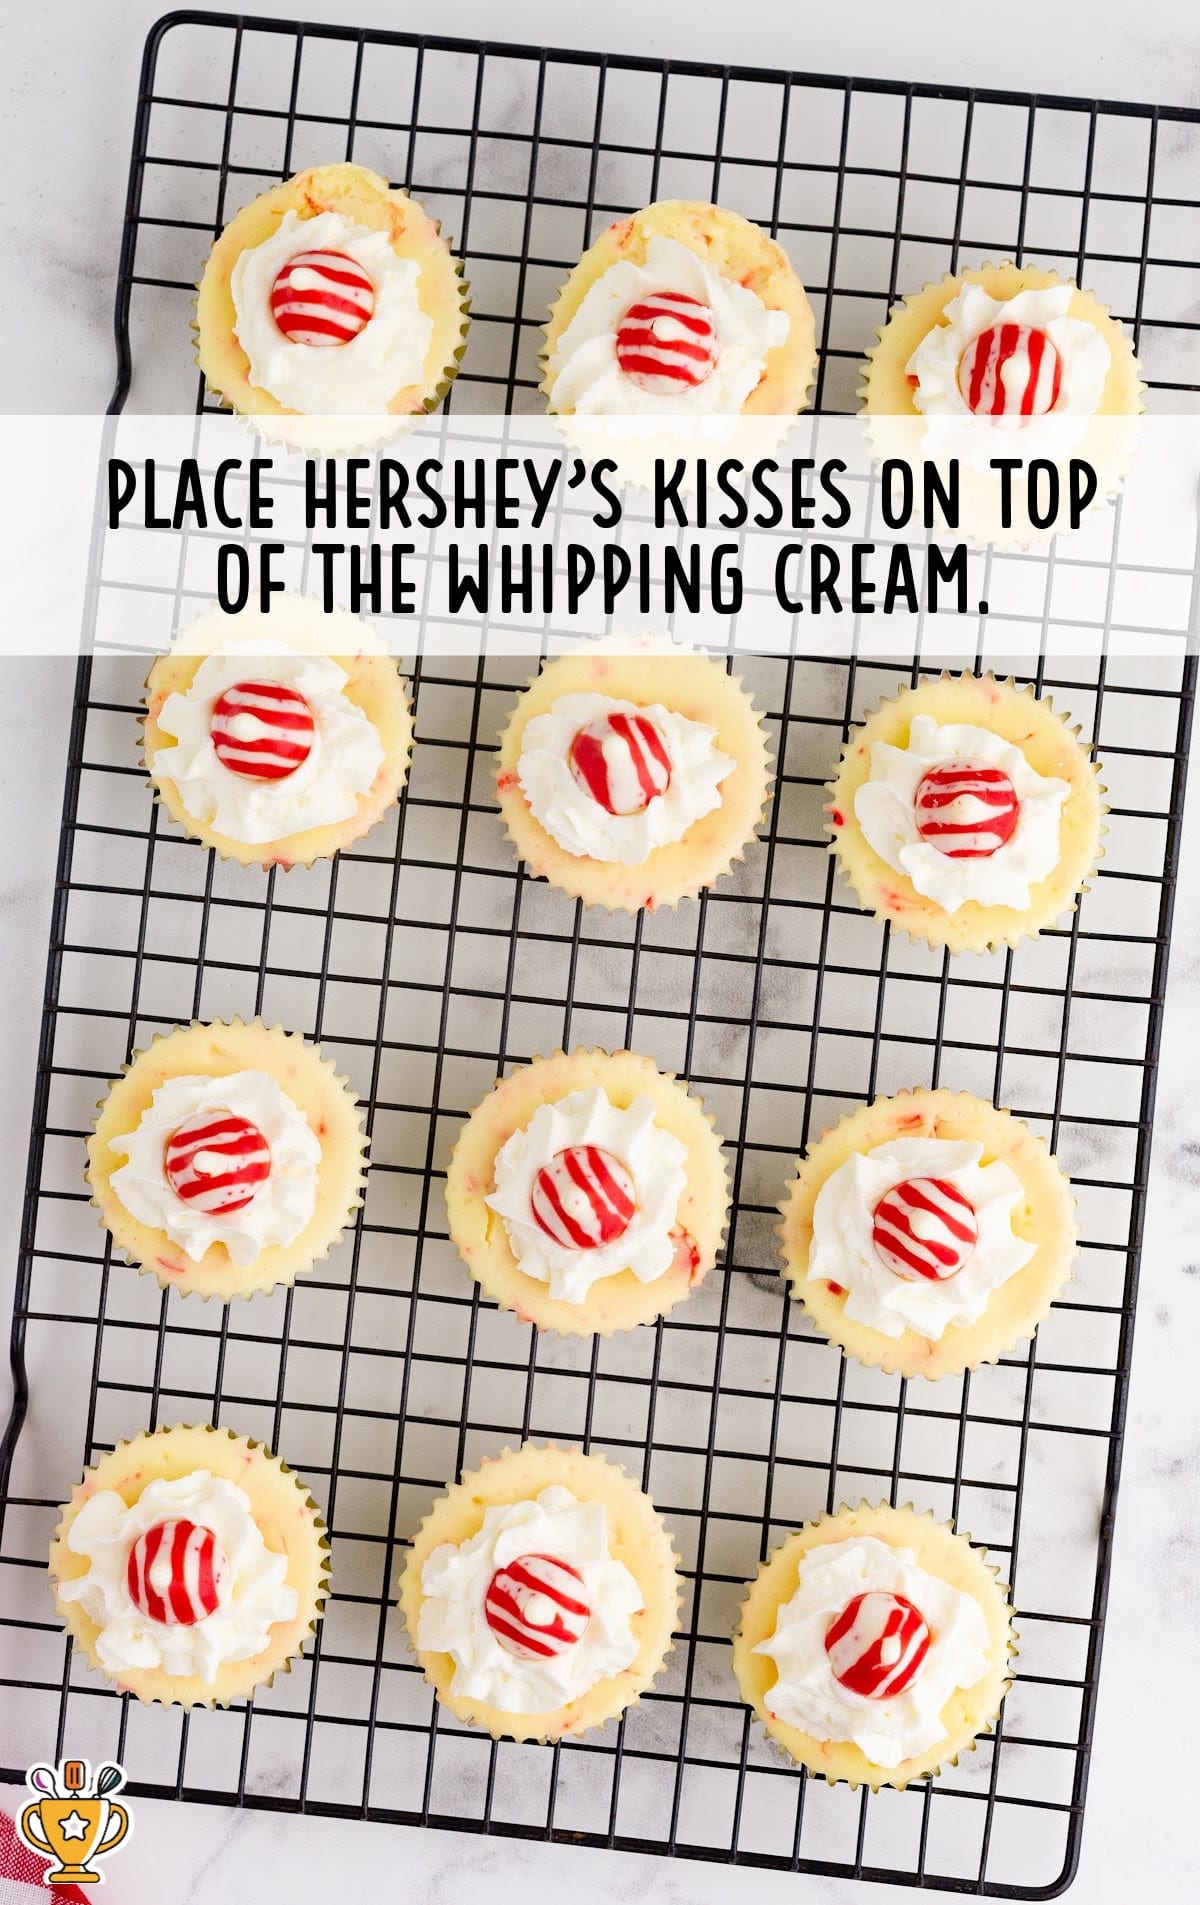
TENTH STEP: In a medium mixing bowl, beat heavy whipping cream and powdered sugar with a handheld mixer. Beat until it forms stiff peaks.
ELEVENTH STEP: Transfer the whipping cream into a piping bag.
TWELFTH STEP: Pipe the cream onto the middle of the cheesecake cups.
THIRTEENTH STEP: Place Hershey’s Kisses on top of the whipping cream.
STEP FOURTEENTH: Refrigerate overnight.
How To Serve These Mini Cheesecakes
You can serve these white chocolate peppermint mini cheesecakes in so many fun ways! Whether it’s for a holiday gathering or a casual treat, they’re perfect for any occasion.
Holiday Parties: These cheesecakes are ideal for Christmas or winter holiday parties. Their festive peppermint flavor and candy cane topping make them a crowd-pleaser. Pair with hot cocoa or a festive punch for an extra special treat!
Kid-Friendly Desserts: Kids love these mini cheesecakes because they’re bite-sized and topped with colorful candy! Serve them at birthday parties or family gatherings. Add a batch of sugar cookies or chocolate cupcakes for a fun dessert spread.
Winter Treats: These cheesecakes are perfect for cozying up on a chilly winter day. Their cool peppermint flavor pairs wonderfully with warm drinks. Serve them alongside hot apple cider or spiced lattes for a delicious winter dessert!

Why You'll Love This Peppermint Cheesecakes Recipe
Mini mint cheesecake is more than just a dessert—it's a favorite among our readers for several delicious reasons:
A Festive Flavor Treat: These cheesecakes blend creamy cheesecake with the cool, refreshing flavor of peppermint, making each bite a holiday delight. The Oreo crust adds a crunchy contrast, making these cheesecakes irresistible.
Perfect for Any Occasion: Whether it’s a holiday party or a cozy winter night in, these peppermint cheesecakes fit every occasion. They’re bite-sized and easy to serve, making them ideal for gatherings of any size.
Easy and Fun to Make: Readers love how simple this recipe is with step-by-step directions that make it fun to prepare. You can create this impressive dessert quickly without stress, perfect for both beginner and experienced bakers.
These mini peppermint cheesecakes will quickly become a beloved addition to your recipe collection, bringing joy to any occasion!

Recipe FAQ
How do I keep my mini cheesecakes from cracking?
To prevent cracks, avoid overmixing the batter and bake at a consistent, low temperature. Let them cool gradually.
Can I use silicone muffin liners for this recipe?
Yes, silicone muffin liners work great and make it easier to remove the cheesecakes once chilled and set.
How long should I chill mini peppermint cheesecakes before serving?
Chill the cheesecakes for at least two hours to ensure they set properly and have the best texture.
Why do I need to use room temperature ingredients for the cheesecake filling?
Using room temperature ingredients ensures a smoother, creamier filling without lumps, creating the perfect texture in your cheesecakes.

Serving FAQ
How should I garnish mini peppermint cheesecakes before serving?
Top each cheesecake with whipped cream, crushed candy canes, or chocolate shavings for a festive presentation.
Can I serve mini peppermint cheesecakes warm or cold?
Serve these mini cheesecakes chilled for the best flavor and texture. They hold their shape and taste delicious when cold.
What’s the best way to plate mini peppermint cheesecakes for a party?
Arrange the cheesecakes on a decorative platter, spacing them out for an elegant, eye-catching party display.
How many mini peppermint cheesecakes should I serve per person?
Plan on serving one to two mini cheesecakes per person, depending on the size of your dessert selection.

Storage FAQ
Follow the directions, tips, and tricks below for optimal storage of these mini peppermint cheesecakes. From making ahead to serving them later, we've got you covered!
Can I make mini peppermint cheesecakes ahead of time?
Yes, you can make them ahead and chill in the fridge for up to two days before serving.
What’s the best way to store leftover mini peppermint cheesecakes?
Store any leftover cheesecakes in an airtight container in the fridge. They will stay fresh for up to three days.
Can I freeze mini peppermint cheesecakes?
Yes, you can freeze the cheesecakes without the toppings. Store in an airtight container for up to one month.
How do I thaw and serve frozen mini peppermint cheesecakes?
Thaw the cheesecakes in the fridge overnight. Add your toppings and serve them chilled for the best flavor.


Peppermint Cheesecakes
These mini peppermint cheesecakes are creamy, festive, and perfect for the holidays. Quick to make, they deliver a delicious minty treat!
Did you try this recipe?Let our readers know how it turned out by Leaving a Review!
Ingredients
Crust
- 1½ cups honey graham crumbs
- 1¼ cups butter (melted)
Cream Cheese Filling
- 16 ounces cream cheese (room temperature)
- ⅓ cup granulated sugar
- 2 eggs (room temperature)
- ¼ cup sour cream
- 1 teaspoon peppermint extract
- 1 cup Hershey’s Kisses in peppermint flavor (quartered plus 12 whole Hershey’s Kisses (optional))
Whipping Cream (optional)
- 1 cup heavy whipping cream
- ¾ cup powdered sugar
DIRECTIONS
- Preheat the oven to 350°F. Line the muffin pan with cupcake liners.
- In a mixing bowl, combine honey graham crumbs and butter until well mixed.
- Scoop about 1 tablespoon of cookie crumb mixture into each muffin tin. Using your fingertips, press the mixture into an even layer until it’s evenly packed.
- Bake the cookie crust for 5 minutes. Allow it to cool on the countertop while you prepare the cheesecake batter.
- Reduce the oven to 325°F.
- In a large mixing bowl, combine cream cheese and sugar until well incorporated using a hand mixer on low speed.
- Add in eggs, sour cream, and peppermint extract. Beat for about 1 minute. Mix in the quartered peppermint kisses with a wooden spoon.
- Using a cookie scoop, scoop the cream cheese filling into each cupcake liner until it lines right at the top of the cupcake liner.
- Bake in the oven for 20 to 22 minutes. Let cool on top of the countertop.
- Meanwhile, in a medium mixing bowl, beat together heavy whipping cream and powdered sugar with a handheld mixer. Beat until it forms a peak.
- Transfer the whipping cream into a piping bag.
- Pipe the cream onto the middle of the cheesecake cups.
- Place Hershey’s Kisses on top of the whipping cream.
- Refrigerate overnight.
Notes
- Parchment paper or foil-lined liners are the easiest to peel from the cheesecake filling.
- Oven temperatures vary and may need to be recalibrated periodically to ensure they are accurate. Make sure to keep a close eye on your crust as the suggested baking time approaches.
- Make sure the cream cheese is fully warmed to room temperature. This is important! If you choose to use it while it’s cold or even chilled, it will cause lumps in the batter mixture.
- Be careful not to overbeat the cream cheese mixture because you don’t want to incorporate air into the mixture. Make sure you always beat at low speed. Overbeating can cause cracks in the cheesecake once baked.
Nutrition
Calories: 479kcal | Carbohydrates: 25g | Protein: 5g | Fat: 41g | Saturated Fat: 25g | Polyunsaturated Fat: 2g | Monounsaturated Fat: 11g | Trans Fat: 1g | Cholesterol: 139mg | Sodium: 363mg | Potassium: 110mg | Fiber: 0.4g | Sugar: 17g | Vitamin A: 1442IU | Vitamin C: 0.1mg | Calcium: 74mg | Iron: 1mg
HAVE YOU TRIED THIS RECIPE?Follow me on Pinterest @bestblogrecipes

Comments
Mike B says
So yummy! For a once in a while treat!