
Last updated on
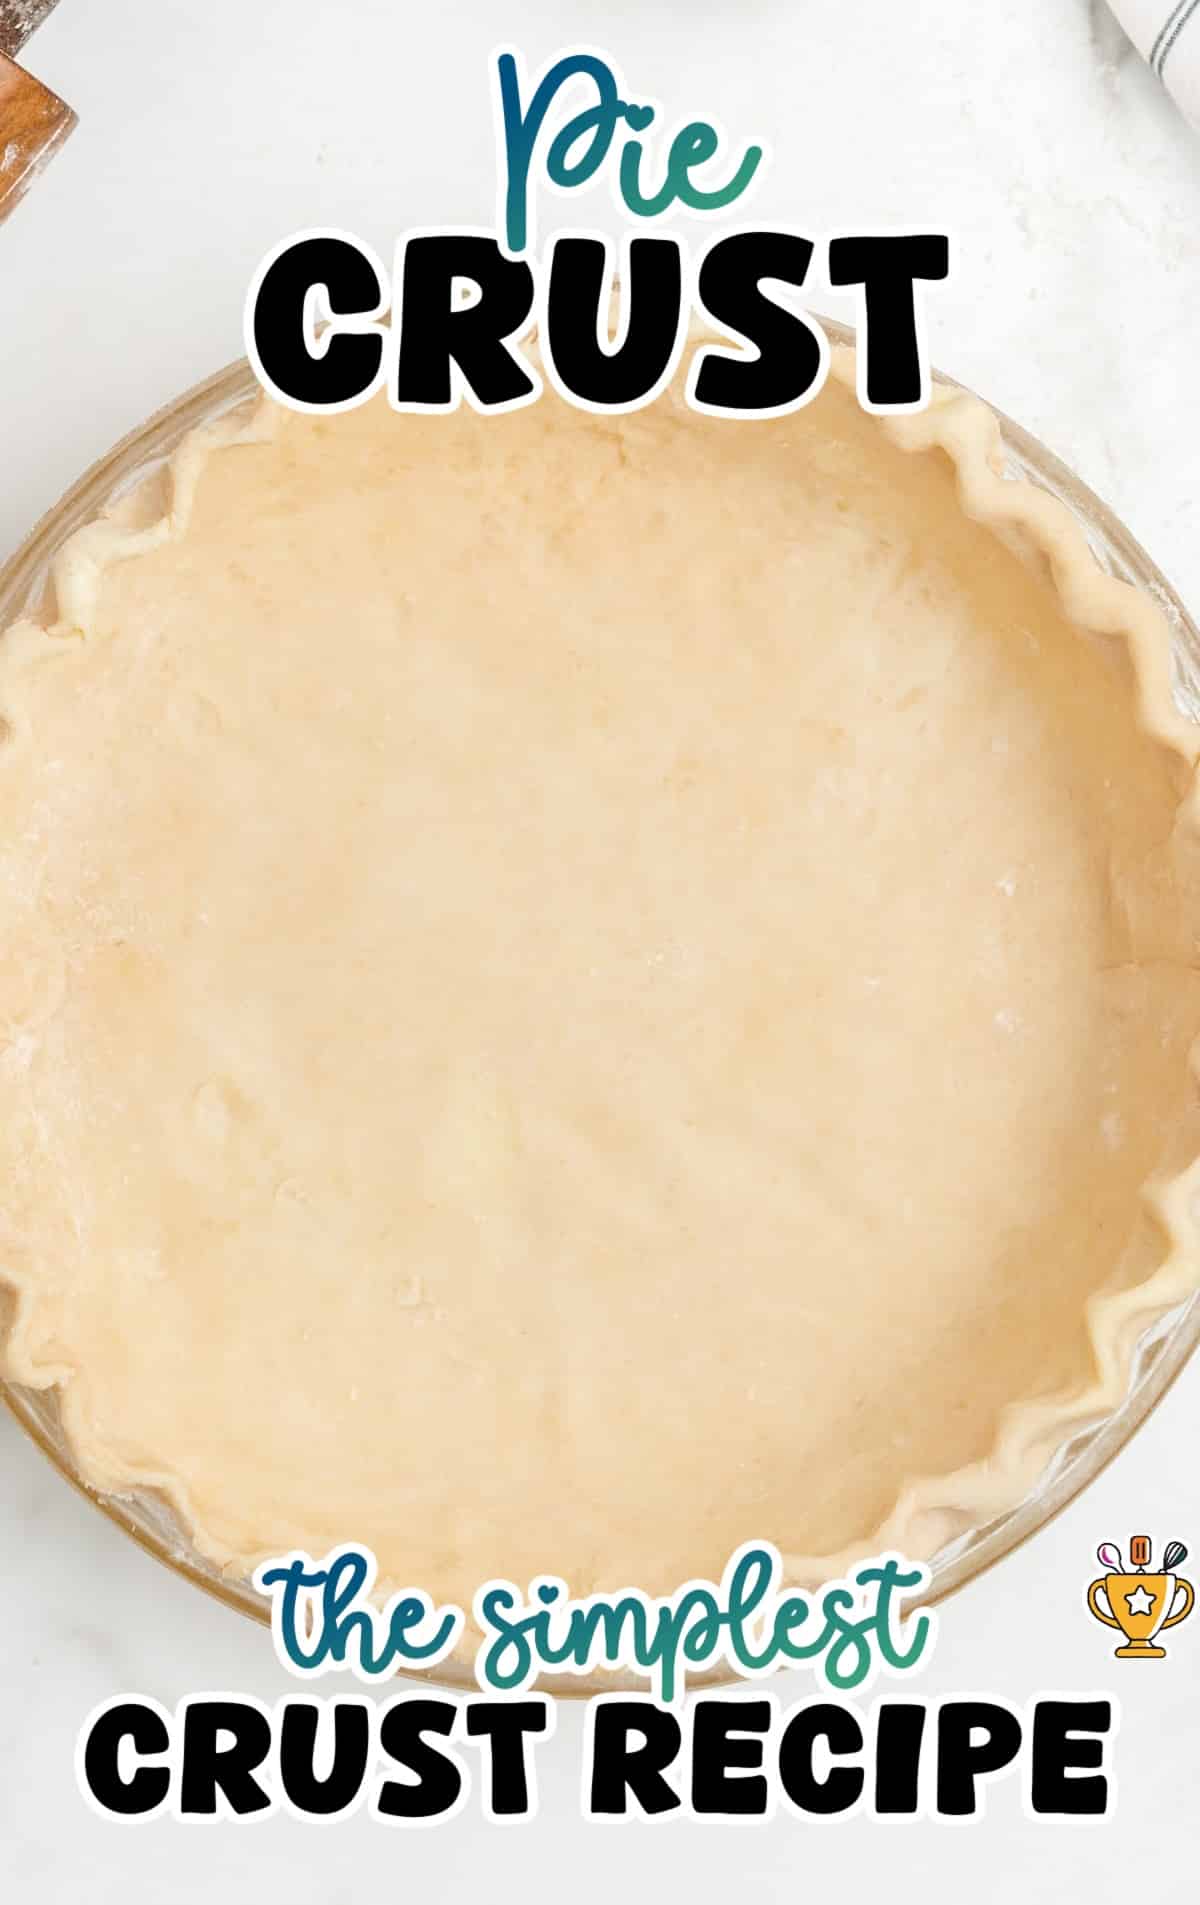
Pie Crust

This homemade pie crust turns out golden, flaky, and crisp every time with just a few basic ingredients. Skip the store-bought crust and make your pies taste even better.
Jump to RecipeTable of Contents
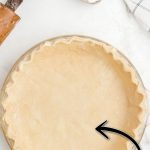


Make this flaky homemade pie crust recipe with just a few simple ingredients and no stress. It turns out golden, crisp, and buttery every time. You can use it for sweet or savory pies all year long. Follow this easy guide and skip the store-bought stuff next time.
This pie crust recipe is easy to make, even for beginners. Follow the step-by-step photos and directions to get it just right. We’ve added helpful pro tips and tricks, plus answers to the most frequently asked questions so you feel confident from start to finish.
More Recipes ⭐ Old Fashioned Apple Pie |Cherry Pie Filling Desserts | Butterscotch Delight
This easy pie crust recipe takes just thirty minutes to prep and always comes out golden, flaky, and full of flavor. Use it for holiday pies, potlucks, or weeknight dinners when you want something homemade and tasty.
It beats store-bought crusts every time and only needs a few pantry staples. Follow the tips below and bake it like a pro.
Ingredients
What you'll need to make this pie dough recipe:
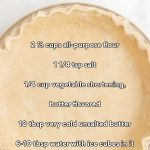
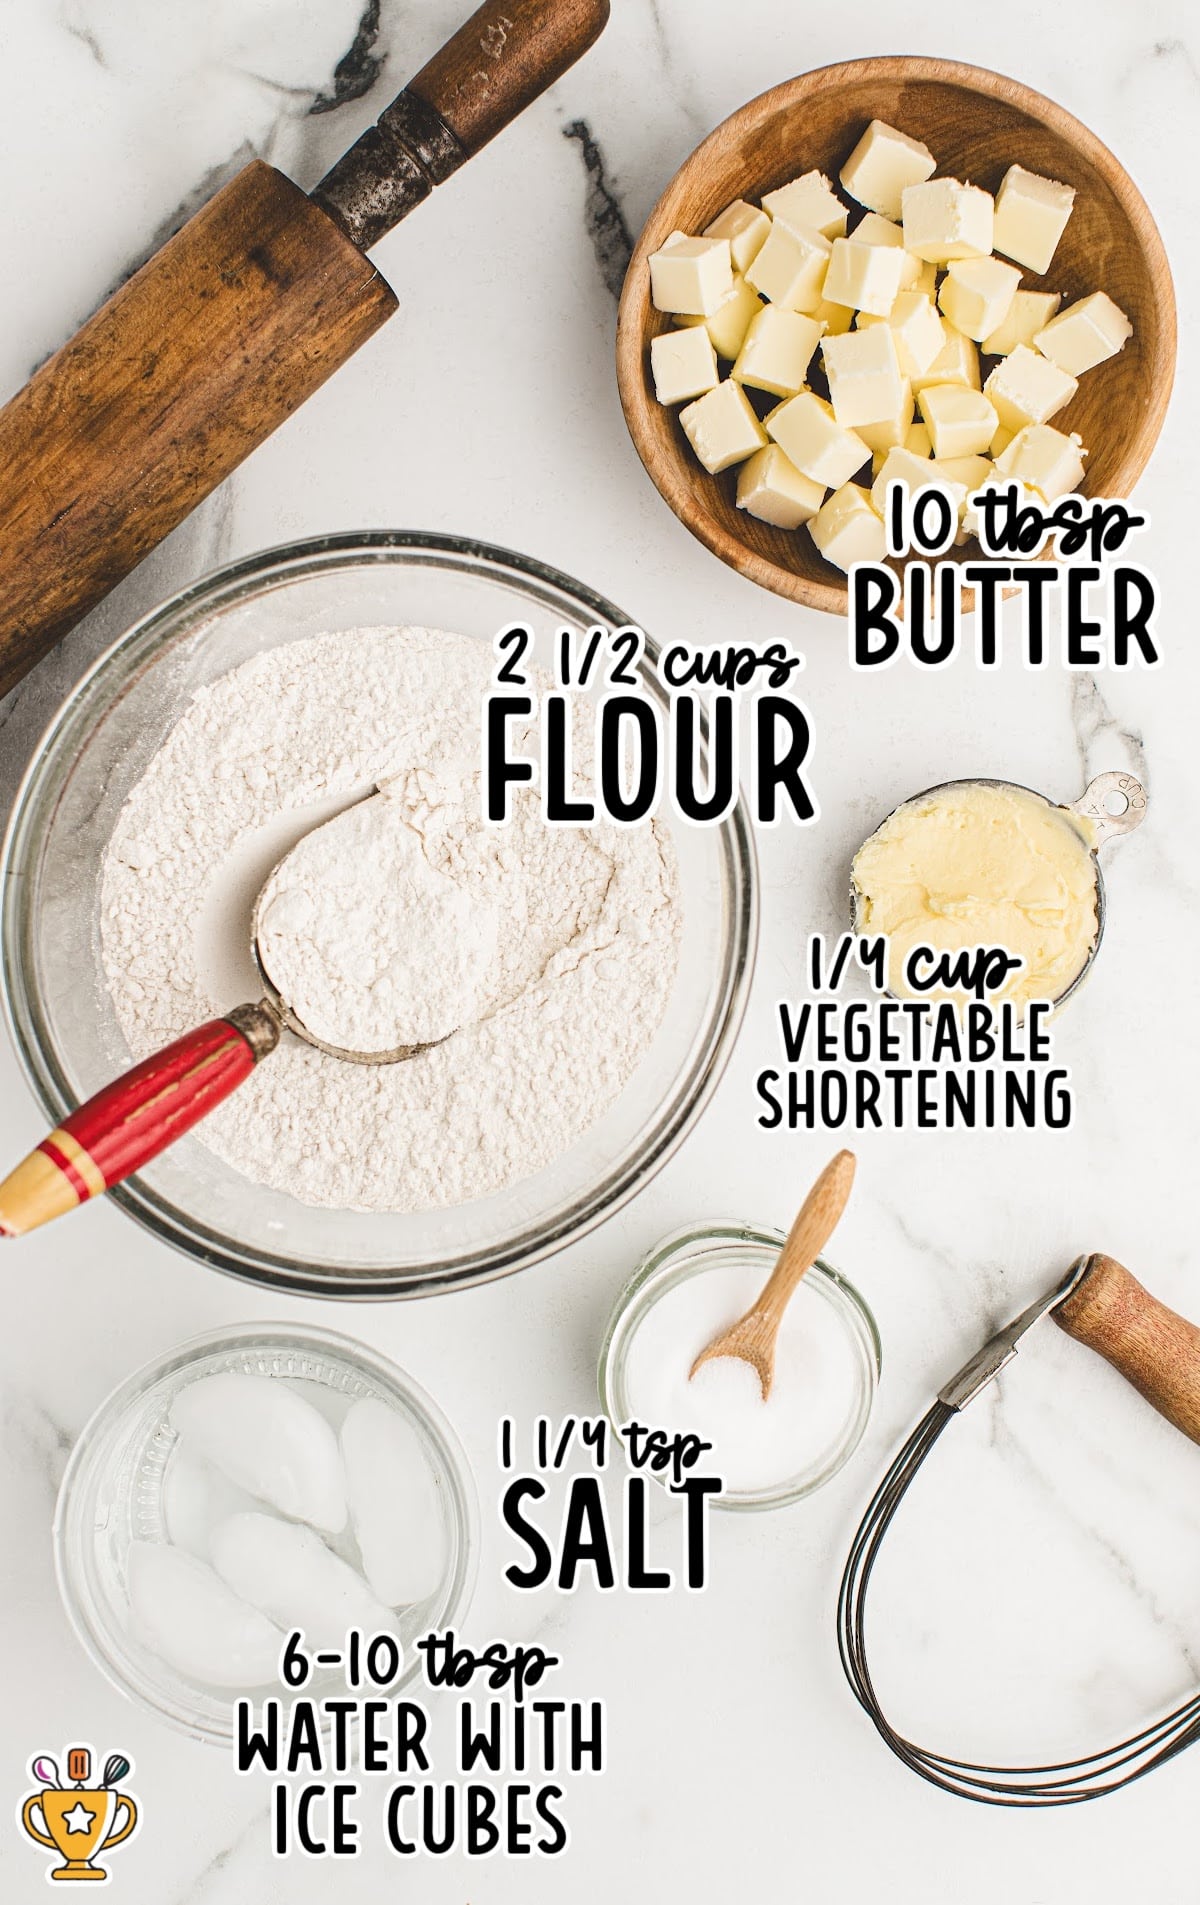
- 2½ cups of all-purpose flour
- 1¼ teaspoons of salt
- ¼ cup of vegetable shortening, butter flavored
- 10 tablespoons of very cold unsalted butter
- 6 to 10 tablespoons of water, with ice cubes in it
Use ice water to bring the dough together and get the right texture without making it sticky or soft. Keep the dough cold so the butter stays solid.
Cold butter creates those flaky layers you want. Add just enough water to shape the dough—too much makes it tough and chewy.
Substitutions and Additions
- Substitute Butter: Swap in shortening or lard for a crust that’s extra flaky and holds its shape while baking.
- Add Sugar: For dessert pies, mix in a tablespoon of sugar to sweeten the crust just a little bit.
- Substitute All-Purpose Flour: Try pastry flour for a softer texture and a more tender homemade pie crust.
- Add Seasoning: Mix in a pinch of garlic powder or dried herbs if you're using the crust for savory pies.
- Substitute Ice Water: Use cold buttermilk instead of water to give your crust a richer, tangier flavor.
How to Make Pie Crust
Follow along with our step-by-step pictures and instructions to make the best homemade pie crust. Don’t skip the tips and tricks below—they’ll help everything turn out just right. Grab your ingredients and let’s get started!
FIRST STEP: Measure your flour by gently spooning it into a measuring cup and then sweeping off any excess, using the back of a butter knife.
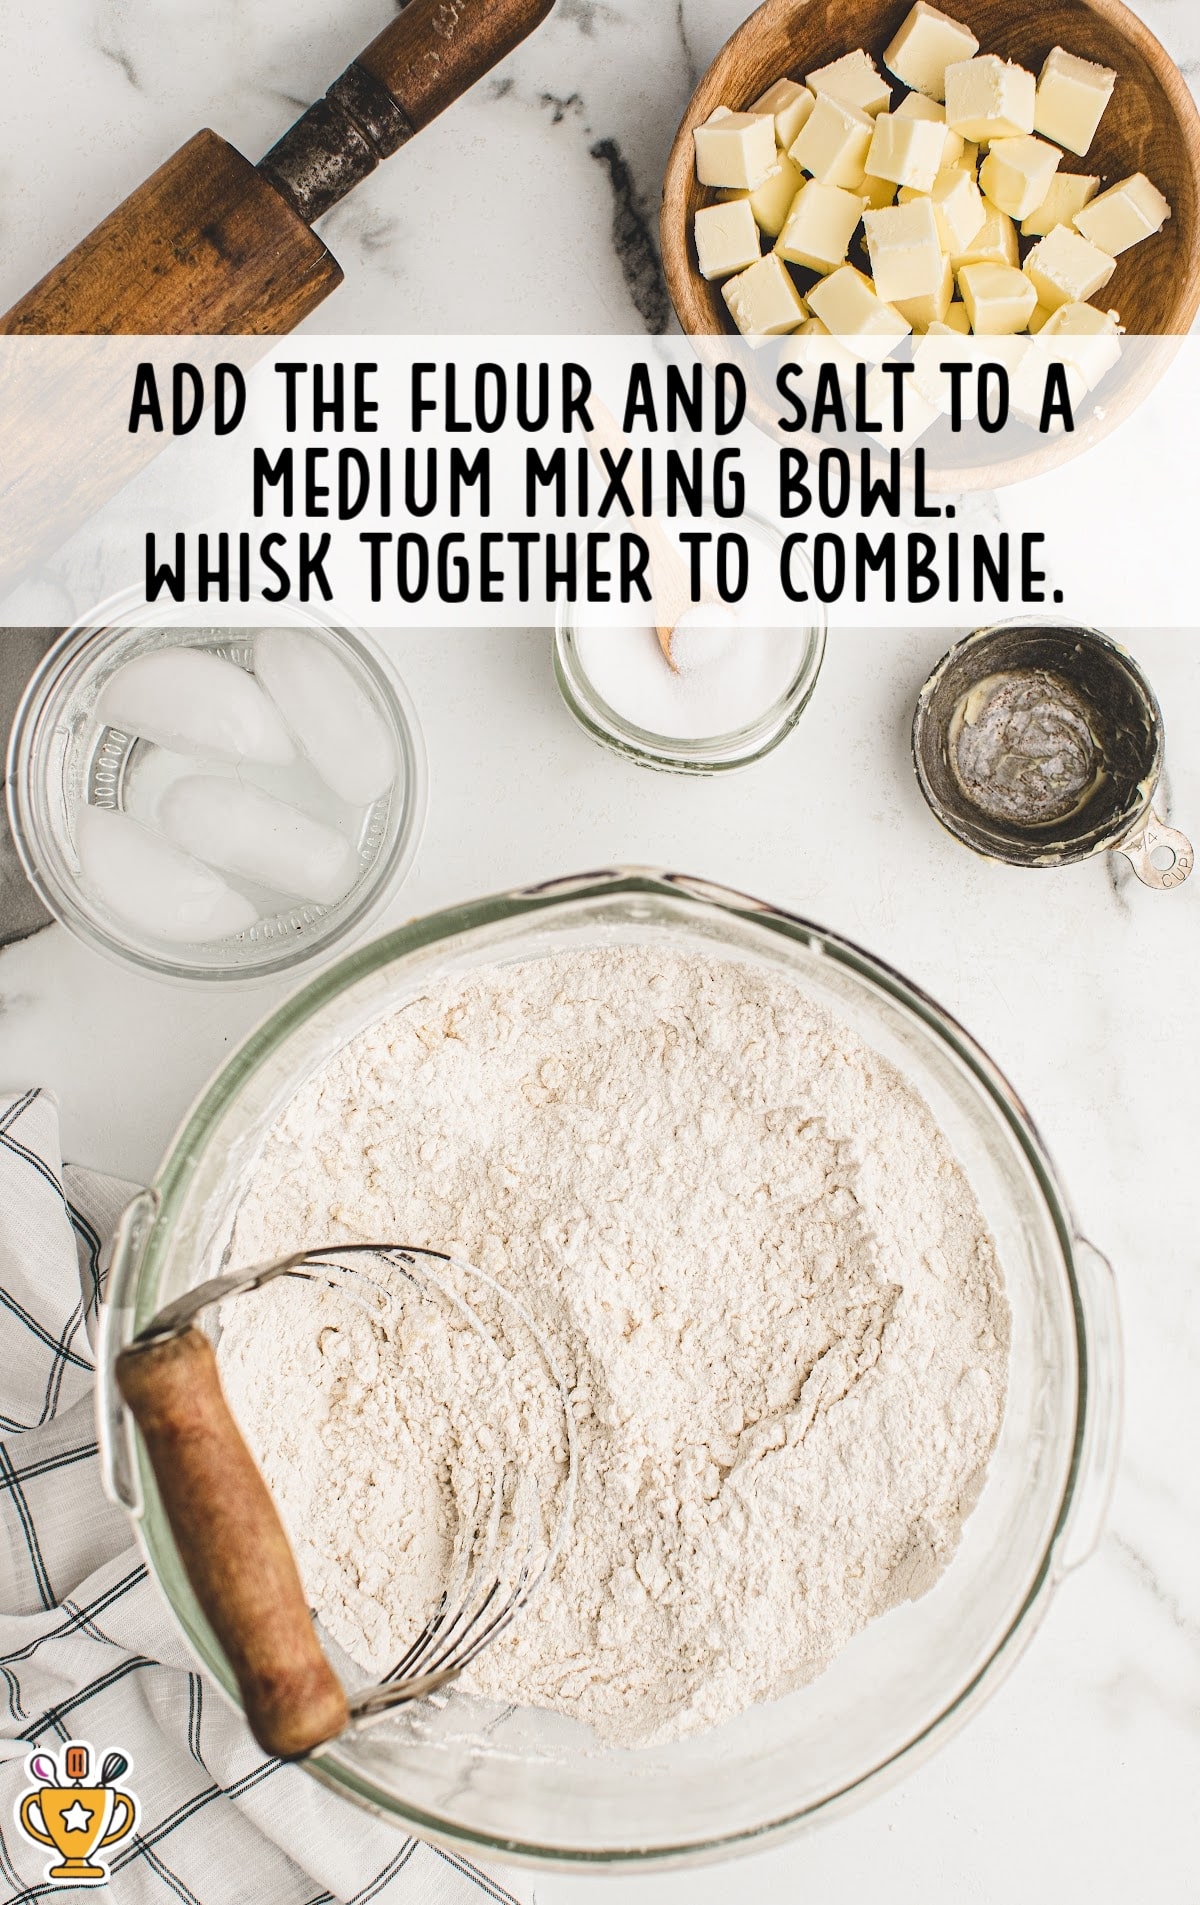
Add the measured flour and salt to a medium mixing bowl.
Whisk together to combine. Add the shortening, working it into the flour until the mixture is crumbly. It should resemble coarse sand and thoroughly combine.
Pro Tip
This is where using a pastry cutter works wonders.
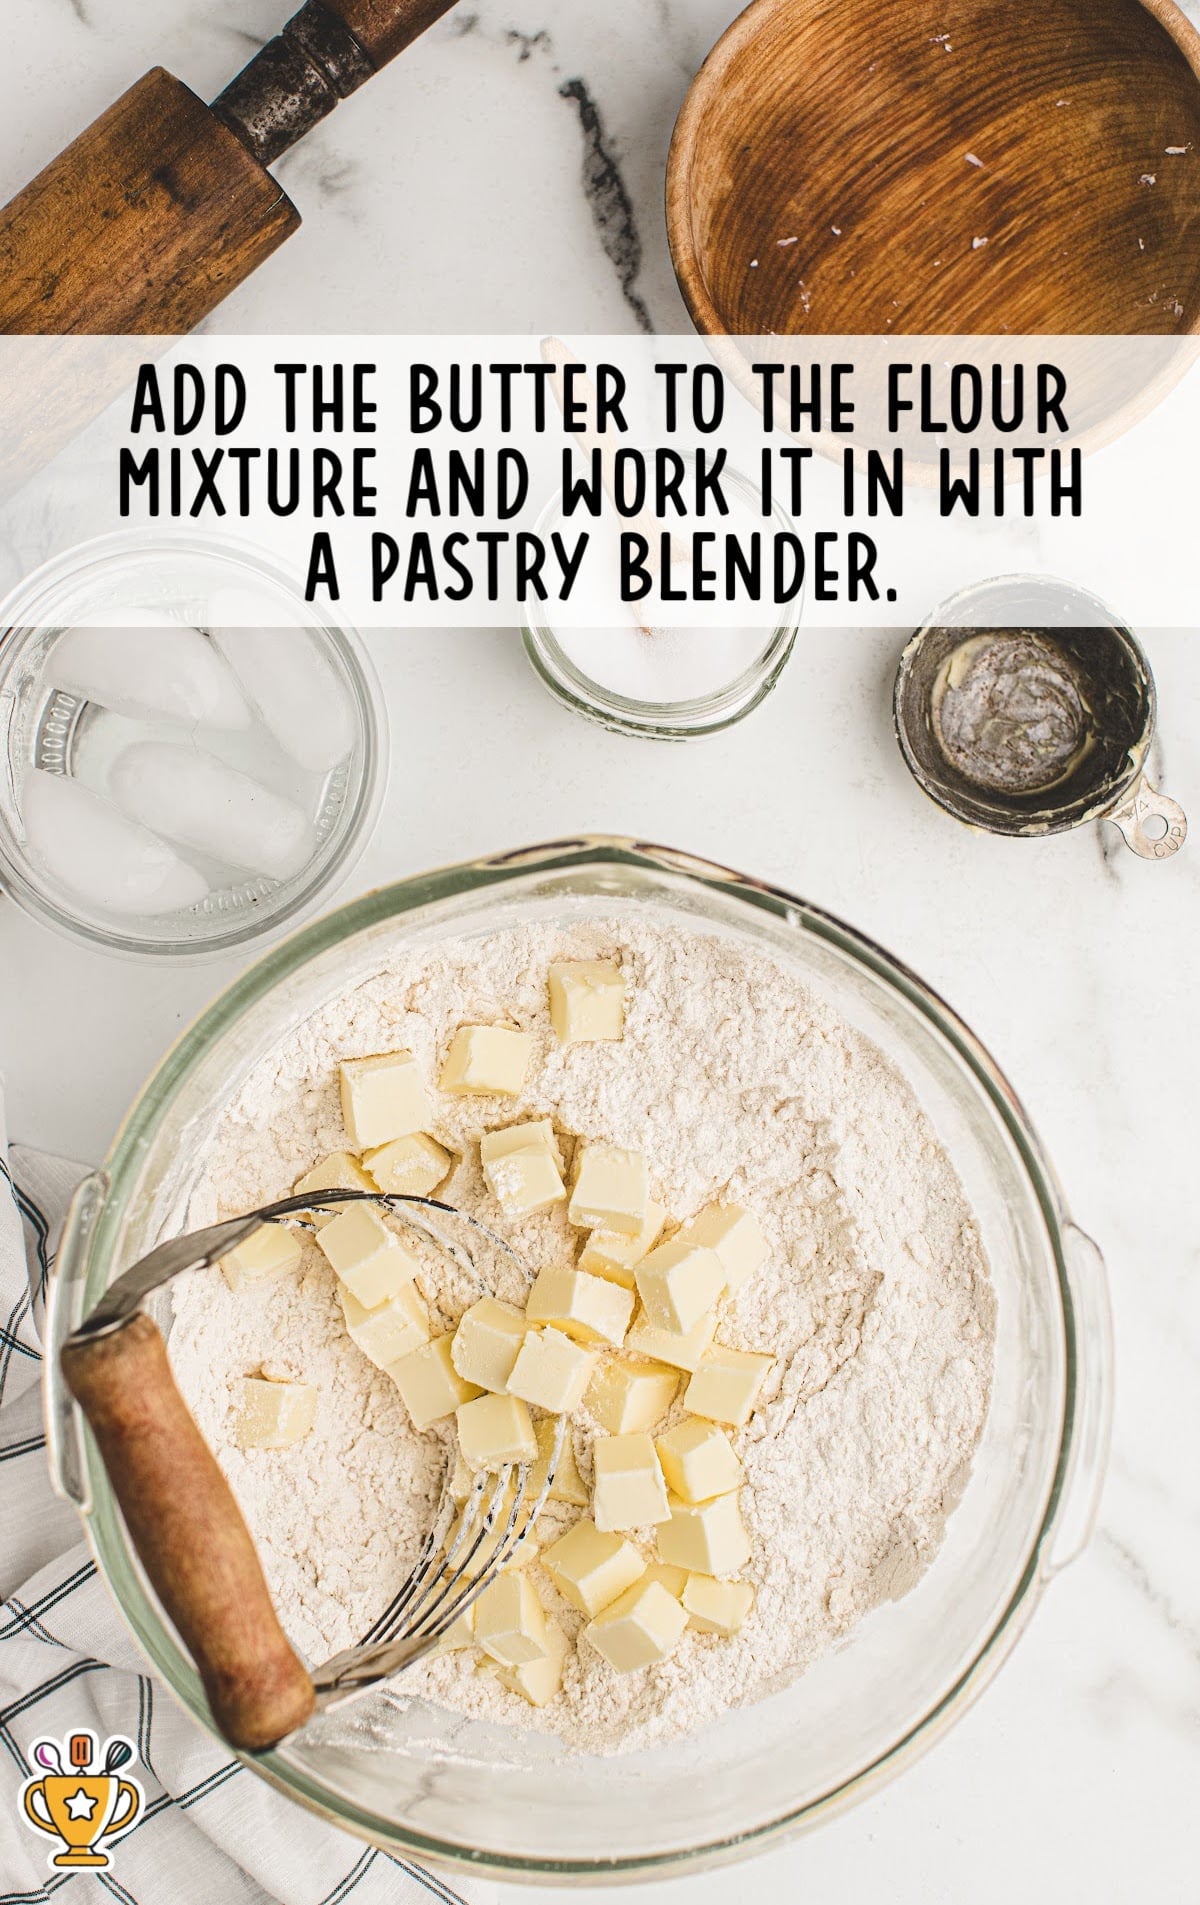
SECOND STEP: Cut the cold butter into small cubes, cutting each tablespoon into four pieces.
Add the butter to the flour mixture and quickly work it into the mix with a pastry blender.
You can also use your hands to crumble the butter pieces in with the flour.
The mixture should be somewhat uneven, with bigger chunks of butter mixed in with the smaller pieces.
Pro Tip
Bits of butter help your crust come out more flaky and delicious, so it’s okay to have some chunks throughout the mix.
THIRD STEP: Drizzle four tablespoons of ice water over the mixture. Toss gently to combine.
Add only enough additional tablespoons of water to make it hold together when you gather it up and squeeze it in your hand.
You don’t want to knead your dough or add too much water, as this will create a tougher crust.

FOURTH STEP: Transfer the mixture to a piece of parchment paper. Fold the dough into a rectangle, and then fold the dough into thirds.
Roughly shape it into a rectangle about 7×15. Then fold the right side to the middle about one-third, then fold the left side to the middle.
Flatten back out into a rectangle again and repeat. It should resemble a business letter in shape. If needed, spray a little bit of cold water on any dry areas.
Flatten and fold again, repeating this process until it has been incorporated. Folding the dough this way will create more flaky layers in your crust.
Pro Tip
Make sure not to handle the dough too much with your hands as they will heat up the dough and melt the butter.

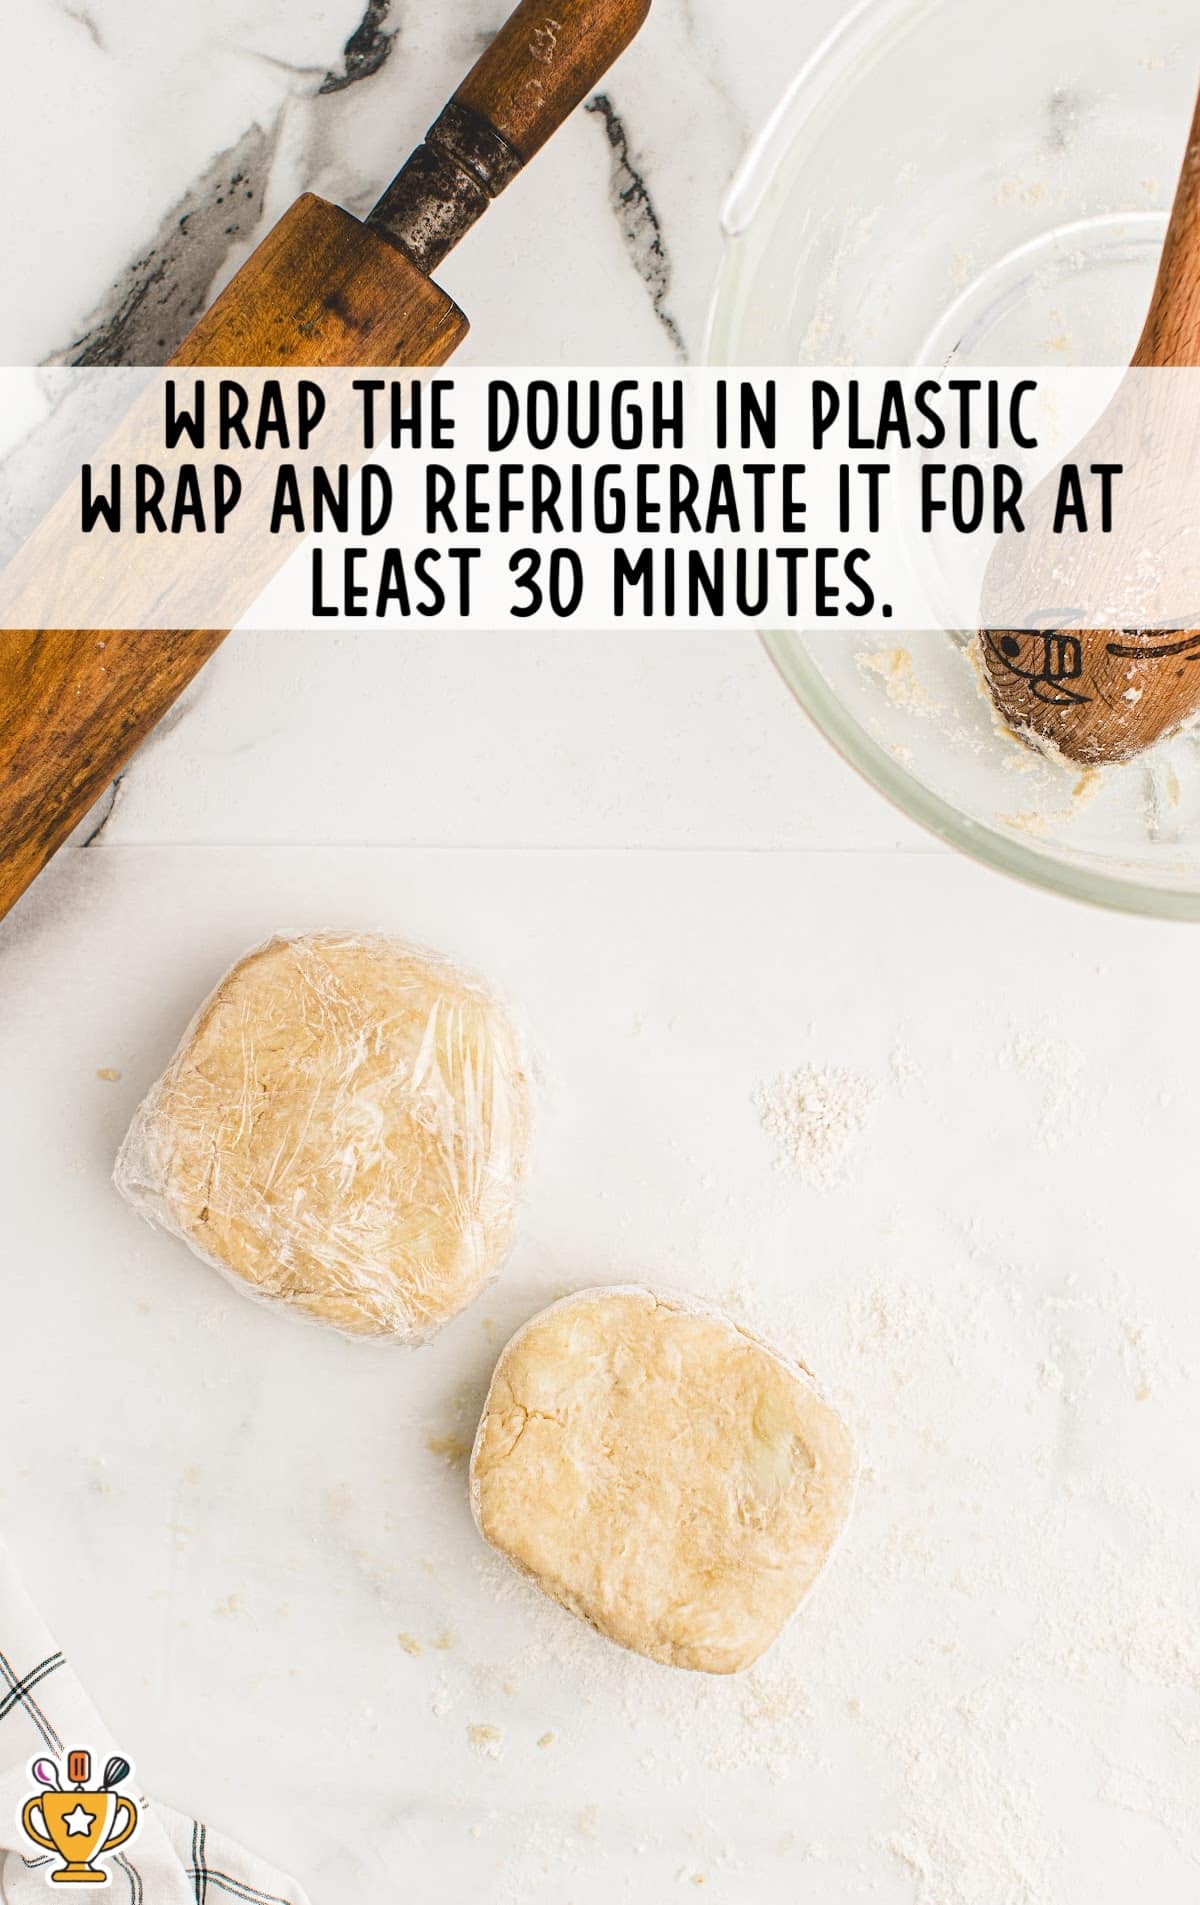
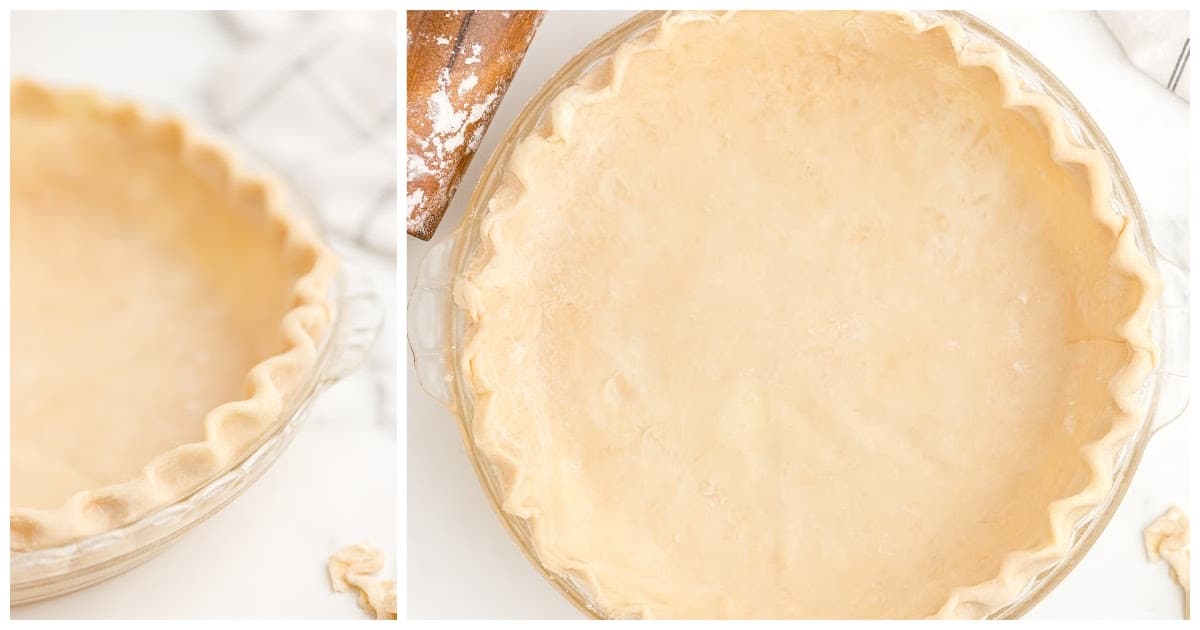
FIFTH STEP: Divide the dough in half. Shape each piece of dough into a round disk.
Roll the edges of the round disk along a lightly floured cutting board to smooth out the sides, kind of like rolling a wheel.
The smoother you can get your edges now, the smoother and more round your pie crust will be when it is rolled out.

SIXTH STEP: Wrap the dough in plastic wrap and refrigerate it for at least 30 minutes or the dough can also be refrigerated overnight.
To Make Your Pie
Pro Tip
If you want to make a double-crust pie, we have included directions below this section to help you out!
FIRST STEP: When the pie crust dough is done refrigerating, remove it from the refrigerator.
Allow it to warm just a bit if chilled longer than 30 minutes (a few minutes will do).
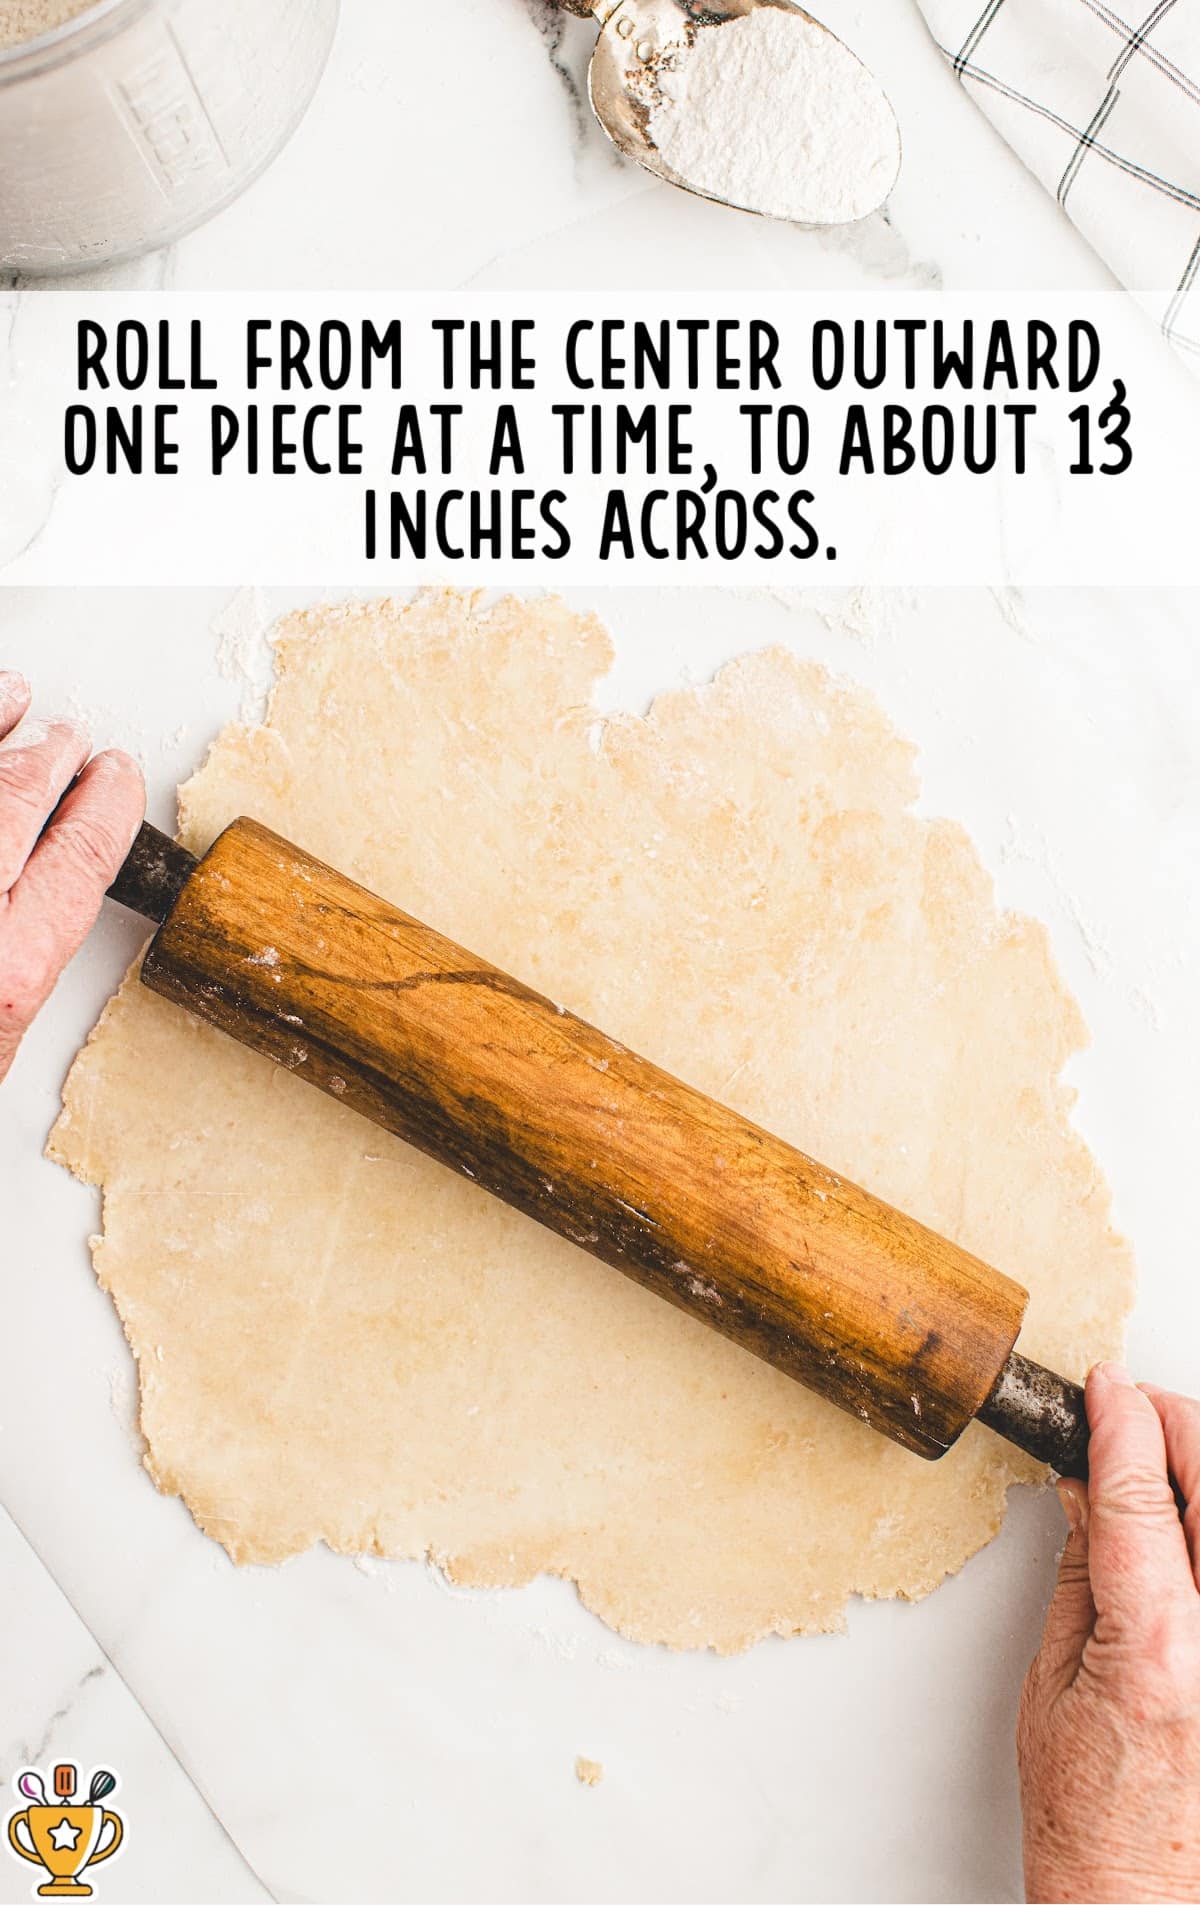
SECOND STEP: When it is soft enough to roll, place the dough crust on a lightly floured work surface.
Roll dough from the center outward using a rolling pin, one piece at a time. It should roll out to be about 13 inches round.
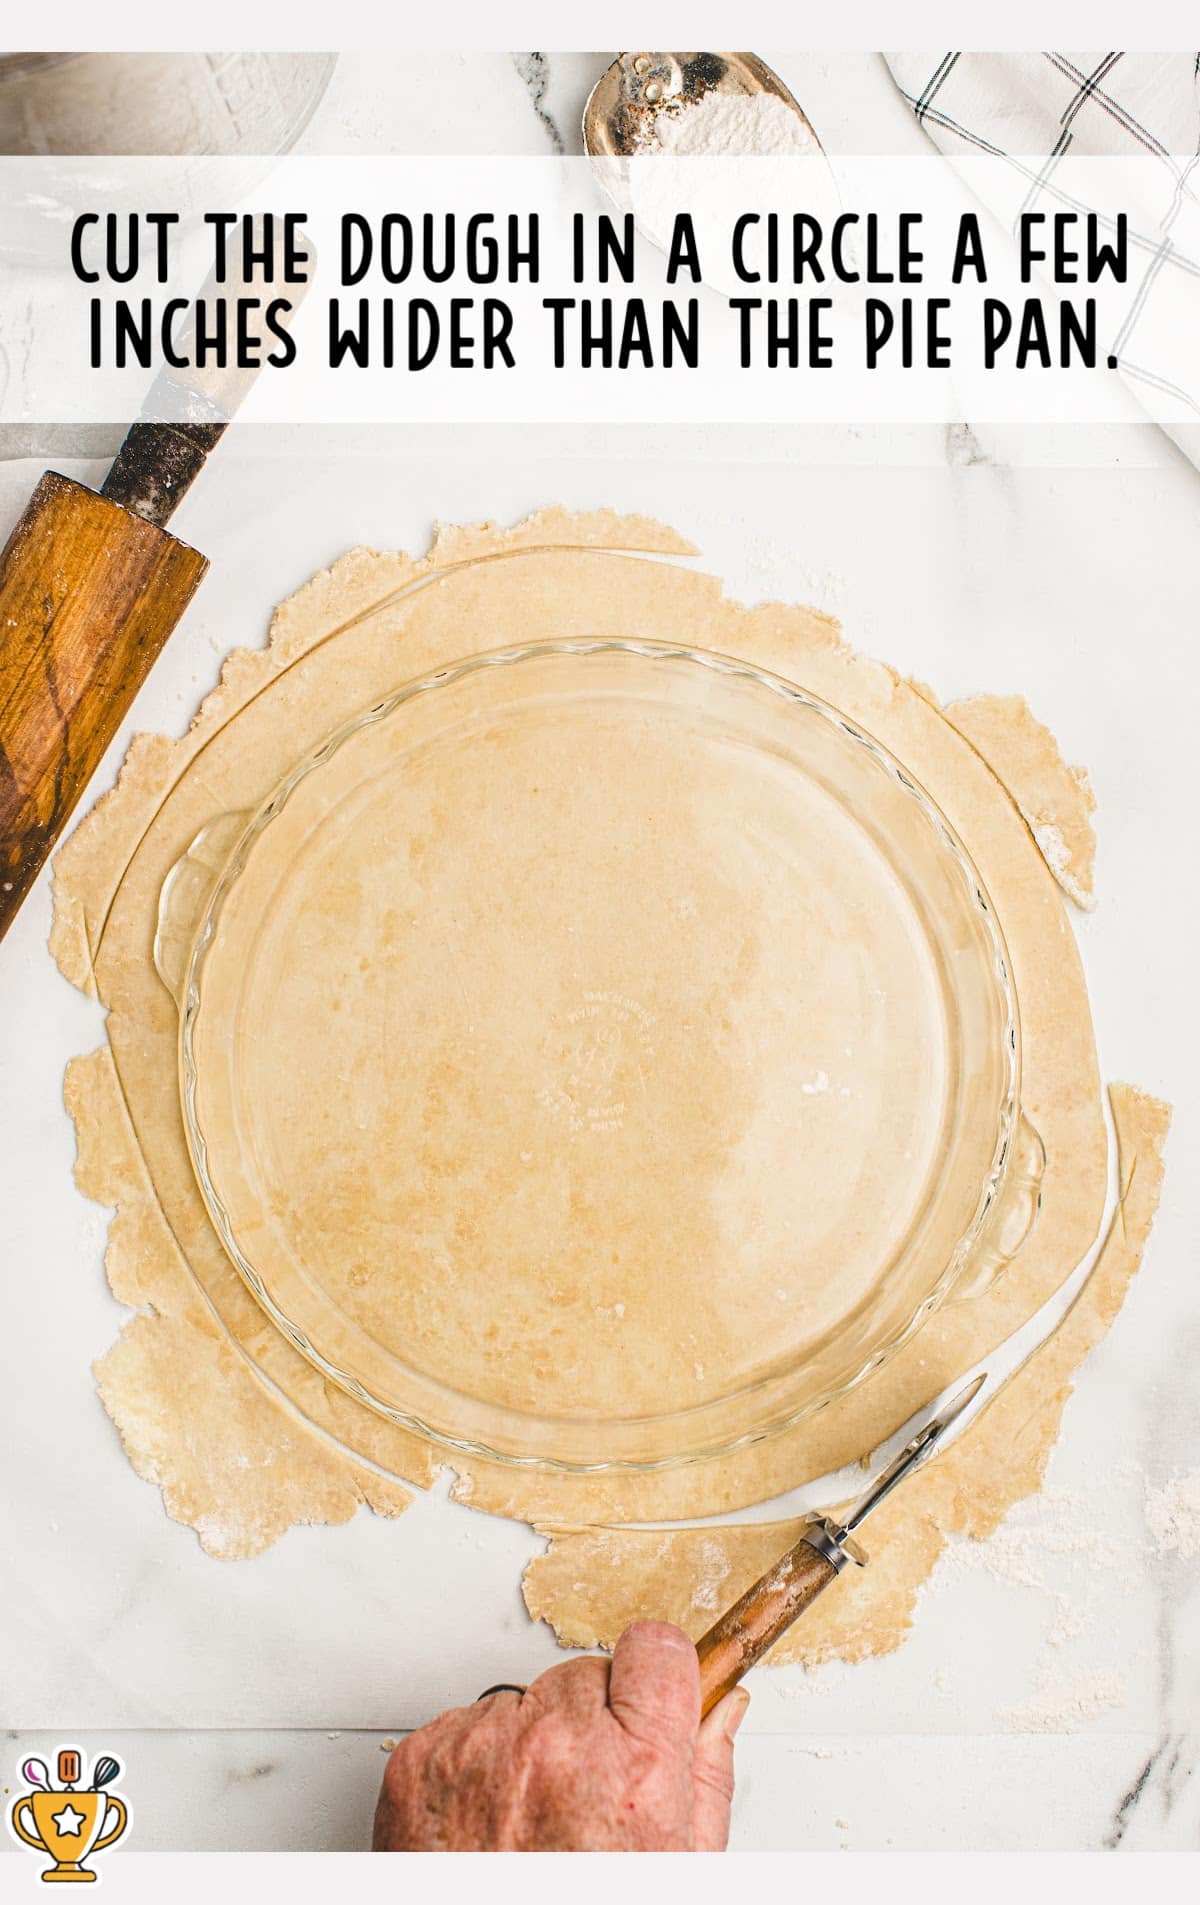
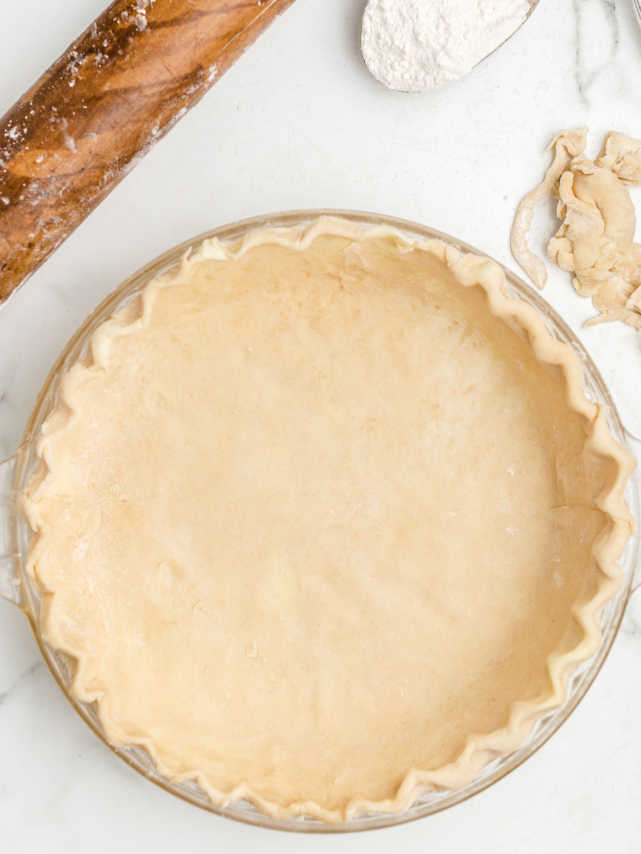
THIRD STEP: You can take your pie pan, lay it on the dough, and cut two to three inches outside of it with a pizza cutter to get the perfect circle.
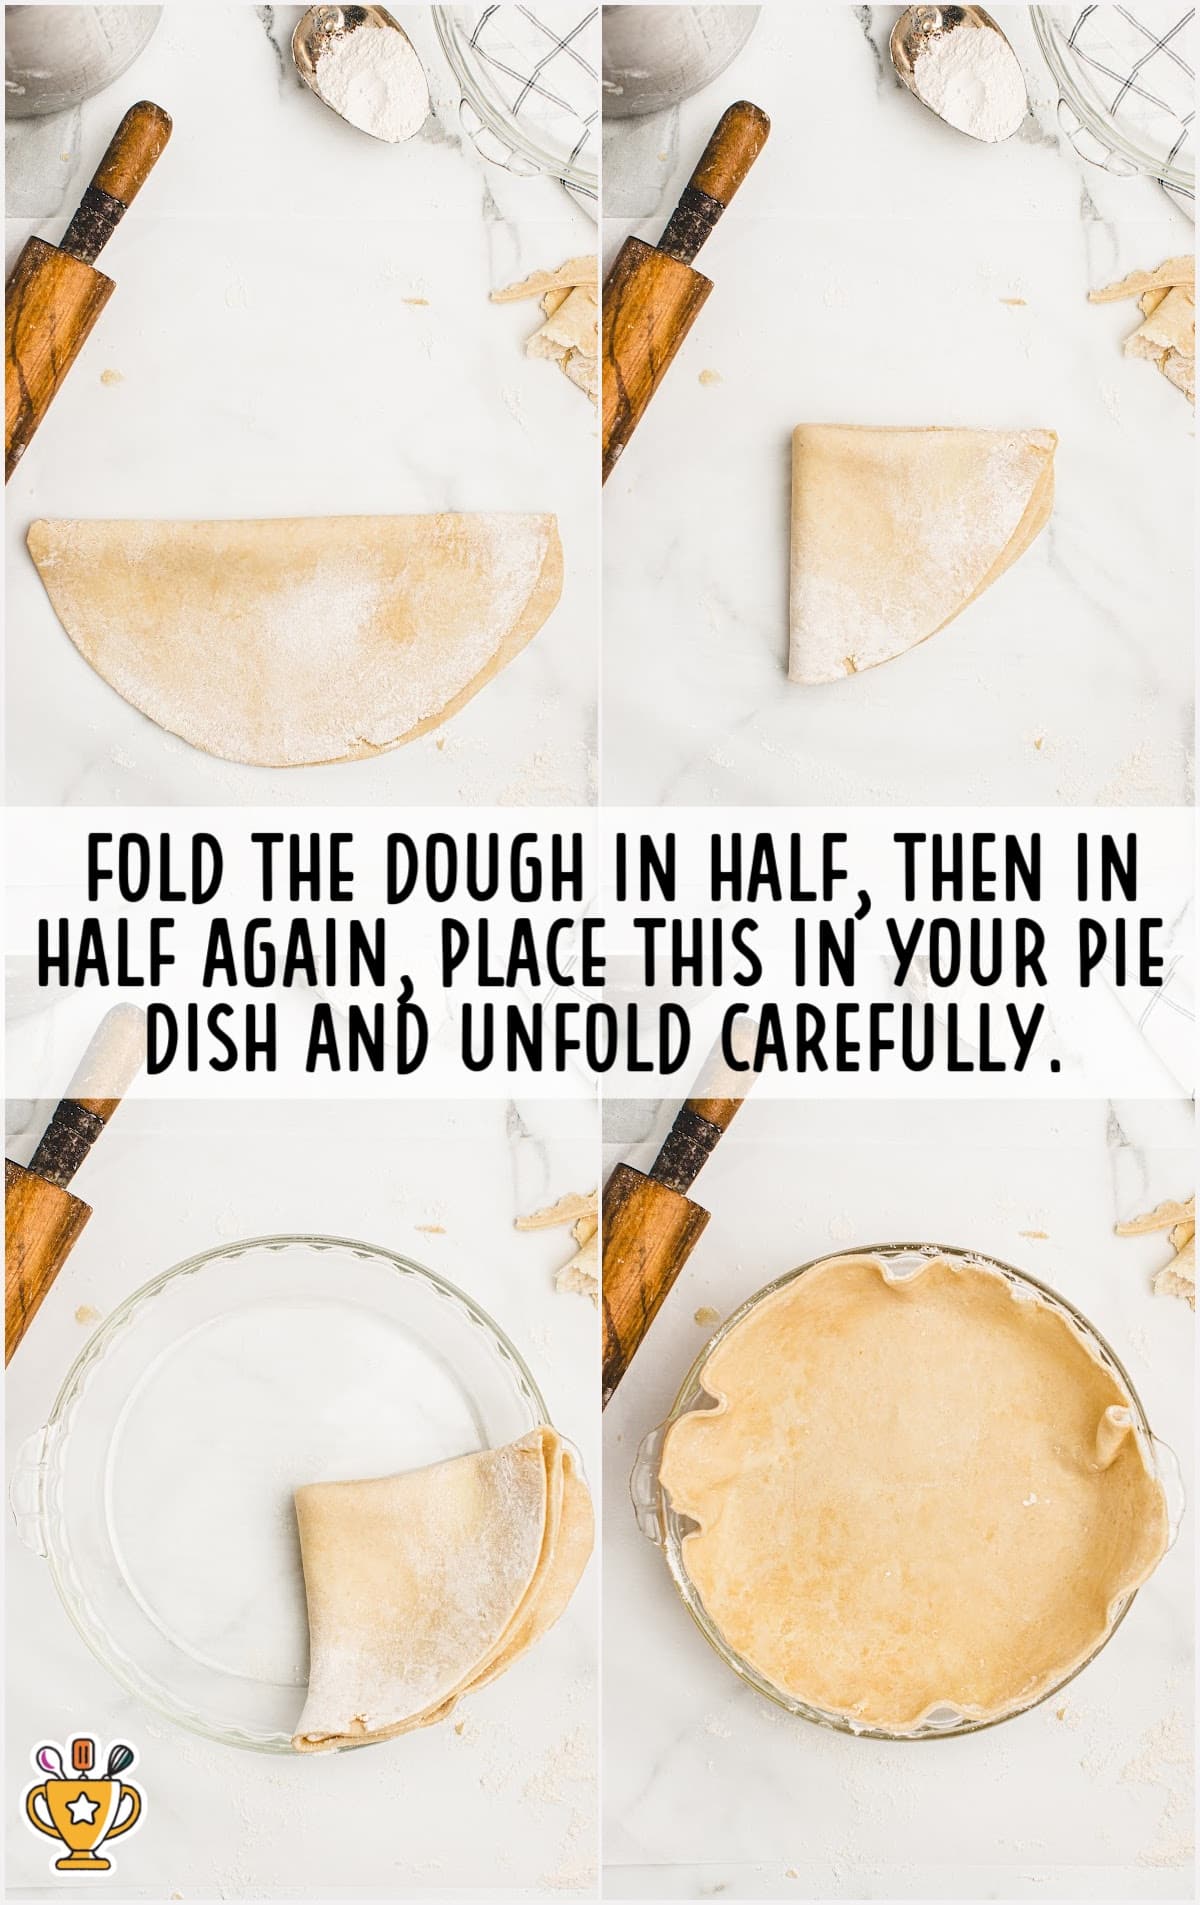
Then fold it in half and in half again to transfer to the prepared pie pan.
If the crust cracks, gently push it back together, dipping your finger in a little water to smooth it out.
FOURTH STEP: Lightly grease your pie dish with cooking spray. Gently transfer your rolled-out pie crust to the dish.
Add canned pie filling right away, or if making a filling, tent the pie crust and place it in the fridge until ready to fill.
Pro Tip
For pies that the filling isn’t to be baked, lemon meringue, etc. Prebake the pie crust.
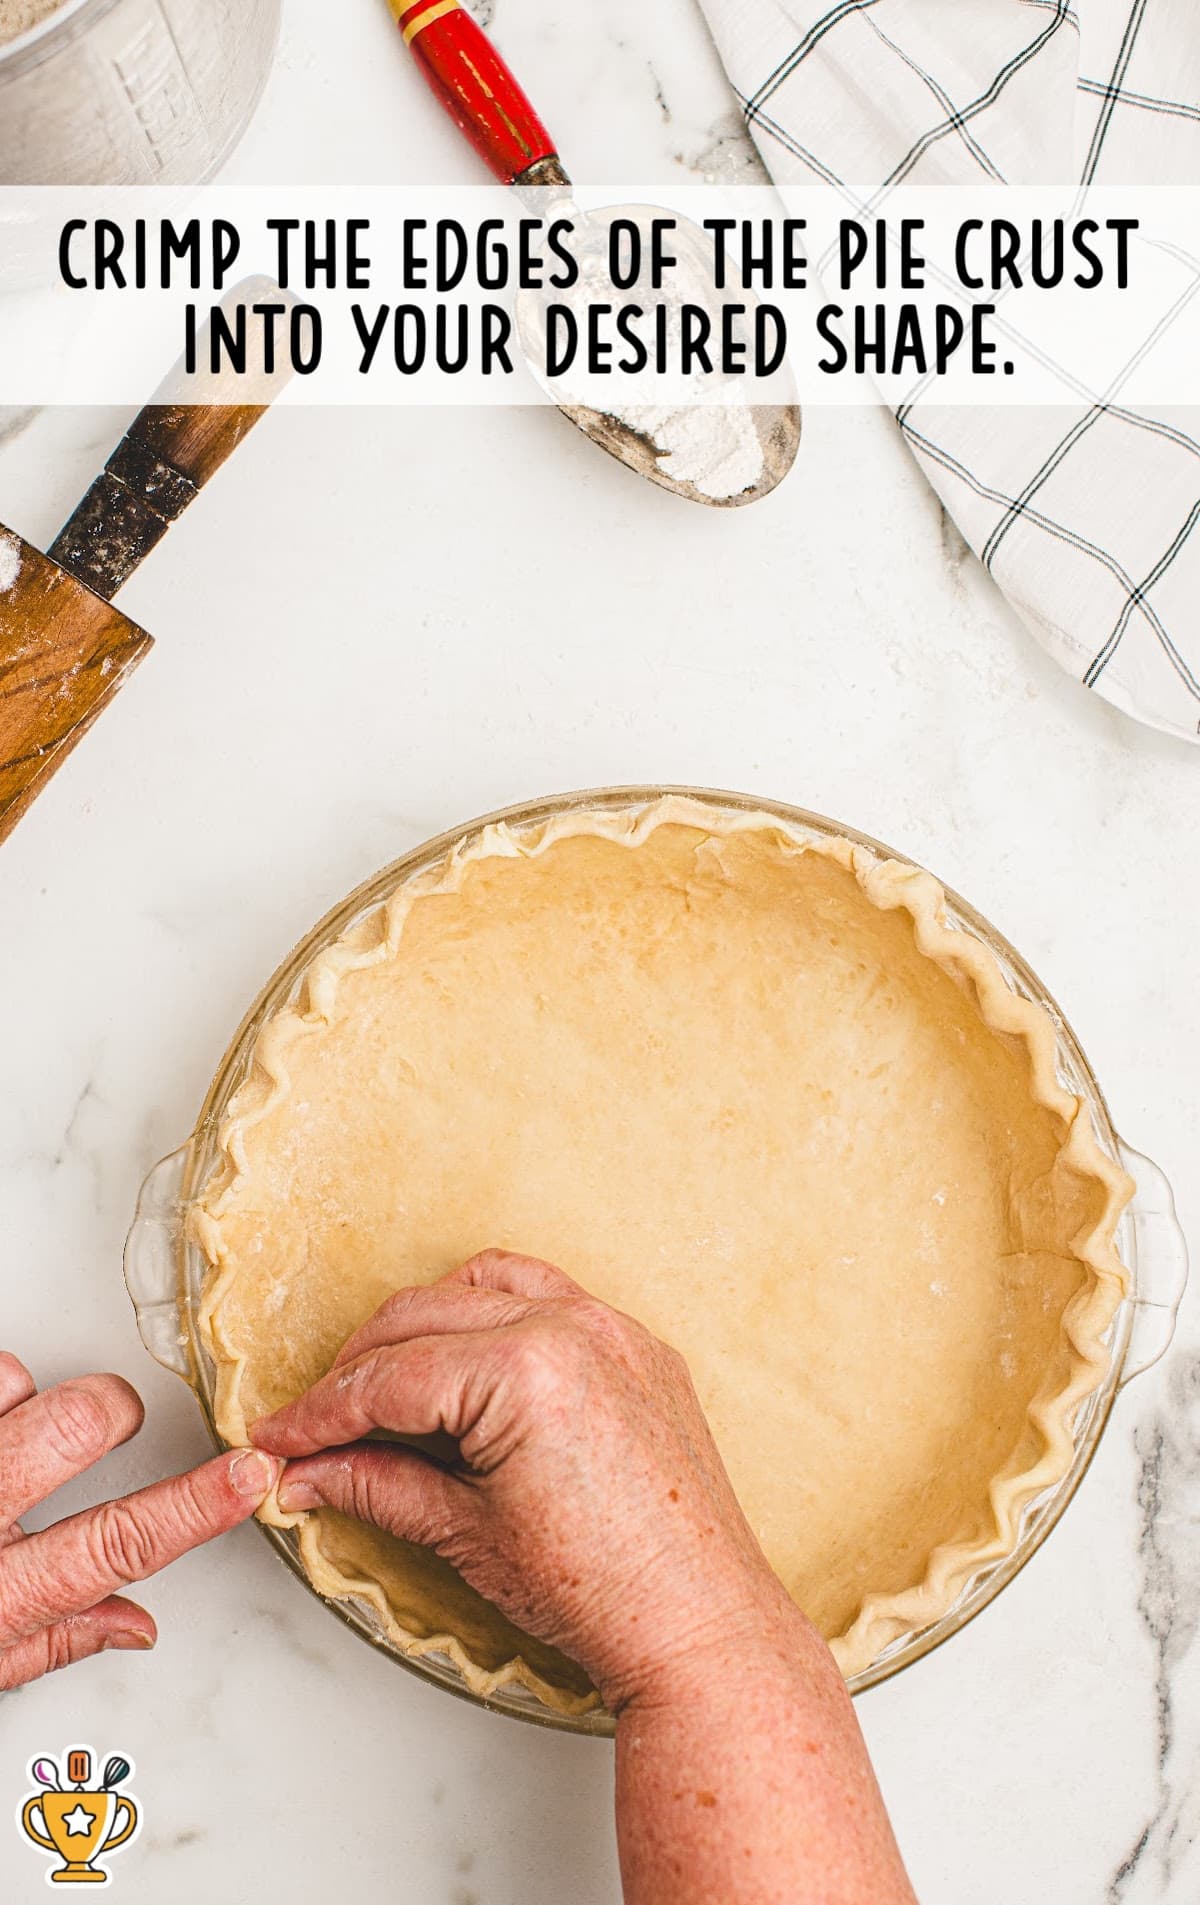
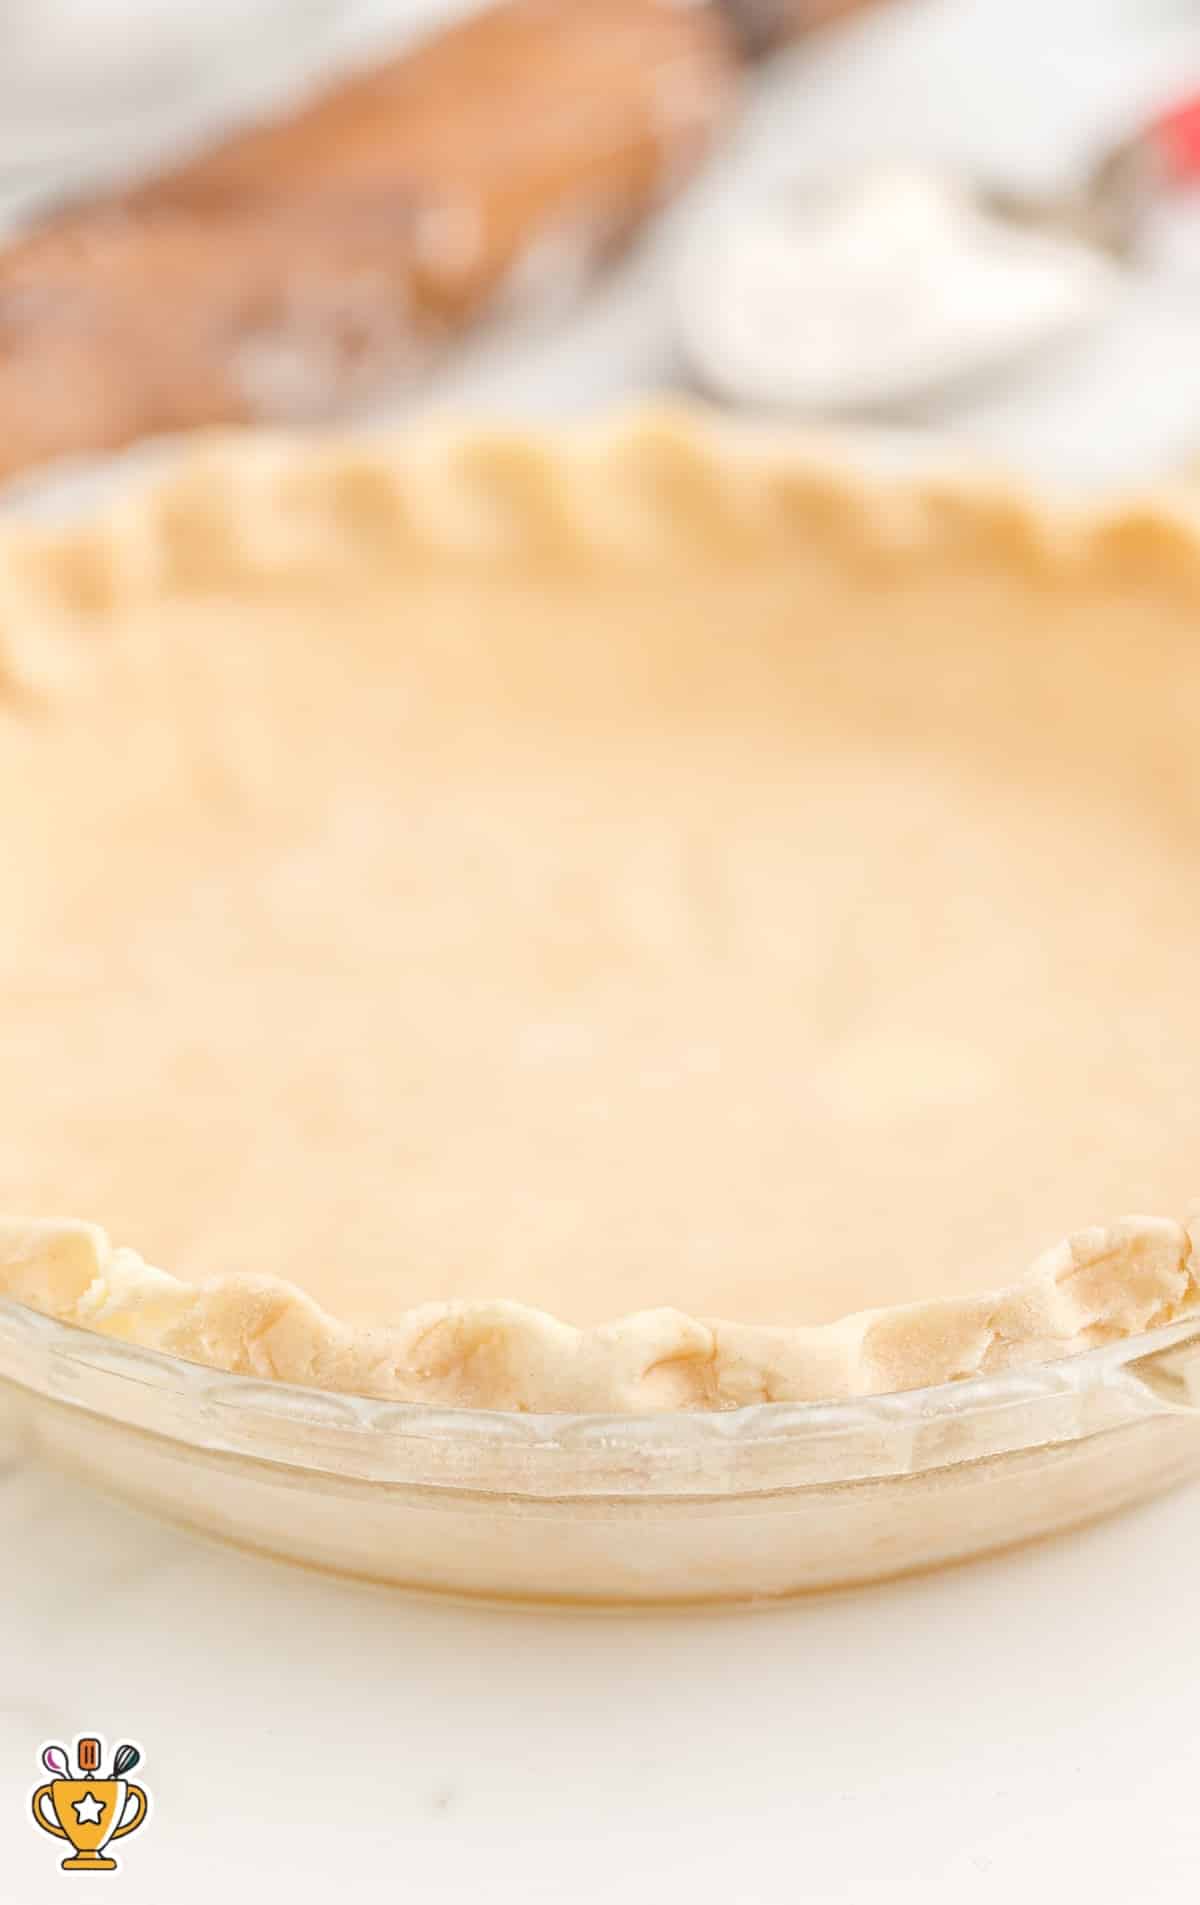
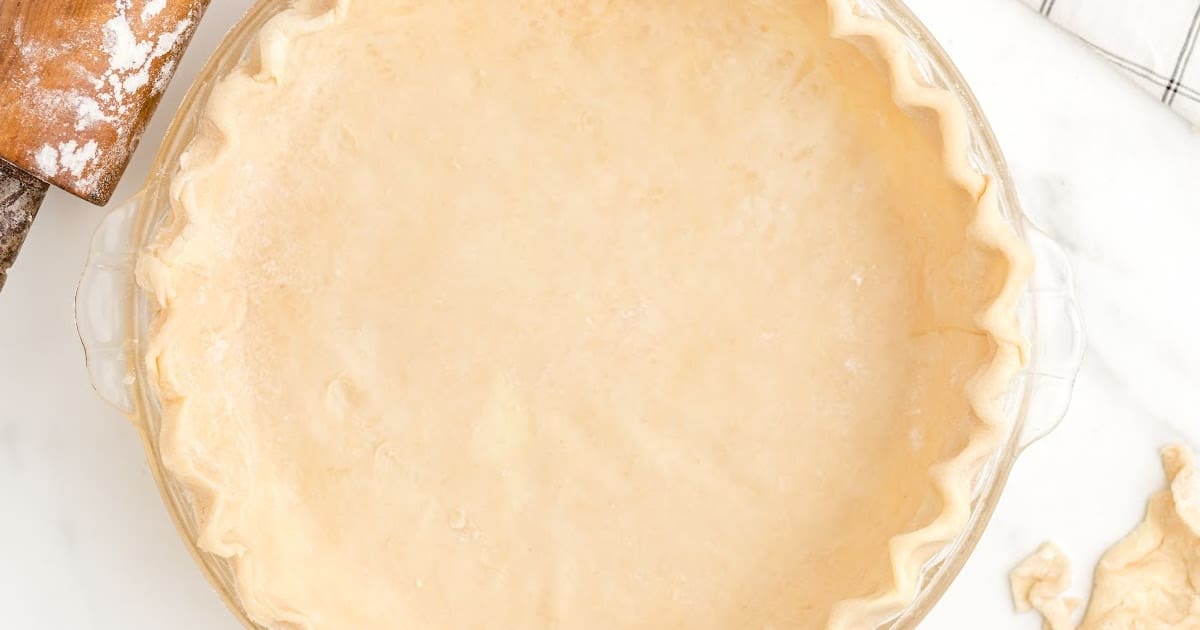
FIFTH STEP: Roll sides under or crimp the edges of the pie crust into the desired shape.
SIXTH STEP: Place a baking sheet in the oven and preheat to 425°F.
Remove the baking sheet when the oven comes to temperature and place the pie dish directly on the baking sheet.
Place the baking sheet in the oven on the lowest rack.
Bake the pie at 425°F for 20 minutes. Lower the temperature to 350°F and bake for an additional 60 minutes, or until the filling is bubbly and the crust is golden brown.
Check the pie when it has about 10 to 15 minutes left. If it’s already browned, then tent it with foil and allow it to cook for the remaining time.
Pro Tip
If the edges of your crust are browning too quickly, use strips of foil wrapped around the edges, or use pie shields while baking.
SEVENTH STEP: Cool the pie to allow the filling to set up.
If you want the pie to slice cleanly without oozing the filling everywhere, allow it to cool completely before serving. The pie will take a few hours to cool completely.
For A Double Pie Crust
FIRST STEP: Gently transfer your rolled-out bottom crust to the dish.
Add canned pie filling right away, or if making a filling, tent the pie crust and place it in the fridge until ready to fill.
SECOND STEP: Once the pie filling has been added, fold the edges under themselves. This will ensure you have a nice thick crust that will stand up when serving.
THIRD STEP: Repeat the steps and roll out the remaining dough for your top crust.
FOURTH STEP: Place the top crust over the pie filling and trim the edges to ½ inch of the edge if hanging over. Roll sides under.
Crimp the edges of the pie crust into the desired shape.
Make sure to vent the top of the pie by making a series of 3 to 4-inch parallel cuts on the top of the crust.
Feel free to be as decorative as you’d like. I love the lattice look myself!
FIFTH STEP: Place a baking sheet in the oven and preheat to 425°F.
Remove the baking sheet when the oven comes to temperature and place the pie dish directly on the baking sheet.
Place the baking sheet in the oven on the lowest rack.
Bake the pie at 425°F for 20 minutes. Lower the temperature to 350°F and bake for an additional 60 minutes, or until the filling is bubbly and the crust is golden brown.
Check the pie when it has about 10 to 15 minutes left. If it’s already browned, then tent it with foil and allow it to cook for the remaining time.
Pro Tip
If the edges of your crust are browning too quickly use strips of foil wrapped around the edges, or use pie shields while baking.
SIXTH STEP: Cool the pie to allow the filling to set up. If you want the pie to slice cleanly without oozing the filling everywhere, allow it to cool completely before serving.
The pie will take a few hours to cool completely.
How To Serve this Easy Pie Crust Recipe
This easy pie crust works for any time of year and fits any occasion. Make it sweet or savory to match the mood.
- Serve for holidays and special gatherings: Bake it for Thanksgiving, Christmas, or family reunions when you want something that feels homemade and special. Fill it with pumpkin pie or classic apple pie for a cozy, crowd-pleasing dessert.
- Serve during weeknight dinners: This crust turns leftovers or simple ingredients into dinner fast. Use it for pot pies or quiche with baked mac and cheese on the side.
- Serve for birthdays and kid-friendly treats: Kids love mini pies or hand pies made with this buttery crust. Pair it with chocolate pudding pie or chocolate peanut butter pie for a fun twist.
Why You'll Love This Flaky Pie Crust Recipe
This homemade pie crust has earned its spot as a favorite for a reason. It's fast, flexible, and made with pantry staples. Readers love how it fits every occasion without any fuss.
- Easy to Make: You only need a few ingredients and a few minutes to whip up this flaky crust.
- Reliable Every Time: No guessing—just follow the steps and you’ll get perfect results with every single bake.
- Tastes Like Homemade Should: This crust brings that from-scratch taste people expect without making things complicated.
- Works for Any Filling: Whether you’re baking sweet or savory, this pie crust holds up and makes it all taste better.
- Loved by Beginners: You don’t need to be a pro—just chill the dough, roll it out, and bake.
Once you try this butter pie crust recipe, it’ll be your go-to for every pie you make!

Recipe FAQ
What kind of flour works best for homemade pie crust?
All-purpose flour works best for homemade crust because it creates the right balance of structure and softness.
Why does the butter need to stay cold for pie crust?
Cold butter in pie crust helps create flaky layers, so always chill your dough before rolling it out.
How much water should I add to the pie crust dough?
Add ice water one tablespoon at a time until the pie crust dough holds together without feeling sticky.
What’s the best way to mix pie crust dough?
Use a pastry cutter or your hands to mix pie crust dough just until it sticks together—don’t overmix.
Can I use a food processor to make pie crust?
Yes, you can use a food processor to make pie dough, but stop once the dough starts to clump together.
How thick should I roll out the pie crust dough?
Roll your pie crust dough to about ⅛ inch thick so it bakes evenly and holds up well in the pan.
Why does my pie crust shrink in the oven?
Your pie crust may shrink if the dough wasn’t chilled long enough or if you stretched it into the pan.
How do I keep pie crust from getting soggy on the bottom?
To keep your crust from getting soggy, brush it with egg wash and bake it briefly before adding filling.
What’s the best way to crimp pie crust edges?
Use your fingers or a fork to crimp pie crust edges and seal the dough, so nothing leaks out during baking.
Serving FAQ
Can I serve homemade pie crust as part of a dessert bar?
Yes, bake mini pies using this crust and set them out on a tray for easy grab-and-go desserts.
Is homemade pie crust good for special occasions like birthdays?
Absolutely! Use it to make fruit pies or cream pies for birthdays when you want something that feels homemade and classic.
Can kids enjoy pie made with this homemade crust?
Kids love pies made with this crust, especially when filled with chocolate, pudding, or their favorite fruit filling.
Should I slice pie with this crust while it's still warm?
Let the pie cool slightly before slicing so the crust holds its shape and doesn’t crumble apart.
Is this pie crust recipe good for casual weeknight dinners?
Yes, use this crust for savory pot pies or quiche when you need a quick and comforting meal during the week.
Storage FAQ
Follow the directions, tips, and tricks below to store your homemade pie crust the right way. Keeping the dough cold and wrapped tight makes all the difference. These simple steps will help you prep ahead and save extra pie dough without stress.
Can I prepare pastry crust ahead of time?
Yes, you can prep pie crust dough ahead. Wrap it tightly in plastic wrap and keep it chilled for up to three days.
What's the best way to store unbaked pie crust dough?
Store unbaked pie crust dough in the fridge, tightly wrapped, to keep it cold and fresh until you're ready to roll.
Can I freeze homemade pie dough?
Yes, wrap the dough tightly in plastic wrap and place it in a freezer bag. You can freeze it for up to six months.
How do I thaw frozen pie crust dough?
Move the frozen pie crust dough to the fridge and let it thaw overnight before rolling and baking.
Should I chill pie crust again before baking?
Yes, always chill your rolled-out pie crust for fifteen to thirty minutes before baking to help it keep its shape.
Can I freeze pie crust already in the pie dish?
Yes, press the dough into a pie dish, wrap it well, and freeze it flat. It's ready to bake straight from frozen.
Pie Dessert Recipes
- Lemon Cream Cheese Pie
- Cool Whip Pie
- Hershey Pie
- No Bake Coconut Cream Pie
- Peach Cool Whip Pie
- French Silk Pie
- Butterscotch Cool Whip Pie
- Pecan Cream Pie
- Buttermilk Pie
- Blueberry Pie Bars
- No-Bake Lemon Pie
- Strawberry Pie
- Strawberry Jello Pie
- Blueberry Hand Pies
- Key Lime Pie
- Banana Pudding Pie
- Apple Pie Recipe
- No-Bake Chocolate Pudding Pie
- Pistachio Pie
- Mini Blueberry Pies
- Pecan Pie Cheesecake
- Blueberry Pie
- Custard Pie
- Sugar Pie
- Chocolate Cherry Pie
- Chess Pie
- Pumpkin Pie (No Sugar Added)
- Mini Pumpkin Pies
- Crustless Pumpkin Pie
- Impossible Pumpkin Pie Cupcakes
- Layered Pumpkin Spice Jell-O Pie (No Bake)
- No-Bake Chocolate Peanut Butter Pie
- Pie Crust

Pie Crust
This homemade pie crust turns out golden, flaky, and crisp every time with just a few basic ingredients. Skip the store-bought crust and make your pies taste even better.
Did you try this recipe?Let our readers know how it turned out by Leaving a Review!
Ingredients
- 2½ cups all-purpose flour
- 1¼ teaspoons salt
- ¼ cup vegetable shortening (butter flavored)
- 10 tablespoons unsalted butter (very cold)
- 6 to 10 tablespoons water (with ice cubes in it)
DIRECTIONS
- Measure your flour by gently spooning it into a measuring cup and then sweeping off any excess using the back of a butter knife. Add the measured flour and salt to a medium mixing bowl. Whisk together to combine.
- Add the shortening, working it into the flour until the mixture is crumbly using a pastry cutter. It should resemble coarse sand and be thoroughly combined.
- Cut the butter into small cubes (cut each tablespoon into 4 pieces). Add the butter to the flour mixture and toss to cover the pieces with flour. Quickly work it into the mix with a pastry cutter or your hands breaking apart the pieces of butter and continuing to toss in the flour.
- The mixture should be somewhat uneven, with bigger chunks of butter mixed in with the smaller pieces (bits of butter help your crust come out more flaky and delicious, so it’s okay to have some chunks throughout the mix).
- Drizzle 4 tablespoons of ice cold water over the mixture (I ended up using 8 tablespoons). Toss gently to combine. Add only enough additional tablespoon of water to make it hold together when you gather it up and squeeze it in your hand (you don’t want to knead your dough or add too much water as this will create a tougher crust).
- Transfer the mixture to a piece of parchment paper. Loosely shape the dough into a rectangle about 15×7 or so. Fold the right side toward the middle for about one-third. Then fold the left side toward the middle. It should resemble a business letter in shape. If needed, spray a little bit of cold water on any dry areas.
- Flatten and fold again, repeating this process until it has been incorporated. (folding the dough in this way will create more flaky layers in your crust). Make sure not to handle the dough too much with your hands as they will heat up the dough and melt the butter.
- Divide the dough in half. Shape each piece of dough into a round disk. Roll the edges of the round disk along a lightly floured cutting board to smooth out the sides, kind of like rolling a wheel. The smoother you can get your edges now, the smoother and more round your pie crust will be when it is rolled out.
- Wrap the dough in plastic wrap and refrigerate it for at least 30 minutes (this dough can be refrigerated overnight).
- When the dough is done refrigerating, remove it from the refrigerator. Allow it to warm just a bit if chilled longer than 30 minutes (a few minutes will do). When it is soft enough to roll, place the dough crust on a lightly floured surface. (I used lightly floured parchment paper that I turned after a few rolls, I put the corner of the parchment paper between my leg and the counter to keep it from moving.)
- Roll from the center outward, one piece at a time. It should roll out to be about 13 inches round. If the crust cracks, gently push it back together, dipping your finger in water to smooth it out.
- Lay your pie pan upside down on the dough to see if it is rolled out enough for the pan. Using a pizza cutter or knife, cut the dough in a circle a few inches away from the pie pan. Discard the dough or cut cute little shapes to bake on the pie or separate.
- Lightly grease your pie dish with cooking spray.
- You now have a big circle of dough. Fold the dough in half to make a half circle, then in half again. Place this in your prepared pie dish.
- If making a single crust pie that has a filling that needs to bake like pumpkin or custard then using a sharp knife “dot” the bottom of the crust in a few spots, not slits but just tiny holes. Fill with your filling and bake per pie instructions.
Notes
- For pies that the filling isn’t to be baked, lemon meringue, etc. Prebake the pie crust.
- For two-crust pies, start here. Gently transfer your rolled-out pie crust to the dish. Add canned pie filling right away, or if making a filling, tent the pie crust and place it in the fridge until ready to fill.
- Once the pie filling has been added, fold the edges under themselves. This will ensure you have a nice thick crust that will stand up when serving.
- Repeat the steps and roll out the remaining dough for your top crust.
- Place the top crust over the pie filling and trim the edges to ½ inch of the edge if hanging over. Roll sides under. Crimp the edges of the pie crust into the desired shape. Make sure to vent the top of the pie by making a series of 3” to 4” parallel cuts on the top of the crust. Feel free to be as decorative as you’d like. I love the lattice look myself!
- Place a baking sheet in the oven and preheat to 425°F. Remove the baking sheet when the oven comes to temperature and place the pie dish directly on the baking sheet. Place the baking sheet in the oven on the lowest rack. Bake the pie at 425°F for 20 minutes. Lower the temperature to 350°F and bake for an additional 60 minutes, or until the filling is bubbly and the crust is golden brown. Check the pie when it has about 10-15 minutes left. If it’s already browned, then tent it with foil and allow it to cook for the remaining time.
- Cool the pie to allow the filling to set up. If you want the pie to slice cleanly without oozing the filling everywhere, allow it to cool completely before serving. The pie will take a few hours to cool completely.
- If the edges of your crust are browning too quickly, use strips of foil wrapped around the edges, or use pie shields while baking.
- Bits of butter help your crust come out more flaky and delicious, so it’s okay to have some chunks throughout the mix.
- Make sure not to handle the dough too much with your hands as they will heat up the dough and melt the butter.
Nutrition
Calories: 1297kcal | Carbohydrates: 119g | Protein: 17g | Fat: 84g | Saturated Fat: 43g | Polyunsaturated Fat: 10g | Monounsaturated Fat: 25g | Trans Fat: 6g | Cholesterol: 151mg | Sodium: 1468mg | Potassium: 184mg | Fiber: 4g | Sugar: 0.5g | Vitamin A: 1749IU | Calcium: 43mg | Iron: 7mg
HAVE YOU TRIED THIS RECIPE?Follow me on Pinterest @bestblogrecipes


Comments
Starla says
Totally amazing I've never made this before but I'm going to try