
Last updated on
Peeps Rice Krispie Treats Recipe
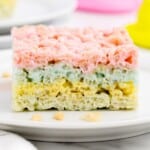
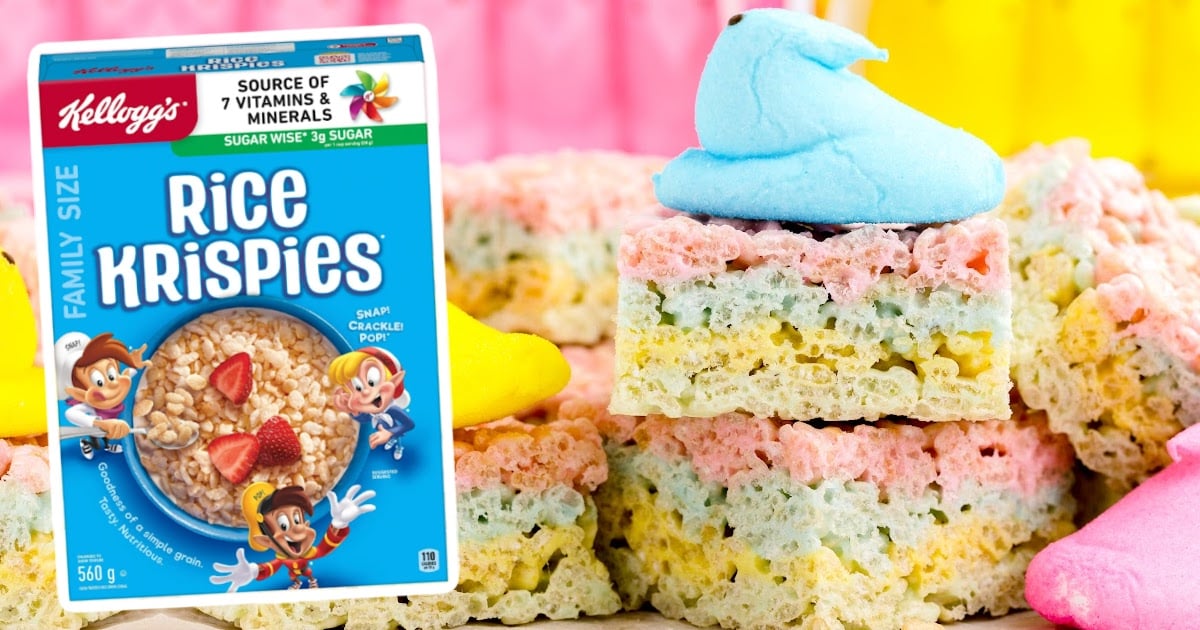
This Peeps Rice Krispie treats recipe makes a colorful, gooey treat made with melted Peeps and crispy cereal. This easy no-bake dessert is perfect for Easter, parties, and sweet snacks!
Jump to RecipeTable of Contents


This peeps rice krispie treats recipe is the ultimate Easter treat! Melted Peeps give these gooey, colorful squares a fun marshmallow twist. They take minutes to make with just a few ingredients. Perfect for spring parties, bake sales, or a sweet snack!
This recipe is quick and simple, so anyone can make it at home. Follow the step-by-step photos and directions to get perfect results. We’ve included pro tips and tricks to help along the way. Check out the FAQs for answers to the most common questions!

More Recipes ⭐ Bunny Butt Cupcakes | Drunk Bunny Easter Cocktail | Coconut Cream Easter Eggs
Peeps rice krispie squares bring a burst of color to any Easter celebration. The gooey marshmallow texture, sweet flavor, and bright pastel colors make them a fun and festive treat.
These no-bake squares are perfect for parties, potlucks, or a quick homemade dessert. Kids and adults will love the soft, chewy bites packed with melted Peeps and crispy cereal!
Ingredients

What you'll need to make these Rice Krispie Peeps:
- 8 (1.38-ounce) PEEPS Rainbow pops (4 colors of peeps in each pop – pink, blue, green & yellow)
- 2 cups of mini marshmallows, divided into four ½-cup portions
- ¾ cup of salted butter, room temperature, divided into four 3-tablespoon portions
- 2 teaspoons of vanilla extract, divided into four ½-teaspoon portions
- 8 cups of Rice Krispies cereal, divided into four 2-cup portions
Pro Tip
Make sure you are using fresh Peeps and mini marshmallows in this recipe. They melt so much easier and smoother.
Substitutions and Additions
Make your Peeps Rice Krispie treats recipe even more fun by switching up ingredients and adding tasty extras! These easy swaps let you create a treat that’s all your own. Here are some of the best substitutions and additions:
- Substitute Peeps: Use different Peeps flavors or colors to match any holiday or theme. Try blue raspberry, cotton candy, or fruit punch Peeps.
- Add Chocolate Chips: Mix in mini chocolate chips for a sweet, melty surprise in every bite. White or milk chocolate works best.
- Substitute Cereal: Swap Rice Krispies for Fruity Pebbles or Cocoa Krispies for a colorful or chocolatey twist on this classic treat.
- Add Sprinkles: Stir in pastel sprinkles or colored sugar to add extra crunch and a festive look to each square.
- Substitute Butter: Use melted marshmallow fluff instead of butter for an even gooier and softer texture in every bite.
How to Make this Peeps Rice Krispie Treats Recipe
Make the best rice krispie treats with Peeps by following our step-by-step pictures, easy instructions, and helpful tips and tricks below. You’ll get colorful, gooey, and delicious treats every time. Let’s get started!
FIRST STEP: Spray a 9×13-inch baking pan with baking spray and set aside. Prepare all your ingredients before you start making these Peeps Rice Krispie squares because you will need to work quickly with each Peeps color batch.
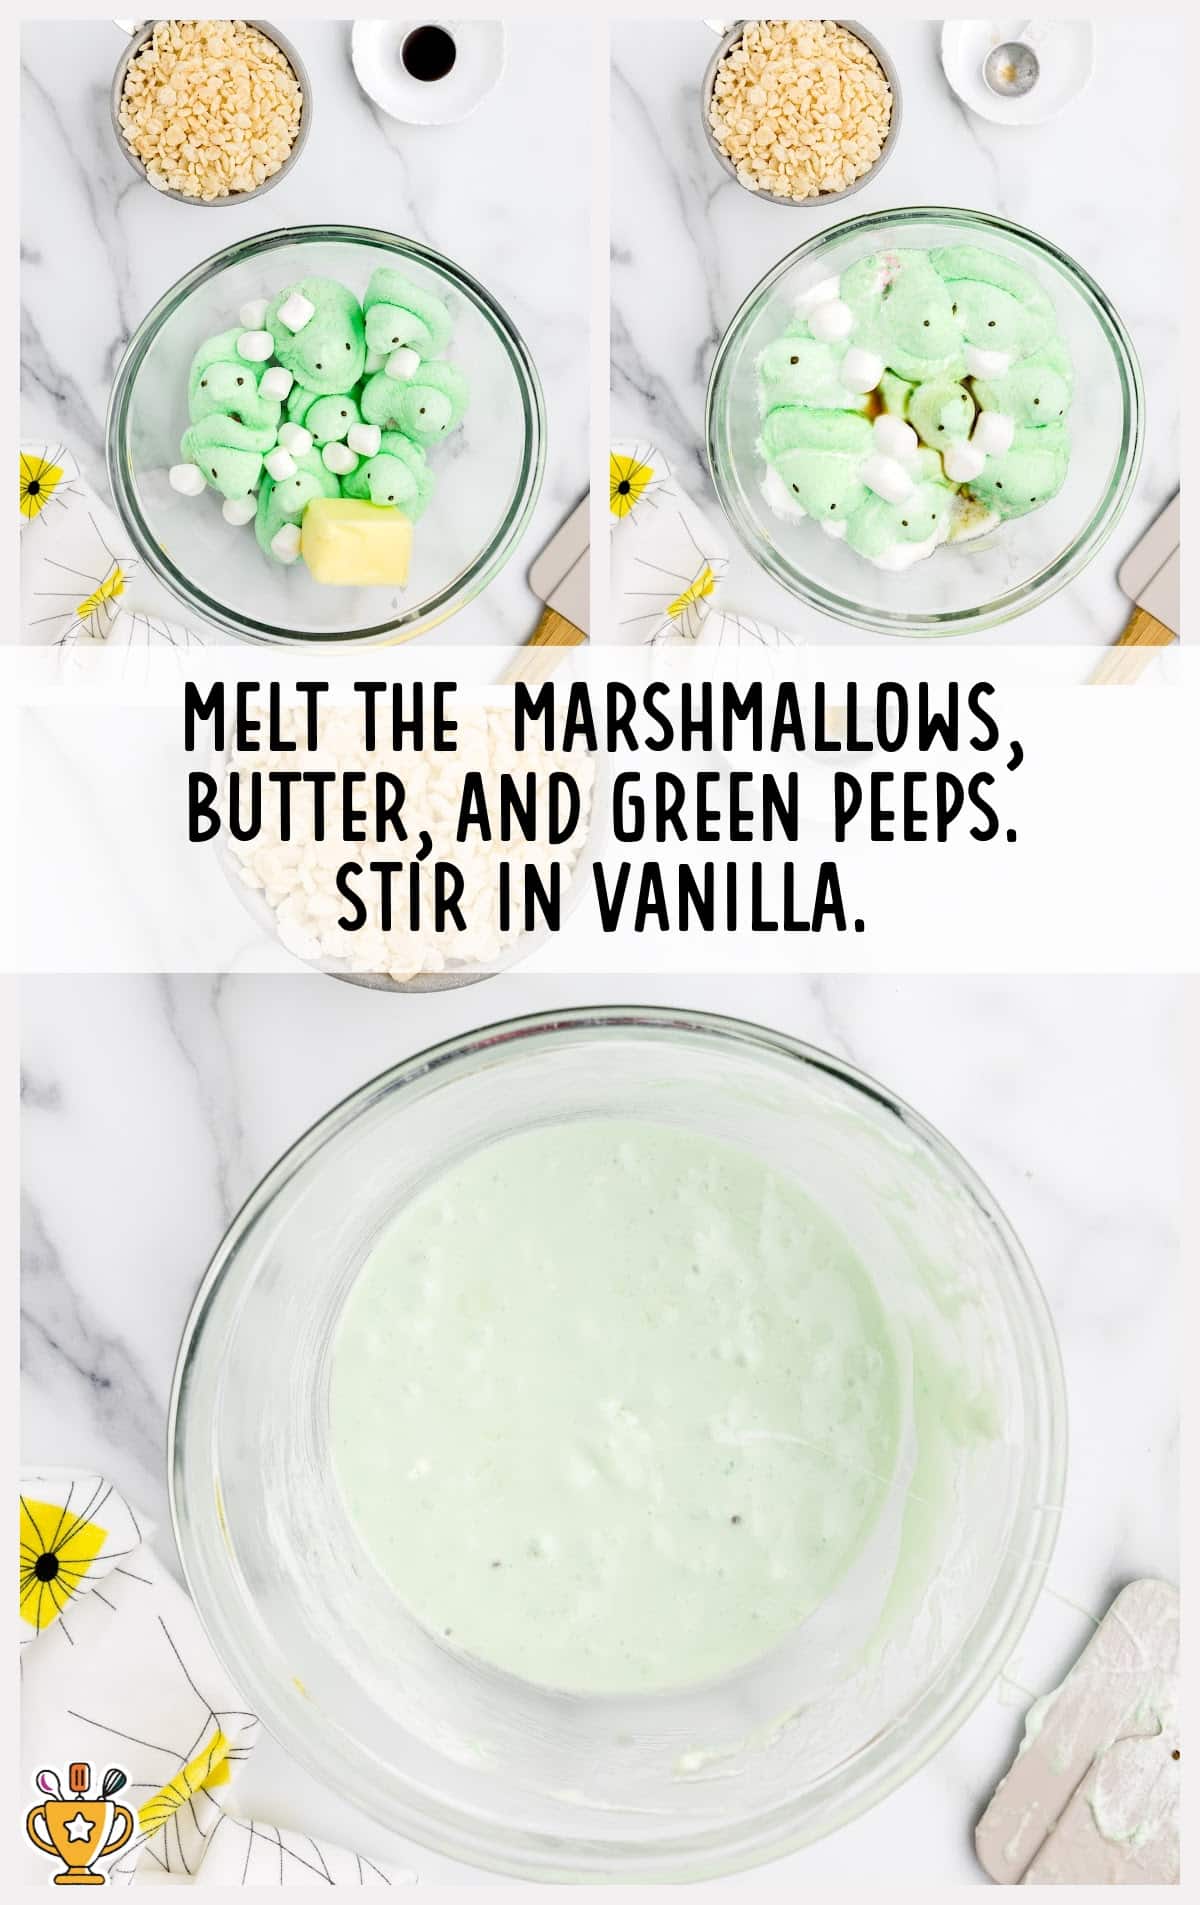
You will need 4 medium-sized microwave-safe mixing bowls for this recipe. If you only have one or two mixing bowls, then you will need to wash the bowls between mixing each colored batch of marshmallow Peeps. Remove the Peeps from their lollipop stick and sort them into colors.
SECOND STEP: To a medium-sized microwave-safe bowl, add ½ cup of mini marshmallows, 3 tablespoons of butter, and all 8 green Peeps. Microwave on high for 45 seconds to 1 minute. Add ½ teaspoon vanilla extract and stir to completely combine all the ingredients into a smooth consistency.
Pro Tip
You can add a few drops of liquid or gel food coloring if you would like to deepen the colors of your layers. I would start with 2 to 3 drops of food coloring, then work your way up to your desired color intensity.
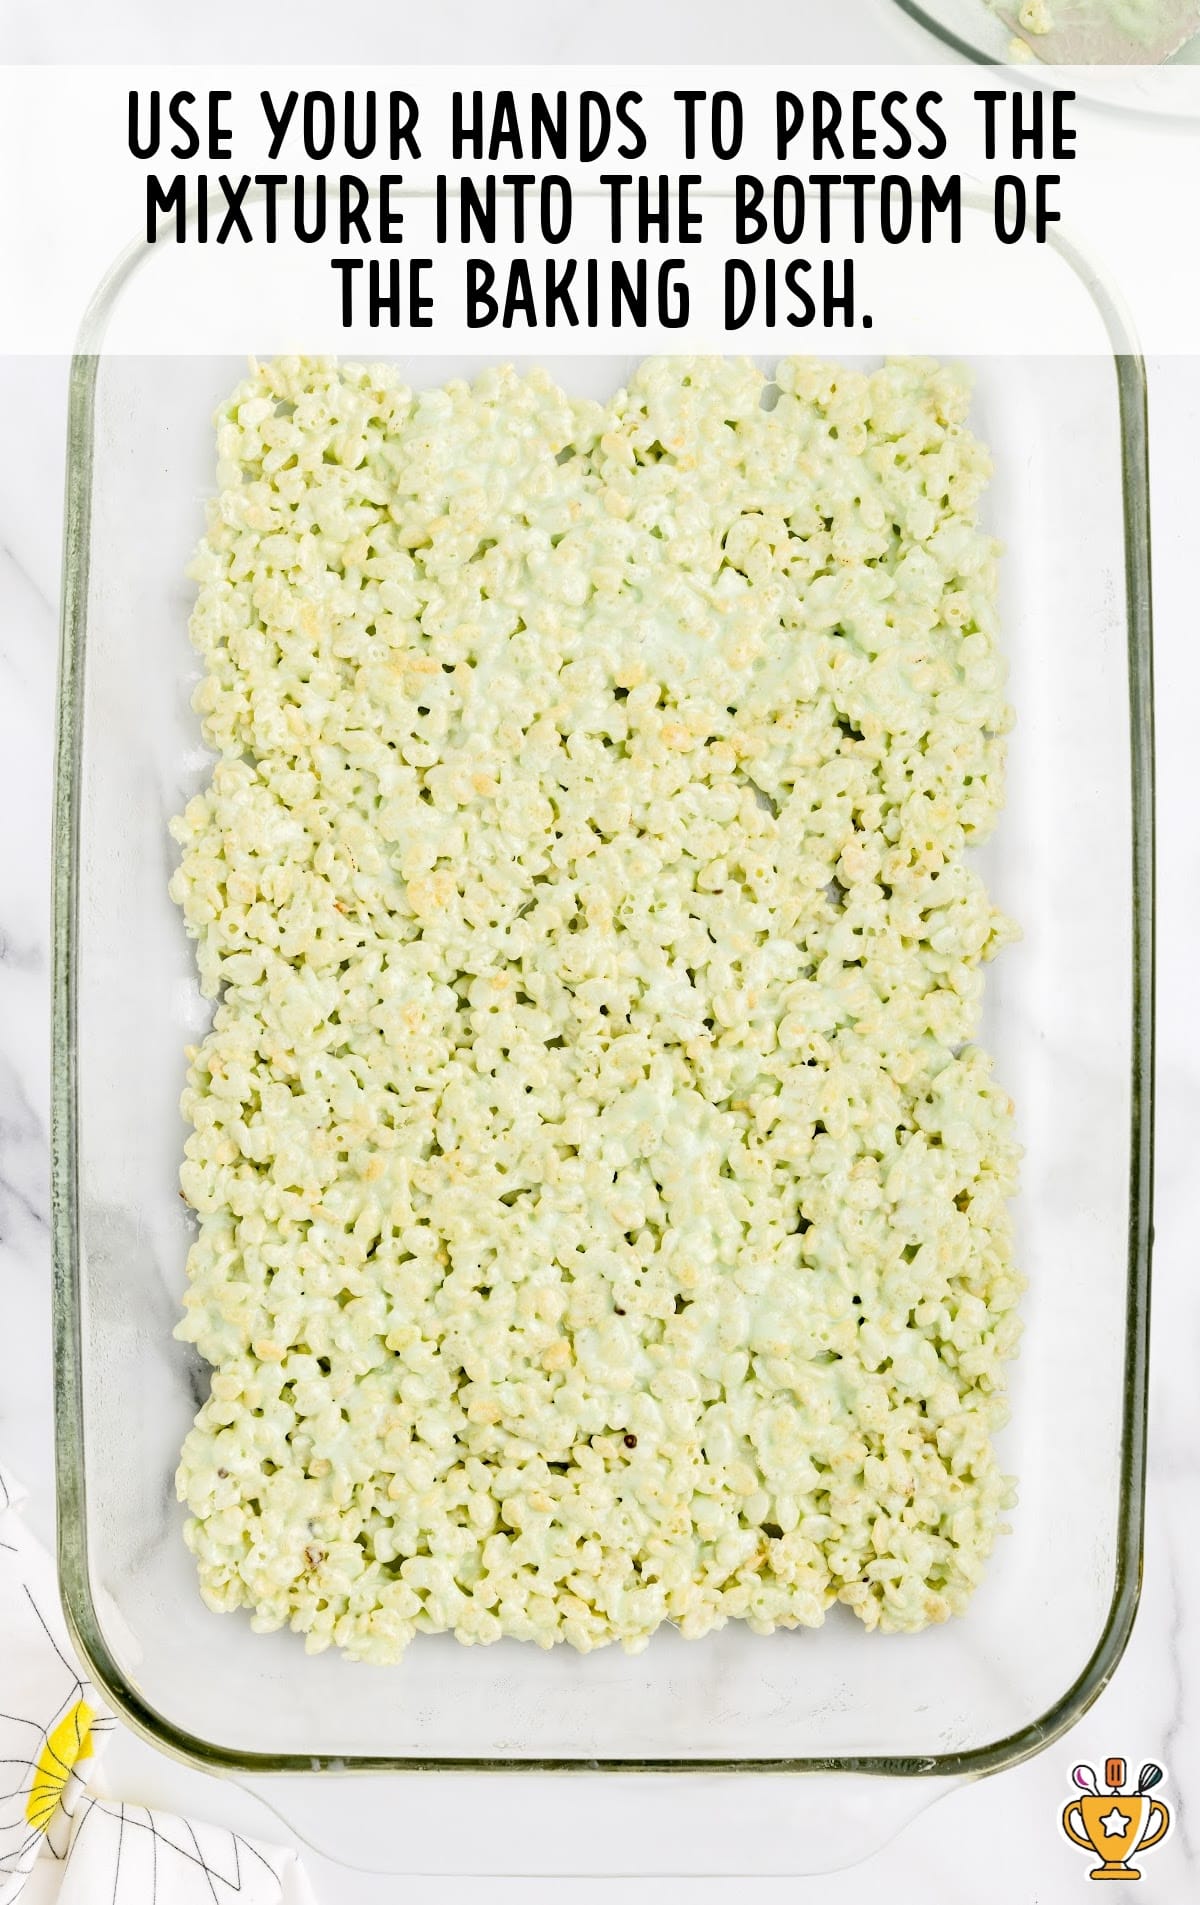
THIRD STEP: Fold in 2 cups of Rice Krispie cereal until all the cereal is coated in the colored marshmallow mixture.
FOURTH STEP: Layer the green-colored marshmallow-coated Rice Krispie cereal mixture into the bottom of the prepared baking dish. Using your hands, gently press the mixture into an even layer.
Pro Tip
Wet your hands with warm water, or spray them lightly with cooking spray, to help keep the marshmallow mixture from sticking to your hands as you firmly press the mixture down in the dish.
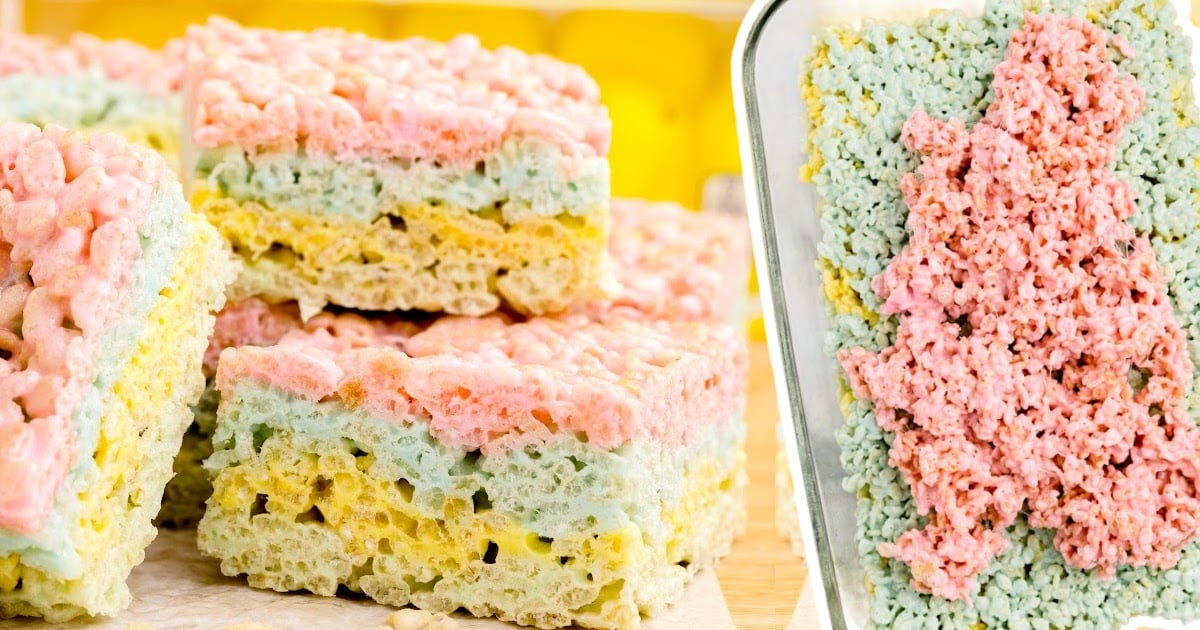
FIFTH STEP: Repeat steps 2 and 3 for the yellow-colored Peeps followed by the blue Peeps and pink Peeps, until you have 4 layers of Peeps-colored Rice Krispie cereal, layered one on top of the other.
Gently press down on the final layer to make sure that your Peeps Rice Krispie squares are tightly packed.

SIXTH STEP: Place the baking dish into the refrigerator for 30 minutes to allow the Peeps Rice Krispies to cool and set completely before slicing and serving them.
How To Serve this Peep Rice Krispie Recipe
You can serve Peeps Rice Krispie Squares in so many fun ways! These colorful treats are great for parties, holidays, and everyday snacks. Here are the best ways to enjoy them:
- Easter celebrations: Peeps make this the ultimate Easter dessert, bringing bright colors and marshmallow sweetness to your holiday table. Serve them with carrot cake or cherry cheesecake cookies for a festive treat.
- Kids’ birthday parties: These chewy, sweet squares are always a hit at kids’ parties! They’re easy to grab and eat with little mess. Pair them with funfetti cupcakes or key kime fudge for an extra fun dessert spread.
- Spring bake sales: Bright, colorful, and easy to make, these no-bake bars are perfect for bake sales! They stand out on any table and sell fast. Package them with chocolate chip blondies or fruity pebble treats for a fun variety.

Why You'll Love This Homemade Peeps Recipe
These easy peeps rice krispie squares are bright, fun, and packed with marshmallow goodness! They bring color and sweetness to any celebration. Whether for Easter, a party, or a quick homemade treat, they’re always a favorite.
- Easy to Make: This no-bake recipe comes together in just ten minutes with a few simple ingredients.
- Festive and Fun: The colorful Peeps melt into gooey, chewy squares that look just as fun as they taste.
- Kid-Approved: Kids love the bright colors and sweet flavor, making these a hit at any gathering.
- Perfect for Holidays: They’re a must-have for Easter but work for any springtime celebration.
- Customizable: Change up the Peeps flavors, mix in extras, or use different cereals for a new spin each time.
This recipe is a fun and easy way to bring a little extra sweetness to your day!

Recipe FAQ
Why are my Peeps not melting smoothly?
Peeps can be sticky, so stir constantly over low heat until fully melted. If needed, add a little butter to help.
Why are my Peeps Rice Krispie Squares too hard?
Cooking the Peeps on high heat or pressing the mixture too firmly into the pan can make them hard. Keep the heat low and press gently.
Can I double this recipe for a bigger batch?
Yes, you can double the recipe by using a larger pan and making sure all the cereal gets coated evenly.
How do I keep my hands from sticking when pressing the mixture into the pan?
Coat your hands with butter or use wax paper to press the mixture down without it sticking to your fingers.
Can I add extra mix-ins to Peeps Rice Krispie Squares?
Yes, you can mix in sprinkles, mini chocolate chips, or crushed cookies for extra crunch and sweetness.
Serving FAQ
What’s the best way to serve Peeps Rice Krispie Squares at a party?
Cut them into small squares and stack them on a colorful platter. Add extra Peeps on top for a fun display.
Should I serve Peeps Rice Krispie Squares warm or cold?
They taste best at room temperature, but you can chill them for a firmer texture or warm them slightly for extra gooeyness.
Can I serve Peeps Rice Krispie Squares as individual treats?
Yes, wrap each square in plastic or place them in cupcake liners for an easy grab-and-go treat at any event.
How do I make these squares extra festive for Easter?
Use different Peeps colors, add pastel sprinkles, or drizzle melted white chocolate on top for a fun Easter look.
Can I shape Peeps Rice Krispie Squares into fun designs?
Yes, press the mixture into cookie cutters while warm to create bunnies, chicks, or eggs for a festive presentation.
What’s the best way to serve these treats for kids?
Stick a popsicle stick into each square for a fun, mess-free treat that kids can easily hold and enjoy.
Storage FAQ
Follow these directions, tips, and tricks for the best way to store your Peeps Rice Krispie treats recipe. Keep them fresh and chewy by storing them properly. Whether you’re making them ahead or saving leftovers, these simple steps will help.
Can I make Peeps Rice Krispie Squares ahead of time?
Yes, you can make them a day ahead. Store them in an airtight container at room temperature to keep them soft and chewy.
What’s the best way to store leftover Peeps Rice Krispie Squares?
Keep leftovers in an airtight container at room temperature for up to a week. Avoid the fridge, as it can make them too hard.
Can I freeze Peeps Rice Krispie Squares?
These cute treats can be frozen for up to six weeks, but you may find they are not quite as gooey once you thaw them.
How do I keep Peeps Rice Krispie Squares from getting too hard?
Store them in a sealed container and add a slice of bread inside. The bread helps keep them soft longer.
Can I reheat Peeps Rice Krispie Squares to soften them?
Yes, microwave them for five to ten seconds to bring back some of the gooey texture. Don’t overheat, or they can get too sticky.
Should I wrap Peeps Rice Krispie Squares individually for storage?
It’s a good idea if you want to grab them easily. Wrap each square in plastic wrap or store with wax paper between layers.
More Easy Easter Dessert Recipes


Peeps Rice Krispie Treats Recipe
This Peeps Rice Krispie treats recipe makes a colorful, gooey treat made with melted Peeps and crispy cereal. This easy no-bake dessert is perfect for Easter, parties, and sweet snacks!
Did you try this recipe?Let our readers know how it turned out by Leaving a Review!
Ingredients
- 8 1.38-ounce PEEPS Rainbow pops (4 colors of peeps in each pop – pink, blue, green & yellow)
- 2 cups mini marshmallows (divided into four ½-cup portions)
- ¾ cup salted butter (room temperature and divided into four 3-tablespoon portions)
- 2 teaspoons vanilla extract (divided into four ½-cup portions)
- 8 cups Rice Krispies cereal (divided into four 2-cup portions)
DIRECTIONS
- Spray a 9×13-inch baking pan with baking spray and set aside. Prepare all your ingredients before you start making these Peeps Rice Krispie squares because you will need to work quickly with each peeps color batch.
- You will need 4 medium-sized microwave-safe mixing bowls for this recipe. If you only have one or two mixing bowls, then you will need to wash the bowls between mixing each colored batch of marshmallow Peeps. Remove the Peeps from their lollipop stick and sort them into colors.
- To a medium-sized microwave-safe bowl, add ½ cup of mini marshmallows, 3 tablespoons of butter, and all 8 green Peeps. Microwave on high for 45 seconds to 1 minute. Add ½ teaspoon vanilla extract and stir to completely combine all the ingredients into a smooth consistency.
- Fold in 2 cups of Rice Krispie cereal until all the cereal is coated in the colored marshmallow mixture.
- Layer the green-colored marshmallow coated Rice Krispie cereal mixture into the bottom of the prepared baking dish. Using your hands, gently press the mixture into an even layer.
- Repeat steps 2 and 3 for the yellow-colored Peeps followed by the blue Peeps and pink Peeps until you have 4 layers of Peeps-colored Rice Krispie cereal layered one on top of the other. Gently press down on the final layer to make sure that your Peeps Rice Krispie squares are tightly packed.
- Place the baking dish into the refrigerator for 30 minutes to allow the Peeps Rice Krispies to cool and set completely before slicing and serving them.
Notes
- Make sure you are using fresh Peeps and mini marshmallows in this recipe. They melt so much easier and smoother.
- You can add a few drops of liquid or gel food coloring if you would like to deepen the colors of your layers. I would start with 2 to 3 drops of food coloring, then work your way up to your desired color intensity.
- Wet your hands with warm water, or spray them lightly with cooking spray, to help keep the marshmallow mixture from sticking to your hands as you firmly press the mixture down in the dish.
- You can allow your Peeps Rice Krispies to cool, and set them on the counter instead of chilling them. However, I suggest you wait at least an hour or more before slicing them. They may be a bit stickier when cutting them if you skip the chill in the refrigerator.
Nutrition
Calories: 220kcal | Carbohydrates: 28g | Protein: 2g | Fat: 12g | Saturated Fat: 7g | Polyunsaturated Fat: 1g | Monounsaturated Fat: 3g | Trans Fat: 0.5g | Cholesterol: 31mg | Sodium: 198mg | Potassium: 28mg | Fiber: 0.1g | Sugar: 11g | Vitamin A: 1596IU | Vitamin C: 12mg | Calcium: 5mg | Iron: 6mg
HAVE YOU TRIED THIS RECIPE?Follow me on Pinterest @bestblogrecipes

Leave a Comment